Showing posts with label spring floral. Show all posts

Sunday, May 24, 2026

With Sympathy for PP787

Hello friends!  We have a new sketch challenge over at the Paper Players and this week LeAnne is hosting.  She's created a fun one to work with.

I decided to use a die set from Honey Bee Stamps that I bought two, maybe three years ago, and never used it, so I'll be sending it over to Darnell's NBUS challenge as well.


Here's what I came up with.


When I was young, my parents planted a beautiful Dogwood tree in our front yard.  It was my mother's favorite, which was enjoyable to think about as I was making this card.  

The branch and leaves were die cut from colored cardstock and the flowers from white.  I added ink blending to all the die cuts, including the extra flower, leaves and the circle. Since the sentiment was gold foiled, the flower centers were die cut from gold as well to bring more gold into the design. 

For the background I used a rectangle die with the same design as the circle to cut a panel of white and attach it to the card base.  The lattice was also cut from white and turned out to be the perfect size for the rectangle in LeAnne's sketch.  There were a few foiled sentiments from the same set already made and the sympathy one seemed to fit best.  Fortunately, I have no immediate need for a sympathy card, but it is always good to have extra on hand.  


Thanks for stopping by and I encourage you to visit the challenge blog, where the other DT members have some wonderful cards to inspire you!  The challenge will remain open until 3pm EDT on Friday May 29th.  I hope you'll join us this week!

Stef

  • Honey Bee Stamps Lovely Layers: Dogwood dies
  • Spellbinders Woven Lattice Texture die
  • Pinkfresh Studio Folk Edge Circle and Rectangle dies
  • Spellbinders You Are Everything BetterPress plate and die

Friday, August 15, 2025

Peony Bowl for The Flower Challenge

Hello friends!  I'm here today with my reminder card for The Flower Challenge.  This month we're adding embellishments to our floral creations.  

Many years ago, when I was learning to color with my Copic markers, there were a number of people I followed, trying to learn their techniques and color choices, etc., which led me to Power Poppy.  It is owned by Marcella Hawley and as far as I know she still does all the illustrations.  I bought a couple of stamp sets and a few digi images, which have been tucked away. I haven't used them in ages and I thought it was way past time, especially since the image I used is one of my very favorites.


Isn't that an amazing illustration?  Since the peonies in our garden are a glorious pink, I was inspired to use the same color here.  It is an intricate image, so it did take a couple of hours to color but I love how it turned out.  I used some light brown markers to create a "table" and since I colored the bowl blue, I opted to use a light yellow in the background.

I trimmed the image down, matted on black then added to the card base.  I found some pretty gems that in real life are very close in color to the bowl.  I chose not to add a sentiment.


You still have 10 days to join in this month or add a second card - the challenge ends on the 25th.  In the meantime, do stop by the challenge and see the amazing inspiration by my talented teammates, there are some gorgeous cards to behold!

Thanks for taking time to stop by!

Stef

  • Power Poppy digi print (not sure if it was Peony Bowl or ??)
  • Honey Bee Stamps Winter Wonder gems
  • Copics - B05, 02, 00, Y26, 15, 000, YG67, 45 17, 05, G29, 21, 40, E43, 41, 40
  • Olos - RV 0.6, 0.5, 0.2, 0.1

Sunday, May 4, 2025

So Kind for The Flower Challenge

Hello friends!  It's time for May flowers at The Flower Challenge!  This month we'd like you to add spots or stripes.

I went with spots this time, using an older Tim Holtz stencil that hadn't seen the light of day for some time.


Truth be known, the stamp set hadn't been used for over a year either.  I believe those flowers are camellia japonica, at least that was the photo they resembled in my search.  Anyway, I decided to use all three floral images from the set, along with one of the sentiments.

I colored them with Olo markers then die cut them with the matching dies.  For the background I moved the stencil around the panel to get  uneven coverage, then ink blended around the outside before splattering with gold metallic paint.  When that all dried the layered arch die cut was adhered along with the flowers framing the sentiment.  No gems, I thought the splatter was sufficient.


Well, we finally have some truly warmer weather and I think it's going to stick around.  How about you?  As the weather gets better, I hope you'll still find time to join us this month!  The challenge will remain open until Sunday, May 25th. But, before you head off, please be sure to visit the blog where my oh-so-talented teammates have some gorgeous cards to inspire you.

Take care and thanks for stopping by!

Stef

  • SSS/Memory Box So Kind Stamps and Dies (Stamptember 2023)
  • Tim Holtz Bubble Stencil
  • SSS Nested Domed Arches Frame
  • SSS Seafoam ink
  • Gansi Tambi Starry Colors Gold Metallic paint
  • Olos - RV0.6, 0.4, 0.2, 0.1, G1.8, 1.7, 1.5, 1.4
  • Copics - E37, 33

Tuesday, April 15, 2025

Hello for The Flower Challenge

Hello friends!  I'm back with my reminder post for The Flower Challenge.  This month the theme is to use spring colors.

At the first of the month I used purple and green here so this time I went with more peachy/orange colors.  


I started by coloring the flowers with Copic markers and the leaves with Olo markers.  I was trying to achieve a peachy color for the flowers but in the end it appears to lean more toward orange, and I was fine with that.  After die cutting, I used a black glaze pen to color in the stamen.

For the background I used the SSS Whirl Diamond Plate in white on a piece of Spellbinders Bellini cardstock, which I though complimented the color of the flowers without competing with it.  I placed the floral image up a little higher on the panel than I wanted, so I found a large die cut hello that helped balance things out.  Black enamel dots finished things off.


Can you believe it's mid-April already?  Time flies, that's for sure, but if you haven't joined us yet this month, or you have another floral with spring colors, there's still time to share.  The challenge will be open until Friday, April 25th. Please take a moment to visit the challenge blog, my amazing teammates have some more inspiration for you.  

Thanks for visiting and take care!

Stef

PS - come on back tomorrow when I'll be sharing my DT card for our new Color Hues challenge!

  • Simon Says Stamp/Alex Syberia Close at Heart stamp and die (Stamptember 2024)
  • SSS Whirl Diamond Plate
  • Altenew Timeless Sentiment dies
  • Altenew Essential Black Enamel Dots
  • Sakura Black Glaze pen
  • Copics - YR68, 02, 00
  • Olos - YG 1.6, 1.4, 1.2

Sunday, March 2, 2025

Best Day for The Paper Players

Hello friends!  Here we are at the first Sunday in March and the Paper Players have a new challenge for you.  The lovely Claire is hosting our theme challenge and she has chosen spring flowers.  You know I'm here for that!

I decided to use a stamp set I have had for at least a year and I don't believe I've ever used it.  Anyway, with lots of flowers, I thought it would work great for this challenge.


The stamp was specifically designed for the matching oval dies, as you can tell (unfortunately, it's no longer available).  The wreath was stamped and colored with Copic and Olo markers in my favorite bright colors.  Before die cutting I stamped the sentiment on the same piece and thought I had it straight but after die cutting I realized, even using my stamp positioner, I managed to stamp it crooked lol!  So, the oval was cut and matted on a pink oval, then I stamped the sentiment on a scrap of white, fussy cut around it and added it with foam tape.

Next a white panel was embossed with a wood planks folder, adhered to the base, then I added a bright yellow strip that matched the yellow flowers.  The oval was popped up on foam tape and I decided there was enough going on with all the bright flowers that embellies weren't needed.


So, for my northern hemisphere friends, are you as ready for spring as I am? No matter what hemisphere you're living in, we'd love to have you pull out your favorite spring flowers and share them with us this week!  For more inspiration, my wonderfully talented teammates have a some gorgeous cards over on the challenge blog (linked above).  

I do hope you'll play along - the challenge will remain open until Friday, March 7th at 3pm EST.

Thanks for visiting and take care!

Stef

  • Spellbinders Stylish Oval Birthday Wishes stamps (retired)
  • Spellbinders Stylish Oval dies
  • Honey Bee Stamps Wood Plank embossing folder
  • Copics - BG49, 13, 23, 11, YG 67, 63, 61, V09, 06, 04, 01, YR23, 15, 13 (yellow), YR18, 16, 09, Y17 (orange)
  • Olos - RV 1.7, 1.5, 1.3, 1.1, BV 1.7, 1.4, 1.2, 1.1, YG 1.6, 1.4, 1.2


Sunday, January 12, 2025

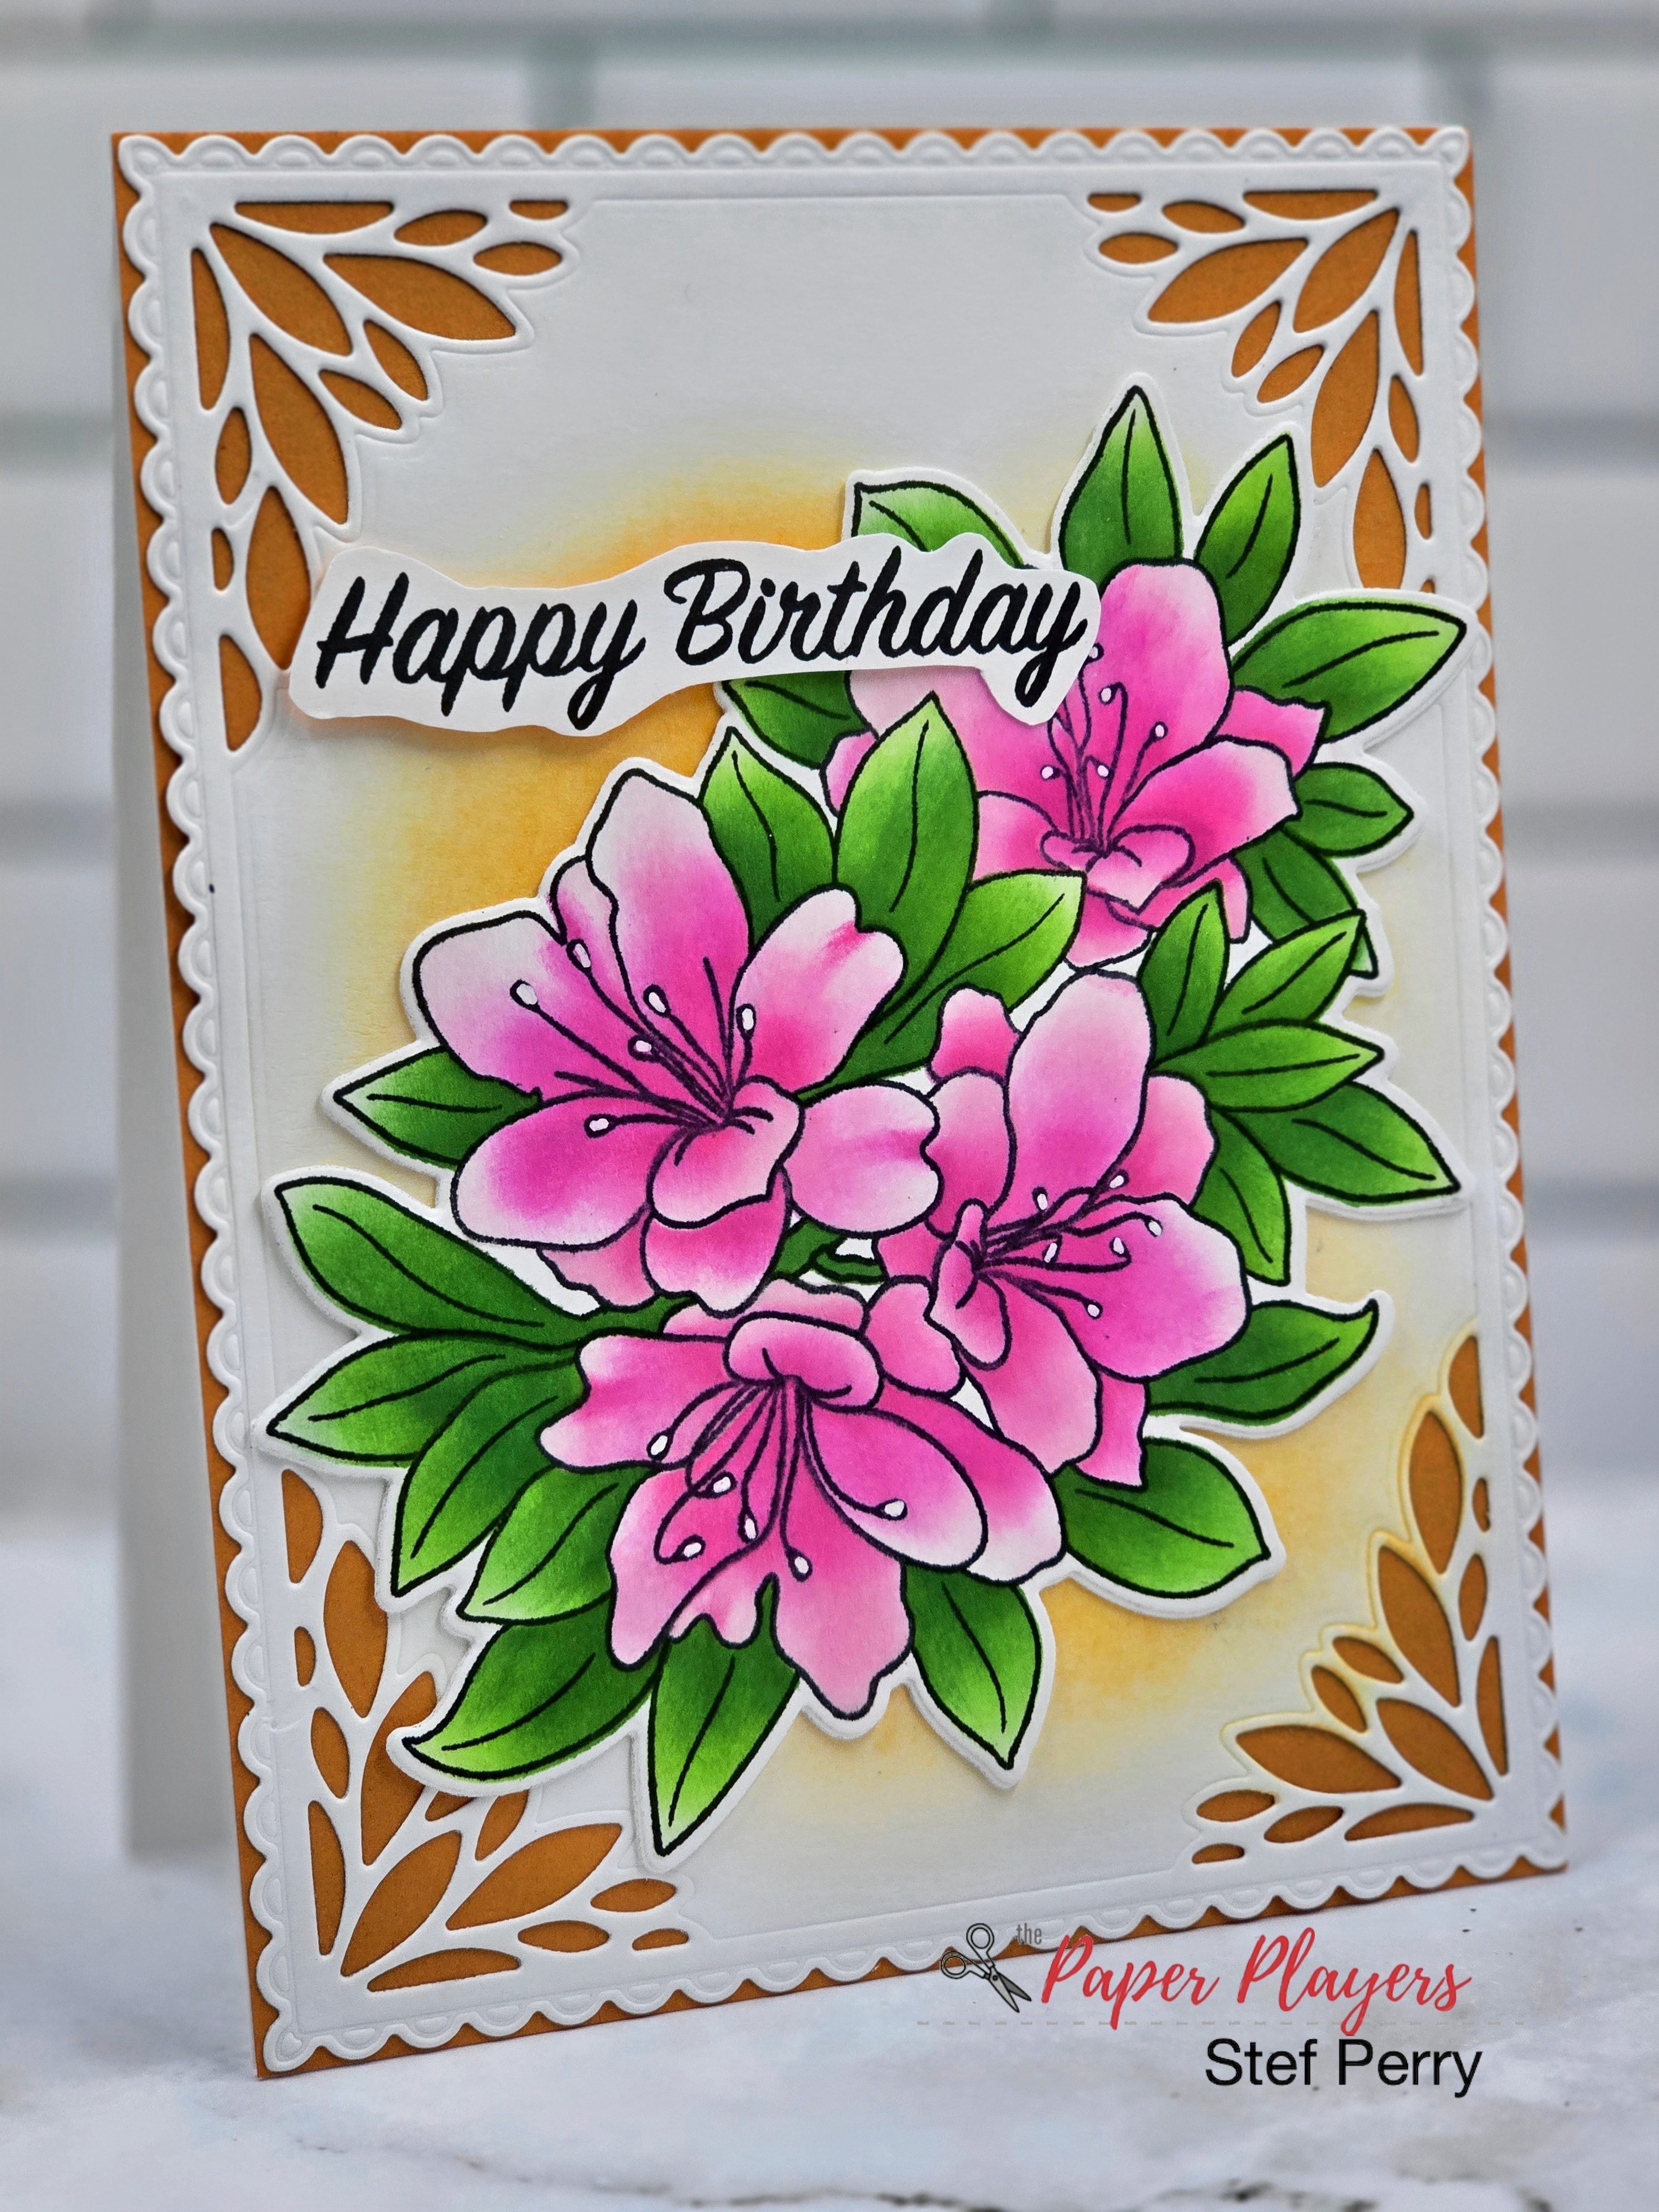
Azalea Bunch for The Paper Players

Hello friends! The team at The Paper Players is all ready to go for 2025 and our first challenge of the year, hosted by the lovely Elizabeth, starts today!  It's color week and she's selected three wonderful colors.  And neutrals are welcome too.


These colors definitely made me think of flowers and Spring, so that's the direction I took with this challenge.


I used products from many crafty manufacturers to create this.  The flowers were part of the Stamptember 2024 collaboration with Altenew and Simon Says Stamp. I have oodles of floral stamps but no azaleas until this stamp set made its way into my craft room.

I started by stenciling the stamped image with Altenew inks (listed below), then using the matching die to cut it out.  The background panel was die cut from white using a Honey Bee Stamps layering frame die, then I softly ink blended some orange in the middle so that it would highlight the floral arrangement.  It was then layered on a panel of Concord & 9th Clementine cardstock and added to the card base.  The floral image was added onto two additional die cut layers, then arranged on the card, along with fussy cut the sentiment to finish things off.


I hope to see your card in our gallery this week and definitely encourage you to visit the challenge blog for more inspiration and ideas from my talented teammates!  The challenge remains open until Friday 1/17 at 3pm EST.

Thanks for visiting and take care!

Stef


  • Simon Says Stamp/Altenew Azalea Bunch stamp, die and stencils
  • Stampendous Birthday Messages stamp set
  • Honey Bee Stamps Spring Vine Layering Frame die
  • Altenew inks - Pink Diamond, Pinkalicious, Rubellite, Snapdragon, Firefly, Green Field, Shadow Creek and Mountain Pine
  • White gel pen 

Wednesday, May 15, 2024

Sparkle Birthday for The Flower Challenge

Hello friends!  I'm back with my reminder card for The Flower Challenge, where this month we are coloring our flowers with any medium of choice.

My coloring medium this time is ink blending on my die cut floral.


I kept things pretty CAS with this card in order to let that gorgeous tulip be the star of the show.  The petals and leaves were die cut from white cardstock, then the petals ink blended in a variety Altenew pink inks.  For the leaves, I used two brand new colors that were part of the Altenew Secret Garden class kit, one a yellow and the other a teal, which makes the yummiest blend of green!

While the ink dried on the floral die cuts, a white panel was embossed, lightly splattered with gold metallic paint then when dry, adhered to the card base.  Separately, the flower and leaves were also splattered with gold paint.

I chose to make this card a bit larger at 4.5" x 6" so the frame and floral would fit with ease.  The frame was cut from gold metallic cardstock, adhered to the card front, then the flower and leaves arranged in the bottom right.  The foiled die cut sentiment was added, then it was finished off with some sparkle gems around the frame.


If you haven't had a chance to play along yet, or have another card to share, we'd love to see what you created!  The challenge remains open until the 25th of May, so still plenty of time.  In the meantime, don't forget to visit the challenge blog because my very talented teammates have a new bevy of beautiful cards to inspire you!

Thanks for visiting!  If you have a chance tomorrow, drop back by when I'll be sharing my DT card for the newest challenge at Color Hues.

Take care!

Stef

  • Altenew Pink Star Tulip die set
  • Altenew Sparkle Frame die
  • Spellbinders Tufted embossing folder
  • Spellbinders You Are Everything Betterpress sentiment set
  • Altenew inks - Baby Pink, Pinkalicious, Rubellite, Honeyglow and Teal Tempest
  • Altenew Metallic Gold paint
  • Altenew Crystal Clear Gem Sparkles

Wednesday, May 1, 2024

Tulip Pattern for Color Hues

Hello friends!  Well, here we are at the beginning of May and it's time for a new challenge at Color Hues!  This time the amazing Julie B. has chosen the beautiful color combo of Lilac and Lime.

I'm also joining the current Simon Says Stamp Wednesday Challenge where the theme is Feminine. 

For my card, I'm using a Hero Arts stencil and die set that was released in February, I believe.


The stencil set is a layering one, so I found two ink shades each of purples and greens and went to work.  After the stenciling was complete, the panel was trimmed to just slightly smaller than A2 size.  The cover die was used on two panels of white, layered up and then adhered over the stenciled panel.  It would also be fun to use the cover die to cut the stenciled panel then use inlay but I wasn't up that task the day I was working on this card lol!

I had a die cut sentiment that I was going to use on the heart, but it was too big, so I went on "the search" for a sentiment and found the perfect match with another Hero Arts stamp set.  Most of the words are meant for Valentine's day but these worked out fine, stamped in gray ink.  

The dragonfly is having it's first outing on this card, cut from white then inked with the same purples.  I then used a shimmer pen on the wings, glued it together and added to the heart.  I liked the glitter look so much I then proceeded to go over all the tulips as well, then for the last touch, added some sparkly gems.


I hope I've provided a little bit of inspiration and for even more, be sure to visit the challenge blog and see all the beautiful cards by my very talented teammates!  The challenge will remain open until 9 am EDT Tuesday 5/14.  We would love to have you join us!

Take care!

Stef

  • Hero Arts Tulip Pattern Layering Stencils and Fancy Cover Die
  • Hero Arts You're Mine Stamp set
  • Simon Says Stamp Nested Round Heart die and Etched Dragonfly die
  • Altenew Lavender Fields, Deep Iris, Lime and Fresh Leaf inks
  • Versamark Clair Morning Mist pigment ink
  • Tonic Aqua Shimmer pen
  • Honeybee Stamps Aurora Borealis gems

Tuesday, April 16, 2024

Wild & Free for Color Hues

Hello friends!  Are you ready for a new color combo?  We have you covered at Color Hues, where the lovely Hannelie has chosen pink and yellow.  So perfect for Spring, right?


I couldn't resist making a card with flowers using these colors and of course I added a bit of gold metallic as well. ;-)


The April card kit at Simon Says Stamp had me swooning with the pretty floral stamps, so of course I inked up one for this card.  It was gold heat embossed, along with the sentiment from the same stamp set, and then I did some simple coloring of the flowers with yellow Copic makers.  I die cut both with the coordinating dies, then went to work on the background.

Pink ink was ink blended on a panel of white cardstock, darkening the edges while leaving the center a lighter color.  It was embossed with the Floating Flowers folder that came with the kit, then I used both gold and white to splatter although the white is very subtle, even in person.

After the panel dried, it was adhered to a 4.5" x 6" card base.  A pretty die cut circle was layered on, then the flower and sentiment were added.  With all the gold splatter I didn't think any bling was needed.


So what are you inspired to make with these colors?  We sure hope you'll share your wonderful creation with us, the challenge remains open until 9am EDT April 29th.  For more inspiration, you don't want to miss what my super talented teammates have made, so please be sure to pop over to the challenge blog!

Take care and thanks for visiting!

Stef

  • SSS Wild & Free Flowers Stamps and Dies
  • SSS Floating Flowers ef
  • Altenew Baby Pink Crisp Dye ink
  • Altenew Gold Metallic paint
  • Dr. Ph Martin's Bleed Proof White paint
  • Copics - Y15, 11, 00

Thursday, June 15, 2023

Billowing Peonies for The Flower Challenge

Hello friends!  It's mid-month and time for The Flower Challenge reminder post.  This month our theme is to use your favorite flowers.  I hope you'll join us and share your favorite flower!


Warning - this is a longer than normal post as I couldn't make just one card. ;-)

As I shared in my post at the beginning of the month, I love peonies and we had some beauties in our front yard this year but unfortunately the series of thunderstorms we've been experiencing cut their life a bit short.  But I do have a couple photos to share.


The pink flowers start out almost red, then bloom out to the light pink, and while it's hard to see, the whites one have small, vibrant pink stripes right in the middle. 

Now onto my cards.  When Altenew celebrated their 9th anniversary in April, I just had to get their mega-sized Billowing Peonies bundle.  The stamp used today is HUGE and I had to use my Memory Misti to stamp it!  I decided to use the accompanying stencils to color them pink and white like those in our garden.


The card ended up being 5 1/2 x 7 3/4 inches and I used my W R Memory Keepers 1-2-3 Punch board to make a custom envelope.  Altenew inks (listed below) were used for stenciling the image, then it was die cut with the coordinating die.  A separate panel was ink blended with light blue, then both the floral image and the panel were lightly splattered with Altenew Jet Black ink spray using a small paintbrush.


When the splatter dried, I used the punchboard to round two corners of the panel, adhered the floral image, then trimmed off the overhanging parts.  The panel was adhered to a white card base, then I added the die cut sentiment.  A few clear sequins finished things off.

I couldn't help but stamp a few more images while I was at it, so I made a couple more cards.


Similar to the last, it was stenciled, splattered with black ink spray, then the panel trimmed down with a rectangle die and added to a light gray card base.


And of course, I couldn't stop before coloring at least one flower with alcohol markers!  I tried out some of my new OLO markers - the flower was certainly a treat to color and the markers blended beautifully.

So there you have it, my total love affair with anything peony on full display lol!  Now, be sure to head over to the challenge blog, my amazing teammates have even more stunning floral cards to share with and inspire you.  Remember, you have until the 25th to play along!

Take care!

Stef


Stamps:  Altenew Billowing Peonies
Paper:  Neenah Solar White, Black, Fog
Ink:  Memento Tuxedo Black; Altenew Obsidian, Pink Diamond, Pinkalicious, Rubellite, Warm Sunshine, Honey Drizzle, Firefly, Grass Field, Shadow Creek, Limestone, Silver Stone, Industrial Diamond, Sea Breeze
Dies:  Altenew Billowing Peonies, Versatile Greetings and Featured Sentiment dies; Simon Says Stamp Fancy Hello; Hero Arts Rounded Rectangle Infinity die; Pink & Main Layered Square dies
Other:  Altenew Jet Black ink spray and Billowing Peonies stencil set, Pretty Pink Posh Sparkling Clear Sequins, W R Memory Keepers 1-2-3 Punchboard Envelope Maker, Honey Bee Stamps Small Clear Dew Drops
OLO markers:  V2.8, 2.7, 2.6, 2.4, 2.3, 1.1, G1.8, 1.7, 1.4, 0.1, YO 2.7, 2.5, 2.3, Copic Y04

Sunday, June 4, 2023

Peony Birthday Wishes for The Flower Challenge

Hello friends!  The new month also brings a new challenge at The Flower Challenge.  This month the theme is to use your favorite flower - how easy is that?  Well, unless you have multiple favorites, then you'll have to choose one - or even better, make more than one card for the challenge!


I'm also joining the current Anything Goes challenge at Simon Says Stamp Wednesday Challenge.

If you follow my blog, you may know that peonies are my very favorite flowers and I have a one to share today that I colored in what I guess is my current favorite color - peach!


This gorgeous image is from Altenew, and as a peony lover, one I could not resist adding to my collection of flower stamp sets.  I used Copic markers to color it, then it was die cut with the coordinating die.  The sentiment is from Spellbinders, foiled in gold and die cut with a sentiment label die.


Next the Diamond Frame cover die was cut from Concord & 9th Nectar cardstock, then adhered to a white panel that was ink blended around the outside with the same shade of ink from C&9, and added to a white card base.  The floral image was layered with two additional die cuts for dimension, adhered to the card front, then the sentiment was added with both glue and then foam squares.  To tie in the gold on the sentiment I added three sparkling gold gems and that finished it off.


I'd love to know what your favorite flower is and I hope you'll share with us this month!  The challenge is open through the 25th.  In the meantime, be sure to take a peek at the stunning array of flower cards from the other DT members!

Take care!

Stef


Stamps:  Altenew Build-A-Flower:  Pristine Peonies
Paper:  Neenah Solar White, Hammermill, C&9 Nectar
Ink:  Memento Tuxedo Black, Nectar
Dies:  All from Altenew - Pristine Peonies, Diamond Frame Cover and Featured Sentiments
Foiling:  Spellbinders Everyday Sentiments II Hot Foil Plate and Gold Glimmer Hot Foil
Gems:  Spellbinders Aura Color Essential Gems
Copics:  R32, 11, E00, YR23, Y15, YG67, 17, 25, 03

Thursday, May 4, 2023

Hello Friend for The Flower Challenge

Hello friends!  I hope the first part of May brings flowers your way and it's also bringing us a new challenge at The Flower Challenge!  This month we are using our pretty pastels.


There are several flowers that bloom in pastel colors this time of year and one of my favorites is from the dogwood tree.  When I saw that Honey Bee Stamps came out with their beautiful Lovely Layers: Dogwood dies and coordinating products, well let's just say I was totally smitten!


I started by die cutting all the dogwood branch components from white cardstock, then used my Copic markers to color them.  Next I followed the layering guide and put together all the pieces/parts.  It really didn't take an enormous amount of time and the branches are so, so pretty!  I put those aside and then worked on the card base.


Next, Seafoam and Surf inks were blended on a portion of a panel of white cardstock, then embossed with the coordinating Dogwood Blooms 3D embossing folder.  I trimmed it down and added to the card base.  Next I die cut the Spring Vine Layering Frame dies twice, took apart the various pieces and just used the frame and the interior.  Those were all added to the card before adding the dogwood branches.  The sentiment was stamped in Versafine Clair Morning Mist, a nice soft gray, die cut and added to the center.  The last step was to scatter about a few Ocean Wave Crystals from Studio Katia and the card was complete.


So what florals in your stash are calling out to be used for this challenge?  I know you have some lol!  In the meantime, for some amazing inspiration, be sure to drop by the challenge blog and see what my fabulously talented teammates have created.

Take care!

Stef


Copics:  RV23, 21, 10, E47, 44, YG17, G43, 40

Sunday, April 30, 2023

Dainty Flowers for Sunday Stamps

Hello and welcome!  It's time for a new challenge at Sunday Stamps and this time Melissa has given us a wonderful sketch to work with.


I decided to pull out some pretty patterned paper that I've had for a few years and use that as the inspiration for my card.


I love the dainty flowers and the soft colors, plus I was pretty certain I had a flower stamp with a similar shape to those on the paper. Sure enough, the Altenew Floral Henna stamp set had a trio of stamps shaped similarly to the ones on the paper.  I stamped them, then Copic colored and fussy cut the center flower and a couple of the leaves.


I pulled out two sheets of the paper. One was die cut and adhered to the white card base.  From the other I cut a 1" strip and layered it on a slightly larger piece of white, then added it to the card front.  The sentiment was stamped and die cut then added with thin foam tape.  Lastly the fussy cut flower was popped up with regular foam tape.  Originally, I had the flower on a die cut circle with the sentiment going across the bottom but it didn't look proportional to the size of the vertical strip, and since that was already glued down, I decided to add just the flower without the circle.  That helped but I do wish I'd made the blue strip about a quarter or half inch larger.


Thanks so much for visiting!  Now it's your turn to create something with this fabulous sketch!  But before you head off to your craft room, the design team has oodles of wonderful inspiration to share so head over there and take a peek!

Take care!

Stef


Stamps:  Altenew Floral Henna, MFT Stylish Sentiments
Paper:  Neenah Solar White, Moda Scrap Spring Flowers Collection paper pack
Ink:  Memento Tuxedo Black, Versafine Clair Nocturne
Dies:  Hero Arts Nested Infinity Rectangle die, Simon Says Stamp Sentiment Label dies
Copics:  B93, 91, C0, G82, 40

Saturday, April 22, 2023

Delightful Day

Hello friends!  Today I'm sharing a card that I made using Karren's fabulous sketch at Freshly Made Sketches.


I had just received Altenew's new Delightful Day stamp set the day before and it worked perfectly with this card design.


This set is a layering stamp set and specifically made to be used in Altenew's new Stampwheel.  It has the four  (or three for the leaves) layers on one stamp that you simply rotate to create the layers.  It took me a couple of tries to feel comfortable using it, but for me, it certainly beat trying to line up the individual layers, which I always had trouble with.  After stamping the flower, leaves and the sentiment, they were all die cut with the matching dies.


Next, a panel of SSS Sea Glass cardstock was embossed using Spellbinder's Beveled Diamonds 3D folder, then adhered directly to the white card base.  The circles were die cut with the Folk Edge Circle dies from Pinkfresh Studio, adhered to the embossed panel, then I added the floral image with thin foam squares.  I also used foam squares under the part of the sentiment that was hanging off the edge, then finished things up with a few Bridal Suite Jewels from Lucy's Cards.


I hope you are having a delightful day!  Thanks for stopping by!

Stef


Inks:  Altenew Obsidian, Baby Pink, Fuchsia, Magenta, Honey Drizzle, Lime, Fresh Leaf and Green Opal