Tuesday, January 30, 2018

Folk Heart Love

Hello again and welcome back!  I'm trying to quickly complete my Valentine cards so I can get them sent out in the next few days, and I'm sharing one of tonight.  I had some fun playing with alcohol inks in various shades of pink, red and plum and making hearts using the beautiful Folk Heart dies.  Those heart shapes make me swoon!


Aren't those pretty?  Playing with things that make my fingers inky make me happy, but equally, I like being able to make something CAS with the results.  After die cutting the hearts, they were layered on a rectangle die cut panel of white card stock, using some Fun Foam and foam tape.


The sentiment was die cut from red foil with the Script Words die and added to the bottom of the panel, then the entire thing was adhered to the white card base.


This week's fun sketch at CAS(E) this Sketch is the basis of my card design.  I'm also joining the current All You Need is Love challenge at Stamp Ink Paper.  I've added links to both challenges below, so please be sure to head over to both and check them out!


Thanks so much for visiting, it's so appreciated!  I hope you have a great week ahead!


Stef


Product details
Paper:  Neenah Solar White, Red Foil, Yupo, Glossy White
Other:  Wonky Stitched Rectangle die (SSS), Script Words dies (Altenew), Folk Hearts dies (Ellen Hutson), Ranger Alcohol Inks (Flamingo, Raspberry, Red Pepper, Wild Plum)

Monday, January 29, 2018

Hugs and Thank You

Hello crafty friends!  It's time for a new Color Challenge at Splitcoaststampers and this week I am the host!  The colors I chose for this week are Powder Pink, Lemon Lime Twist and Night of Navy, and dessert is "florals".  While we use Stampin' Up colors, any brand inks are fine to use as long as they are closed to the challenge colors.


I ended up making two cards for this challenge.  For the first card I stamped various images from the Kind Flowers stamp set on watercolor paper, then used Distress Inks similar to the challenge colors for water coloring.  Because most of the images are small and fanciful rather than realistic looking, I didn't try to do any real shading, instead tried to get some contrast with darker and lighter colors.  After the panel dried, it was die cut with a stitched rectangle die, then a white gel pen was used to color the trio of white dots and added strip on one of the flowers.  The panel was added to a Powder Pink card base and the sentiment oval popped up on foam tape.


For my second card, I started with a watercolor panel, stamped various Rose Bamboo flower and leaf images, and a sweet little butterfly, that were then watercolored, this time with Distress Oxide Inks.  Since I don't have the matching die set, I fussy cut them all after drying.  For the background I used the Watercolor Stripes stencil, ironically water coloring with Chipped Sapphire Distress Ink rather than ink blending.


The dried panel was adhered to a white card base, then the flowers added with both glue dots and some foam tape.  The sentiment was die cut three times, then layered and adhered.  Clear Wink of Stella was added to the flowers and butterfly before the white Nuvo drops were added to the flower centers and a few Navy drops added around the panel.


Thanks for visiting, it's always so appreciated!  I hope you'll be able to join the Color Challenge this week, I've added a link above so you can check it out.


Stef


Product details
Card #1

Stamps:  Kind Flowers (SSS), Heartfelt Sentiments (Altenew)
Paper:  Neenah Solar White, Powder Pink, Canson XL
Ink:  Versafine Onyx Black, Chipped Sapphire, Twisted Citron, Tattered Rose, Victorian Velvet
Other:  Stitched Rectangle die, Stitched Shapes Oval Framelit, Simply White Nuvo Crystal Drops, Rainforest sequins (SSS), Sakura White Gelly Roll pen


Card #2
Stamps:  Bamboo Rose (Altenew)
Paper:  Neenah Solar White, Canson XL and Ranger watercolor
Ink:  Chipped Sapphire DI, Faded Jeans, Twisted Citron, Worn Lipstick DOX, Versafine Onyx Black
Other:  Script Words die (Altenew), Watercolor Stripes Stencil (Altenew), Simply White and Navy Blue Crystal Drops, Clear Wink of Stella, Paper Snips

Thursday, January 25, 2018

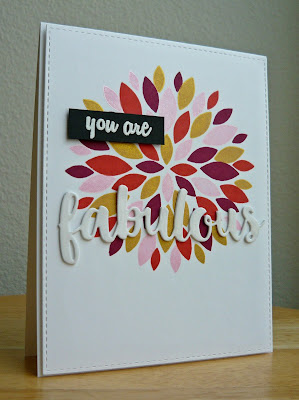
Fab Dahlia

Hello again and welcome !  Tonight I've got a card to share made with a new (to me) and fun stamp and I love how it turned out!


The dahlia image is from the Dahlia Turnabout stamp set from Concord & 9th and the flower is created by rotating the stamp four times to stamp all the petals (use of a stamp positioner makes it easier to use).  The cool thing to me is that I could alternate the colors of the petals to create the dahlia petals!  For this image I used Calypso Coral and Berry Burst inks along with Delicata Pink Shimmer and Golden Glitz metallic inks.  Those metallic inks really make this image pop!


After stamping and die cutting the panel, the die cut and heat embossed sentiments were added to the panel.  The die cut sentiment was layered 3 times with the top layer covered with shimmer spray and Nuvo Crystal Glaze before adhering to the panel. 


As the basis for creating my card, I used the current color challenge at Stamp Ink Paper and the sketch challenge at CAS Colours & Sketches.  I've added links to both challenges below so be sure to visit and enjoy all the beautiful inspiration!


Thanks so much for visiting, it's always so appreciated!


Stef


Product details
Stamps:  Dahlia Turnabout (C9), Heartfelt Sentiments (Altenew)
Paper:  Neenah Solar White, Basic Black (SU)
Ink:  Calypso Coral and Berry Burst (SU), Delicata Pink Shimmer and Gold Glitz, Versmark
Other:  MFT Fabulous sentiment die and A2 Stitched Rectangle Stax Set 1 Die-namics, Hero Arts White Embossing Powder, Tonic Nuvo Crystal Glaze

Wednesday, January 24, 2018

Poppy Birthday

Hello there and welcome back!  Tonight I'm sharing a card where I used both watercolor paints and colored pencils in my effort to expand the mediums I use on my cards.  I typically use dye inks, primarily Distress Inks, but recently decided I should branch out a bit more and use what else I have on hand.  Not really a New Year's resolution per se, but just putting into action something I've been thinking about for a while. 


So I have to admit, the water coloring was fun but the end result was not quite what I was hoping for (read more practice needed lol!!), so I pulled out my colored pencils and worked on deepening the shading, then used gamsol to blend.  When the coloring was complete I splattered a bit of watercolor paint on the background, stamped the sentiment and die cut the panel with a Stitched Rectangle die.


The panel was adhered to a slightly larger panel of Island Indigo, then added to a More Mustard card base with foam tape.  For the final touch Clear Droplets were added.


I'm joining two challenges with this card, the Color Week challenge at Just Us Girls and the weekly Sketch Challenge at Splitcoaststampers.  I've added links below so be sure to visit and enjoy all the wonderful inspiration!


Thanks for visiting!


Stef


Product details
Stamps:  Divine (Penny Black), Tin of Cards (sentiment/Stampin' Up)
Paper:  More Mustard, Island Indigo, Canson Montval watercolor
Ink:  Versafine Onyx Black
Other:  Daniel Smith and Sakura Koi Watercolor paints, Prismacolor Colored Pencils, Stitched Rectangle die, Inky Antics Gamsol kit, Pretty Pink Posh Clear Droplets

Monday, January 22, 2018

Center Cut Heart

Hello crafty friends, it's time for a new weekly Color Challenge at Splitcoaststampers (link here)!  This week Barbara has chosen the lovely combination of Real Red, Whisper White and Silver.  Dessert is to make a Valentine.


I decided to use the gorgeous Center Cut Heart background stamp from Simon Says Stamp.  I made 2 cards with this stamp, heat embossing the stamped image on red card stock with silver embossing powder on both cards.  Take a look!


For this first card, I let the embossed image be the star so no embellishments were added.  I trimmed down the card size to 4 x 5 inches in order to have the heart image to the side rather than in the center.  The sentiment was die cut from white card stock 3 times, layered then covered with Clear Wink of Stella for some sparkle, coated with crystal glaze then adhered to the lower right corner.  Simple and easy!


For my second card, I used the same techniques as the card above but I put the heart in the center of the card, then used metallic white gold watercolor paints to add some additional interest.


I LOVE how the white paint highlights the design of the stamp!  After the paint dried I trimmed down the panel and mounted it with Fun Foam on a white card base.  The die cut sentiment had the same treatment as on the card above plus I stamped the word you in Versamark ink on a piece of black card stock then heat set with white embossing powder.


The photo above lets you see some of the sparkle and shine of the sentiment, and the gorgeous detail of the stamp.


Thanks so much for visiting, I so appreciate it!  I've added a link to the Color Challenge above, so please be sure to head over there and enjoy all the beautiful inspiration, and hopefully join in the challenge this week!


Stef


Product details
Stamps:  Center Cut Heart background (SSS), Lucky (Concord & 9th) (sentiment card#2)
Paper:  Real Red, Basic Black, Neenah Solar White
Ink:  Versamark
Other:  Hero Arts Silver and White embossing powders, Clear Wink of Stella, Tonic Nuvo Crystal Glaze, Gansai Tambi Starry Colors Metallic watercolor paints, Script Words sentiment die (Altenew) (card#1), Holiday Words sentiment die (Ellen Hutson) (card#2)

Saturday, January 20, 2018

Bloom

Hello, friends!  So glad you came by to visit!  Today's card features a little image I stamped on drawing paper some time ago, planning on using my colored pencils.  Well, I finally got around to it this week, and while I realized I like using colored pencils, I certainly need to get in more practice!  Still, I was happy with how it turned out.


I picked up this cute Impression Obsession mini stamp from my LSS quite a while ago and maybe have used it once on a card.  So it was great to not only color it with colored pencils but to get it on a card!  Once the coloring was complete I traced all around the image with a black sharpie.  I trimmed around the outside of the image as the edges are drawn a bit wonky, then added it to a slightly larger piece of white card stock.  I used a white gel pen to add dots to the cone flower and the three little sprig ends coming out of the top. 


A piece of Doll Pink card stock was die cut with a stitched rectangle die, then I used a retired Stampin' Up Edgelit as a stencil to create an impression across the panel.  A scored line was added slightly above it, Black Baker's Twin wrapped around the panel, then the colored piece popped up with foam tape.  Fun Foam was added under the panel then it was adhered to the white card base.  White Nuvo dots were added for a finishing touch to this rather CAS card.


I'm joining the current sketch challenge at Stamp Ink Paper, which was the basis for my card design.  I've added a link to the challenge below, so please be sure to head over there and enjoy all the wonderful inspiration!


Stef


Product details
Stamps:  Impression Obsession "Bloom"
Paper:  Neenah Solar White, Doll Pink (Simon Says Stamp), drawing paper
Ink:  Versafine Onyx Black
Other:  Prismacolor Premier Colored Pencils, Finishing Touches Edgelit (SU), Stitched Rectangle die (SSS), Black Baker's Twine, Simply White Tonic Nuvo drops, Black Fine Point Sharpie, Sakura White Gelly Roll pen

Thursday, January 18, 2018

Ink Smooshing and Poppies

Hello, friends!  I hope you've had a good week!  I've been a busy bee in my craft room this week and have a couple of cards to share with you tonight.  Both use the "ink smooshing" technique and the Pleasant Poppies stamp.  This first card is being entered into the current Color Challenge at The Paper Players (link below).


For this first card I used Dapper Denim, Lemon Lime Twist and Tranquil tide ink pads, smooshing them onto a craft mat, spraying the ink with clear water from my mister, then laid a panel of watercolor paper on top.  Pressing down without moving the panel I made sure ink kind of squished out the sides around the panel then picked up straight up of the craft mat and laid it on a hard board.  I used a paper towel to soak up the excess water around the edges then used my heat tool to dry the panel.  I put the dried panel in my Misti and stamped the poppy image four times with Versafine Onyx Black ink to get complete coverage, then sprayed it with shimmer spray, which unfortunately isn't really visible in the photo. 


I considered cutting down the panel but decided not to because I thought it turned out so pretty, so I just used a stitched rectangle die, mounted that on a panel of Lemon Lime Twist card stock and a Thick Very Vanilla card base.  The sentiment is from a long retired SU stamp set and added to a die cut Dapper Denim oval.


Here's the link to The Paper Players challenge.  If you want some great inspiration, be sure to head over there!


PP 376


For my next card, I used the same basic concept as the one above, but using just Lemon Lime Twist and Tranquil Tide for the "smooshing" colors, then stamping the poppy image on the dried panel.  The other difference is that I used the current Technique Lovers Challenge at Splitcoaststampers (link here ) to take a line stamp and make it a silhouette, coloring in the image with a black sharpie.  How fun is that?  I'm in!


It didn't take that long to color in the images and it's just such a different but pretty look from the first card.  To give it a bit of a pop, I mounted it on a panel of white card stock before adding to the black card base.


Thanks so much for visiting, I'm so very grateful!  Please be sure to use the links above and check out both these wonderful challenges!


Stef


Product details
Card #1
Stamps:  Pleasant Poppies, Watercolor Trio (both retired SU)
Paper:  Very Vanilla, Dapper Denim, Lemon Lime Twist, Canson XL
Ink:  Dapper Denim, Lemon Lime Twist, Tranquil Tide, Versafine Onyx Black
Other:  Layering Ovals and Stitched Shapes Framelits, A2 Stitched Rectangle Stax Set 1 Die-namics (MFT), Sparkle Sheer Shimmer Spritz, Chameleon Sequin mix (SSS)

Card #2
Stamps:  Pleasant Poppies
Paper:  Neenah Solar White, Basic Black, Canson XL watercolor
Ink:  Lemon Lime Twist, Tranquil Tide, Versafine Onyx Black
Other:  Black Sharpies, A2 Rectangle Stax Set 1 Die-namics, A2 Stitched Rectangle Stax Set 1 Die-namics, Black Baker's Twine, Sparkle Sheer Shimmer Spritz, Pretty Pink Post Sparkling Clear sequins

Wednesday, January 17, 2018

Galaxy Love

Hi there and welcome back!  Tonight I'm sharing a kind of non-traditional Valentine's Day card using a galaxy background and a fun stamp set from My Favorite Things.  If you're not familiar with how to make a galaxy background, there are several videos on You Tube showing different methods of making one.  I've provided a brief explanation of my process here, but if you're a visual learner, then using You Tube is your best bet.


I started with a panel of watercolor paper, taping down to a hard board to try to minimize warping.  I spread clear clean water over the entire panel then dropped in various colors of watercolor paints - a bit of yellow, fuchsia, teal and blue, letting the colors meld (but not get muddy) and cover the panel.  I also used some lovely metallic gold watercolor paint in a few places just for some added interest.  I used a heat tool to dry it then started adding black watercolor paint over the top, along with more clean, clear water.  When I was happy with the coverage, I dried the panel again.  Because of the opacity of watercolor paints, when it dried after applying the black the colors underneath showed through.  To finish the look, I used pearl metallic acrylic paint to flick the panel and create the "stars" in the background.


The panel was die cut with a Wonky Rectangle die and mounted with foam tape on the white card base.  The large die cut sentiment was cut from white card stock 3 times and layered to make it more prominent on the panel.  The rest of the sentiment was stamped, trimmed and mounted with foam tape.  Finally the silver foil die cut hearts were scattered around the panel.


I'm joining this weeks Trend Week challenge at Just Us Girls, where the challenge is to make a galaxy background or night sky.  I've added a link below, so be sure to head over there and check out all the lovely inspiration!


Thanks so much for visiting, it's so appreciate!


Stef


Product detail
Stamps:  Written in the Stars (MFT)
Paper:  Neenah Solar White, Silver Foil, Canson XL
Ink:  Versafine Onyx Black
Other:  Written in the Stars companion die (sentiment), Wildly Cuddly Critters companion dies (SSS) (hearts), Sakura Koi Watercolor paints, Gansai Tambi Starry colors watercolor paints, Ranger Pearl Metallic Acrylic Paint, Wonky Rectangle die (SSS)

Tuesday, January 16, 2018

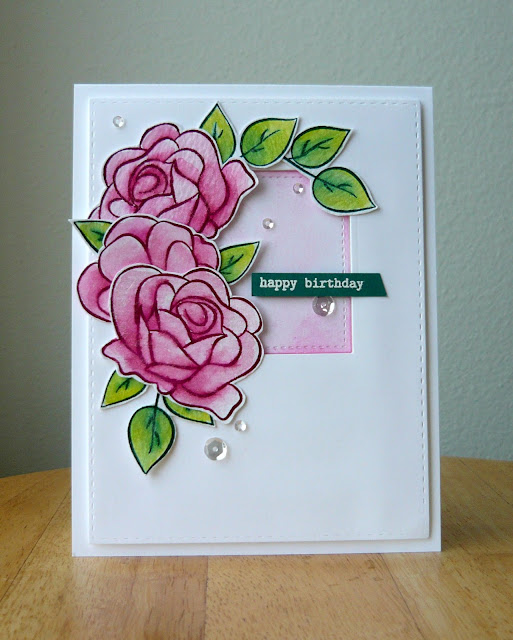
In Bloom Birthday

Hello friends!  I hope your week is going well!  I have been working on a few cards this week for various challenges and wanted to share one with you today.  Recently I won a free stamp set and decided I needed to use it because the flower images were so pretty.


I started by stamping the flowers and leaves on watercolor paper with dye inks.  Normally I would use a waterproof black ink or heat set the images with embossing powder, I but recently saw a video You Tube by Sandy Allnock where she inked up an image with dye markers, stamped it then pulled the color into the images, so I was inspired to try it with these images.  I did have to add more ink from the ink pad lid to create deeper shadows on the flowers, but it was a fun to get a more organic movement of the water coloring than my normal very controlled style.  I really liked drawing out the Tranquil Tide color into the Lemon Lime Twist to get a beautiful blending of those two colors.  Once dried, I fussy cut all the leaves and flowers.


Next a panel of white card stock was die cut with a stitched rectangle die, then a small stitched square was cut from the upper center.  I blended a light bit of Picked Raspberry Distress Oxide ink onto the square then used the die cut panel to position it on the card base.  Then the panel was popped up with foam tape before adding the flowers, leaves and sentiment.  A few sparkling sequins finished things off along with a coating of Clear Wink of Stella on the flowers and leaves.


I'm joining 3 challenges with this card - CAS(E) this Sketch, the 30-Day Coloring Challenge and the current color challenge at Fab Friday.  I've added links to all three below, so be sure to head over there to check out all the beautiful inspiration!


Thanks for visiting!


Stef


Product details
Stamps:  In Bloom:  Julie's Roses (Winnie & Walter)
Paper:  Neenah Solar White, Tim Holtz watercolor
Ink:  Berry Burst, Tranquil Tide, Lemon Lime Twist (Stampin' Up), Picked Raspberry Distress Oxide, Versamark
Other:  Wow Ultra Fine White embossing powder, Stitched Rectangle dies (Simon Says Stamp), Stitched Shapes Framelit (SU), Pretty Pink Posh Sparkling Clear sequins, Paper Snips, Clear Wink of Stella

Monday, January 15, 2018

Lovely Friend

Hello friends!  It's time for another weekly Color Challenge at Splitcoaststampers.  Karen is hosting this week and she has chosen the lovely Pink Pirouette, Blushing Bride and Pear Pizzazz for her colors, and dessert is to use lace.


I'm also excited to be joining Kathy Racoosin's 9th 30 Day Coloring Challenge!  The point of the challenge is to color something every day, even if it's a few minutes, and to share that with others within the community.  If you follow the link below, there are also links to Facebook and Instagram for the challenge if you prefer those platforms for sharing rather than on a blog.  It's exciting to see what others are doing and it's open to everyone of all skill levels and is a very supportive community!  Be sure to check it out!


Last summer had had a huge craft garage sale and pared down my stamp "collection" significantly.  I almost included the background stamp I used today but at the last minute decided I would keep it, and now I'm glad I did.


I used my Misti to get a good impression of this stamp, because the Stazon Stone Gray stamp pad I used is getting a bit dry and I was stamping on watercolor paper. I decided on gray ink rather than black to have a softer look.  I used Distress Inks in colors similar to the challenge colors, starting by water coloring Spun Sugar on all the flower images.  Next, Tattered Rose, a color similar to Blushing Bride, was painted on all the flowers with the patterned petals.  To create a bit more contrast Worn Lipstick was then added to the other flowers.  After Shabby Shutters was added to the leaves, I lightly painted the Spun Sugar in random places in the background.  When the panel was thoroughly dry, I used a white gel pen to whiten the "berries" and flower centers.


I don't use ribbon or lace much on my cards anymore but still have a healthy stash, so I found this lovely bit of white lace to add to the bottom of the card.  The sentiment was created by die cutting white card stock with the Lovely Words Framelit, which was then layered on top of a piece of oval cut vellum so the sentiment would be more visible against the busy background.  And that finished off the card!  I decided against adding sequins or Nuvo drops as I thought those embellishments would get lost against the background.


Thanks so much for visiting, it's always appreciated.  I've added a link to the Color Challenge above, so I hope you'll head over there and enjoy all the beautiful inspiration and hopefully play along this week!


Stef


Product details
Stamps:  Something Lacy (Stampin' Up)
Paper:  Neenah Solar White, Blushing Bride, Pink Pirouette, Canson XL Watercolor, Vellum 
Ink:  Stazon Stone Gray, Shabby Shutters, Spun Sugar, Worn Lipstick, Tattered Rose
Other:  Layered Ovals, Stitched Shapes and Lovely Words dies, white lace (Joanne), Sakura White Jellyroll pen.

Saturday, January 13, 2018

Brush Stroke Thanks

Hello again!  I hope you're having a great weekend so far.  Today I have a card that I made using the current challenges at Freshly Made Sketches and Color Throwdown.


I could not resist the beautiful color combination of Navy, Aqua and Pink, and the FMS sketch was perfect for what I had in mind, which was to use my new Square Dance stencil from Simon Says Stamp.  I used Distress Inks to create the stenciled panel on Bristol card stock.


I used a light hand with the ink blending, then splattered the panel with clear water and once dry, was adhered to a piece of Audrey Blue card stock (*swoon*love that color!).  I decided to add the scallop edge to give a bit more interest and to contrast the geometric pattern of the stencil.  The sentiment was heat set with aqua embossing powder, then trimmed down and added to the card.  The final step was to add some sparkle with my favorite sequins.


Thanks so much for visiting, it's always so appreciated!  I've added links to both challenges above, so please be sure to use them and enjoy all the beautiful inspiration.


Stef


Product details
Stamps:  Brush Stroke Greetings (SSS)
Paper:  Thick Whisper White (SU), Audrey Blue (SSS), Strathmore Bristol
Ink:  Versamark, Spun Sugar, Picked Raspberry, Faded Jeans, Peacock Feathers
Other:  Square Dance stencil (SSS), Wendy Vecchi Garden Patina embossing powder, Scallop Border punch (ret. SU), Sparkling Clear sequins (PPP)

Monday, January 8, 2018

Blooming Bouquet

Hello again!  It's time for a new Color Challenge at Splitcoaststampers.  Robin is hosting this week and she has chosen the lovely combination of Daffodil Delight, Berry Burst, Old Olive and Pool Party.  Dessert is to add sparkle.


These colors are perfect for flowers so I used the lovely Blooming Bouquet stamp from Altenew for my card.  It was heat set with white embossing powder on Bristol paper then I used various Zig markers to water color the bouquet along with a paint brush and clear water.


While that panel dried, a piece of Berry Burst card stock was embossed with the butterfly folder, then sprayed with Sparkle Sheer Shimmer Spritz (you can see the sparkle better in the photo below, which was taken in indirect natural light rather then direct sunlight).  More sparkle was added by painting Clear Wink of Stella to the flowers and leaves.


 The watercolor panel was die cut with a stitched rectangle die, a sentiment added and then it was wrapped with Gold Cord before the card was assembled.  I love how this turned out, a bit like a hope of spring during the dead of winter.


Thanks for visiting, it's always so appreciated!  I've added a link to the challenge above so you can enjoy all the great inspiration.  We'd love it if you'd join us this week as well!


Have a great week!


Stef


Product details
Stamps:  Blooming Bouquet, Heartfelt Sentiments (Altenew)
Paper:  Neenah Solar White, Berry Burst, Strathmore Bristol
Ink:  Versamark, Versafine Onyx Black
Other:  Zig Clean Color Real Brush Markers, Fluttering embossing folder (SU), Gold Cord, Hero Arts White Embossing Powder, A2 Stitched Rectangle Stax Set 1 (MFT), Tsukineko Sparkle Sheer Shimmer Spritz, Clear Wink of Stella

Saturday, January 6, 2018

Birthday Gold

Hello again!  I hope you're having a good weekend so far.  Recently I had a chance to play with my new alcohol inks (thanks Santa!) and created a few fun backgrounds.  For my card today, I made the background the primary focus of the card because it turned out so pretty (at least I think so!).


Look at all those pretty colors swirling around on the panel!  This was the first time I tried using alcohol markers so I decided to try both glossy white card stock and Yupo paper, mainly because I have a lot of glossy white in my stash, whereas Yupo paper is a bit on the expensive side.  I did find that the inks moved much, much better on Yupo than glossy white, but I also discovered if I added some Alcohol Blending solution on the glossy white first, then added the inks and metallic mixatives, I had much better success and was able to achieve the satisfactory results. 

  
After the panel dried I added gold embossing around all the edges then adhered it to a white card base.  The sentiment was also heat set with gold embossing powder, then die cut with a Layering Circles Framelit.  I used tape to add the gold cord to the panel then adhered the sentiment circle with foam tape.


I'm entering my card in the weekly Mixability challenge at Splitcoaststampers (link here), where we are to use gold or silver and at least two mediums (alcohol inks and embossing powder used here).  I'm also joining the Anything Goes challenge at Seize the Birthday and the Something New challenge at Simon Says Stamp Wednesday Challenge (links below).


Thanks so much for visiting!


Stef


Product details
Stamps:  Tin of Cards (Stampin' Up)
Paper:  Neenah Solar White, Glossy White
Ink:  Versamark
Other:  Ranger Alcohol inks, Gold Mixative and Blending Solution, Hero Arts Gold Embossing Powder, Layering Circle Framelit, Gold Cord