Sunday, July 25, 2021

Just Because for Sunday Stamps

Hello friends, I hope you're doing well!  It's time for a new Sunday Stamps challenge and Melissa has given us this fabulous sketch to play with.


I'm also sharing this over at Addicted to Stamps and More where the current theme is to use die cuts and/or stencils.


And finally, I'm joining the current Simon Says Stamp Wednesday Challenge where the theme this week is "out with the old and in with the new", so we are to use something old that has been in our stash forever and something new or unused.  My card definitely has both those elements!

And by the way, thank you to Simon Says Stamp for the $25 gift certificate that I won as a result of my Sweet Friend card being the random pick for the Emboss It challenge!  Happy dance!! It will definitely be put to good use ha, ha.

Now onto my card...


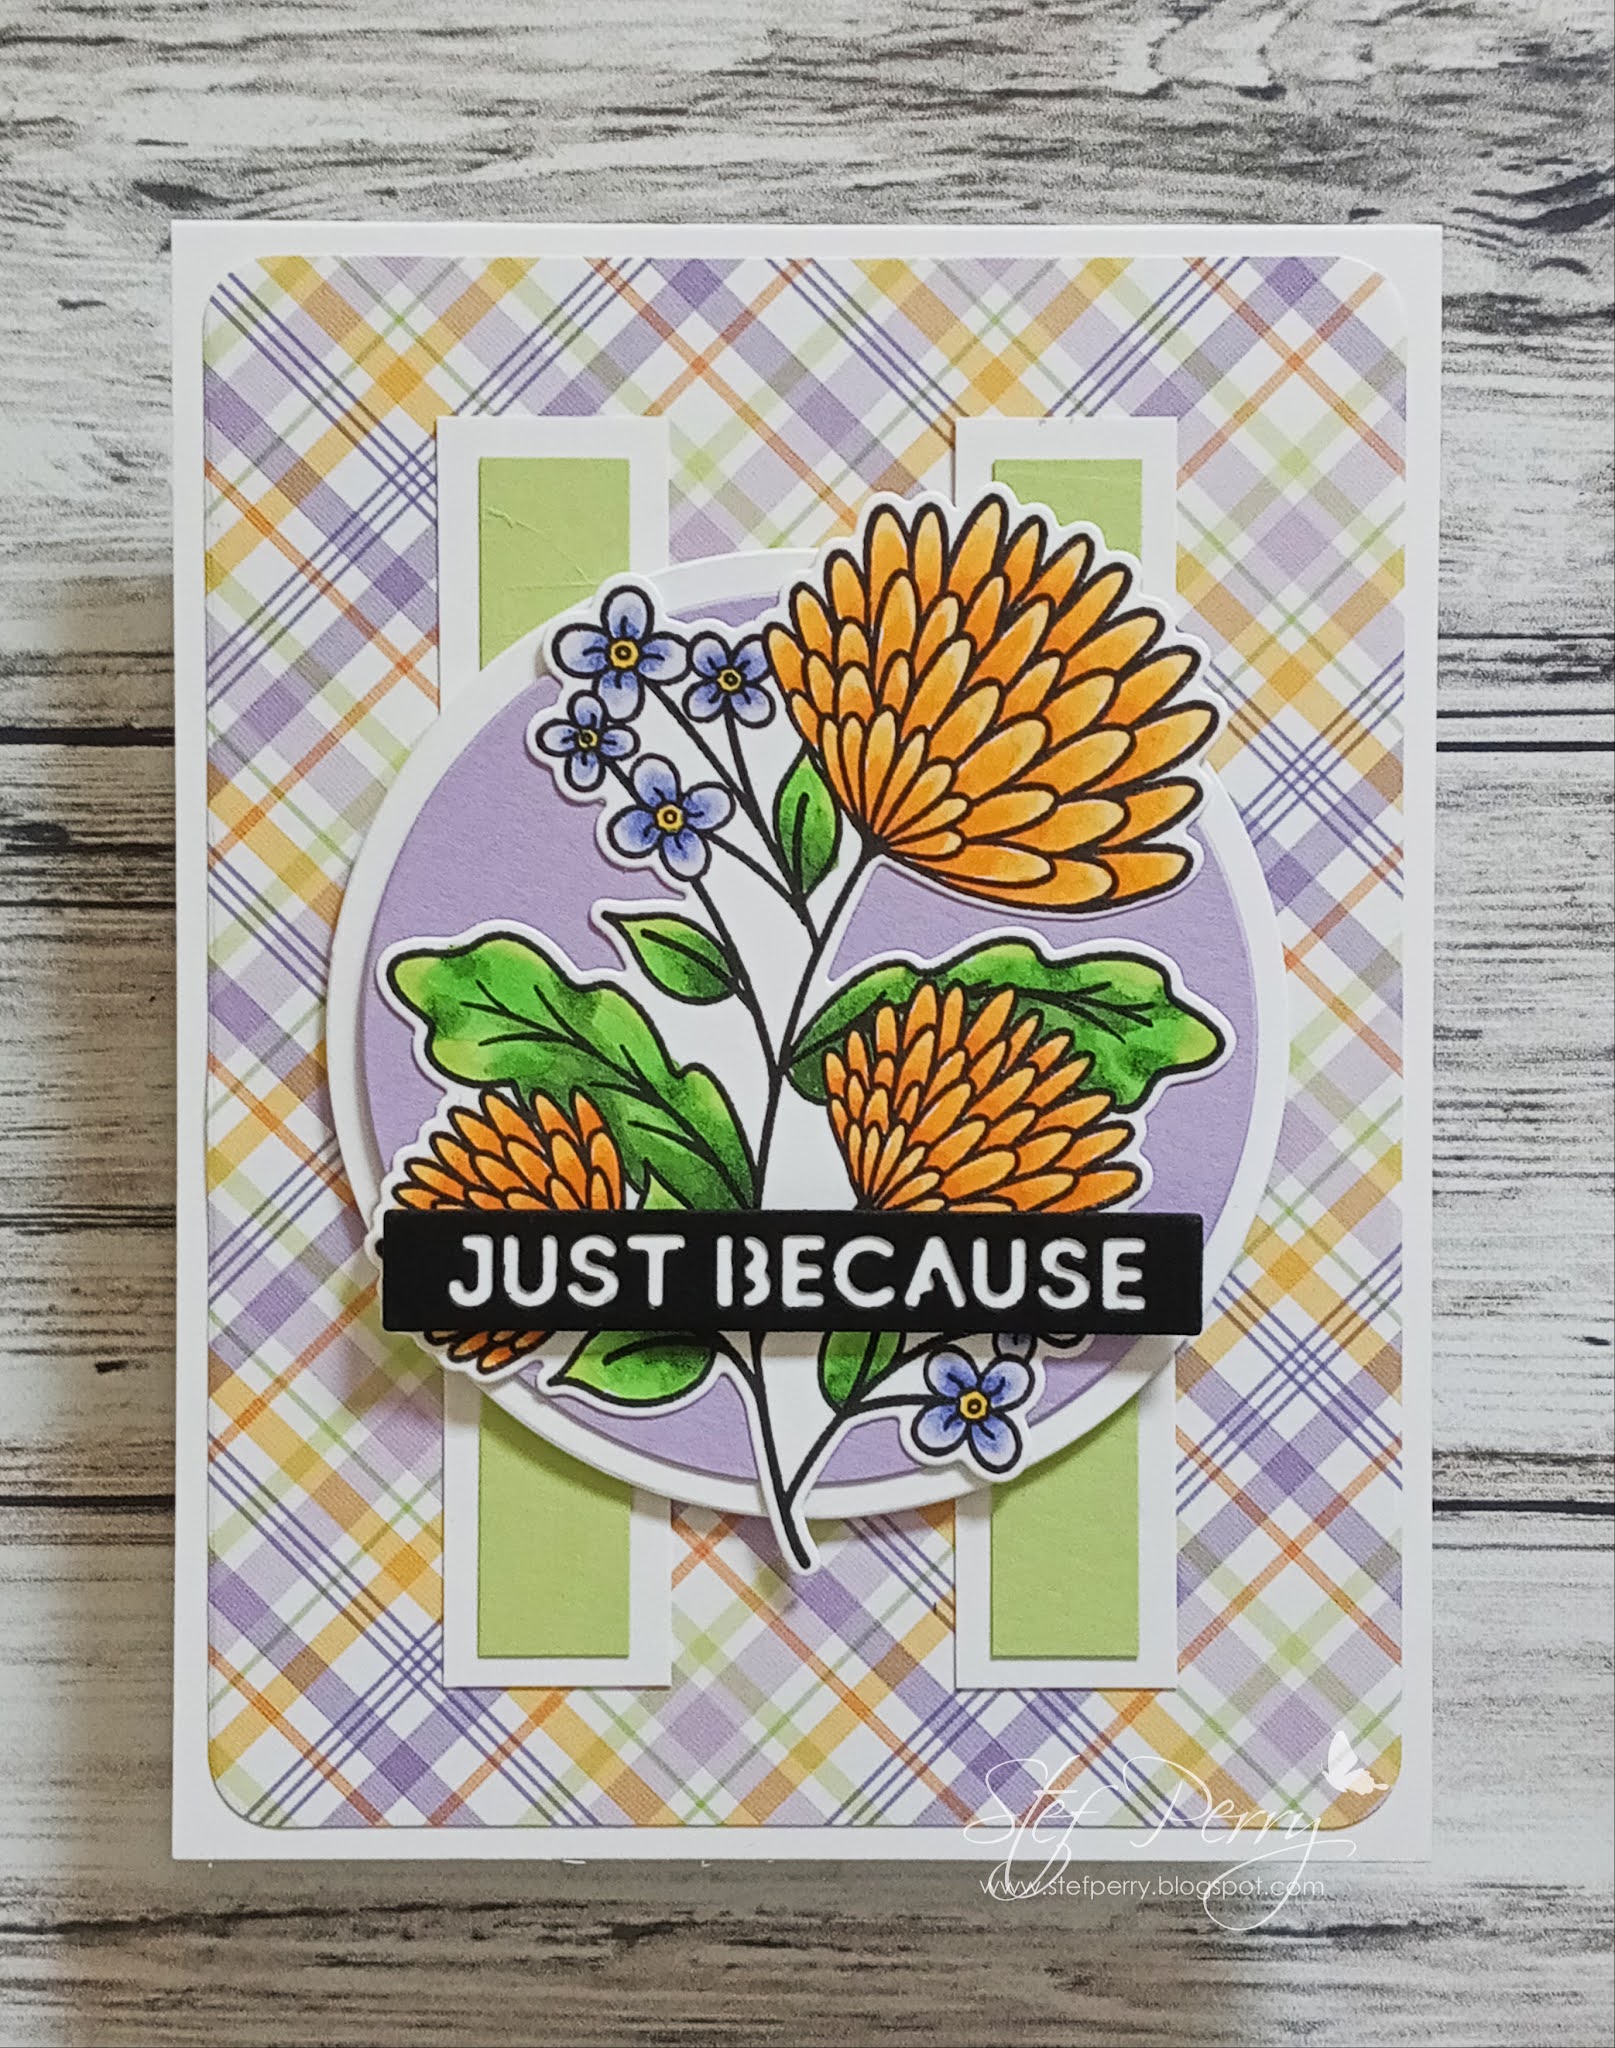
I began by choosing some patterned paper from my stash (the "old" thing) that drove the color scheme for my floral image (the "unused" thing). I love purple/lavender and orange together so this paper is a lovely pastel mix of that with a wee bit of light green thrown in.  I have to laugh because paper crafting has opened my eyes and my mind to all sorts of colors and mixes of colors that I never would have come to love without this wonderful hobby. 

As is my normal fashion, I used Copic markers to color the floral image, deciding to make light orange the predominate color for the big blooms.  When the coloring was complete, the image was cut with the coordinating die. 


To put the card together I started by using a rounded rectangle die to cut out the plaid panel, then adhered it directly to the white card base.  A scrap of light green cardstock was trimmed down, cut in two, then adhered to the white strips, then added to the card front.  The lavender circle was die cut and glued to the slightly larger white circle, then popped up on the card front with foam tape. The floral image was adhered directly to the circle, then the die cut sentiment added with thin foam tape.  And that finished things off!


Thanks for visiting, I always appreciate it!  Be sure to use the link above for the Sunday Stamps challenge and check out all the beautiful cards by the other DT members and hopefully are inspired to join us!

Stef


Stamps:  Best Friend Ever (SSS)
Paper:  Neenah Solar White, Black, Lavender (SSS), Sprout (Concord & 9th), Plaid Patterns 6x6 paper pad (MFT)
Ink:  Memento Tuxedo Black
Other:  Best Friend Ever die, Essential Sentiment Strips die (Altenew), Nested Infinity Rounded Rectangle die and Nested Infinity Circle dies (Hero Arts)
Copics:  YR16, Y38, 35, 21, 08, BV04, 02, 000, YG67, 17, 05, 03

Thursday, July 22, 2021

Bee You

Hello friends and welcome back!  Today I'm sharing a fun little card that I made for LeAnne's fun CAS challenge over at the Paper Players.


I received a free gift with purchase from the Colorado Craft Company that I have been dying to use and this is the perfect opportunity.


That ever-so-cute bee landing on the flower is an Anita Jeram illustration and so fun and easy to color using my Copic markers.  After coloring, it was cut down with an Essential Arches die, then I lined it up in my Misti to stamp to get good placement of the sentiment.  The next size larger arch die was used to cut a piece of white cardstock then I colored around the edges with one of the markers used to color the flower so it could be all nice and matchy-matchy, because I didn't have any colored cardstock closed enough in color.


I fiddled around for what seemed like ages, trying to decide on the placement of the main image.  I landed on the idea of a trimmed down embossed panel that looks like a honeycomb, wrapped it with some Baker's Twine and added it to the white card base with thin foam squares.  I ended up preferring the lower corner placement of the main image, so I added it to the card, also with thin foam squares.  I love CAS but I also love a wee bit of dimension as well.  Lastly, the wings of the bee were painted with an aqua shimmer pen for a little sparkle. 


Thanks for taking time to visit, I appreciate it!  Take care and enjoy the coming weekend!

Stef


Stamps:  Bee You (Anita Jeram for CCC)
Paper:  Neenah Solar White
Ink:  Memento Tuxedo Black, Versafine Clair Nocturne
Other:  Essential Arches dies (Ellen Hutson), Hexagon embossing folder (ret. SU), pink Baker's Twine (EH)
Copics:  YR24, Y15, 13, 11, C2, RV69, 19, 55, 52, YG67, 17, 05, 03, BG000, 0000

Tree Peony for the Tic Tac Toe Challenge

Hello friends and welcome back!  It's time for a new Tic Tac Toe challenge!  This week we are thrilled to have a board by our new DT member Silke Ledlow!  I hope you'll be inspired to join us this week!


I'm also joining the Watercooler Wednesday All About Occasions Challenge.


For the Tic Tac Toe challenge, I went across the top row - sequins, peony, orange.


I've had this Tree Peony stamp set for a while and have been itching to use it, so this challenge gave me that opportunity.  The peony and leaves are part of a layering stamp set.  I used the layering stamps to create the flower, which were easy to line up, but for the life of me could not get the leaf layers to line up properly, so I simply stamped the outline layer and colored the leaves with warm gray Copic markers.  I love the gray with the orange flower!


Next I die cut the Bold Stripes cover die three times from white cardstock, layered them together then adhered them to the Fog card base. The sentiment was white heat embossed on black cardstock, then die cut.  The leaves and small floral stems were adhered directly to the white die cut, then the large peony added with foam tape.  I used thin foam squares to add the sentiment, then added some luscious copper sequins that I have been hoarding saving in my stash.  And that finished things off!


Thanks for taking time to visit, I really appreciate it!  Be sure to use the link above to check out all the beautiful cards by the other DT members and hopefully join us this week!

Stef


Stamps:  Build-A-Flower:  Tree Peony, Sentiment Strips (both Altenew)
Paper:  Neenah Solar White, Black and Fog (both Simon Says Stamp)
Ink:  Memento Tuxedo Black; Versamark; Pure Graphite, Burnt Red, Canyon Clay, Pastel Sunrise, Warm Sunshine, Honey Drizzle and Paper Bag (all Altenew)
Other:  Tree Peony dies (Altenew), Featured Sentiment die (Altenew), Bold Stripes Cover-up die (MFT), Super Fine White embossing powder (SSS), Copper sequins (SSS)
Copics:  W5, 3, 1, 0

Friday, July 16, 2021

Sweet Friend

Hello there and welcome back!  I have a card to share that I've made for the wonderful Festive Friday Challenge.  The three elements I used from the list are wreath, heart and friendship sentiment.


I'm also joining the current Simon Says Stamp Wednesday Challenge where the current theme is "Emboss It".

This is my second post today.  If you're interested, you can see my stargazer lily card here.

To create my card I used one of my favorite wreath stamps and a new word die.


I absolutely love that the wreath is shaped as a heart, I think it's so pretty.  The stamped image was colored with Copic markers then die cut with the coordinating die.  I also used a gold gel pen to color the berries but it looks more like platinum in the photos.  Next a panel of white cardstock was embossed with a 3D floral embossing folder and adhered to a panel of Pale Papaya, one of the new Stampin' Up In Colors which I love!  I knew I wanted to add the hugs die to the center of the wreath but it didn't stand out from the embossed background, so I channeled my inner Jennifer McGuire and set about adding vellum to the center.


To create some dimension as well as add the vellum center, I die cut the wreath three more times from white cardstock.  Before adhering I glued the colored wreath to a piece of vellum, let it dry then cut off the excess so it didn't show around the outside edges.  Then the vellum layer was sandwiched between the top layer and the other three layers glued underneath.  The hugs die was die cut five additional times from white cardstock, adhering the gold layer to two white layers and gluing to the vellum center, then adding the three remaining under the vellum so the center would not sag (I hope that makes sense!).  I truly felt like this was almost an engineering project lol!

To wrap things up the wreath with the die cut sentiment were adhered to the embossed layer, then the rest of the sentiment was stamped and heat embossed with gold embossing power, die cut and added to the card front with thin foam squares.  Lastly, some gold sequins were added to the card.


Thanks so much for visiting, I really appreciate it!  Take care and have a great weekend!

Stef


Stamps:  You Have My Heart (Simon Says Stamp), Bitty Buzzwords (Honeybee Stamps)
Paper:  Neenah Solar White, Pale Papaya (SU), Black (SSS), Tonic Mirror Gold cardstock, Pearlescent Vellum (Lawn Fawn)
Ink:  Gina K Obsidian Amalgam, Versamark
Other:  Big Scripty Hugs (SSS), Blossom Field embossing folder (SSS), You Have My Heart die, Featured Sentiment Die (Altenew), Antique Gold embossing powder (Altenew), Marvy gold gel pen, gold sequins from my stash
Copics:  G29, 28, 09, 03, 21, YG45, YR02, 01, 00

Stargazer Birthday

Hello friends, I hope you're doing well!  Today I'm sharing the card I made for my daughter's birthday, which is today!  Her favorite flower of all is the Stargazer Lily and I was fortunate to find a stamp set with beautiful images of these flowers.  I'm sharing this card with two challenges - Seize the Birthday and The Flower Challenge.


The card I created has a frame around the edge of the front panel.  I added spots with splatter in the background plus the flowers have spots on them as well.


The floral stamp set is a layering stamp set, so I started by using my Misti to create the two lilies and the leaves, then die cut them with the coordinating dies.  I used a few of Altenew's Woodless Watercolor pencils as colored pencils to deepen some of the shadows in the flower centers and on some of the petals.

Next I moved onto the background.  I taped down a piece of watercolor paper, covered it with clear water then added color with a Magenta Karin marker.  I spread it around until I was happy then dried it with my heat tool.  When it was all dry, I splattered it with some of the marker ink as well as some white gouache.  I also added a tiny bit of white gouache splatter to the flowers as well.


The next step was to create the frame.  I used a scallop frame die and cut three frames from white cardstock then layered them together.  The stacked frame was then adhered to the trimmed down watercolor background panel, then added to the Ivory card base.  I arranged the floral images using liquid glue and foam tape, then stamped and hand cut the label sentiment, adding to the front with some then foam squares.  As a final touch a few gems were scattered about.


This is the first of two posts today, so come on back a bit later and check out my card for Festive Friday!

Thanks for taking time to visit, I really appreciate it!  Take care and I hope you have a great weekend!

Stef


Stamps: Build-A-Flower: Stargazer, Label Love (both Altenew)
Paper:  Neenah Solar White, Ivory (Simon Says Stamp), Strathmore Watercolor
Ink:  Versafine Clair Nocturne; Pink Diamond, Pinkalicious, Rubellite, Ruby Red, Autumn Blaze, Firebrick, Firefly, Frayed Leaf, Forest Glades and Evergreen (Altenew)
Other:  Karin Marker, White Gouache, Stitched Rectangle Scallop Edge Frame die (MFT), Wedding Mix gems (Lucy's Cards), Woodless Watercolor pencils (Altenew)

Sunday, July 11, 2021

Tropical Birthday Shaker for Sunday Stamps

Welcome back friends, it's time for a new Sunday Stamps challenge, where we have a fun color combination for you to create with.


I really love the combination of orange, aqua and navy so those are the colors I used for my card, along with a little neutral light brown for the sand. I just could find a way to use the gray in the color board that made sense, and still abides by the challenge rules to use at least 3 of the colors.


I recently bought a stencil with the tropical scene and thought it would work well for combining the orange and aqua.  I used Distress Inks on Bristol paper to get a smooth blend and ink application. I used three shades of orange to get a bit deeper color at the top of the sky.  I masked off a strip to create the "ocean", then flipped it around to mask off the bottom and added some light brown for the "sand", which is easier to see in the next photo.  I used a white gel pen to create the look of waves in the water then set the panel aside to dry. (The white stripes between the ocean and sand are part of the stencil)


Because the stenciled image is round, I thought it would be fun to make this a shaker card.  I cut a panel of navy cardstock to 5"x 7", then die cut a circle in the upper part of the panel.  A piece of acetate was glued onto the back, then I proceeded to add two layers of foam tape around the circle and covering the entire back of the panel.  I trimmed down the stenciled image, piled some sequins on it, then adhered the navy panel over it.  After adding this to a white card base, the sentiment was die cut from orange cardstock and layered on the shadow layer cut from Bristol.  I just felt like something else was needed so a scallop circle was die cut and added as an outside border around the shaker.  A few more sequins and the sentiment were adhered to finish things off.


Thanks so much for visiting, I appreciate it!  Be sure to use the link above to check out the other DT members beautiful cards and hopefully be inspired to play along with us!

Stef


Stamps:  None
Paper:  Soft Navy (Simon Says Stamp), Aqua Sky (Concord & 9th), Pumpkin Pie (SU), Strathmore Bristol
Ink:  Cracklin' Campfire, Ripe Persimmon, Spiced Marmalade, Peacock Feathers, Antique Linen and Tea Dye Distress
Other:  Palm Tree Stencil (Erin Lee Creative), Happy Birthday Brush Script die (Simon Says Stamp), Stitched Scallop Circle (Pinkfresh Studio), Nested Infinity Circle die (Hero Arts), Acetate Sheet (HA), Sakura White Gelly Roll pen, sequins from my stash

Thursday, July 8, 2021

Birthday Stripes

Hello friends and welcome back! The card I'm sharing today is for two challenges - Color Hues and the Paper Players. 


In thinking about my card design, I decided that I would use strips of paper for the stripes for Anne Marie's challenge.


I started by taping a piece of cold press watercolor paper to a board and thoroughly wetting it.  Then I used 4 Karin markers in different shades of blue to get a medium to light blue ombre or color gradient.  When that panel dried, I cut it into strips of varying sizes.  I also cut some red and white cardstock of varying sizes as well.  I love the look of red and light blue, I find it a very pleasing combination.  (ETA:  I didn't realize that Anne Marie had used the same color combo on her DT card until I uploaded my card to the challenge.  I guess great minds think alike lol!)

Next I added an adhesive sheet to a panel of white cardstock, then began randomly layering the strips. When complete, I trimmed off the excess  around all the edges, with the panel ending up at 4" x 5.25" and adhered to the white A2 size card base.


The happy birthday sentiment was die cut three times and layered for dimension, adhered to the vellum circle, then added to the card applying liquid glue only behind the letters.  It was positioned lower on the card because I had the idea that I was going to tie the red die cut balloon to one of the letters with some twine but the card just wasn't big enough for that (bad planning on my part lol!).  So I added the balloon to the card with foam tape, covered it with Glossy Accents and when dry, used silver thread to create a bow.  The final step was to add some silver baubles.


So glad you took time to visit, I appreciate it.  Take care and enjoy the rest of your week!

Stef


Stamps: None
Paper:  Neenah Solar White, Lipstick Red (Simon Says Stamp), Pearlescent Vellum (Lawn Fawn), Arches 140lb Cold Press watercolor 
Ink:  Karin Markers
Other:  Happy Birthday Thinlits die (ret. SU), Bear Ware balloon die (Ellen Hutson), Nested Infinity Circle die (Hero Arts), silver thread, Crystal Collection Night Sky silver baubles (Lucy's Cards)

Sundae Funday for the Tic Tac Toe Challenge

Hello friends and welcome back!  It's time for a new Tic Tac Toe challenge!  This week's board is full of options for summer themed cards.


I was also inspired by this great sketch at Fab Friday but ended up altering it significantly so I'm not joining the challenge with this card, but wanted to give credit to them.  


And finally I'm joining the current Any Occasion challenge at Addicted to Stamps.


For my card I went down the right column of the Tic Tac Toe board - pink, glitter, ice cream.  


I love that image of the cute bunny about ready to take a big scoop out of the sundae!  I colored it with Copic markers and die cut with the matching die.  Next a scallop circle die was cut four times from white, then layered together.  Between layers one and two, a vellum circle was inserted so the bunny could stand out better against the plaid background.


For the base, a piece of plaid paper was die cut then adhered directly to the white base.  The sentiments were stamped on strips of cardstock with brown pigment ink, then clear heat embossed.  The were trimmed down with the sentiments in the center, then layered on the base along with the top layer trimmed out from glitter card stock.  The bunny and sundae image were glued to the circle, then the layer added to the base.  Lastly, I used an aqua shimmer pen to add glitter to the chocolate and a white gel pen to help the sprinkles stand out a bit more.  So fun!


Thanks so much for visiting, I really appreciate it!  Be sure to use the link above to check out the fabulous cards by the other DT members and hopefully be inspired to join us this week!

Stef


Stamps: Sundae Funday and Watch This! (Both Anita Jeram for Colorado Craft Company)
Paper:  Neenah Solar White, Ballet Slipper and Aqua Sky (Concord and 9th), White Glitter (Simon Says Stamp), Sweet Talk 6x8" paper pack (Simple Stories), Vellum
Ink:  Memento Tuxedo Black, Versafine Clair Pinecone
Other:  Clear embossing powder (SSS), Sundae Funday die, Stitched Scallop circle die (Pinkfresh Studio), Nested Infinity Circle die (Hero Arts), Sakura White Gelly Roll pen, Tonic Aqua Shimmer pen
Copics:  W5, 3, 1, R22, 21, 20, T2, E29, 37, 35

Saturday, July 3, 2021

Stay Chill!

Hello friends and welcome back!  I have a fun card to share today that I made for my oldest grandson's upcoming birthday. I'm sharing it at three challenges - Inspired By, Addicted to Stamps and Double D.


My grandson is in his 20's and I think this card is Just.So.Him. 😎


Isn't that gnome fun?  Since my grandson has a brown beard, which has been at varying lengths over time, I think this worked perfectly. And the sentiment too.  I started by coloring the mushroom and gnome, using Copic markers in colors from the Inspired By board (plus he has polka dot shorts lol!). Once complete they were cut out with the matching dies and also die cut the stamped sentiment. 


I wanted to keep the background simple, so I first inked up the sun using a stencil.  Next, I die cut two rows of grass from green cardstock and adhered that at the bottom of the stenciled panel. The mushroom was tucked between the rows of grass and adhered directly to the panel, then the sentiment and gnome were added with foam tape.  The entire panel was popped up on foam tape on the card base, then the final touch was to use a white gel pen to add some reflection to his sunglasses.   


Thanks for taking time to visit, I appreciate it!  I hope your summer is going well so far and for those in the US, have a happy 4th of July!

Stef


Stamps:  Chillin' Gnomes (Simon Says Stamp)
Paper:  Neenah Solar White
Ink: Memento Tuxedo Black, Versafine Clair Nocturne, Citrus Burst, Maple Yellow and Autumn Blaze (Altenew)
Other:  Chillin' Gnomes dies, Featured Sentiment die (Altenew), Sun Stencil (Erin Lee Creative), Slimline Grassy Hills (MFT)
Copics:  BG57, 53, 11, YG23, 01, 00, Y26, 19, 17, 15, 13, YR18, 07, 16, E29, 27, 25, 23, 21, 11, 00, 51, W9