Showing posts with label Gina K. Show all posts

Sunday, October 20, 2024

Peaceful Holiday for The Paper Players

Hello friends!  It's Sunday and time for a new CAS challenge over at The Paper Players where LeAnne is asking us to add a tag.

I am also sharing over at Inkspirational, where the theme is Seasonal.


I love to make cards with tags, so I was excited to see our tag challenge.  I am in desperate need of adding more cards to my holiday card stash, so that is where I went with this challenge.


I started by die cutting the tag then stamping and clear heat embossing the tree trio on the tag.  I created a mask using the circle die that comes with the set to cover the moon while I used inks to create the night sky, then removed the mask and used the moon stamps in light and medium yellow.  I grabbed a scrap of white cardstock, hand cut the top then used the tag die to cut the bottom.  After it was adhered to the tag, I added some Star Dust Stickles to the top of the "snow"

The stag and the sentiment were also stamped and clear heat embossed, then die cut with the matching dies.  A white gel pen was used to create "stars" in the sky then the die cut pieces were added to the tag. I found a leftover bit of white sparkle ribbon and added that to the top of the tag and tied it off with some silver baker's twine.  It was then added to a card base that I found in my stash with the embossed panel already adhered.  The final step was to add some of the Star Dust Stickles to the tree branches.  It sparkles so much IRL!


What are you inspired to create with this challenge?  We'd love to have you join us this week - the challenge remains open until Friday October 25th at 3pm EDT.  In the meantime, be sure to head over to the challenge blog, where my wonderful teammates have some fantastic inspiration to share with you!

Thanks for visiting and take care!

Stef

  • Simon Says Stamp/Gina K Stamptember 2024 Stay Cozy collaboration stamps and dies
  • SSS Snowy Pines embossing folder
  • Ellen Hutson Tag Trio die
  • Altenew Desert Night, Dusk, Lemonade Stand and Honeydew Glow inks
  • Lawn Fawn Silver Baker's Twine
  • Sakura White Gelly Roll pen

Friday, December 1, 2023

Pink Shimmering Season for Color Hues

Hello friends!  I'm back with a card for the final challenge of 2023 at Color Hues.  The lovely Nancy has chosen a gorgeous non-traditional color combination sure to work for any of your last-minute holiday cards!

For my card I used the beautiful Gina K/Simon Says Stamp Stamptember 2023 stamp set Shimmering Seasons.


I started by silver heat embossing all the images on a panel of pink cardstock, then used a darker pink ink to blend around the edges.  I really fussed and debated about the sentiment.  I had one idea in mind, but it didn't look right and then I realized some the of embossing didn't come out well. Rather than toss the panel, I came up with a new plan.


I opted to use a large sentiment die cut from matte silver cardstock but the background was too busy without something behind it plus I wanted to hide the areas where the embossing didn't take properly.  A band of vellum took care of that and was the perfect home for that beautiful sentiment and I really like how the card turned out.  I hope to create some other cards using this stamp set before I'm done making Christmas cards, the images are so pretty.


What are you inspired to create with these colors?  Please take a moment to check out the cards by my wonderfully talented teammates and hopefully you'll be inspired to join us!  The challenge will last all month, so you have plenty of time to play along.  The challenge will close at 9 am EST Thursday December 28th.

I wish you all the best during the holidays!  I'll have a new post on the 4th, so I hope you'll swing by and take a look.

Take care!

Stef


Stamps:  Gina K/SSS Stampember 2023 Shimmering Season
Paper:  Neenah Solar White, Concord & 9th Carnation, Lawn Fawn Pearlescent Vellum, SSS Matte Silver
Ink:  Versamark, C&9 Sweet Pea
Dies:  Poppy Stamps Poe Script Merry Christmas
Other: SSS Fine Detail Silver embossing powder

Sunday, August 6, 2023

Ocean Silhouettes for Sunday Stamps

Hello, friends!  We have a new challenge for you over at Sunday Stamps and this time we bring you a colorful palette to spark your creativity!


I'm also joining the current challenge at Simon Says Stamp Wednesday Challenge where the theme is Summer.  

After thinking a bit about the colors, I felt they would work well for a tropical sky just after sunset, using the turquoise, yellow, orange and a little bit of purple. So here's what I came up with.


I started with an A2 sized panel of Ranger Distress Heavystock, which is wonderful for ink blending, and masked off where I wanted the horizon line to start and inked up the sky.  I began with a light yellow ink and went from up about 2/3rds of the way, then came down with the orange, and blending back and forth so I had a thin line of light yellow up to the dark orange.  I then blended some purple into the very top of the orange to add a bit more depth to the color.  Next, I reversed the masking and used a beautiful turquoise color for the ocean.


The panel was then place in my Misti and I used black pigment ink to stamp the lovely scene and sentiment with Gina K's Ocean Silhouettes stamp set.  When the ink dried, I used a white gel pen to create some waves in the water, minimally trimmed down the panel, then adhered directly to a black card base.  Ta da!  All done!  I love this silhouette stamp set - I used it for a couple other cards that I hope to share in the future.


I hope this has given you a bit of inspiration and for even more, please head over to the blog where my talented teammates have a bevy of beautiful creations to share with you!

Take care.

Stef


Stamps:  Gina K Ocean Silhouettes
Paper:  Hero Arts Pitch Black, Distress Heavystock
Ink:  Simon Says Stamp Surf and Orchid, Altenew Lemon Ice, Citrus Burst and Mandarin, Versafine Clair Nocturne
Other:  Sakura Gelly Roll White Gel pen

Sunday, July 2, 2023

Beautiful Friend

Hi there, I hope your weekend is going well and hopefully you have an extended one due to Independence Day holiday on Tuesday.  I'm here to share a quick post with a card I created for the current challenge at Color Throwdown.


These colors just made me swoon and fortunately I had time this week to put something together before the end of the challenge lol!


I started by using the Altenew Charming Foliage dies to create the flowers and leaves, mostly from Concord & 9th cardstock (listed below).  Putting the layering dies together was pretty easy, using the packaging as a guide.  Then the beautiful new frame from Gina K's Master Layouts 12 was die cut twice from white cardstock and adhered together.

The background was ink blended on Bristol paper with three purples and set aside to dry.  The sentiment was heat embossed on pearlescent vellum then die cut with the stitched circle die, also from the Gina K die set.  That was added to the purple panel along with the frame, then the flowers were arranged and adhered.  All in all, a pretty easy card to make once all the components were assembled.  And I think those die cut flowers are sooo pretty on that lovely frame.  :-)

And one more photo...


Thanks for stopping by, I appreciate it!  Have a great week and take care.

Stef


Stamps:  Simon Says Stamp Beautiful Friend
Paper:  Neenah Solar White, Koh-I-Noor Bristol, Lawn Fawn Pearlescent Vellum; Concord & 9th Sprout, Parsley, Ballet Slipper, Carnation, Sweet Pea and Dragon Fruit; SSS Green Apple
Ink:  Versamark, SSS Lilac, Orchid and Amethyst
Dies:  Altenew Charming Foilage, Gina K Designs Master Layouts 12

Sunday, April 16, 2023

Smile for Color Hues

Hello and welcome!  It's time for a new challenge at Color Hues and this beautiful combo of purple and green is brought to us by the amazing Cindy.  Perfect for spring flowers!  We're also fortunate to have Amanda Mertz as our fabulous guest designer for this challenge.  


I'm also joining the current challenge at Addicted to CAS, where the theme this time is Garden.


I chose to color some pretty violets to use with these colors.


The Gina K Blue Violets are just so pretty and delicate, I really love this stamp.  I chose an orientation in the lower left corner so I could stamp the stems off the bottom of the panel.  I colored them with alcohol markers (listed below), then trimmed down the panel with a Hero Arts Rounded Rectangle die.


Next I used gold paint from the Altenew Metallic Watercolor paints to color the flower centers then added just a light bit of splatter.  The Altenew Vertical Greetings die set had fortuitously just landed in my mailbox, so I die cut one of the sentiments from SSS Matte Gold along with two additional layers of white, adhered them together then onto a white shadow die.  I wrapped some gold twine around the panel to anchor the sentiment, popped it up with thin foam squares then used more foam to add the panel to the card base.  


Now it's your turn!  But first, stop by the challenge blog to be see the amazing cards by the other DT members, they are fabulous!  I hope to see your card in the gallery - you have until 4/28 at 9:00 am to play along.

Take care!

Stef


Copics:  G28, 09, 02; Sketchmarker Brush Pros:  V60, 61, 62, 54

Monday, April 18, 2022

Butterfly Birthday for the SCS Color Challenge

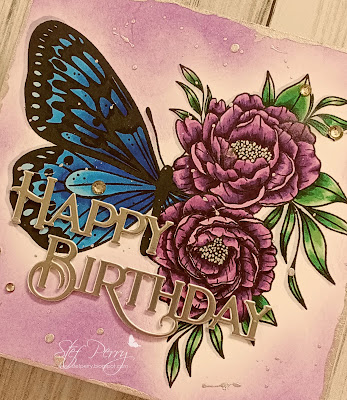
Hello and welcome!  I'm in my third week of guesting with the fabulous Color Challenge team at Splitcoaststampers!  This week, my dear former teamie Karen has chosen some vibrant colors for us to play with - Gorgeous Grape, Pacific Point and Pear Pizzazz.  I was a bit thrown by Pacific Point at first, but figured out a way to use it that I really love, and I hope you do too!

I'm also joining the current challenge at Festive Friday.  I used blue, rhinestones and die cuts from the Inspo List.


Because the image I stamped and colored was so large, and I didn't want to trim it down, the card ended up being five inches square.


Such an amazing stamp and the challenge colors worked beautifully with it.  It was colored with Copic markers, then I inked blended around it with a vibrant Distress Oxide ink called Villainous Poison, which as you can imagine was released last fall just in time for Halloween.  I tried to color the stamen gray but it was too blah, so I used my silver gel pen instead.  And that led me to use more silver for the sentiment die cuts and some metallic ink as well.


After the ink blending was complete, I used a metallic paint/ink around the edges of the colored panel, then decided to add some splatter.  I had a couple of large "bloops" that I had to try to clean up and eventually covered up one with the strategic placement of a crystal gem.  After the paint dried, the panel was adhered to the white card base, then the sentiment (which was die cut and layered 3 times) was added along with the gems.  


I'm so glad you took time to stop by!  I've added a link above to the Splitcoaststamper's front page from which you can access the Color Challenge to check out all the great inspiration and play along this week.

Take care!

Stef


Stamps:  Spread Your Wings (Gina K Designs)
Paper:  Neenah Solar White, Matte Silver (Simon Says Stamp)
Ink:  Memento Tuxedo Black, Villainous Poison Distress Oxide
Other:  Happy Birthday Poe Script dies (Poppystamps), Silver Mica Ink (Kuretake), Silver Gel Pen (Altenew), Crystal Collection-Night Sky (Lucy's Cards)
Copics:  V09, 17, 15, 12, G29, 21, 40, YG45, B28, 26, 24, 21, C2

Thursday, March 31, 2022

Happy Flowers for the Tic Tac Toe Challenge

Hello and welcome!  It's time for a new Tic Tac Toe Challenge and this week Claire created this fun board for us to play with.


I'm also joining the current Make Your Mark Challenge at Addicted to Stamps and More and the Anything Goes challenge at Simon Says Stamp Wednesday Challenge.


I had a hard time deciding but ultimately chose to use the right-hand column - flowers, coloring, green.


I saw this beautiful floral stamp set at Gina K and it was definitely a must have!  I colored it with Copic markers, then die cut it with the matching die.  It took a full afternoon to complete, but what a labor of love!  I also had some fun with the colors, deciding to use both a green and blue-green for the foliage.


I wanted to keep the background very simple, die cutting a cover die from white cardstock then adhering it directly to the white card base.  The flower image was added at an angle using foam tape - it is a really big image!  The sentiment was stamped then die cut with the matching die, then adhered directly to the flower except for the word "well", where I used a bit of foam tape to have it level with the flower.  I waffled about adding any embellishments but finally decided to add a few gold sequins.


Thanks for taking time to drop by, I appreciate it!  Be sure to use the link above to see all the wonderful cards by the other DT members and hopefully join us this week!

Take care!

Stef


Stamps:  Happy Flowers (Gina K), Just a Note Floral (sentiment/Pinkfresh Studio)
Paper:  Neenah Solar White,
Ink:  Memento Tuxedo Black, Versafine Clair Nocturne
Other:  Happy Flowers and Just a Note Floral dies, String Panel Cover die (Altenew), Antique Gold Sequins (Altenew)
Copics:  RV69,66, 55, 52, BG09, 15, 11, YG45, G21, 40, YR23, Y15, 11

Tuesday, March 15, 2022

Bold Bouquet for The Flower Challenge Reminder

Hello and welcome! It's mid-month, which means it's time for our reminder post at The Flower Challenge! This month we are using scraps (paper scraps, unused bits for other projects, you get the picture) and you have until the 25th to upload your card.  I sure hope you'll join us!


For my first DT card here, I added a metallic die cut sentiment and a die cut slimline panel that had been unused from prior projects.  For my card today, I pulled out an alcohol ink background that I'd created some months ago and never used, and stenciled a large floral image on it using embossing paste.  I saw Mindy Eggen do this same technique with the same stencil here on You Tube and thought it would work beautifully for this challenge.  The sentiment was also a leftover that I found tucked in with the die set.


The alcohol ink panel was created using Ranger Amethyst, Tranquil Pearl and Silver Mixative.  The large flower at the bottom unfortunately covers up most of the Tranquil Pearl but you can see it bit of it midway up the right side.  I used a new-to-me embossing paste and it had a rather thick, gooey consistency but since my other embossing paste had dried up, I forged ahead. It didn't come out absolutely perfect but then using embossing paste rarely does (at least for me lol!). After the stenciling was done, the panel was set aside to dry. 


I decided to mat the image on silver so a panel of Matte Silver cardstock was die cut with one of the Mix and Match Frame dies.  When the stenciled panel was dry I trimmed it down but felt like it needed another layer between it and the silver.  So I used nested rectangle dies to cut it down along with a slightly larger panel of black glossy cardstock.  All three layers were adhered directly to the white card base, then the sentiment was added using foam tape, and that finished things off!


Thanks for so much for visiting!  Be sure to use the link above to enjoy all the gorgeous creations by the other DT members and hopefully join us by the 25th of the month!

Take care!

Stef


Stamps:  None
Paper:  Neenah Solar White, Simon Says Stamp Matte Silver and Glossy Black cardstock, Ranger Heavyweight Yupo, Black
Ink:  None
Other:  Ranger Alcohol Inks - Amethyst, Tranquil Pearl and Silver Mixative, Pastillage Texture Paste, Altenew Mix and Match Frames dies, Gina K Bold Bouquet Stencil, Altenew Essential Sentiment Strips die, Hero Arts Nested Infinity Rectangle dies

Sunday, February 20, 2022

Birthday Silhouettes for Sunday Stamps

Hello and welcome!  It's time for a new challenge at Sunday Stamps and this time we have a beautiful color combination for you to play with!


I'm also joining the current challenge at Addicted to Stamps, where the theme is Birthdays.


I just love those yummy browns and blues together, I hope you do too!   All you need to do is use at least three colors for the challenge.  I ended up using four - dark blue, light blue, white and dark brown.


I started by blending two shades of blue ink on a panel of Koh-I-Noor bristol, which is a whiter white than Strathmore Bristol, although with this card it ended up not mattering because I covered the entire panel with ink.  I let the panel dry overnight, then worked on the remainder of the card.


I decided to use a few of the beautiful silhouette images from Gina K's Friendly Silhouettes.  I used my Misti so I could stamp the images off the bottom and side edges of the panel, using a dark brown pigment ink for really good coverage.  When that dried the panel was trimmed down and adhered to a white card base.  The sentiment was stamped in the same brown on white and die cut with the matching die.  I used the die to cut two more layers, adhered them together and added to the card front.  Lastly, I fished out those beautiful pearls from a sequin shaker mix and adhered them around the sentiment. Very simple design that could be easily replicated with any silhouette stamps.


So glad you dropped by - now use the link above and check out the beautiful cards by the other DT members, and hopefully be inspired to join us!

Take care!

Stef


Stamps:  Friendly Silhouettes (Gina K), XL Birthday Greetings (Simon Says Stamp)
Paper:  Neenah Solar White, Koh-I-Noor Bristol
Ink:  Ocean Waves and Galactic Stream (Altenew), Versafine Clair Pinecone
Other:  XL Birthday Greetings die, Arctic Aquamarine Sequin Shaker Mix (Little Things from Lucy's Cards)

Sunday, March 7, 2021

Beautiful Wings for Sunday Stamps

Hello friends, and welcome back!  It's time for a new challenge at Sunday Stamps where Heidi has given us two fun sketch options.


For my card, I decided to use the one on the left.


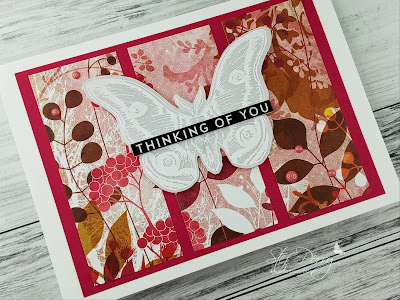
This was such a simple card to pull together once I made a decision about what papers to use LOL!  I decided to use a sheet from one of my old Basic Grey paper pads (the date on the front of the pad is 2009!!)  I love the colors and thought the botanical background would be perfect for the heat embossed moth.


I started by heat embossing in white on pearlescent vellum that fabulously detailed large moth, then it was die cut with a coordinating die.  I also die cut a second moth from vellum to layer underneath.  To put the card together, I started with a 5 x 7" white card base, directly adhered a panel of Rose Red, then added the three strips of patterned paper.  The moth was added with discretely hidden small pieces of foam tape.  The sentiment was adhered to the top of 3 layers of white card strips, then added to the moth.  A few enamel dots were scattered about to finish things off.


Thanks so much for visiting, I really appreciate it!  Be sure to use the link above to check out the challenge and all the beautiful cards by the other DT members.  I hope you'll be inspired to join us for this great challenge!

Take care, stay safe and healthy, and enjoy the coming week!

Stef


Stamps:  Beautiful Wings (Gina K)
Paper:  Neenah Solar White, Rose Red (ret. SU), Pearlescent Vellum (Lawn Fawn), Indian Summer paper pad (BG), Thinking of You Sentiment Strips (SSS), 
Ink:  Versamark
Other:  Fine Detail White embossing powder (SSS), Botanical Enamel Dots (Waffle Flower), Beautiful Wings Coordinating dies

Thursday, February 18, 2021

Beautiful Wings

Hi there, friends!  I hope you're doing well!  Today I'm sharing a card made for two challenges - a color challenge from the lovely Jaydee at The Paper Players and a great sketch challenge at Fab Friday. 


I decided to go with pink, black and silver, and loosely based the card design on the sketch, but adding an offset layer of silver foil.


I started by using a rose stencil on a piece of white heavyweight cardstock, using the new Kitsch Flamingo Distress Oxide ink for the roses, then adding a soft layer of Spun Sugar DOX over the entire panel, almost giving it a look of vellum in the photos.  Both this panel and the silver foil one were cut with a deckled rectangle die then added to the black card base.


Next, the large dragonfly and the sentiment were heat embossed on black cardstock, then die cut.  A strip of silver was adhered directly to the stenciled panel, then the sentiment and the dragonfly both adhered with foam tape.  The last step was to add a few silver and crystal baubles for a bit of sparkle.


Thanks for visiting, I always appreciate it so much!  Take care and have a great weekend!

Stef


Stamps:  Beautiful Wings (Gina K)
Paper:  Black, Silver Foil, White Heavystock (Tim Holtz)
Ink:  Kitsch Pink and Spun Sugar Distress Oxide, Versamark
Other:  Beautiful Wings coordinating die, Bed of Roses stencil (Trinity Stamps), Deckled Frames rectangle and A7 Labels small rectangle dies (Waffle Flower), Crystal Collection Night Sky (Little Things by Lucy's Cards)