Showing posts with label Masculine. Show all posts

Wednesday, July 1, 2026

You Rock! for Color Hues

Hello, my friends!  Can you believe half the year is gone by already? I can almost hear the wind whistling in my ears as the year seems to be flying by lol!

Anyway, let's get down to business.  It's time for a new challenge at Color Hues and the amazing Julie is hosting.  She's chosen a lovely color combination.

These colors would work beautifully for a wedding or anniversary card, but I decided to go a different direction.  Take a look!


Once again, I am filling the need of masculine birthday cards.  This one, with the Retro Radio from Concord & 9th went to my nephew Ron a while back. When he was young, he and my sister lived with my parents and me for a time.  My mom had an old cream-colored radio she always listened to during the day, which inspired this card.  He and I both had a good time reminiscing about that memory on his birthday.

The radio components were die cut from glossy black, matte gold and off-white cardstock.  The music notes are also part of the die set.  The You Rock sentiment, heat embossed in gold and off-set layered on black, is from the coordinating stamp set.  

All the components were super easy to put together but I felt like the card needed a little something more. I die cut a frame from both gold and black, and, as you can see the black won out. It seemed to bring it all together better. I know I'll be making at least two more cards with this die set for each of my BILs, so it may make an appearance in a future post.


Thanks for taking time to visit!  I encourage you to visit the challenge blog, where my talent teammates have some beautiful inspiration for you.  The challenge will remain open until Tuesday, July 14th at 9am EDT.  I hope you'll join us!

Stef

  • Concord & 9th Retro Radio Stamps and Dies
  • Simon Says Stamp A2 Nesting Frames die
  • SSS Glossy Black and Matte Gold cardstock
  • Neenah Natural White cardstock

Sunday, June 7, 2026

Pool Room Birthday Card for PP789

Hello friends!  It's time for our first challenge of the month of June over at the Paper Players and it's a theme challenge.  I'm hosting this week, asking everyone to create masculine cards.  It's a great time of year, especially with Father's Day a week away. Or, in my case, I have 2 grandsons, 2 nephews, 2 brothers-in-law and my husband celebrating birthdays this summer!


For this week's card, I created a slimline style with a scene.  


The die set is a Lovely Layers set from Honey Bee Stamps called Man Cave.  It rang a bell for me because my husband and I have a pool table and I thought the entire die set was so cleverly designed.  


All the components were die cut from colored cardstock with the exception of the glasses of beer and the pool balls. The beer glasses were cut twice from vellum and then, to make two beers facing one another, I simply flipped one over and adhered the yellow cardstock piece to the back of each glass for the look of beer.  The pool balls were cut from white cardstock then colored with Copic markers.  Glossy accents was then added to the beer foam, the light fixtures and the pool balls.

The blue wall was ink blended then I used an old rag to create some texture by dabbing it in the ink then randomly dabbing onto the panel.  I created the wood floor using a plank die, doing partial die cutting on one end then flipping it around so that I could make it 8 1/2" long. I added the sentiment to the TV screen along with some holographic stars for the finishing touch.


Thanks for visiting and I encourage you to head over to the challenge blog to see all the fabulous masculine cards from the rest of the team.  The challenge will remain open until Friday June 12th at 3pm EDT.  I hope you'll come join us this week!

Stef

  • Honey Bee Stamps Lovely Layers: Man Cave
  • Simon Says Stamp Wood Plank Die
  • Spellbinders Just Add Cake Sentiment Stamp and Die
  • Trinity Stamps Oh My Stars embellishments

Friday, May 1, 2026

Cheers to You for Color Hues

Hello friends!  We have a new challenge for you over at Color Hues and this time I am hosting!  I've chosen one of my favorite color combinations for the challenge.

As a reminder, you may use any hue of the two challenge colors, so lighter, darker, whatever tone, as long as it's a yellow and a blue.  Neutrals are also welcome (black, white, gray, ivory, brown, kraft and metallics).  So sorry, but green is not a neutral lol!

I'm also sharing over at Seize the Birthday for their Anything Goes portion of the challenge.


Okay, let's get to my card! 

For a long time I knew precisely what I was going to create for this challenge, but then...Spellbinders released their Just A Cake Birthday Card Kit and I went in a completely different direction.  Take a look!


As I am always in need of masculine birthday cards, I chose to use the Birthday Brew die set from the kit, Confetti Drop embossing folder and the Just Add Cake stamps and dies.  In addition, I used the Essential Arches and the Color Block Accent Arches, which are not part of the kit.

I love that color block look in yellow and blue!  For the beer mug itself, it was die cut from both light blue and vellum.  Between those two layers a piece of acetate was added to give the look of glass with the beer behind it.  

The watch was easy to put together, once I decided on the colors of metallics to be used.  Sandwiched between the face and band of the watch is a die cut circle of gray to make the watch hands visible.  

The background arch was cut from white, embossed with the Confetti Drop folder, then a yellow ink pad was swiped across the raised elements so they would be more visible, plus give more contrast between it and the beer "foam". I used partial die cutting to create a top-folding arched shaped card base.  The final step, after everything was assembled, was to add a few small clear dew drops for an effervescent look.  


Thanks for stopping by!  Please take a moment to visit the challenge blog for more inspiration by my incredibly talented teammates and guest designer Greta.  The challenge will remain open until Thursday, May 14th at 9:00 am EDT.  I hope you'll join us, I'd love to see your card in the gallery!

Stef


Sunday, August 24, 2025

Big B-Day Vibes for the Paper Players

Hello friends!  It's time for a new challenge at the Paper Players and this week the fabulous Jaydee is hosting our monthly sketch challenge and she's created great one with lots of options.


I decided to work on adding to my pile of masculine birthday cards, of which I never seem to have enough.


This card, which is a gatefold shape, was super-duper simple to create, as you can see.  In hindsight, the only thing I wish I would have added was some twine around the middle piece before adding to the card.  Maybe next time, if I make more.

I started with the patterned paper, which is from an 2008 paper pad by  Basic Grey.  It's been a great source for masculine/boy paper designs and I still have a few pieces I'm hoarding holding onto.  I trimmed it down to A2 size then cut it in the middle to fit each side of my gatefold. After ink blending brown all around the outside edges, I die cut two decorative strips from a grungy orange panel from the same paper pad and added them to each side of the card front.

The middle piece was created with a wood plank die.  I made two, cut them in half, then used 3 of the 4 pieces.  I arranged them onto a small square, which was then added to the left side of the gatefold.  The sentiment was added with a bit of thin foam tape and that finished things off.  A bit plain but I hope the gate fold and the paper add enough interest for the recipient.


Thanks for stopping by and I encourage you to visit the challenge blog, where my talented teammates have some fabulous and varied takes on this sketch for your inspiration!  The challenge remains open until Friday, August 29th at 3pm EDT.  Hope to see your card in the gallery!

Stef

  • Simon Says Stamp Big Old Birthday stamp and die
  • SSS Wood Plank die
  • Basic Grey Archaic paper pad
  • MFT Fine Finish Edge die

Sunday, February 16, 2025

Geo Happy Birthday for the Paper Players

Hello friends!  It's Sunday and you know what that means - a new challenge at the Paper Players.  This week Jan is hosting our CAS challenge with a theme of masculine cards.

Like many, I struggle with creating masculine cards.  But one of my fall backs is to use geometrics.  For todays card, I used a geometric foil plate and matching stencils that has been retired, but there are many stencils and stamps available for creating something similar.


The geometric pattern was created with silver foil on a Spellbinders Glimmer machine, as was the sentiment.  I then used the matching stencils to create the colored pattern.  There are three stencils but I only used two because I liked leaving part of the pattern white.  I actually made creating four cards in one day using this and another geometric foil plate/stencil set and different colors.

After the stenciling was complete I used a rectangle die to trim down the panel and adhered it to a white card base.  The sentiment was layered on two additional die cuts then added to the card.  This is a ridiculously simple design, but I like the clean and crisp look to it.


So glad you came by and I encourage you to visit the challenge blog because my talented teammates have loads for masculine card inspiration for you.  The challenge ends on Friday, Feb 21st at 3pm EST. I hope you'll join us!

Stef

  • Pinkfresh Studio Geo Tiles hot foil plate and stencils
  • PS Fancy Script Words hot foil plate and die
  • Altenew Water Dyacinth and Alpine Aster Fresh Dye inks
  • Spellbinders Glimmer hot foil in silver

Sunday, June 23, 2024

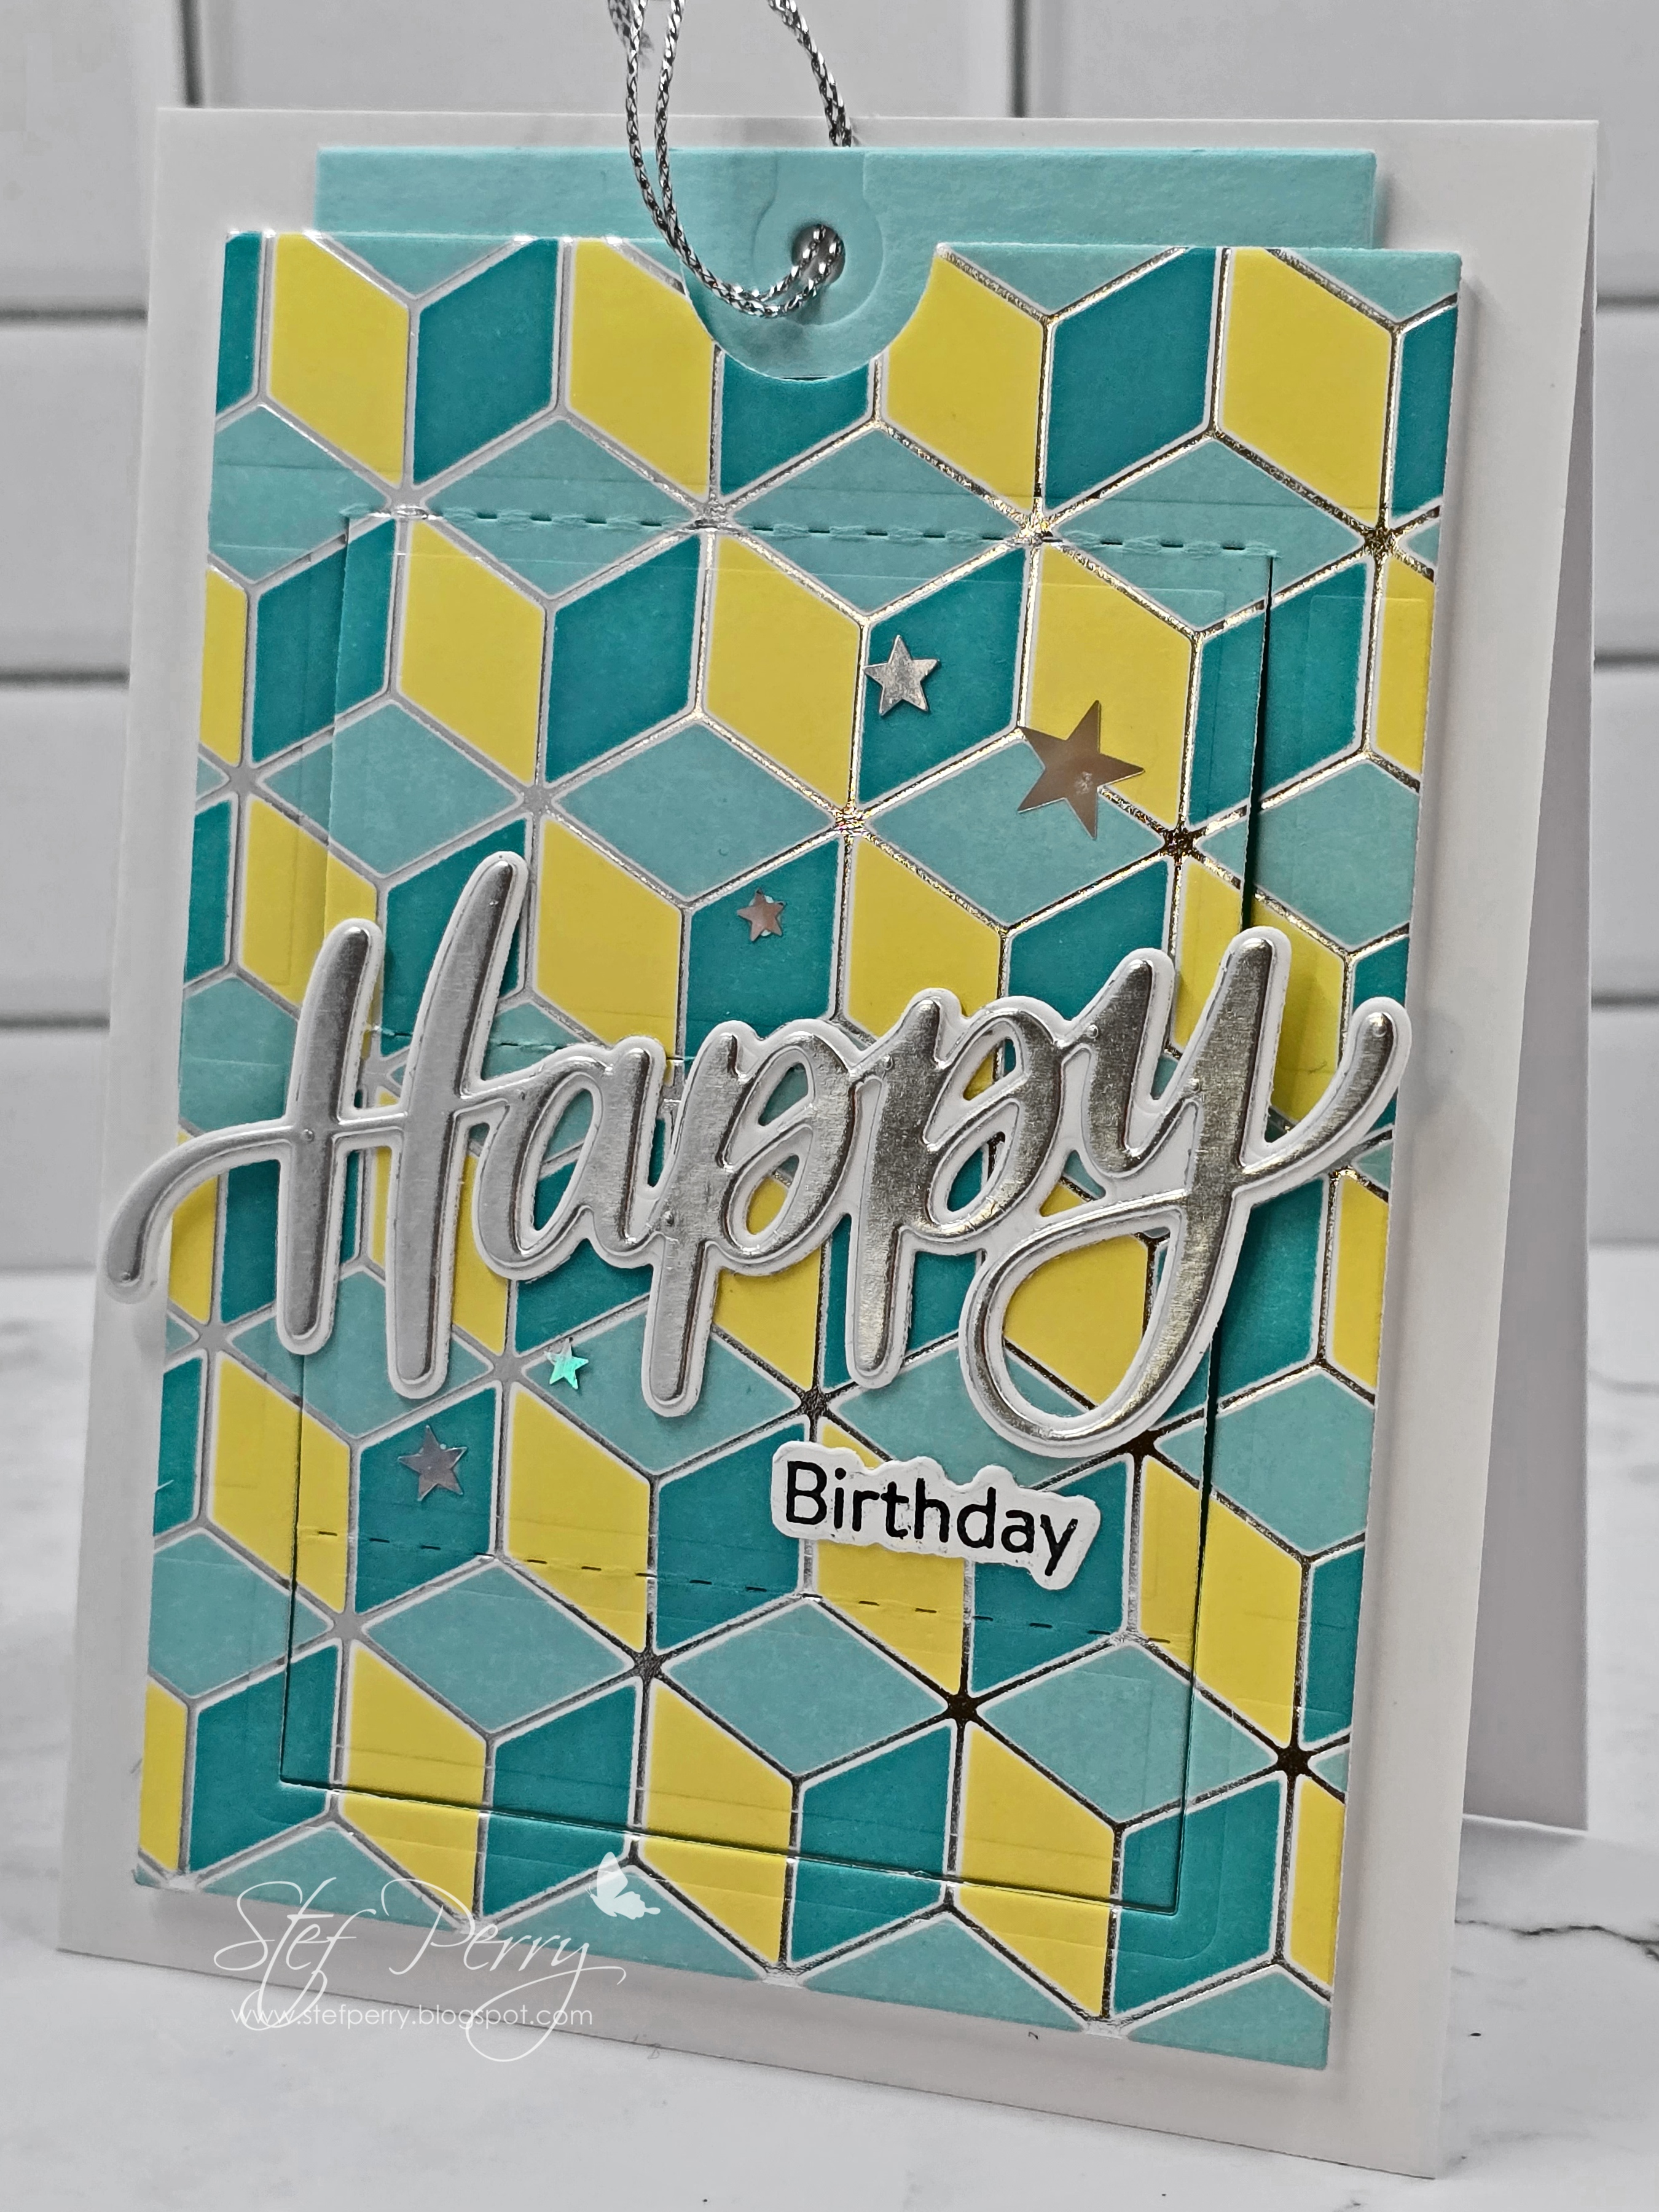
Slider Birthday Card

Hello friends, I have a fun card to share with you that I made for my grandson.  I rarely make interactive cards but I saw the die used on a Jennifer McGuire video (link to her blog post with the video here) and thought that even I could figure out how to use it lol!

I'm sharing this over at Inkspirational, where they have a fabulous mood board and I was inspired by some of the colors.

I was planning on using various foiled geometric panels that I've had in my stash for a long time for a number of upcoming masculine birthdays (doesn't have to be just for men, but it works well for those dudes that wouldn't appreciate florals lol!).  This one in particular makes these cool 3D blocks, so I used the matching stencil with Distress Oxide inks to create a panel.


The stenciled panel was die cut with the interactive feature die (Pinkfresh Studio A2 Slider die), then the tag that goes underneath was die cut from a piece of aqua paper that matched the ink colors well.  You'll see in photos below that the front of the interactive part has scoring, so the panel will open using the tag to reveal a message.

The panel was popped up on a white card base using foam tape, then the tag slipped in and adhered to the bottom of the interactive feature.  I pulled the tag up then used glue dots to add the gift card, and it slid up and down smoothly.  The pictures below will show it better than I can explain it.  Pinkfresh also has a how-to video on their product page. 


The word happy was cut from matte silver cardstock, layered on the white shadow die, then adhered to the pop-up panel that also reveals the interior sentiment.  Sooo clever!  The last thing was to add some holographic stars for some added shine. 

It was a fun card to make and I know my grandson will appreciate it.


Thanks for visiting and have a good week!

Take care!

Stef

  • Pinkfresh Studio Geo Blocks Hot Foil Plate and Stencils
  • PS A2 Slider Card dies
  • SSS Big Happy die
  • Honey Bee Stamps Birthday Wishes Stamp and die
  • Peacock Feathers, Salvaged Patin and Squeezed Lemonade Distress Oxide inks
  • Silver Metallic Thread

Sunday, June 11, 2023

Fisherman for Sunday Stamps

Hello and welcome!  It's time for a new challenge at Sunday Stamps and this time we have some muted colors that I found to work well for my husband's birthday card.  I used red, gray and steel blue.


I'm also playing along with Seize the Birthday's Anything Goes Challenge.


My husband is a fly fisherman and I have found when crafting companies create stamp sets with fishing images, they are mostly for bait fishing.  So I was pleased when I found this stamp from Whimsy Stamps.


I started by stamping the image on white cardstock, then ink blended Simon Says Stamp Morning ink in the background for the sky.  I used Copic markers to color the water, his waders, jeans, vest, shirt and hat and was going to call it good but the background looked to vacant.  I used very light gray copic markers to faintly draw in the trees on the other side of the water.  I am not much of a sketch artist but these are easy trees - draw a line for the trunk and add random squiggly lines for the limbs and it gives the impression of tall fir trees without having to get too detailed.


The main panel was die cut with a deckled rectangle and added with foam tape to a gray panel that was die cut with a larger deckled rectangle, then embossed with a retired Stampin' Up embossing folder.  The sentiment was stamped and die cut with an extra layer to give it a bit of dimension. The final step was to add the fishing line coming off the end of his rod; the stamp didn't have that so I just drew one with a ruler and a black Copic Fineliner pen.


Be sure to pop over to the challenge blog to check out the wonderful cards by the other DT members and hopefully be inspired to join us!

Take care!

Stef


Stamps:  Whimsy Stamps Fisherman, Honey Bee Stamps Pickup Lines
Paper:  Neenah Solar White, Simon Says Stamp Slate
Ink:  Memento Tuxedo Black, Altenew Obsidian, SSS Morning
Dies:  Pickup Lines coordinating sentiment die, Altenew Mix and Match Frames, Waffle Flower Deckled Frames
Embossing folder:  ret. SU Bark
Copics:  E35, 34, 30, 21, 11, 00, 000, T0, 2, C6, 4, 2, B99, 97, 93, 91, R59, 39, 37

Thursday, June 8, 2023

The Joy is in the Journey

Hello friends!  Today I'm sharing a birthday card that I made for my nephew and am playing along with Ann's challenge to create a masculine card at The Paper Players.


The Paper Players always has great challenges, I have found myself not having time (making time?) to play along, so this week I made sure to do so.


I used Altenew's Spectacular Adventures stamp and die set.  I think the idea of the reflection in glasses is so clever and there are three different scenes to choose from - obviously I chose the mountain scene.  The glasses were stamped in black, then I used Gina K's Warm Glow Amalgam ink to stamp the scene.  It's a light ink to use for that "no-line" stamping look.  Copic markers were used to color the scene, then the piece was die cut.


I used one of my favorite plaid prints from the retired Stampin' Up Plaid Tidings DSP - I hoard this paper pack lol!  The panel was trimmed down and layered on a white card base.  The sentiments were stamped on a white strip, layered on a slightly larger one of Garden Green cardstock, the adhered to the card.  Lastly the glasses were added with foam tape for a bit of dimension.


Thanks for talking time to stop by.  I hope you're having a great week!

Take care!

Stef


Stamps:  Altenew Spectacular Adventures, PTI Stylish Sentiments: Birthday
Paper:  Neenah Solar White, Garden Green, Plaid Tidings dsp
Ink:  Memento Tuxedo Black, Versafine Clair Nocturne, Gina K Warm Glow Amalgam
Die:  Spectacular Adventures
Copics:  G46, 43, W1, 0, BG000, 0000

Sunday, September 11, 2022

Celebrate You!

Hello friends! Today I'm joining two special challenges, both celebrating the 2nd birthday of the Color Hues Challenge.  The endlessly talented Nancy Leppek started this challenge two years ago and it has become a smashing success!  The Color Hues' sister challenge, Seize the Birthday, is celebrating along with them.  I'm getting in at nearly the tail of the challenges; it seems the last week has been chockablock full of other things to do besides playing in my craft room.  However, I finally carved out some time in order to join the celebration!


These colors seemed to be perfect for a masculine birthday card, but in the end I think this card would work for anyone.


First step was to use the Interlocking Circle stencils to create the background.  I used a mixed media paper for ease of laying down color and inked up the 4 layering stencils.  Once the ink was dry, I centered a rectangle die on the piece and die cut it.  


Next the sentiment was stamped and cut out with the matching die, along with two additional layers that were added for some dimension. The vellum circle was die cut with double sided adhesive on the back and added to the stenciled panel.  I used thin foam tape to adhere the panel to the white card base, then glued the sentiment on the vellum circle. The final step was to add holographic stars to all the green squares and around the sentiment, which made it so much more festive!  


Thanks for taking time to stop by, I appreciate it.  Have a great week and take care!

Stef


Stamps:  XL Birthday Greetings (Simon Says Stamp)
Paper:  Neenah Solar White, Vicki Boutin Mixed Media, Lawn Fawn Pearlescent Vellum
Ink:  Lime, Tanzanite (both Altenew)
Other:  XL Birthday Greetings die, Interlocking Circles Stencil (SSS), Oh My Stars Confetti Mix (Trinity Stamps), Hero Arts Nested Infinity Rectangle and Circle dies

Wednesday, June 22, 2022

Hole In One Kind of Day

Hello and welcome!  I'm back with another post today, this time for the great color challenge over at Just Us Girls, where Elizabeth chose red, blue, yellow and a color of your choice, which for me was green.  That combo worked perfectly for two BIL birthday cards I needed. 


My BILs and my husband are lifelong golfing buddies, so I always try to grab stamp sets with those types of images, because they seem to be so rare.  Gina K Designs just came out with a fun set and I used one of the stamps for these cards.


I started by stamping and coloring the 18th tee image.  The "grass" was a bit tricky because I wanted to give it some dimension but since greens (the putting area for those of you non-golfers) are so closely mowed that there can't be long grass blades, I resorted to making dots and squiggles with 3 consecutively darker colors over the lightest color, then blending it all with the 2nd lightest color.  While not perfect, my husband gave them a thumbs up, so I figured it looked satisfactory lol!


The sentiments were stamped with black pigment ink, then the Happy Birthday portion cut out with a label die and I ended up fussy cutting around the sub sentiment.  I settled on a mini-slimline design and used a die set to cut out the white and red layers, ink blending a bit of bright yellow on the white before adhering everything with thin foam squares.  I couldn't decide whether to use navy or the bright blue for the base so I made one of each.  Super simple but I think the guys will like their cards, because, you know, golf... ;-)


Thanks for visiting, I appreciate it!  I hope the rest of your week ahead is nothing but fabulous!  

If you're interested you can check out my prior post here.

Take care!

Stef


Stamps:  Hole in One (Gina K)
Paper:  Neenah Solar White, Real Red and Pacific Point (SU), Soft Navy (SSS)
Ink:  Memento Tuxedo Black, Versafine Clair Nocturne, Squeezed Lemonade Distress
Other:  Hole in One dies, Mini Slimline Essentials dies (Pinkfresh Studio), Featured Sentiment die (Altenew)
Copics:  R59, 46, 17, T8, 6, 4, 2, 0, YG67, 17, 03, 01

Wednesday, August 18, 2021

Bear Birthday

Hello and welcome!  I'm sharing a card that I made for the challenges at The Paper Players and As You See It.


Quite honestly I have many animals I consider my favorites and bears are one of them.  My card uses a real fun one that has lots of accessory stamp sets.


This was a fun and easy card to make.  The bear, his party hat and balloons were all colored with Copic markers.  I used the colors from the patterned paper as the inspiration for the hat and balloon colors.  They were all cut with the matching die set.  One of the things I love about the bear die is that it cuts around his arms to you can create scenes were he is holding things.  So cute!


After die cutting the bear and accessories, I stamped the sentiment and die cut the circle.  The strip of patterned paper was adhered to the navy card base, then the circle added with thin foam squares.  I determined where I wanted the balloons and also popped those up with thin foam squares after tying on the linen thread.  The bear was adhered to the circle with thin foam squares, making sure not to stick down his right arm (leg? 😁) before tucking in the strands of linen thread.  Some navy enamel dots finished off this quick, easy and relatively CAS birthday card.


Thanks for visiting, I really appreciate it!  Have a great remainder of your week!

Take care and stay safe!

Stef


Stamps:  All Inside and Bear Ware (Ellen Hutson), Watch This (sentiment/Colorado Craft Company)
Paper:  Neenah Solar White, Soft Navy (Simon Says Stamp), Enjoy the Ride 6x6 paper pack (Altenew)
Ink: Memento Tuxedo Black, Versafine Clair Nocturne
Other:  All Inside and Bear Ware dies, Nested Circle Infinity die (Hero Arts), Linen Thread (SU), Sakura White Gelly Roll pen, Glacier Caves Enamel Dots (Altenew)
Copics:  B99, 97, 95, 93, YG17, 05, 03, 01, E79, 57, 35, 33, 31


Sunday, September 6, 2020

Crackle Birthday for the Paper Players and Sunday Stamps

Hello friends, I hope you are doing well, staying safe and healthy!  It's time for new challenges at The Paper Players and Sunday Stamps and I've combined them both to make today's card.

For the Paper Players, the lovely Jaydee is hosting our theme challenge to make a masculine birthday card.


At Sunday Stamps we have a new Color Challenge with fabulous Fall colors!


I'm also joining the current Simon Says Stamp Wednesday Challenge where this week's theme is to "Stamp It!"

For my card, I decided to use this opportunity to make a card for our nephew's birthday later this month. 


I definitely went towards the grungy side with this one!  To begin, the Crackle Background stamp was inked up in brown pigment ink on a panel of Bristol, then sprinkled randomly with gold embossing powder, then the remainder was covered with clear embossing powder.  After setting with my heat tool and letting it cool I did some controlled "ink smooshing" to layer on three colors of Distress Oxide Ink, the new Crackling Campground, Speckled Egg and Walnut Stain, the last of which came out much lighter than I expected as it melded into the other two colors.  The panel spritzed with water then when dry, splattered with gold metallic paint.


While the panel dried, the leaves and sentiment were die cut, then I rimmed the edge of the leaves with gold paint.  The Cajun Craze base was created to be a 6" x 4.5" card.  The dried ink smooshed layer was trimmed down and adhered to a slightly larger panel of Early Espresso and added to the base with fun foam.  Next the leaves were adhered to the back of the die cut sentiment and mounted onto the base with foam tape.  Even though there's a lot going on in the background it still needed something, so I remembered I'd recently ordered some enamel dots and sure enough there was a color that matched perfectly.  Love it when that happens!


Thanks so much for visiting, I really appreciate it!  Be sure to use the links above to check out the amazing cards by the other DT members and hopefully join us at both The Paper Players and Sunday Stamps for these great challenges!

Stef


Stamps:  Crackle Background (SSS)
Paper:  Cajun Craze, Early Espresso (SU), Ivory (SSS), Neenah Dessert Storm
Ink:  Versafine Clair Pinecone; Crackling Campfire, Speckled Egg and Walnut Stain DOX
Other:  Layering Leaves dies (MFT), Happy Birthday sentiment dies (SSS), Antique Gold embossing powder (Altenew), Ultra Fine Clear embossing powder (Hero Arts), Gansi Tambi Starry Colors Metallic watercolor paints, Warm and Cozy Enamel dies (Altenew)