Showing posts with label Tim Holtz. Show all posts

Sunday, July 26, 2026

Jingle All the Way for PP796

Hello friends!  It's the 4th Sunday in July (can you believe it?) and time for the monthly sketch challenge at the Paper Players.  This week, the amazing Christy is hosting and has created a fun sketch.


I think this is sketch is a neat way to showcase three of something, like little flowers or numbers or quilt block designs.  For my card, I went with Christmas and three icon images.


This card uses images from the 2024 Simon Says Stamp/Tim Holtz Stamptember stamp and die set, including 2 sizes of postage stamp dies.  I first used the set for this card with the larger postage stamp dies, but the smaller ones worked better for this layout.

I was fortunate that the images were already stamped, colored and die cut, so it was a matter of choosing a trio.  But as it turned out, I had plenty of images ready to go, so I ended up making six cards using this layout and one where I changed it up a bit.


I'm not fond of mass production but I couldn't resist since these images were all ready to go!  I used another Tim Holtz Christmas stamp and die set for the sentiments, except for the one on the card at the top with the different layout.  That was a from a TH sentiment sticker book. The snowflakes were die cut from white glitter cardstock and I added a small red gem in the middle.  Some of the icon pieces have Glossy accents for shine.  After assembling, I decided no other embellishments were needed for all these cute cards!  Thanks for the fun sketch, Christy!


Thanks for stopping by and I encourage you to head over to the challenge blog to see all the fabulous inspiration by the the rest of the design team.  The challenge will remain open until Friday July 31st at 3pm EDT.  I hope you'll find time to join us!

Stef

  • SSS/Tim Holtz Stamptember 2024 stamp and die set, including 2 postage stamp dies
  • Tim Holtz Tiny Text Christmas stamps and SSS Tiny Text dies
  • TH/Idea-ology Christmas Noel sticker book
  • SSS Sensational Snowflake die
  • SSS A2 Postage Rectangles 
  • Patterned paper from stash (Honey Bee and MFT)
  • Copic markers

Sunday, November 30, 2025

Christmas Magic for the Paper Players

Hello friends!  I hope all of you in the US had a wonderful Thanksgiving Holiday.  We had a big family gathering and it was a gorgeous day for the end of November.

Since it's the fifth Sunday of the month, we have a Tic-Tac-Toe challenge this week at the Paper Players.  The lovely Claire is hosting and has created a wonderful board full of great combinations.

I'm also sharing over at the Simon Says Stamp Wednesday Challenge
where this week's theme is Anything Goes.

My card fits both the left column (white, Christmas, die cuts) and the bottom row (die cuts, trees, sparkle).  Let's take a look!


I'm a big fan of Tim Holtz die sets and when this came out earlier in the fall, I snapped it up.  I didn't have a cityscape die set and thought this one was so cute and I ended up making four of them!

First came the background.  It was ink blended on Distress Watercolor paper with light, medium and dark blues, along with black around the edges.  The die set has a moon die but I wanted this to be a snowy scene, so I intentionally left a lighter spot, suggesting the moon trying to show through the clouds.  At least that was the story in my head lol! After applying the ink, the panel was splattered with an iridescent shimmer spray and white paint.

Next all the city scene components were die cut, then ink blended towards the bottom of the die cut for some shading.  I took time to randomly add little strips and squares of yellow cardstock behind some of the windows in the buildings, then adhered all the die cut pieces to the dried backgrounds.  The snowbanks were hand cut from white glitter paper. I used more white paint to splatter which dried while I created the sentiments.  Those were added with foam tape to finish things off.

I will admit I probably got carried away with the snow/splatter but I still like how it turned out!


I hope Claire's TTT board inspires you to play along with us this week!  The challenge will remain open until Friday December 5th at 3pm EDT.  Before you head off to your crafty space, I hope you'll pop over to the challenge blog, where my talented teammates have some fun cards to inspire you further!

Thanks for stopping by!

Stef


  • Tim Holtz/Sizzix Vault Christmas Magic dies
  • TH/Stamper's Anonymous Simple Sayings Stamp
  • Simon Says Stamp Labels die
  • Distress Watercolor and Black Heavystock paper
  • SSS Slate, Red Metallic and White Glitter paper
  • Broken China, Uncharted Mariner, Chipped Sapphire and Black Soot Distress inks
  • SSS Kale ink
  • SSS White Splatter medium
  • Hero Arts White Iridescent Spray

Sunday, November 9, 2025

Funky Hello for the Paper Players

Hello friends!  Today we have a new color challenge at the Paper Players.  The amazing Jan is hosting and has chosen a wonderful fall palette.

Because this is the first outing for the die set I used for this card, I'll be sending my card to Darnell's NBUS challenge as well.

It took me a while to decide what kind of fall/autumn card I wanted to create, but then I remembered my Tim Holtz Funky Foliage that was still waiting to be used after quite a while sitting in my NBUS bin, and it turned out to be perfect for this challenge!


I'll just say up front this card took quite a while to make, but I love how it turned out.  The next time I use the die set, I will start with colored cardstock rather than white to save some time.  I colored each die cut component using my Copic markers, which I'd chosen to closely represent the challenge colors.  The photos do make the "cajun" colors a bit more orange than rust-ish, but IRL they look much closer.

Next I took a background panel of Kraft cardstock, embossed it with the Tim Holtz Cracked folder, then blended dark brown ink over it for more visible texture.  The arch is black and was die cut three times and layered together before adding to the card front.  

I then added all the elements going up the left side, some with glue and others with foam squares, leaving room for the sentiment.  I actually didn't have one in mind, but a search yielded the Hello that had already been stamped and die cut.  Adding that finished things off.  I'm really happy with this funky/grungy look!


What are you inspired to create with these four colors?  I hope you'll share with us this week, we'd love to see your card in the gallery.  In the meantime, I encourage you to visit the challenge blog where my talented teammates are sharing how they used these colors.  The challenge will stay open until 3pm EST on Friday November 14th.

Thanks for visiting!

Stef

  • Tim Holtz/Sizzix Funky Foliage dies
  • TH/S Cracked embossing folder
  • Simon Says Stamped Nested Domed Arch die
  • Copics - Cajun-YR07, 18, E19; Early Espresso-E49, 47, 44, 43; Mossy Meadow-G99, 94, 82; Old Olive-YG99, 97, 95, 93; Grays-W5, 3, 1

Sunday, October 26, 2025

Peace for the Paper Players

Hello friends!  It's time for a new challenge at the Paper Players.  Since it's the fourth Sunday of the month, that means a sketch challenge, and this time the fabulous Joanne is hosting and given us this great sketch to work with.

I did take some liberties with the sketch, using a landscape format and using metallic cord rather than horizontal strips, so I hope you'll be okay with what I came up with, Joanne!!


This card was actually created during an online class with Tim Holtz using Simon Says Stamp collaboration products, designed by Tim.  Afterwards, I was looking at the card I made, and it reminded me of Joanne's sketch, so I decided to use it for this challenge.

We created many flowers and different types of foliage, going direct to the stamps with Distress Watercolor pencils after misting with water, then stamping on watercolor paper.  It's not a new technique to me, but one I haven't used in at least two years and some of the images turned out fine and some went into recycling lol! I selected a small poinsettia and two branches for the card, all of which were decorated with a bit of glitter on the edges.

The white panel was sprayed with Hickory Smoke Distress Spritz, which looks more silver the gray IRL, dried it and die cut the Peace shadow die from it.   The panel was backed with acetate to create a shaker card.  I used silver sequins and chunky Rock Candy glitter for the interior.  After completing the shaker portion, the silver die cut Peace was adhered to the front along with the flower and branches, and the panel wrapped with silver cord.  It was matted with a panel of silver metallic cardstock then added to a Sea Glass card base.  

This card was not my typical style, but I was happy to step out of my comfort zone and just have fun creating!


So what are you inspired to make with Joanne's fabulous sketch? Take a moment to stop by the challenge blog (linked above) to see a wonderful variety of cards by my talented teammates, then please join us this week!  The challenge will remain open until 3pm EDT Friday October 31st.

Thanks for visiting!

Stef

  • SSS/TH Festive Watercolor Stamps and dies
  • SSS/TH Festive Words dies 
  • Distress Watercolor pencils
  • SSS Starshine Confetti
  • Tim Holtz Rock Candy and Chunky Rock Candy Glitter
  • Hickory Smoke Distress Spritz
  • SSS Silver Cording

Thursday, October 16, 2025

Sketch Manor for Color Hues

Hello friends!  It's time for a new challenge over at Color Hues and this time I am hosting!  The colors I've chosen are a favorite pair of mine for Halloween cards, but you could certainly use them for other styles like florals or geometrics.  Just be sure to use only the challenge colors plus neutrals.

ETA:  I saw that Inkspirational has a current challenge theme of Seasonal, so I thought I'd link up my card for the fall season.


I used a new stamp and die set along with a couple others to create my card, so I'll be sending this over to Darnell's NBUS challenge.

Since this is one of my favorite color combos for Halloween, was there any question about what I was going to make?


I used the new Sketch Manor stamp set from Tim Holtz and the new accompanying die set made in conjunction with Simon Says Stamp.  The fun part is that the house is stamped four times, then different sections are die cut to layer on the base.  After die cutting, I used Distress inks to watercolor the layers, then set that aside to create the background.

I started by masking off the moon then ink blending two orange Distress inks around the mask, transitioned to purples, then ended with Scorched Timber and Black Soot.  The mask was removed from the moon, then I used a stencil with a light orange Distress ink to color it. The last step for the background was to stamp the tree, the limb, the bats and the fence on other side of where the house would sit.  

I die cut even more additional layers for the house in black for more dimension, then glued them together.  You can see the layers in the photo below. Yeah, I'll probably add additional postage when it gets mailed but is worth it!


The final step before adhering the house to the card front was to add the three ghosts that were die cut from vellum.  I love the one popping out of the front door!  


What are you inspired to create with these colors?  My lovely and talented teammates and our fabulous guest designer Bobby have some amazing cards to give you more design ideas, so please head over to the challenge blog (linked above) and see what they've come up with.  The challenge will remain open until 9 am EDT Wednesday October 29th.  I hope to see your card in the gallery!

Thanks for stopping by!

Stef

  • Tim Holtz/Stampers Anonymous Sketch Manor stamp set
  • TH/SSS Sketch Manor dies
  • TH/Sizzix Vault Fright Night dies
  • Spellbinders Haunted House ghost die
  • Picket Fence Haunted Moon Stencils
  • Villainous Potion, Wilted Violet, Carved Pumpkin, Rusty Hinge, Spiced Marmalade, Scorched Timber and Black Soot Distress Inks

Sunday, October 5, 2025

Trick or Treat for the Paper Players

Hello friends!  Today the Paper Players has a new theme challenge.  The amazing Claire is hosting and has chosen a fun one for the season - Halloween Costumes!


If you've followed me for any length of time you know I LOVE making Halloween cards and for this one I used a new Tim Holtz/Sizzix die set.


Isn't that a hoot?  I love the cute/creepy costumed kids with a cat and an umbrella (???)!  

I started by masking off the moon, then using a number of Distress inks to create the atmospheric setting.  I splattered it with a bit of water and when that was dry, I used a stencil to lightly color in the moon.  

All the images were die cut with black cardstock, then attached to the background.  The only thing that took time, other than making the background, was just figuring out the placement of the sentiment, limbs and bats.  Not hard to make but I like how it turned out.

I'll have a couple more Halloween cards to share in upcoming posts (one on 10/12, the other on the 16th), so please come back and take a peek if you enjoy these types of cards.  Or consider yourself forewarned if you don't lol!


What are you inspired to create using Claire's fun theme?  The other DT members have created some fabulous cards and I encourage you to visit the challenge blog and check them out.  This challenge will remain open until Friday October 10th at 3pm EDT.  I hope to see your card in the gallery!

Thanks for visiting and take care.

Stef

  • Tim Holtz/Sizzix Trick-or-Treat and Vault Fright Night dies
  • Hero Arts Nested Circle die (for moon mask)
  • Villainous Potion, Wilted Violet, Crushed Olive, Peeled Paint, Antique Linen and Black Soot Distress Inks
  • Picket Fence Haunted Moon Blending Stencils

Thursday, October 2, 2025

Trick or Treat

Hello friends!  I'm popping in with a card to share with the lovelies over at the Time Out Challenge.  It's the "Pick 2" challenge, which is always a fun one to play along with.  This time I chose spatter and season.


I love making Halloween cards, so my season choice is fall.  I have to admit this one is a bit more on the creepy side, but I had a blast making it because I love getting inky.


I started with the background using a panel of Distress watercolor paper.  After masking off the moon, I used Distress Spray Stains to cover the panel.  It was a lot of water, spray, dry to get what I wanted. I dried, that, removed the mask then sprayed water on the moon so the spray stains around the edges would seep across the moon and create that spooky atmosphere. 

I learned out this technique from watching a video by Amy R. who credited it to Stacy Hutchinson here. I used it on a couple other Halloween cards I'll be posting in the next couple of weeks.

In the end, the background turned out much darker than I originally planned because I ink blended Black Soot on the foreground so the pumpkins looked less like they were floating in space.  They still do a little bit, ha ha - spooky floating pumpkins!

The pumpkins were colored with Copic markers, die cut, then I used gray markers to color in the white from the die cut.  The sentiment is from the same stamp set and the bats from another TH die set.


Thanks for stopping by, I appreciate it!

Stef

  • Tim Holtz/Stampers Anonymous Pumpkinhead stamps
  • TH/Sizzix Vault Coffin bat dies
  • Simon Says Stamp Pumpkinhead dies
  • Distress Spray Stains - Black Soot, Fossilized Amber, Rusty Hinge, Cracklin' Campfire
  • Distress Inks - Black Soot, Scorched Timber, Antique Linen

Sunday, August 17, 2025

Meowy Christmas for the Paper Players

Hello friends!  We have a fun new challenge over at the Paper Players this week!  The amazing Elizabeth is hosting our Clean and Simple challenge and is asking us to use critters on our cards.  

You can use any type of critter as long as you keep your card CAS - minimal layers and embellishments, simple and uncluttered with plenty of "white" space.

I'm continuing to work on my holiday card stash and I also used a stamp set that I've had for nearly, cough, cough...five years and have never used.  I figured it was high time to do so, and I'll be sharing over at Darnell's NBUS challenge.


Having had cats for at least half of my life, I couldn't love that sentiment more!  It makes me giggle, as does that very tense looking kitty (who knows what's in his cup???).  The cat was stamped then I did very simple coloring with my Copics before fussy cutting.  

The frame was die cut 3 times, twice from white and once from red metallic, then layered together on top of the Sea Glass card base.  The white center portion was stamped with the sentiment, layered inside the frame, then the cat was added with thin foam tape. 

I had cut three Christmas lights from another stamp in the set, colored them, then covered them with Glossy Accents. They, along with some torn up pine needles were added to the floor beneath the cat.  (sorry, they're a bit hard to make out; they're more visable IRL) Those darn cats will make such a mess of your holiday decorations if left unattended, as any cat owner will tell you! 


I hope you'll share your CAS critter card with us this week!  Before you head off to your crafty space, I encourage you to check out what the other DT members came up with (they're so talented!).  The challenge remains open until Friday, August 22nd at 3pm EDT.

Thanks for stopping by!

Stef

  • Simon Says Stamp/Tim Holtz Stamptember 2020 stamp set (this set isn't available any longer but TH has other Snarky Cats stamps available at SSS or other retailers, if you have a warped sense of humor as I do lol!)
  • Tim Hold Mini Holiday Greens die
  • Waffle Flower Nesting Piercing Ticket Frames die
  • Copics - R59, 37, 35, T4, 2, 0, C3, 1, 0, Y11, B00
  • Olos - G1.7, 1.5, 1.4

Monday, June 16, 2025

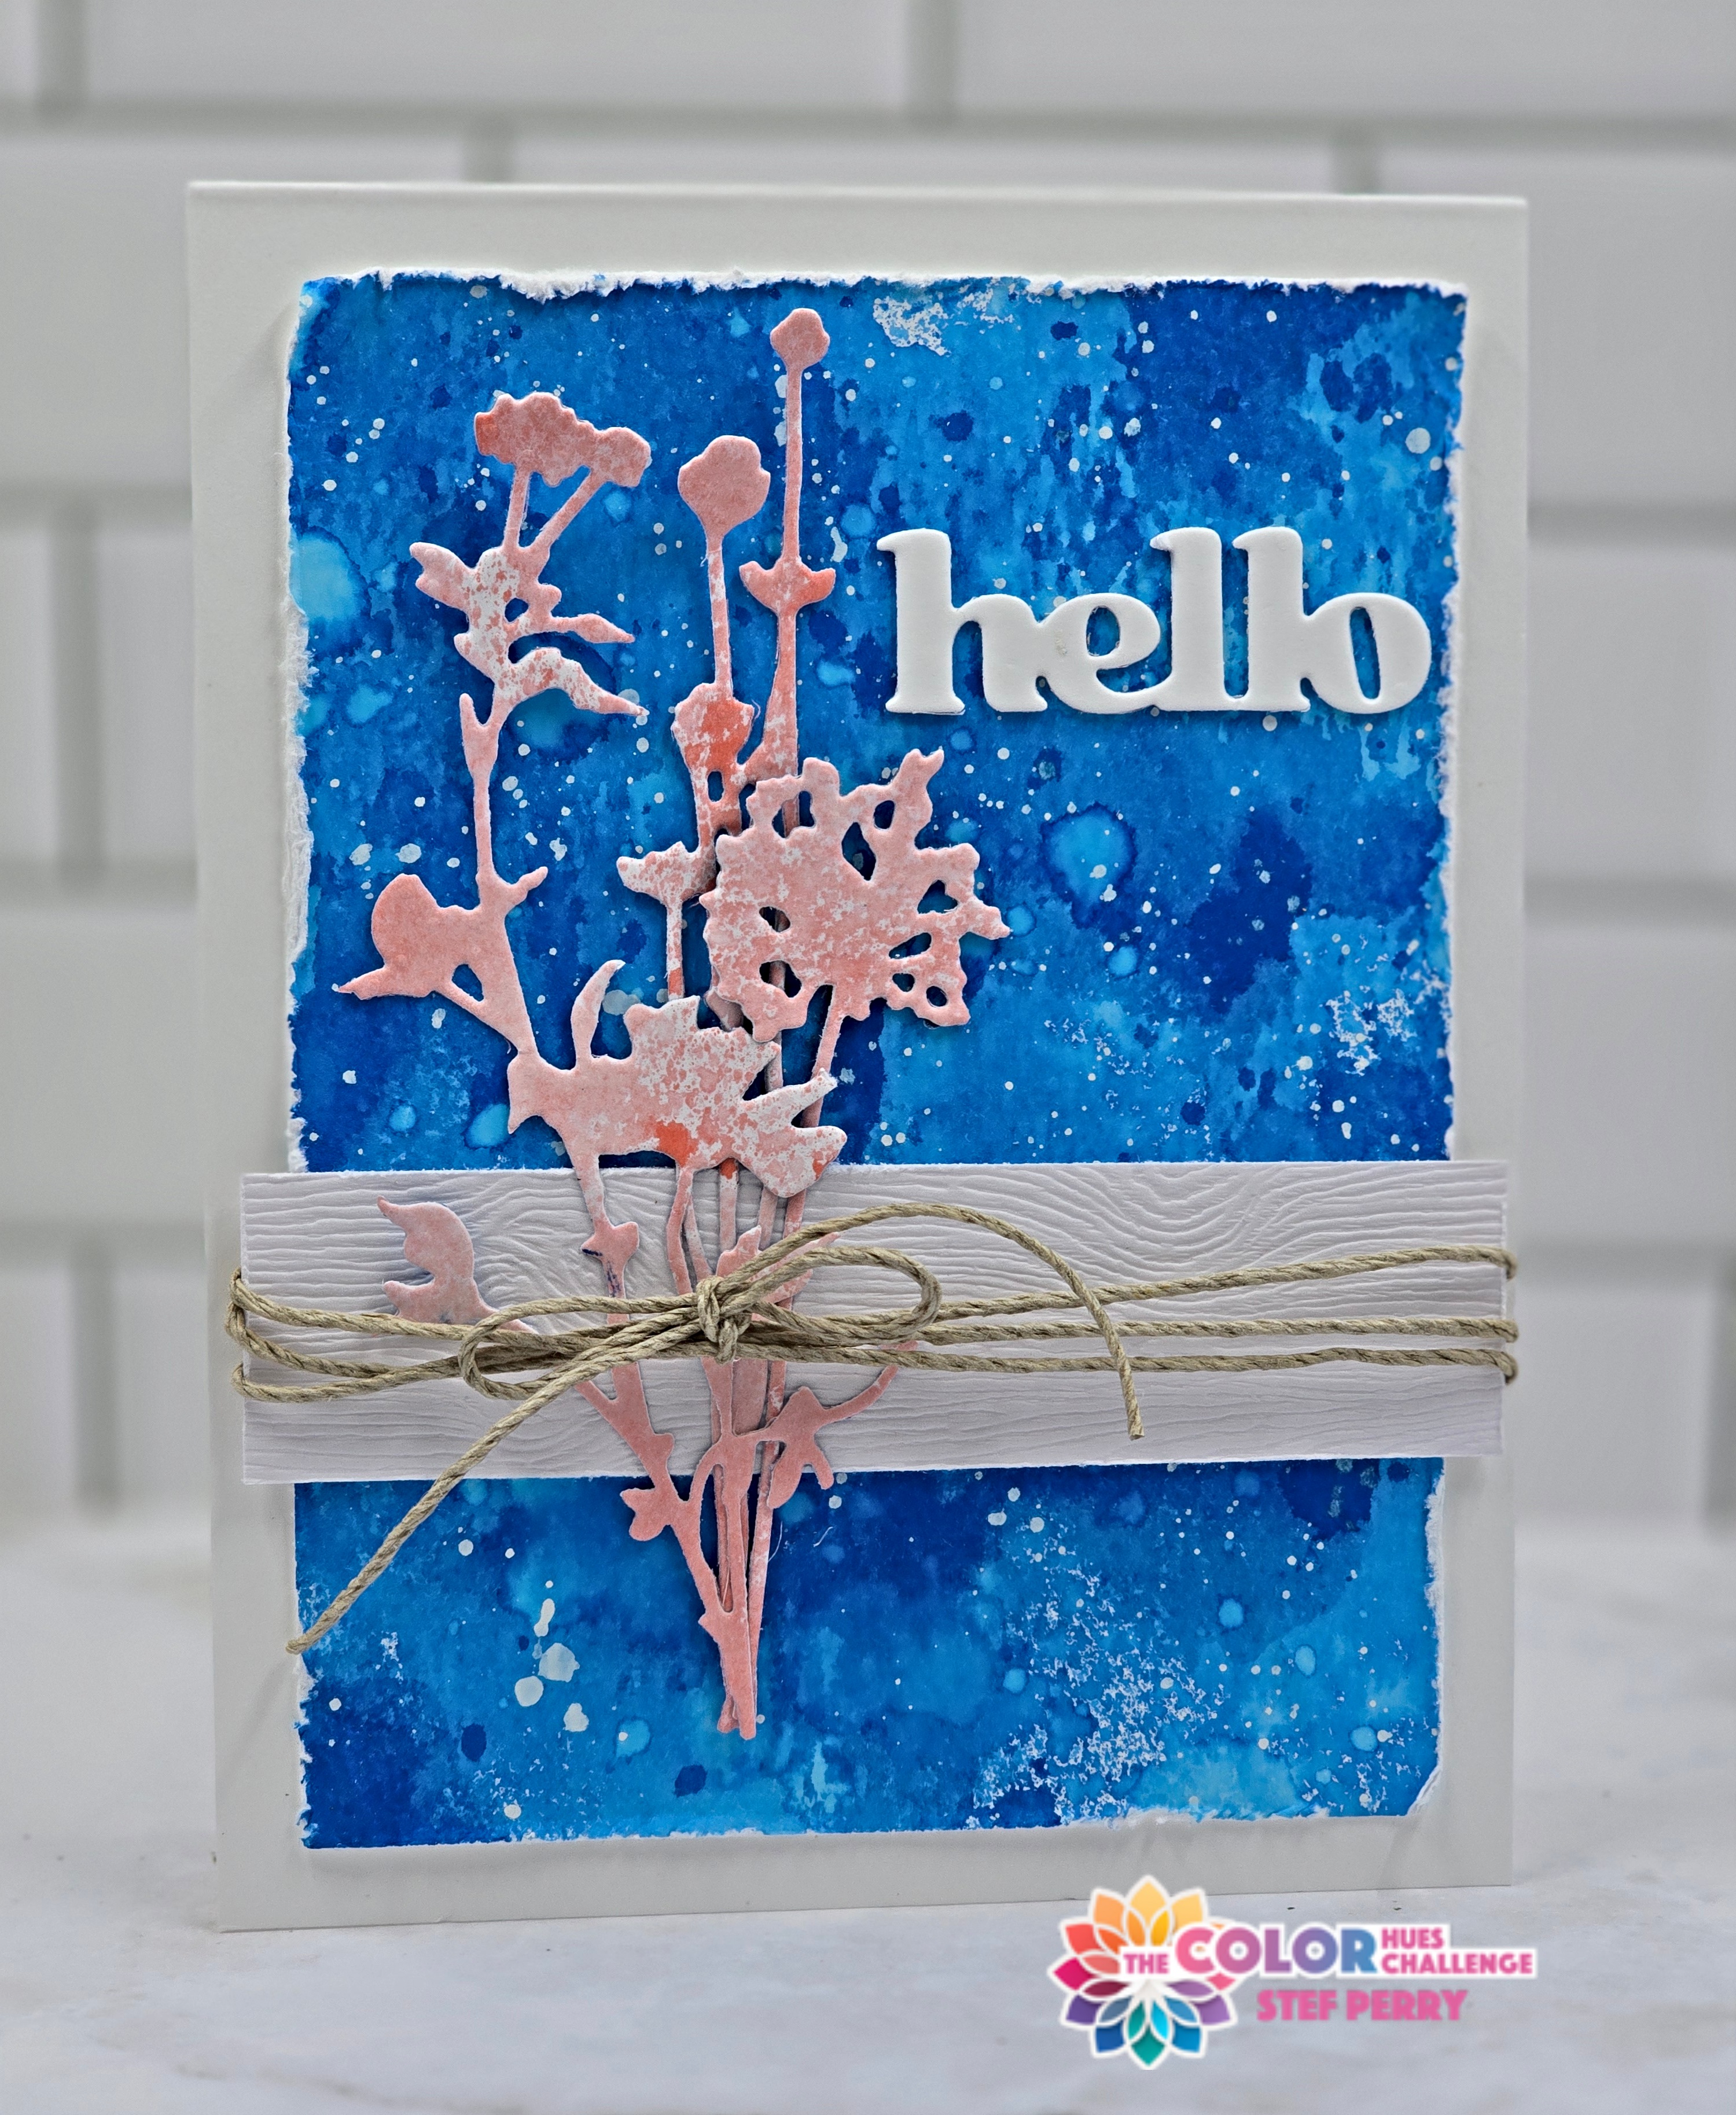
Wildflower Hello for Color Hues

Hello friends!  We have a new challenge at Color Hues and this time I am hosting.  I love this color combo and, as my talented teammates and our wonderful Guest Designer Teresa have demonstrated over at the challenge, it can be used for many different types of designs.


I decided to use some Distress products that I have long neglected for my card.  I watched a Tim Holtz Live video and was soooo inspired.  Although I only used a very simple technique with sprays for my card, the video gave me many more ideas I hope to use in the future.  I based my card layout on one by a Sizzix maker that Tim shared during the live.


I started with two A2 panels of Distress watercolor paper, textured side up.  On one I used Saltwater Taffy Distress Spray Stain, which is a nice pinky peach, and on the other used Salty Ocean.  I did the spray, water and dry method on both then repeated it a couple more times with the Salty Ocean, also smooshing color from my glass board mat.  To finish the Salty Ocean panel, I added splatter using the Distress spray along with water and white paint.  

When the panels were dry, the cobalt one was trimmed down then I used a distressing tool all around the edges.  I found a strip of white woodgrain cardstock to anchor the die cut wildflowers and then wrapped hemp twine all around before adhering everything to the card base.  The sentiment was layered three time the added to the card front.  


Thank you for visiting today and I do hope you'll join us for this challenge.  For further ideas and inspiration, I encourage you to visit the blog.  The challenge will remain open until Sunday, June 29th at 3pm EDT.  Hope to see you there!

Stef

  • Tim Holtz/Sizzix Wildflowers #1 dies
  • Altenew Versatile Greetings die
  • Ellen Hutson Woodgrain cardstock
  • Spellbinders Splatter White paint

Thursday, January 16, 2025

Rupert Says HB2U for Color Hues

Hello friends!  Today I'm sharing my card for the new challenge at Color Hues. I am hosting for the next two weeks and have chosen the color combo navy and lime green.  

I'm also sharing over at Simon Says Stamp Monday Challenge where the theme this week is to add texture and at A Cut Above, where it is always anything goes with dies and this month has an optional theme "New".  This is a new challenge to me, so I think that might fit the theme??  

My card uses Rupert, the cute dragon die set from Tim Holtz.  I first saw this die a year ago when my lovely teammate Carol used it for her CH card linked here.  I was so smitten with her card, and Rupert, that I eventually found the set on sale and he came home to my craft room.  And now he's going to be on a birthday card for one of my two young great nephews.


Rupert is a rather large die so he ended up on an A7 card.  I started by die cutting all the parts of the dragon from navy, lime green and a small amount of gray cardstock.  I cut enough to make two dragons (the other will go on a card for donation), so when I put together the second one, it was much easier than figuring out the first one lol!

For the background I ink blended lime green, dark blue and black inks with a halo effect, then splattered it with white iridescent spray.  While that dried, the balloons, letters and number were all die cut from holographic cardstock.

I added two additional layers of scrap cardstock under Rubert, cutting away a bit of the layers under his neck so the twine would not create a bump under him.  The balloons were added with thin foam tape and the ends of the twine were glued to his hands (I guess that's what they are??? ;-)), then the sentiment was added to the right side to complete the card.


So what are you inspired to create with these colors?  There are so many possibilities, as my incredibly talented teammates and Guest Designer Esther will show you over on the challenge blog, so please pop over and see their fabulous creations!  The challenge will remain open until 9 am Wednesday January 29th, and I hope to see your card in the gallery!

Thanks for visiting and take care!

Stef

  • Tim Holtz/Sizzex Rubert and Vault Seasonal Sketches (letters and number) dies
  • MFT Balloon Stax dies
  • Simon Says Stamp Limelicious and Galaxy inks; Black Soot Distress ink
  • Concord & 9th Midnight and Sprout cardstock; SSS Holographic cardstock
  • Lawn Fawn Silver Baker's Twine
  • Hero Arts White Iridescent Spray

Sunday, December 1, 2024

Merry and Bright for The Paper Players

Hello friends!  Here we are on December 1st!  I don't know about you, but this year has literally flown by.  But the first Sunday of the month brings a new theme challenge to The Paper Players.  The lovely LeAnne is hosting and is asking everyone to use a deer on your card.


Of course, you needn't make a holiday card, but that is the direction I took with my card because I had some fun little stamps I've been waiting to use.


These cute images and the sentiment are all from the Tim Holtz Stamptember stamp and die set for Simon Says Stamp.  There are like 20 small stamps of different iconic holiday images plus a number of sentiments and two sizes of postage stamp dies.  I'm using the largest of the two here and my bonus card below uses the smaller postage die.  

I started by stamping images on four half sheets of cardstock then coloring them all with Copic and Olo markers, plus I used a gold gel pen for the Christmas tree star and garland. The images were all die cut with coordinating dies along with the postage stamp shapes out of white.  

I then put the postage stamp die cuts on a stick mat and puzzle pieced the die over them so I could ink blend them yet leave a white edge.  After using a white gel pen to add "snow", Rudolph, Santa and the Christmas tree were all added with thin foam squares.

Next a panel of red was cut with a postage edge rectangle die and the sentiment was white heat embossed.  White pigment ink was blended around the edges before mounting on the white card base.  The postage stamp images were added with thin foam squares and lastly I tied some red baker's twine around the top.


The bonus card is arranged just a bit differently.


Oh, so much fun and I have loads of images to make more cards!  Do you have a favorite?

What are you inspired to create using a deer?  It could be a holiday/winter card or it could be one for any time of year as long as a deer is present.  We look forward to seeing to your card in the gallery, the challenge remains open until 3pm EST on Friday December 6th.  For more inspiration, be sure to see what my talented teammates have created - the blog is linked above.

Thanks for visiting and take care!

Stef

PS Check back later to catch my Color Hues DT post!
  • Tim Holtz/SSS Stamptember 2024 stamp and die set
  • Spellbinders Postage Edge Rectangle die
  • Hero Arts Unicorn White and Salvaged Patina Distress inks
  • Copic and Olo markers
  • Altenew Gold and Silver gel pens


Sunday, November 10, 2024

Shaker Snow Globe for The Paper Players

Hello friends!  It's Sunday and that means there's a new challenge at The Paper Players.  This week the lovely Claire is hosting our monthly color challenge and she's chosen some vibrant and beautiful colors.

I decided it was the perfect time to make a fun shaker Christmas card.  While I tend to go towards using traditional reds and greens, I thought it would be fun to "shake" things up (sorry, not sorry, for the pun lol!).


The colors in the photo are a bit off, however I will admit I don't have any true turquoise paper so I got as close as I could with the cardstock I have.  I began by die cutting Twig & Stump from white velvet luxury cardstock and their apparel and the ornaments from colored cardstock.  The backer for the snowmen was cut from black.  The snow globe, tree and snowflakes were die cut from white glitter cardstock.  I also used the snow globe die to created a shaped card for something fun and unique.

I saw this snow globe design two years ago when Twig & Stump were first released, created by the talented Nichol Spohr and found it so clever, and since I rarely make shaker cards, decided to use it.  You can find her original post here.

The background was ink blended with purple and turquoise-ish ink then splattered with white gloss acrylic spray.  When dried I put the snow globe together, adhering the top white glitter layer to an acetate sheet cut to fit, then 3 more die cuts then the ink blended background, after adding the shaker bits.  After assembling Twig & Stump, they along with the tree, ornaments, snowflakes and white heat embossed sentiment were adhered on top.  The final step was to add glitter using Stickles to the ornaments. Definitely not a card for mass production but it was fun and I'll likely make a few more if time allows. 

This photo was taken flat so I could capture the shaker bits inside.


My wonderfully talented teammates have some terrific inspiration for you over at the challenge blog, so I encourage you to check it out.  I hope you'll join us this week with however these colors inspire you - the challenge remains open until Friday November 15th at 3pm EST.

Thanks for visiting and take care!

Stef

  • Tim Holtz Twig & Stump dies
  • Honey Bee Stamps Snow Globe A2 Shaker dies
  • Hero Arts December 2020 card kit (sentiment)
  • Simon Says Stamp White Luxury Velvet and White Glitter cardstock
  • Concord & 9th colored cardstocks

Tuesday, October 1, 2024

Wicked for Color Hues

Happy October, friends!  It's the first of the month and time for a new challenge at Color Hues.  The lovely Julie B. has chosen a wonderful color combination of purple and orange, which made my Halloween-lovin' heart so happy!  Of course, there are many ways one can use this combination - a graphic design, flowers or just a Fall themed card with pumpkins.

I'm also joining Inkspirational, where the theme is Headwear, and my old teammates at Sunday Stamps for a color challenge that couldn't be more perfect for my card with purple, orange and black.


So, no surprise, I went full Halloween in creating this card, keeping a tradition with my grandkids that started when they were small, so, so many years ago lol!


This card is a combination of four die sets, three from Tim Holtz's recent release and one from Spellbinders.  The card size ended up being 5" x 7" to encompass the whole scene.

I started by ink blending the background.  The moon stencil comes with a mask, so I used that while blending some orange around its perimeter then moving on to purples and black.  When I removed the mask, I lightly inked it with orange, using the stencils to create darker areas on the moon, then went over it lightly with a darker orange to mute the color somewhat. I again used the moon mask while adding white acrylic paint splatters to emulate stars in the sky.

The witch, pumpkin, hat, shoes and sentiment were all die cut from various pieces of glitter paper.  I die cut the sentiment a second time from black cardstock and layered beneath the orange glitter paper to give it more stability.  The graveyard and bats were also die cut from black.  Vellum with double sided adhesive on the back was used for the ghosts, which made adhering them very easy and I didn't have to find ways to hid adhesive.  The last step I took before adding all the images to the card front was to use an orange Copic marker to darken the orange glitter paper. 

I am very happy with how this turned out. Now my husband wants me to create one like it to hang in the front window by the door (obviously, we both love Halloween!).  


What are you inspired to create with these colors?  I encourage you to head over to the challenge blog (linked above) and see what my talented teammates and wonderful guest designers Trina Pham and Stephanie Lanzalotto came up with and hope to see your card in the gallery!  The challenge will remain open until 9 am EDT Monday October 14th.

Thanks for visiting and take care!

Stef

  • Spellbinders Witchin' Heels
  • Tim Holtz/Sizzex Vault Fright Night (graveyard and ghosts), Vault Gothic Portraits (wicked sentiment), and Vault Wicked (bats)
  • Picket Fence Haunted Moon Stencils
  • Villainous Potion, Wilted Violet, Rusty Hinge, Wild Honey, Carved Pumpkin and Black Soot Distress Inks

Monday, March 4, 2024

Wildflowers for The Flower Challenge

Hello friends!  We have a new challenge for you over at The Flower Challenge and this month we're asking everyone to make a square card for your lovely florals!

I rarely make square cards but I found I really enjoyed creating this one because of all the real estate this size offers, providing lots of room for both my flowers and large sentiment.  In the US and Canada (I believe) extra postage is required if you mail in a square envelope, but an option is to make a 5" x 5" card like I have, which can be sent it in an A7 envelope for no additional postage.


I was looking through all my floral die cuts and spied a set that hadn't seen the light of day in a long time, so I figured it was time to put it to use!  These dies are large, beautiful wildflowers and it seemed a more vintage style design would work well.  With that in mind, I looked through my stash of patterned paper and found this beauty with gold wildflowers printed on a faint text.


The flowers were die cut from ivory cardstock, then lightly ink blended with Altenew Blush and Rouge inks. I also lightly ink blended both colors around the edge of the patterned paper square before adhering to the ivory card base.  I fiddled around with the floral arrangement and different sentiments, then settled on this design so I could use that lovely, flourished die cut sentiment in matte gold.  After the wildflowers were tied together with the gold twine, they were adhered on the lower stems with glue, then I used pieces of foam tape to elevate the flowers for a little dimension.  No gems needed for this card with all the beautiful metallic gold!


Thank you so much for stopping by and I encourage you to pop over to the challenge blog because, as always, my wonderful teammates have some incredibly beautiful inspiration for you!  I hope you'll find time to join us - the challenge will remain open until 5 pm GMT on March 25th.

Take care!

Stef


  • Tim Holtz Wildflowers dies
  • Altenew Fancy For You die
  • Pink and Main Layered Square dies
  • Altenew Blush and Rouge Fresh Die Inks
  • Hero Arts Ivory and SSS Matte Gold cardstocks, American Crafts Jen Hadfield Heart of Home paper pad
  • Retired SU gold twine