Wednesday, August 31, 2022

Be Merry

Hello friends!  I was working away on my Christmas cards when I saw Anne Marie's terrific sketch at The Paper Players this week and decided to use it for another holiday card.  I'm also joining Addicted to Stamps and More with a Christmas theme and the Anything Goes challenge at Simon Says Stamp Wednesday Challenge. 


I decided to make a cute Christmas card for one of my many dog loving friends using one of the images from the new Anita Jeram/Colorado Craft Company stamp sets.


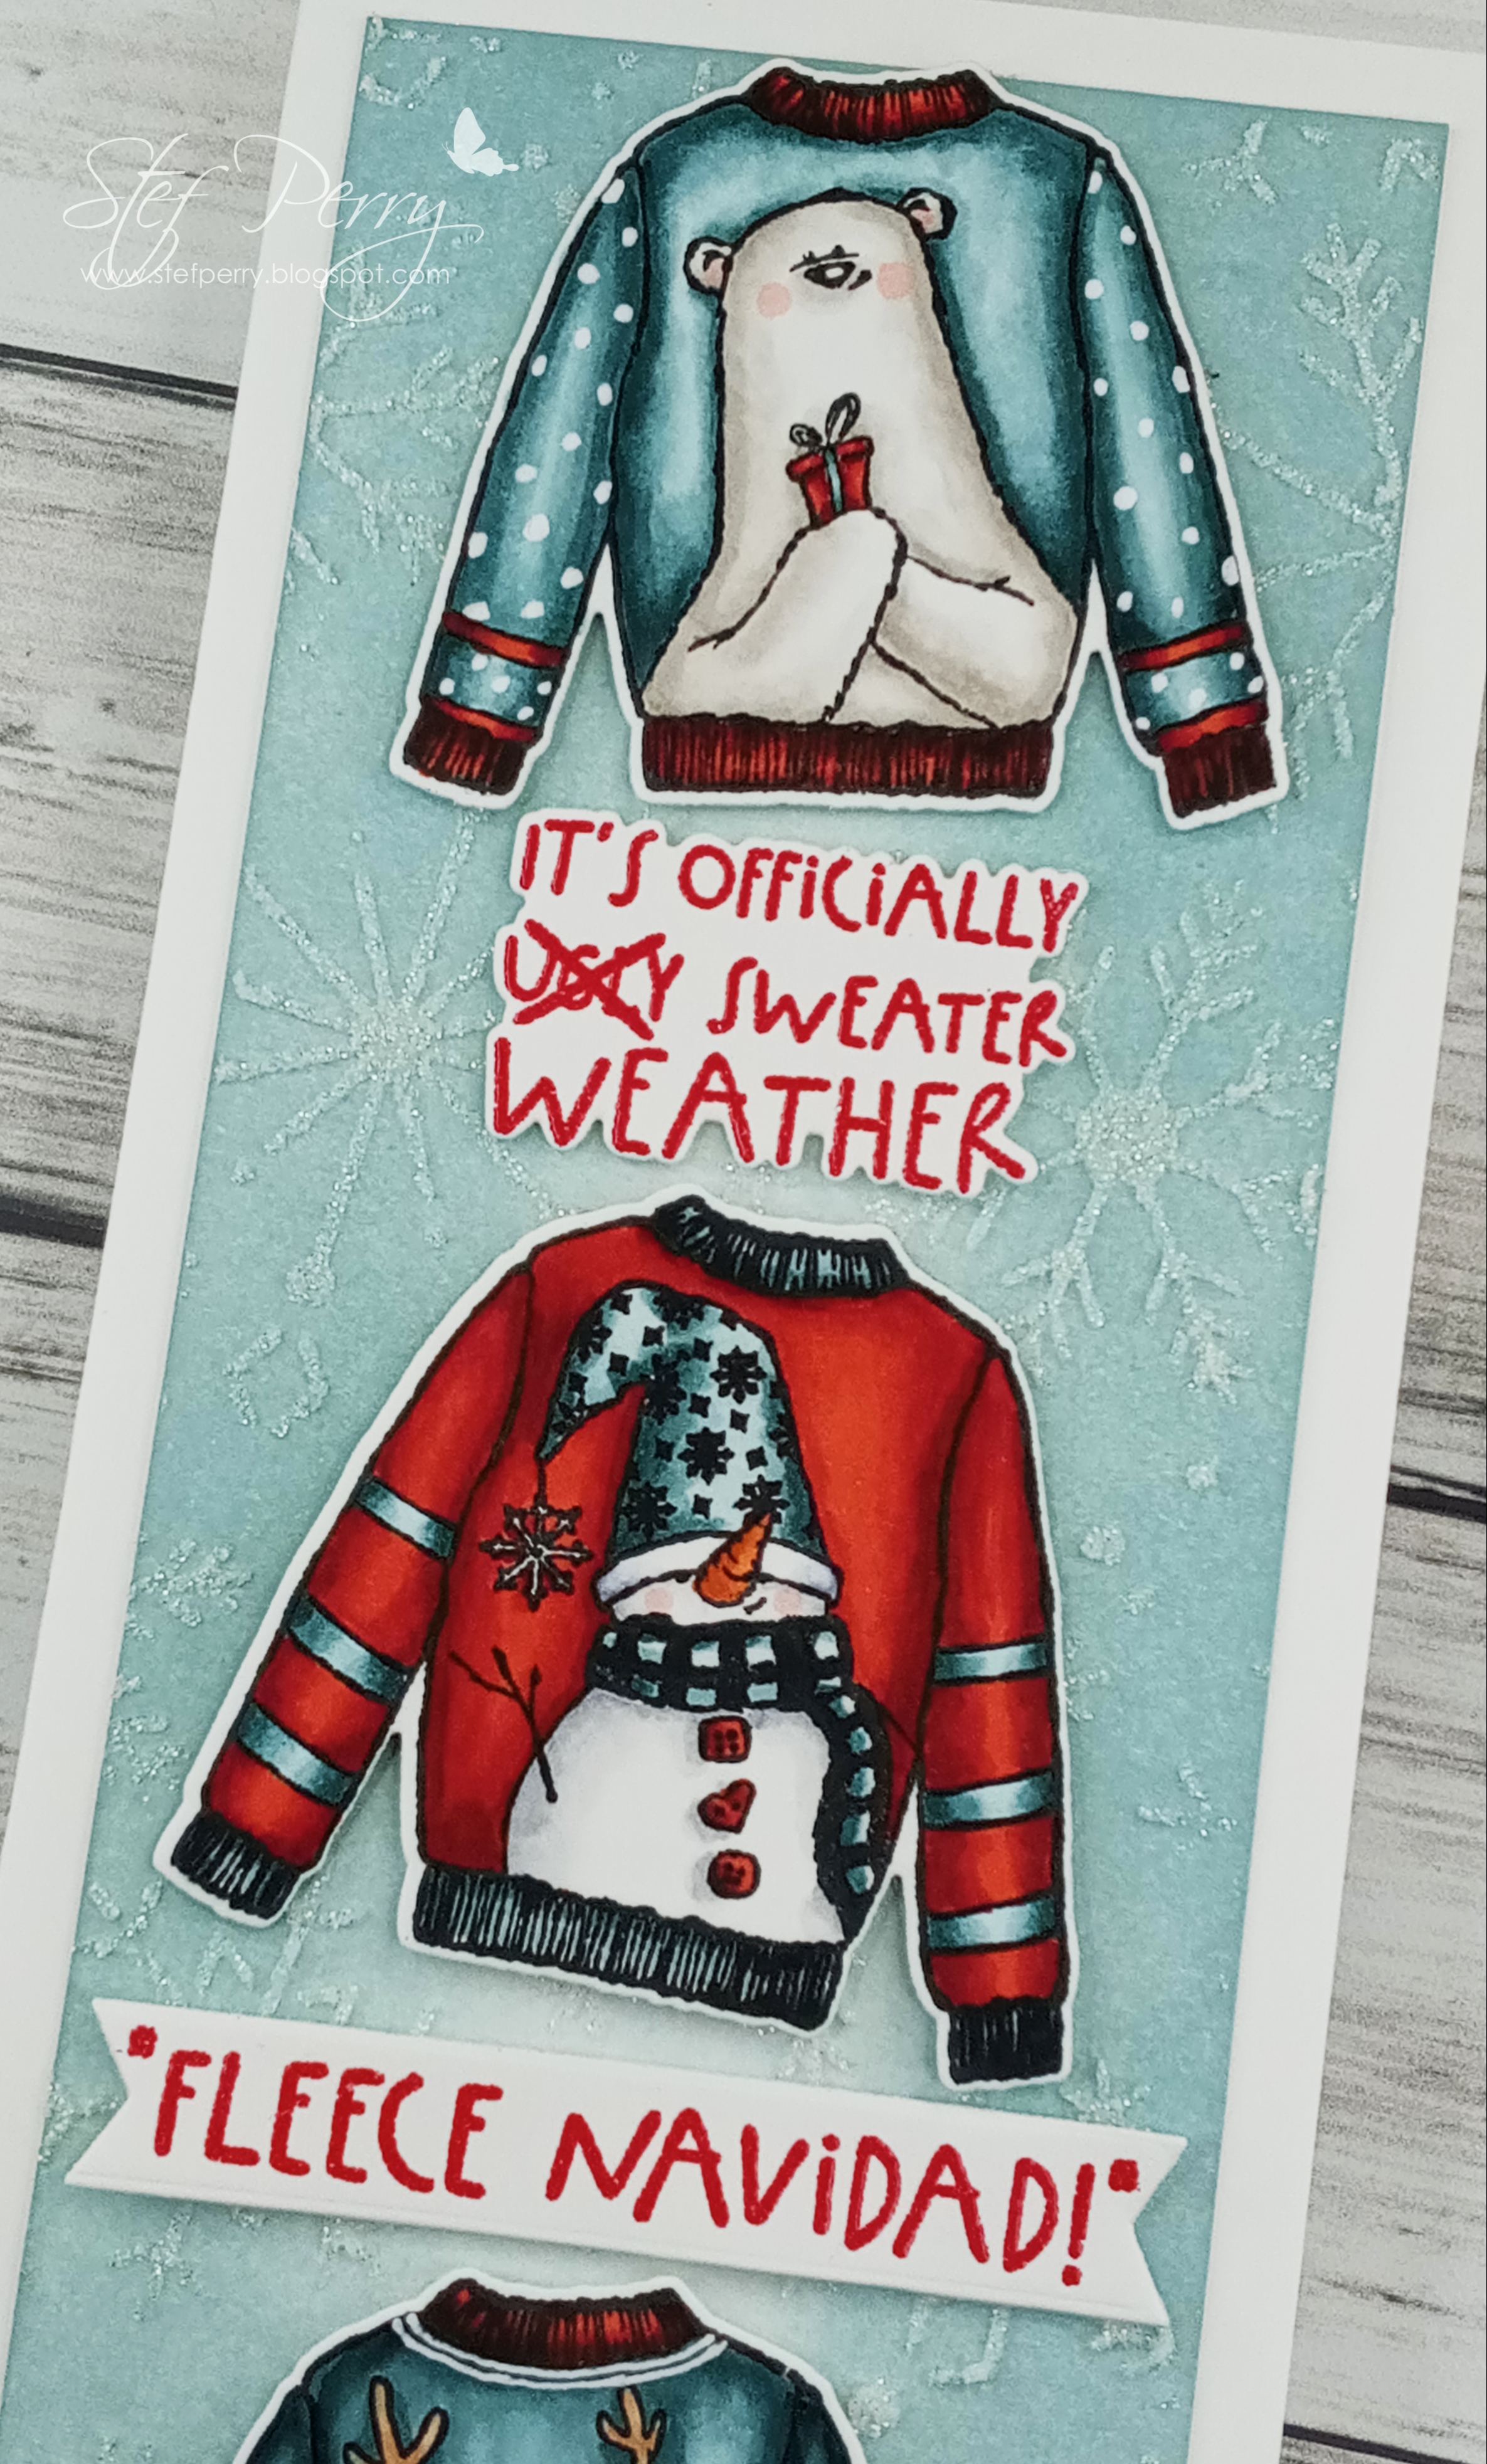
I just love this fluffy golden retriever with his hat on (can you say good boy?).  I stamped and colored him with Copic markers, then used the matching die to cut him out, then he was mounted onto a white die cut oval with thin foam squares.  I'd searched through my cardstock to find a blue to go with the striped pattern paper and came upon this previously die cut scallop oval. Yay, I love it when that happens!


I added the piece of patterned paper to my white card base, then found a strip of Stampin' Up Real Red card stock that worked beautifully for the cross piece (it's like the perfect true red - I always have some in my stash).  The focal image was adhered to the card and then the sentiment was stamped die cut and popped up on thin foam squares.  Then I decided it really needed some sparkle, so I found the previously die cut zig sag strips of Glitter White paper, added them above and below the red horizontal strip, plus found a few stars from the same glitter paper that I'd punched out last year and didn't use.  A little bit of shimmer was painted on the white "fur" on the dog's had as the final touch.


Take care and have a great remainder of your week and stay cool if you're suffering through the many heat waves around the country right now.  Thanks for stopping by!

Stef


Stamps:  Christmas Hats, Happy New Year (both Anita Jeram/CCC)
Paper:  Neenah Solar White, Sea Glass (Simon Says Stamp), Real Red (SU), Glitter White (SSS), Cool Collab Patterned Paper (MFT)
Ink:  Memento Tuxedo Black, Versafine Clair Nocturne
Other:  Christmas Hats die, Scallop Oval die (Spellbinders), Essential Ovals dies (Ellen Hutson), Stars Border punch and Zig Zag Border die (both ret. SU)
Copics:  R59, 46, 27, 17, YR27, 24, 23, 31, 30, W9, 7, 5, 3, 1, 0

Sunday, August 21, 2022

Old Friends for Sunday Stamps

Hello friends! It's time for a new challenge at Sunday Stamps and this week we have fabulous sketch created by the talented Annette!

I decided to use some newer products I hadn't yet used to create my card and to use a rectangular frame rather than a circle.


I started by using the Stampin' Up Timeless Tiles background stamp.  I've had this for months and it needed to be inked up!  I used a light green and purposely die not try to get complete coverage.  When that was done, the panel was trimmed down and adhered to a white card base. I did use a sponge dauber to add some ink for a tiny bit of antiquing, but it's very hard to see in photos because I intentionally left it very light.  

Next the flowers were stamped, colored with Copics and die cut with matching dies.  I also die cut the frame four times, three out of white and the last out of silver, then adhered them together.  The sentiment is from the same stamp set as the flowers and was stamped with a darker green ink.


The cross pieces were trimmed down from white cardstock, then I used the direct to paper method with the same green used to stamp the background.  When dry, they were added onto the card front, then topped with the frame and flowers, along with the sentiment, and that finished it off.  No embellies this time.


Thanks for visiting, I appreciate it.  Be sure to use the link above to see the beautiful cards by the other DT members and hopefully be inspired to play along with us!

Take care!

Stef


Stamps:  Timeless Tiles (SU), Focus on You (Altenew)
Paper:  Neenah Solar White, Matte Silver (Simon Says Stamp)
Ink:  Memento Tuxedo Black; Aspen and Pine (SSS); Antique Linen Distress
Other:  New Day Card Kit Frame (Altenew), Focus on You dies
Sketchmarkers:  V61, 62, 54
Copics:  G29, 21, YG45, YR23, Y17

Friday, August 19, 2022

CAS Happy Holidays

Hello friends!  I finally had a chance to work on a couple of Christmas cards last week, and the one I'm sharing today was made for the monthly CAS Christmas Card Challenge.  I was determined to make Christmas cards every month this year so it would not be a panic-filled time in my craft room come December, but then I was wooed away by all the pretty flowers of spring and let go of my Christmas card making fervor.  Now I'm trying to remedy that!  At least it's August and not late fall lol!


For my card, I used some dies that are intended for creating a snow globe shaped tag or ornament, but instead I used them on my card front. I originally saw them used in a Jennifer McGuire video back in November 2020, where she used them to make tags.  You can find it here. I thought they were so cute and finally bought the dies during a Memory Box sale this year.


With the exception of the night sky, everything was die cut from white card stock.  I layered two of the snow globe dies together to create the hills and pine trees, which were then adhered to an ink blended and splattered panel die cut with a nested globe die.  The panel for the sky was one I'd previously created and stuck in my stash for future use. I used Distress Inks and splattered with water and white gouache to create the "snow".


The sentiment was stamped in blue pigment ink that matched perfectly and was die cut with a label die.  A panel of white was embossed with a snow folder, adhered to the white card base, then the snowglobe scene added on top.  Santa and the reindeer, along with the star were adhered and the sentiment label popped up with thin foam squares.  The last step was to add Star Dust Stickles to the Star, Santa and the Reindeer and the trees for that great bit of sparkle!


Thanks for taking time to visit!  Take care and have a great weekend!

Stef


Stamps:  My Monthly Hero Oct 2017 card kit (sentiment/Hero Arts)
Paper:  Neenah Solar White, Strathmore Bristol
Ink:  Versafine Clair Blue Belle; Seedless Preserves, Chipped Sapphire and Blueprint Sketch Distres
Other:  Memory Box Cabin Snowglobe, Radiant Snowglobe, and Nested Globe dies, Stars die (Simon Says Stamp), Softly Falling embossing folder (ret. SU), Fishtail Foundation die (MFT), white gouache, Star Dust Stickles

Thursday, August 18, 2022

Sweater Weather for the Tic Tac Toe Challenge

Hello friends!  It's time for a new Tic Tac Toe Challenge!  This week Claire has created a wonderful tic tac toe board to spark your imagination!

I'm also joining the Time Out Challenge to create your own background, the Peace on Earth Christmas Challenge, which is Anything Goes, along with the Simon Says Stamp Wednesday Challenge with a theme of Christmas and the Simon Says Stamp Monday Challenge with a theme of Fun with Stencils.


I decided to go diagonal on the tttc board - polka dots, die cuts, embossing - and had oodles of fun making this cute slimline Christmas card!


Oh my, those sweaters with the cute images just drew me in and then. The. Sentiments.  Love a good pun!  The stamp set is new from Colorado Craft Company and the illustrator is new to 3C as well.  Her name is Kris Lauren and I was totally smitten with her work along with those of Anita Jeram.  Lots of cute Christmas cards in the near future!

Anyway, I stamped out these three sweaters, colored them with Copic markers and then used the dies to cut them out.  My white gel pen was handy in adding polka dots on the sleeves of the bear sweater and some extra line detail on the deer sweater.   


The background panel was ink blended with Speckled Egg Distress ink, which I was thrilled to find matched my BG markers beautifully.  Next I used a snowflake stencil and applied Glitz Glitter gel over it for some pretty sparkle.  While that dried, the sentiments were red heat embossed and die cut.  I adhered the background panel to the white card base, laid out all the components how I wanted them arranged, then adhered them all with thin foam squares and I was finished!  My husband even liked this card (although he rolled his eyes at the puny sentiment), so while it's not one I would mass produce, I have enough time before the holidays to make a few more to send out this year.


Thanks so much for visiting, I appreciate it.  Please be sure to use the link above to check out the fantastic cards by the other DT members and hopefully be inspired to join us this week!

Take care!

Stef


Stamps:  Sweater Weather (Kris Lauren/Colorado Craft Company)
Paper:  Neenah Solar White, Koh-I-Noor Bristol (Dick Blick)
Ink:  Memento Tuxedo Black, Versamark, Speckled Egg Distress
Other:  Sweater Weather dies, Delicate Snowflakes stencil (Simon Says Stamp), White Glitz Glitter Gel (Gina K Designs), Sakura White Gelly Roll pen, Red Hot Embossing Powder (GKD)
Copics:  BG78, 75, 72, 70, R59, 46, 27, 05, 20, W9, 3, 1, 0, C3, 1, 00, BV23, 20, YR18, 68, 65, E29, 37, 34, 31, 30

Monday, August 15, 2022

Beautiful Birthday for The Flower Challenge

Hello friends!  Today's card is for The Flower Challenge mid-month reminder of our current challenge which is to use a circle or circles on your card.  I've gone the easy route this time with my card and you can too!  Just remember to upload your card by the 25th.


For my card, I used one of my all time favorite floral images from Altenew.


The flower, leaves and berry branch were all stamped, colored with Copic markers, then die cut with the coordinating dies.  I love the soft pink with the dark blue-green leaves, and I used a muted green and purple for the berry branch.  I had a leftover die cut circle with a pretty design and decided to use that for mounting the floral image.


Happily, the embossed sentiment was a leftover as well.  For the background I used a cover plate on white, then die cut it with a rectangle die and adhered it to the white card base.  Two more circles were die cut and layered together under the top one, then added to the base.  I adhered the leaves and branch to the back of the flower, trimmed off any excess, then used thin foam squares to adhere to the circle.  The sentiment was also added with foam squares and some enamel dots finished things off.


I certainly hope you'll join us by the 25th of the month and in the meantime, be sure to use the link above to see my teammate's beautiful creations!  

As always, thanks for visiting and take care!

Stef


Stamps:  Beautiful Day, Sentiment Strips 3 (both Altenew)
Paper:  Neenah Solar White, Pitch Black (Hero Arts)
Ink:  Memento Tuxedo Black, Versamark
Other:  Beautiful Day matching dies, Featured Sentiment die (A), Fold Edge Circle die (Pinkfresh Studio), Stitched Diamonds Coverplate die (PS), Nested Infinity Rectangle die (HA), Cherry Blossom Enamel Dots (A), Fine Detail White Embossing Powder (Simon Says Stamp)
Copics:  RV95, 55, 52, YR18, 27, 23, V28, 25, 22, BG99, 96, 93, 90, 78, 75, 72

Wednesday, August 10, 2022

Butterfly Birthday

Hi there and welcome!  Today the card I'm sharing was made for three challenges - Just Us Girls (Butterfly), The Paper Players (Birthday) and Seize the Birthday (no stamping).  


Since I was using some larger butterflies, I decided to create a slimline card.


Starting with the butterflies, they were first embossed then die cut with coordinating dies.  They were ink blended with three shades of aqua (my photo reads more blue than how they look IRL), then I applied some Distress Foundry Wax in Glided along each of the wings.  The foundry wax was then heated to obtain the shine.  Separately from the wings, the butterfly bodies were die cut from gold metallic cardstock and adhered after the wax cooled.  The sentiment was also die cut from the same gold metallic cardstock and also from white cardstock four times.


Next I used a leaf stencil for the background, inking in greens and splattering with gold metallic paint.  It was trimmed down, adhered to the white card base, then three layers of a scallop frame were added.  The butterflies were adhered leaving room for the die cut sentiment.  

Originally the sentiment was topped with the gold metallic layer, but I could not get a decent photo of it, so I added a white layer on top and offset just a little so you could see a little gold behind it.  It was adhered to a vellum shadow layer and added to the card to finish things off. 


Thanks for taking time to stop by, I always appreciate it.  

Take care!

Stef


Paper:  Neenah Solar White, Matte Gold (Simon Says Stamp), Vellum
Ink:  Sprout, Fairway, Field, Seafoam, Surf, Ocean
Other:  Happy Birthday Brush Script dies (SSS), Floating Leaves Stencil (SSS), Graceful Butterfly Embossing Folder and Dies set (SSS), Slim Stitched Scallop Rectangle die (Pinkfresh Studio), Gansi Tambi Starry Colors Metallic paint, Gilded Distress Foundry Wax (Ranger)

Sunday, August 7, 2022

Just A Note for Sunday Stamps

Hello friends!  It's time for a new challenge at Sunday Stamps and this time we have a beautiful color combination to spark your creativity.


I'm also joining the current dies and/or stencils challenge at Addicted to Stamps and More.


I love Autumn and these colors really lend themselves to Fall leaves, pumpkins or toadstools, but I decided to use them instead with some sweet flower dies.


This was a really fun and easy card to make.  I began by die cutting the scallop panel, masking off the scallop border, then ink blending with three yellows, primarily in the lower left, leaving the upper right white.  Then, when I removed the masked scallops, I had a nice white border all the way around the panel.  Next, all the flowers and centers were die cut then colored with Copic markers to capture the peachy-orange and dark orange colors.  When that was done, I used white acrylic paint to splatter both the panel and the flowers.


When the paint dried, I did a trial run on the placement of the flowers to determine where the sentiment would fit.  It was stamped in brown pigment ink, then the flowers were adhered to the panel just at their centers so I could give the petals a little lift for some dimension without using foam tape.  The scallop panel was layered on two additional die cut panels for more dimension, then adhered to the brown card base, and I was done.


Thanks for visiting, I appreciate it.  The other DT members have some fabulous cards for even more inspiration, so be sure to use the link above to check them out and hopefully be inspired to join us!

Take care!

Stef


Stamps:  Sentiment Sampler (retired Paper Smooches)
Paper:  Neenah Solar White, Early Espresso (SU), Distress Heavystock
Ink:  Versafine Clair Pinecone; Scattered Straw, Fossilized Amber and Wild Honey Distress Inks
Other:  Petite Blooms Flower set dies (Poppystamps), A2 Scallop Rectangle die (Honeybee Stamps), Picket Fence Distress paint
Copics:  R08, YR02, 18, E95, 93, 19

Thursday, August 4, 2022

In the Moment

Hello and welcome!  I'm back with another post today, this time for a fun challenge at The Paper Players (you can find my DT card for both The Flower Challenge and the Tic Tac Toe Challenge here)  

Since the Paper Players' challenge fell on the 5th Sunday of the month, Claire has created a fantastic Tic Tac Toe board. I went down the middle column (person/blue/cold drink).


I'm also sharing my card at the Simon Says Stamp Wednesday Challenge, where this week's theme is to Emboss It.

I decided to use a new-to-me stamp set for my card.  The In the Moment stamp set from Stampin' Up has three lovely images, one of which worked perfectly with the tic tac toe board.


I started by stamping our lovely lady enjoying her cold glass of rose while enjoying her ocean view.  For time's sake I used Copic markers to color the scene, but all three of the images would definitely lend themselves to coloring with watercolors as well.  The colored panel was die cut and layered on a slightly larger square of white cardstock.  


Next a panel of Fresh Freesia was embossed with the retired SU Seaside folder, then adhered to a white card base.  I cut a rectangle of kraft to mound the picture and the sentiment, but before adhering I felt it need a little something more.  So, I think determining what that "something more" should be took more time than the rest of the card lol!  In the end I used a retired piece of crochet trim under the main image, which I think added some delicate texture.  After everything was adhered, I used Glossy Accents on the wine glass to give it some shine and when it was dry, used a white gel pen to add a line of reflection and then decided to create some waves in the water with it as well.


So glad you took time to visit, I appreciate it.  Stay cool and take care!

Stef


Stamps:  In the Moment (SU), Sentiment Strips (Altenew)
Paper:  Neenah Solar White and Desert Storm, Fresh Freesia (SU)
Ink:  Memento Tuxedo Black, Versafine Clair Nocturne
Other:  Seaside embossing folder (ret.SU), Selfie Squares die (MFT), Skinny Strips die (MFT), Victoria Crochet Trim (ret.SU), Ranger Glossy Accents, Sakura White Gelly Roll pen
Copics:  B18, 16, 000, V05, 01, 000, E59, 57, 55, 49, 47, 34, 31, 30, 13, 11, 00

Stitched Blooms Birthday for The Flower Challenge and the Tic Tac Toe Challenge

Hello friends!  Today I'm sharing a design team card that I was able to use for both The Flower Challenge and the Tic Tac Toe Challenge.  


I'm also joining the dies and/or stencils challenge at Addicted to Stamps and More, and the Happy Birthday Challenge at the Simon Says Stamp Monday Challenge.


For TTTC173, I went on the diagonal (stencil, birthday, flowers), using a stencil with dots, which also works perfectly for TFC theme of circles!  The flowers are all from MFT's Stitched Blooms dies and I had oodles of fun combining the different die cut elements to create these flowers.


I used two peach toned colors of cardstock along with white for the flowers and two greens.  All the flower dies were cut once out of each color and I cut multiples leaves from the two greens.  They were sorted, then I started playing around layering different flower combinations until I was pleased with what I had, then adhered them together.  While I've been using more die cut florals on my cards, these kinds of flowers are a bit out of my wheelhouse in terms of card layouts.  I went to Pinterest for some inspiration, where I found a lovely card by Kay Miller here that inspired this design.  

After stenciling the background panel with dots in a light peach ink, it was trimmed down and adhered to a panel of gold mirror cardstock then layered on a white card base.  I used a stitched rectangle die to trim down another white panel, then added the flower groupings along with the sentiment that was also die cut from gold mirror cardstock.  A few gems seemed necessary for the flower centers, just for that added bit of sparkle.


Thanks for taking time to stop by, I really appreciate it.  We'd love to see you join us for both challenges - you have until the 25th of the month to join The Flower Challenge and you have until the morning of August 11th to play along with TTTC173.  Be sure to use the links above to see even more inspiration by both amazing DT members!

Until next time, take care!

Stef


Paper:  Hammermill White; Tonic Gold Mirror; Sprout, Parsley, Grapefruit and Sorbet (C&9)
Ink:  Peachy (Simon Says Stamp)
Other:  Stitched Bloom dies (MFT), Happy Birthday Poe Script dies (Poppystamps), Stitched Rectangle die (SSS), I Like Small Dots stencil (SSS), Marvelous Moments Gems (Honeybee)

Monday, August 1, 2022

A Charming Gardner for Color Hues

Hello friends!  Today I'm honored to be a guest designer for Color Hues. While thrilled to be joining this wonderful team for their current challenge, it is also a bittersweet time, as both the Color Hues and Seize the Birthday design teams lost their treasured friend and teammate Lindsey after a long, hard-fought battle with cancer.  As Nancy Leppek said so beautifully "Lindsey was well-known for her amazing creativity, witty sense of humor and immense capacity to support and encourage her design team members and challenge participants. The crafting community will miss her shining light."  Indeed we will.  


Today's color challenge was chosen by Lindsey, so the DT members of both challenges are joining together to honor and celebrate her by sharing "Lindsey Inspired" projects using her Blue and Purple combination, along with things she loved most as inspiration.  Please join us to celebrate and pay tribute to Lindsey!


Here are a few of Lindsey's favorite things:  

Humor
Cats
Gardening/flowers
Love of reading
Friendship
Wine 
Tea
CAS designs

For my card, I was inspired by her love of CAS designs along with flowers and gardening.  


The floral image was stamped on a panel of white, making sure to leave room for the sentiment.  It was colored with Copic markers in the challenge colors along with gray for the leaves.  The center of the large flower was rather undefined, so I used a Copic Multiliner pen to create lines to the ends of the stamen, colored the center portion with gray, then used a white gel pen to color the stamen ends and the centers of the smaller flowers.  

I put the panel back in my Misti, stamped the sentiment, die cut the panel to 4.75 x 6.75 and adhered directly to a 5 x 7 inch plum card base.  The font on the sentiment is rather small but hopefully you can read it better below.  When I read it, I found it touching and uplifting!


Thanks so much for visiting, I appreciate it so much.  Please come join us for this wonderful challenge and tribute to Lindsey.  In the meantime, be sure to use the link above to see all the DT cards, you won't want to miss all that inspiration!

Take care!

Stef


Stamps:  Craft Your Life:  Always Sunshine (Altenew), Friendship Blooms (sentiment/collaboration set from Gina K Designs and Hero Arts)
Paper:  Neenah Solar White, Plum (Hero Arts)
Ink:  Memento Tuxedo Black, Versafine Clair Nocturne
Other:  A7 Layers rectangle die (Waffle Flower), Sakura White Gelly Roll pen, 0.1 Copic Multiliner pen
Copics:  B39, 26, 24, 21, 0000, RV69, 66, 63, V06, W9, 7, 5, 3, 1