Showing posts with label Anita Jeram. Show all posts

Thursday, August 1, 2024

Bring On the Treats for Color Hues

Hello friends!  Welcome to August and to the latest Color Hues challenge!  This time I am your hostess and have chosen pink and brown as our hues of color.

I'm also sharing my card over at Addicted to Stamps, where the current theme is "Birthdays".


I had fun making a "sweet" slimline birthday card with cute mice!  


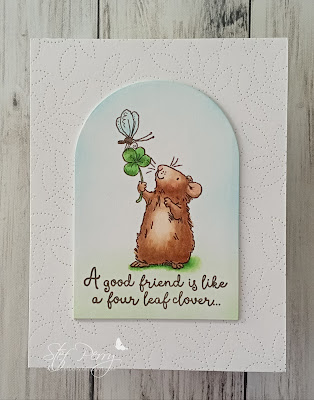
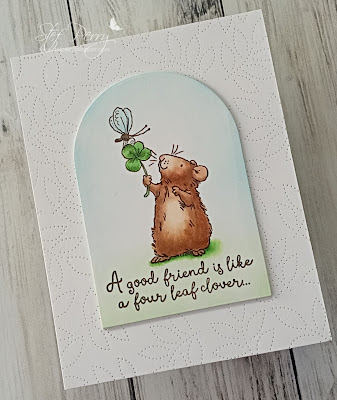
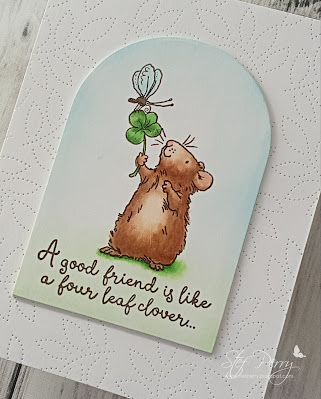
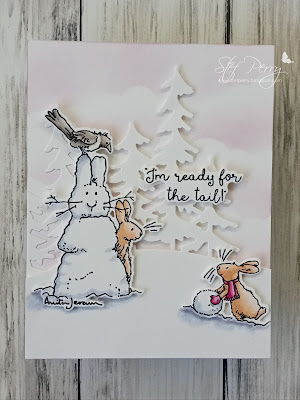
Yes, we have some mice bringing treats for the birthday party!  The first step was to find ink and Copic marker colors that went well together.  Once that was done, the background was ink blended with pink and brown, then I went over the pink with a polka dot stencil.  I varied my inking pressure to create a non-uniform look.  I then splattered the stenciled portion of the background with white iridescent shimmer spray using a paint brush reserved specifically for that task.

Next, all the mice were stamped, colored and die cut.  I used gray for the mice so they would stand out from the background and used various light and dark pinks and browns for the treats.  After stamping the sentiments, the sub-sentiment was cut out with a label die and I fussy cut the happy birthday to give it a fun look.  

The card was assembled with the three middle mice popped up on foam tape, as well as both sentiments.  I used a brown marker to darken the "ground" as it was too light with just the ink blending.  I then colored over the white borders of the die cut images with a brown and pink marker so the die cuts would blend into the background.  I have mixed feelings about doing that; I think next time I would stamp and mask where necessary rather than add die cuts.  But all in all, it still turned out as cute as I'd hoped.  Pink gems were added and an aqua shimmer pen was painted on all the confections for a bit more sparkle.


What are you inspired to create with these colors?  My super talented teammates have a bevy of fabulous cards that will spark your creativity, so be sure to visit the challenge blog before heading off to your crafty space!  The challenge will remain open until 9am EDT Wednesday August 14th.  Hope to see your card in the gallery!

Take care!

Stef

  • Colorado Craft Company/Anita Jeram So Sweet Slimline stamps and dies
  • Simon Says Stamp Slimline Borders Stencil
  • MFT Slimline Skinny Strips die
  • SSS Latte ink
  • Altenew Baby Pink ink
  • Altenew Pink Tourmaline Gem Sparkles
  • Hero Arts White Iridescent Shimmer Mist
  • Tonic Aqua Shimmer pen
  • Sakura White Gelly Roll pen
  • Copics:  E59, 57, 53, 37, 35, 33, 31, 30, RV06, 04, 02, 10, T2, 0

Sunday, July 7, 2024

Summer Fun for The Paper Players

Hello friends!  I am thrilled to be here with my very first card for The Paper Players as a new member of their design team!  Also joining the team are the super talented Elizabeth Stewart and Jan Clothier.  After spending a year as a Guest Designer a few years ago (as did Elizabeth and Jan), it's a wonderful moment to be back as a permanent part of the team with the amazing ladies that have inspired us all for many years! ❤️ 

So, shall we get on with the challenge?  The lovely Claire has chosen Summer Fun for Theme week.

So many options for that theme and I chose one of my favorite things to do in summer, which is hanging out by the ocean.


I decided to use a fun Anita Jeram illustrated stamp set to create a beach scene.  I began by stamping and coloring the images, including the buried cat and the sandcastles, then cut them out with the coordinating dies.  The sentiment was stamped and fussy cut.

The background was masked off as I created each section - sand, water, and sky.  Copics were used to color the sand so they would match the buried cat and sandcastles, then I used a light, medium and dark in Distress ink to create the sky and water, deliberately not fully covering the sky to give the illusion of clouds.  The water was enhanced with a couple of blue Copic markers, then I used a white gel pen to create the "seafoam".  

The row of walking friends was adhered directly to the background, then the buried kitty added with thin foam tape.  The sandcastle was then popped up on regular foam tape.  The sky to the left looked a bit empty, so I added three die cut birds and called it finished.


Won't you come join us and show us your version of fun in the summer?  We'd love to see what you're inspired to make!  The challenge will remain open until open until Noon PST on Friday, July 12th.

Take care!

Stef
  • Anita Jeram/Colorado Craft Company Beach Life stamps and dies
  • Hero Arts Cloudy Sky Scene Fancy Dies
  • Tumbled Glass, Broken Chine and Salty Ocean Distress Inks
  • Copics - CATS - YR27,24, 23, 31, N4, 2, 0, R21; NECKTIE and HAT - B16, 12, R39, 29, 24; DOGS - E27, 23, 21, C7, 5, 3, 1; SAND - E37, 35, 33, 31, 30; OCEAN - B26, 16, 12, 000; SHOVELS - YR26, 08, B16, 12; BUCKETS - R39, 29, 24, B16, 12, Y26, 08

Thursday, May 9, 2024

Magical Birthday for Seize the Birthday

Hello friends!  I'm very pleased to share my card as a Surprise Party Guest for Seize the Birthday!  The challenge is always to make a birthday card and optionally add "toppings" which this time is Beach Theme.

I had several options for this theme in my craft stash, but decided to use a heretofore unused stamp set illustrated by Anita Jeram for Colorado Craft Company, so I'm sharing over at the lovely Darnell's NBUS blog.

I'm diving deep into my Copic markers to make this wonderful stamp set come to life!


This stamp was such a treat to color but it is a bit overwhelming with all the different elements, so I think that's why I hadn't inked it up before.  I went to Pinterest for inspiration and ideas for how to color the mermaid's hair (not my strong suit lol!) and saw Amy Young's card here (if you love colorists, you definitely should follow her!) which also gave me the idea for the sparkles, plus I'd seen Kelly Taylor (another fabulous colorist you should follow!) do something similar here.


When the coloring of the scene was complete, I used a shimmer pen on the mermaid's fin (?), the stars and some shells, then added the sparkles with a white gel pen.  After using a square die to trim the panel down to 5.25" square, I thought it would look cool to continue the coloring on the outside of the stamped frame, then added sparkles all around there as well.  It was mounted on a 5.5" square card base and a sentiment from a different AJ/CCC stamp set was added in the top left corner.  

Then I created a panel for the interior using a stamp with the same flourishes as the frame, a shell and a starfish, and a sentiment from an old Lawn Fawn set that worked perfectly!


Thanks so much for stopping by.  Be sure to pop over to the challenge blog, the design team has some fabulous inspiration!

Take care!

Stef

  • Anita Jeram/CCC Mermaid & Whale stamp, Watch This sentiment stamp and die
  • Lawn Fawn Fairy Friends (interior sentiment)
  • Pink & Main Square die
  • Sakura White Gelly Roll and Black Glaze (walrus and whale eyes) pens
  • Tonic Nuvo Aqua Shimmer pen
  • Copic markers

Wednesday, November 22, 2023

Christmas Hats for Christmas Craft Creations

Hello friends, it's time for our reminder post at Christmas Craft Creations!  For our November challenge, we're asking you to add a hat to your design.


I decided to have some fun with this challenge and created an A7 card with lots of cute critters wearing hats.


I couldn't have had a more perfect stamp and die set in my stash that the Christmas Hats one from Colorado Craft Company and illustrated by Anita Jeram.  After coloring all the critters with Copic markers, they were die cut along with the trees in the background.


The next step was to create the background.  On an A7 panel, I ink blended Simon Says Stamp Galaxy for the sky, then added a panel of snowy hills that I hand cut from a panel of white.  Before adhering to the panel, I used a light blue ink both on the base of the piece and at the top of the hills, then glued it down.  The trees were die cut from dark green cardstock, then I used a dark brown Copic marker to color the trunks before adding to the background.  Next, the sentiment was white heat embossed, then the critters were adhered either with glue or foam tape.  Before adding to the card base, I sprayed the panel with shimmer spray then added "snow" with white paint.


Thanks for stopping by and I do hope you'll join us this month for this fun challenge!  In the meantime, please take a moment to visit the challenge blog, where my talented teammates have lots of inspiration for you.

Take care!

Stef


Stamps and dies:  CCC/AJ Christmas Hats, Honey Bee Stamps Pine Trees
Paper:  Neenah Solar White
Ink:  SSS Galaxy and Marine; Memento Tuxedo Black; Versamark
Other:  SSS Fine Detail embossing powder, Hero Arts White Iridescent Shimmer Spray, Dr. Ph Martins Bleed Proof White
Copics:  R89, 59, 29, 27, G99, 94, 82, 28, 09, 03, B28, 26, 24, 21, 0000, E47, 44, 43, 42, T4, 2, 0, YR27, 24, 23, Y21, C3, 1, 0, W5, 3, 1, 0

Wednesday, July 26, 2023

Winter Wonderland for Christmas Craft Creations

Hello and welcome back!  This month's theme at Christmas Craft Creations is Anything Goes - how easy is that?  I'm here with my reminder post and card, and I'm hoping you'll have time to join us and add to your holiday card stash as well - the challenge stays open until Tuesday, August 8th.


Last fall I bought a couple of the Anita Jeram illustrated Christmas stamp sets from Colorado Craft Company but never had an opportunity to use them, so I pulled one out and did so for this challenge!


I absolutely adore these sweet little bunnies and their squirrel friend, obviously on their way to a holiday party as they have presents in hand.  The scene was stamped on an A2 panel of white and also on some masking paper.  While I do have the dies for this set, I decided to mask instead because I really love the look of continuity with a snowy scene.  Once the mask was in place I used a light and medium blue for ink blending the background and once that was complete, the critters and the rest of the scene were colored with Copic markers.


After the panel was cut down with a rounded rectangle die, into my splatter box it went, where I gently added snow with white paint and a small round paintbrush.  I did lay a small piece of Post-it tape over the faces of the critters, because if I forget to, inevitably a big splat would hit one lol!  While the splatter dried, the sentiments were stamped with blue pigment ink and die cut with label dies.  The dried panel was glued directly to the white card base, then the sentiments were popped up with thin foam squares to finish things off.


What is your favorite type of holiday card to make?  We'd love to have you share it with us at CCC!

Take care!

Stef


Stamps:  CCC/Anita Jeram White Christmas
Paper:  Neenah Solar White
Ink:  Simon Says Stamp Morning and Twilight, Versafine Clair Blue Belle, Memento Tuxedo Black
Dies:  Hero Arts Rounded Rectangle Infinity die, MFT Fishtail Foundations die, Gina K Master Layouts 9 
Other:  Dr. Ph. Martin's Bleed Proof White Paint
Copics:  E77, 74, 71, 33, 31, 30, 0000, G46, 43, 40, BG96, 93, 90, 57, 53, 11, 0000, B21, W3, 1, 0, R85, 83, 81, 20

Wednesday, August 31, 2022

Be Merry

Hello friends!  I was working away on my Christmas cards when I saw Anne Marie's terrific sketch at The Paper Players this week and decided to use it for another holiday card.  I'm also joining Addicted to Stamps and More with a Christmas theme and the Anything Goes challenge at Simon Says Stamp Wednesday Challenge. 


I decided to make a cute Christmas card for one of my many dog loving friends using one of the images from the new Anita Jeram/Colorado Craft Company stamp sets.


I just love this fluffy golden retriever with his hat on (can you say good boy?).  I stamped and colored him with Copic markers, then used the matching die to cut him out, then he was mounted onto a white die cut oval with thin foam squares.  I'd searched through my cardstock to find a blue to go with the striped pattern paper and came upon this previously die cut scallop oval. Yay, I love it when that happens!


I added the piece of patterned paper to my white card base, then found a strip of Stampin' Up Real Red card stock that worked beautifully for the cross piece (it's like the perfect true red - I always have some in my stash).  The focal image was adhered to the card and then the sentiment was stamped die cut and popped up on thin foam squares.  Then I decided it really needed some sparkle, so I found the previously die cut zig sag strips of Glitter White paper, added them above and below the red horizontal strip, plus found a few stars from the same glitter paper that I'd punched out last year and didn't use.  A little bit of shimmer was painted on the white "fur" on the dog's had as the final touch.


Take care and have a great remainder of your week and stay cool if you're suffering through the many heat waves around the country right now.  Thanks for stopping by!

Stef


Stamps:  Christmas Hats, Happy New Year (both Anita Jeram/CCC)
Paper:  Neenah Solar White, Sea Glass (Simon Says Stamp), Real Red (SU), Glitter White (SSS), Cool Collab Patterned Paper (MFT)
Ink:  Memento Tuxedo Black, Versafine Clair Nocturne
Other:  Christmas Hats die, Scallop Oval die (Spellbinders), Essential Ovals dies (Ellen Hutson), Stars Border punch and Zig Zag Border die (both ret. SU)
Copics:  R59, 46, 27, 17, YR27, 24, 23, 31, 30, W9, 7, 5, 3, 1, 0

Thursday, June 9, 2022

Art Is...

Hello friends, thanks for stopping by!  Today I'm sharing a sweet little card that I made for two challenges.  The lovely Lisa has chosen Paintbrush for Word Week at Just Us Girls, and the talented ladies at Addicted to Stamps and More are celebrating 10 years of challenges with a Make Your Mark challenge.  Big congrats to them!


I've admired all the beautiful paintbrush dies but haven't made that plunge...yet lol!  But I remembered I had a sweet Anita Jeram illustrated stamp set that worked perfectly.


Those two little bunnies watching the artist at work just make me smile!  There are some additional cute critters in the set, but I was in a hurry to get this card completed by the deadline, so I opted not to make an elaborate scene this time.  I colored the stamped image with Copic markers and used them to create a little sketched scene for the bunny to be "painting".  The image was then die cut with matching dies.


Next a panel of white was ink blended with light blue and tan, then die cut with a deckled rectangle die.  The sentiment was stamped then I fussy cut around it.  The panel was adhered to the ivory card base with thin foam tape, then the main image and sentiment added on top, also with foam tape and I was done!


Thanks again for visiting!  Take care and enjoy the upcoming weekend!

Stef


Stamps:  Art Is (Anita Jeram/Colorado Craft Company)
Paper:  Neenah Solar White, Antique Ivory (Hero Hues)
Ink:  Memento Tuxedo Black; Latte and Seafoam (Simon Says Stamp Pawsitively Saturated Ink)
Other:  Art Is dies, Deckle Layers Rectangle die (Waffle Flower)
Copics:  W5, 3, 1, 0, C3, 2, R20, B45, 52, E29, 37, 34, 42, 41, 000, G28, 24, 21, BG11, 10, 0000

Thursday, March 3, 2022

Irish Blessing for the Tic Tac Toe Challenge

Hello and welcome!  It's time for a new Tic Tac Toe Challenge and this time Jeanne has given us this very fun board to play with!


I'm also joining the current Simon Says Stamp Wednesday Challenge where the theme is to add a die cut.

For my card I went diagonal from bottom left to upper right - good luck symbol, Spring, ribbon/twine.


While I don't normally send cards for St. Patrick's Day, I couldn't resist this Anita Jeram set from Colorado Craft Company.  Plus I do have a dear friend that is of Irish descent and she will love receiving this.

I started by stamping the guinea pig in the field of shamrocks and the large sentiment on a panel of white, then lightly ink blending with green and blue inks.  I then used Copic markers to color the guinea pig and surrounding shamrocks, then stamped and colored a couple additional shamrocks to add around the sub-sentiment.


Next the colored panel was die cut with a deckled edge die, then added to a white panel that had been die cut with the slightly larger frame die.  I wrapped gold twine around both, tied a bow and secured it all the the white card base with adhesive.  The sub sentiment was stamped, die cut and added to the panel with thin foam squares and the two remaining shamrocks were added to the top and bottom to finish things off.


Thanks for visiting! I hope you'll use the link above to check out the fabulous cards by the other DT members and join us this week!

Take care!

Stef


Stamps:  4-Leaf Clover (Anita Jeram/Colorado Craft Co)
Paper:  Neenah Solar White
Ink:  Memento Tuxedo Black, Versafine Clair Nocturne, Ocean Waves and Firefly (Altenew)
Other:  4-Leaf Clover die, Mix and Match Frames die set (Altenew), Gold Twine (ret. SU)
Copics:  YG17, 05, 03, E33, 31, 30, 0000, R20

Thursday, February 24, 2022

A Good Friend

Hello and welcome!  I have a cute card to share with you that I made for the current CAS challenge at The Paper Players.  The lovely Ann has chosen the theme "Wild About Wildlife".


I'm also joining the current Simon Says Stamp Wednesday Challenge, where the theme is Anything Goes.

I had on my desk a sweet Anita Jeram/Colorado Craft company stamp set that I was planning to use for an upcoming DT assignment and thought this cute little guy would work perfectly for Ann's challenge.


Our little guinea pig is out and about in the yard and he's doubly lucky because he found a 4-leaf clover and made a new friend!  I started by lightly ink blending a panel of white card stock with green, then stamped the sentiment and the critters.  The panel was die cut with a arch shaped die, then I used a light hand to add blue ink for the sky with a small blending brush.  The guinea pig and dragonfly (I think that's what it is supposed to be???) were colored with Copic markers, then I added a bit of shimmer to the shamrock and the dragonfly wings.  


Next a panel of white cardstock was die cut with a leaf cover die, then adhered to the white cardbase.  I like the subtle pattern while still leaving plenty of white space.  Before adhering the main image, the accompanying sentiment "...hard to find and lucky to have!" was stamped on the inside of the card, then the die cut piece was added to the front with foam tape.  Super easy and simple!


Thanks for taking time to visit!  Take care and have a great weekend!

Stef


Stamps:  4-Leaf Clover (AJ/CCC)
Paper:  Neenah Solar White
Ink:  Gina K Chocolate Truffle Amalgam, Ocean Waves and Firefly (Altenew)
Other:  Pinpoint Leaf Plate Cover die (Memory Box), Essential Arches die (Ellen Hutson), Aqua Shimmer pen (Tonic)
Copics:  E44, 40, 33, 31, 30, 0000, R20, YG17, 05, 03, B000, 0000

Friday, January 21, 2022

Snow Happy for Just Us Girls

Hello and welcome! It's my fourth week as a Guest Designer for Just Us Girls, where it's Photo Week.


I'm also playing along with the Addicted to Stamps and the current Simon Says Stamp Wednesday Challenge.


For my card, I was inspired by everything in the Photo Week photo - the colors of blue and red, the winter scene and the hearts - but instead of snow people, I used cute animals.


I love this sweet scene between the bunny and deer! Like many card makers, Anita Jeram illustrations are some of my favorites.  First the scene was stamped on white cardstock, then I used a black Copic Multiliner to add additional snow in the background to give the scene more depth. Then everything was colored with Copic markers.  I grabbed the heart stamps from another AJ set, stamped, colored and die cut them.  


Next, a panel of light blue was adhered to the card base, then the main image was die cut with a scallop rectangle die and layered on two additional scallop rectangles for added dimension.  The hearts were glued to the scene, painted with a shimmer pen, then covered with Glossy Accents to make them shiny and that finished things off for this super simple card.  I opted not to add a greeting right now; I can always do that before I send it.


Thanks for visiting, I really appreciate it!  Be sure to use the link above to check out all the fabulous cards by the DT members and hopefully join in the fun this week!

Take care!

Stef


Stamps:  Snow Happy and Hedgehog Day (both AJ/Colorado Craft Company)
Paper:  Neenah Solar White, Surf Blue (SSS)
Ink:  Memento Tuxedo Black
Other:  Hedgehog Day dies, A2 Scallop rectangle die (Honey Bee), Aqua Shimmer pen (Tonic), Glossy Accents (Ranger)
Copics:  B0000, BV20, YG91, E47, 44, 47, 37, 33, 31, 30, W3, 1, R20, 24

Thursday, January 20, 2022

Flurries of Fun for the Tic Tac Toe Challenge

Hello and welcome! It's time for a new Tic Tac Toe Challenge and Claire has given us this fun board to work with.


I'm also joining the Four Seasons January Winter Challenge and the current Simon Says Stamp Wednesday Challenge where the theme is Four Legged Friends.


I went down the left column - snowman/girl, white, die cut, although for this card it's a snowman bunny!


This was a fun card to make, with those cute bunnies building a snowbunny.  The images were stamped, colored with Copic markers and die cut.  Next, a cloud stencil was used to create the ink blended sky, then the trees were diecut twice to create the background.  One was adhered directly to the stenciled background, then the next one was popped up with foam tape.  


The scene was completed with the bunny images added with thin foam tape, then I fiddled around trying to decide where to put the sentiment.  I had originally thought I'd add it on the snowbank below the bunnies but by the time everything was adhered, I really didn't have sufficient room, so it ended up across the trees.  And actually, I'm good with how it turned out.


Thanks so much for visiting, I appreciate it so much.  Be sure to use the link above to check out all the fabulous cards by the other DT members and hopefully be inspired to play along with us this week!

Stef


Stamps:  Flurries of Fun (Anita Jeram/Colorado Craft Company)
Paper:  Neenah Solar White
Ink:  Memento Tuxedo Black, Milled Lavendar Distress
Other:  Flurries of Fun dies, Alpine Trees die (Memory Box), Mini Cloud Edges stencil (MFT)
Copics:  E31, 30, 0000, RV17, 55, 52, BV20, W5, 3, 1, 0, R20

Wednesday, December 15, 2021

Nice List

Hello and welcome! Today I'm sharing what I think is my final Christmas card for 2021 and I made it using the colors from The Paper Players' current challenge.  I'm also sharing at the Four Seasons challenge, Watercooler Wednesday Challenge and the current Simon Says Stamp Wednesday Challenge where the theme this week is "Bling it On".


LeAnne gave us the perfect traditional colors to use this week.  It was a happy surprise to find I still had some Merry Merlot cardstock!


I love this Santa Bunny image!  He was stamped on white cardstock and colored with Copic markers for everything except the gold buckle and buttons.  For that I used a paintbrush and gold metallic paint.  The sentiment grounding Santa is from the same set and was gold heat embossed on Merry Merlot then die cut with the matching die.  I also die cut Santa but when I decided to layer him directly onto the Ivory panel (my Very Vanilla sub), the white outline did not look good at all, so I ended up fussy cutting him.


Next, the Ivory panel was die cut to give it that deckled edge, embossed with a 3D snowflake embossing folder on the Ivory panel, then I used the same gold paint around the edges.  The panel was adhered directly to the Merry Merlot card base, then the sentiment and Santa Bunny were added with thin foam squares.  The last step was to add a bit of bling with the gold baubles.


Thanks for taking time to visit, I appreciate it very much.  Take care and have a very Merry Christmas!

Stef


Stamps:  Santa Bunny (Anita Jeram/Colorado Craft Company)
Paper:  Neenah Solar White, Ivory (Simon Says Stamp), Merry Merlot (SU)
Ink:  Memento Tuxedo Black, Versamark
Other:  Snowflake Visions 3D embossing folder, Santa Bunny sentiment die, Mix and Match Frames dies (Altenew), Finetec Gold Metallic paint, Antique Gold embossing powder (Altenew), Gorgeous Gold Baubles (Trinity Stamps)