Wednesday, February 28, 2024

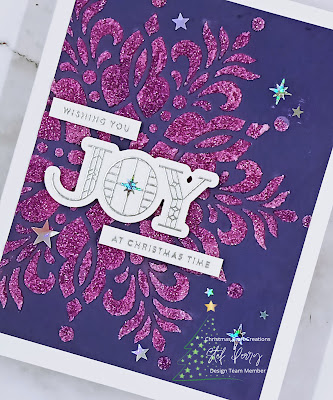
Wishing You Joy for Christmas Craft Creations

Hello friends!  Today's card is for the reminder post at Christmas Craft Creations, where this month we're asking participants to use an embossing folder or stencil.  Easy-peasy, right?


I tried a new technique that I saw Jennifer McGuire do, and while the technique results weren't very satisfactory, I did mange to salvage the card and I like how it turned out.


I started with a panel of Tim Holtz White Heavystock, which can take a lot of water and covered the front of my panel with Villainous Potion Distress Oxide ink.  The technique entails adhering a stencil over the card stock, misting with water, then absorbing the activated ink through the stencil.  This can be done as many times as you'd like until you're happy with the amount of ink removed.  You then dry the panel thoroughly, put the stencil back in place and use a lighter color of ink through the stencil were the ink was removed.  

Well, as I applied Picked Raspberry DOX through the stencil, it just didn't seem vibrant enough, so then I tried the same color in regular Distress ink and it was too dark!  Awwkkk! So my only alternative at that point was to apply some white glitter glitz gel through it and it did turn out beautifully.


After the glitz gel dried, I trimmed the panel down and added directly to a white card base.  The Joy sentiment and sub-sentiments were silver heat embossed then adhered to the card front with thin foam tape.  For additional the final touch, a few holographic stars were added, including one in the middle of the O in Joy.  I was very happy that I managed to save my card and add it to my holiday card stash!


We would love to have you join us, the challenge stays open until Tuesday, March 12th at 6pm GMT.  

Thanks for stopping by and take care!

Stef

  • Gina K Stellar Snowflake Stencil and White Glitter Glitz Gel
  • Simon Says Stamp Stained Glass Greetings stamps and die and Sentiment Labels die
  • Trinity Stamps Oh My Stars Holographic Confetti Mix
  • Villainous Potion DOX, Picked Raspberry DOX and Distress ink, Versamark

Friday, February 16, 2024

Cosmos Birthday for Color Hues

Hello friends!  It's time for a new challenge at Color Hues and this time I am hosting.  I chose a color combo that I don't normally use but thought it would be lovely as we are heading towards spring, or at least away from the worst part of winter (fingers crossed!).

As a reminder, use the hues of color you have on hand that are closest to the challenge colors and have fun creating!

I'm also playing along with the Anything Goes part of the current challenge at Seize the Birthday.


For my card, my "mint" green appears a bit more green in the photos but the ink I used were definitely on the "minty" side. Oh well, what can you do? (maybe breakdown and get a new camera lol!)


I decided to dust off my Betterpress and use it with a relatively new-to-me press plate and matching stencil set.  It was pressed in black ink on watercolor paper, then I used three colors of lilac and mint green inks to create some shading and variation of colors.  Then I took the lightest mint green and gently added it to the panel with a blending brush, while avoiding the flowers, to soften the bright white background.  

For the flower center I initially used a light touch of gray ink but I came back later to change things up but adding Distress Sparkle Texture Paste, which dries clear but made the centers look almost like they were covered with silver glitter.


While the sparkle paste dried, I die cut the sentiment from matte silver and also more from black cardstock for layering.  I debated about adding vellum behind the sentiment but decided not to, so it gets a bit lost in the photos, but looks very prominent in person.  

When the panel dried, it was cut with a rounded rectangle die and layered on black cardstock.  My intent was to mount it as is to a black card base but decided to add the layer of light lavender cardstock and it looked so much better.  After adhering the sentiment, I finished up by adding some pretty Aurora Borealis sticker gems for even more sparkle.


I hope these colors inspire you to head to your craft room, but before you do be sure to visit the challenge blog and see all the gorgeous cards created by my amazingly talented teammates!  The challenge will remain open until 9 am EST February 28th.

Take care!

Stef

  • Spellbinders Cosmos Backdrop Betterpress Plate and Stencil
  • Poppystamps Happy Birthday Poe Script die
  • Hero Arts Rounded Rectangle die
  • Distress Watercolor, Hero Arts Pitch Black and Simon Says Stamp Lavender cardstocks
  • Simon Says Stamp Lilac, Orchid, Amethyst, Spring, Dublin and Lucky ink pads
  • Distress Sparkle Testure Paste
  • Honeybee Stamps Aurora Borealis Gem Stickers

Thursday, February 15, 2024

Favorite Things for The Flower Challenge

Hello friends!  Mid-month has rolled around and which brings our reminder post at The Flower Challenge.  This month we're asking you to add a heart, along with your florals being the primary focus.
I'm also playing along with Seize the Birthday, entering my card for the Anything Goes portion of the challenge and Inkspirational, where the theme is hearts.


For my card, I decided to use the eclipse technique (at least that is the name that I'm familiar with) to add a heart to my card.


Originally I had intended to stamp, color and die cut the floral image and use a heart underneath on my card front.  However, I had laid out the stamped image on my desk along with the heart die and the light bulb went off, so to speak lol!  So I proceeded with the coloring using Copic markers , then trimmed down the panel and die cut the heart from the middle, along with three additional layers.


After embossing an A2 panel of light yellow cardstock with the Gina K Tapestry folder, the die cut panel was adhered, then the layered heart added back into the die cut space.  The sentiment was added then I searched my embellishments for some gems or sequins that might come close to the flower color and was pleasantly surprised to find some.  Last but not least a pretty die cut butterfly as added and finished off my card.


How will you find a way to add a heart to your floral card?  You can certainly find more inspiration on the challenge blog, where my teammates have created some gorgeous cards.  The challenge will remain open until the 25th - hope to see your card in the gallery!

Take care!

Stef


  • Simon Says Stamp Best Friend Ever Stamp set
  • Honey Bee Birthday Wishes stamp and die set
  • SSS Nested Round Hearts and Leanna Butterfly dies
  • Hero Arts Infinity Rectangle die
  • Gina K Tapestry embossing folder
  • Neenah Solar White and SSS Lemon Chiffon card stock
  • Honeybee Stamps Winter Wonder Gem Stickers
  • Copics - B69, 66, 63, G28, 46, 43, BV000, Y15, 13, 11

Sunday, February 4, 2024

Heart Hugs for The Flower Challenge

Hello friends!  It's time for the first challenge of the year at The Flower Challenge, where this month we're asking everyone to add a heart to your card.


The new year brings about an update to our challenge badge and we're also thrilled to be welcoming Vicky Hayes as our latest team member!

For my card I used a retired stamp set is still perfect for hearts and flowers.


I adore this heart wreath.  I colored it, along with two extra flowers, with Copic markers then die cut everything, including a couple more of the heart wreaths in white for layering.  Next a panel of white was lightly stenciled with pink hearts, then trimmed down and adhered to a postage edge rectangle.


A separate heart was die cut, inked around the edges with the same pink ink, then added to the back of the layered wreath.  I wanted the sentiment to match the flowers, so I used my Copic markers to create an ombre on a piece of white cardstock then die cut the sentiment from that.  The ombre is definitely subtle but in real life it's more evident than in the photo. The sentiment was also mounted on two additional die cut layers then added to the center of the heart.  I have to say I'm very happy with how this turned out, especially finding an appropriate sentiment to fit inside the heart wreath!


I do hope you'll join us this month!  There's a wide variety of ways to add a heart to your floral card and if you drop over to the challenge blog, my amazingly talented teammates will dazzle you with their designs!  Come on back on the 15th of the month, when I'll return with my reminder post.

Take care!

Stef


  • Simon Says Stamp You Have My Heart stamp and dies
  • SSS Nested Rounded Hearts
  • Altenew Versatile Greetings die
  • Spellbinders Postage Edge Rectangle die
  • Memory Box Drifting Hearts Stencil
  • Inks - Memento Tuxedo Black, Altenew Pink Diamond
  • Copics - R59, 85, 83, 81, G99 29, 21, YG45
  • Sketchmarkers - V61, 61
  • Olo markers - YG8.7, 8.5, 8.3

Thursday, February 1, 2024

Flat Shaker Valentine for Color Hues

Hello friends!  I'm here with my card for the new challenge at Color Hues!  This time the lovely Sheri has chosen red and pink, so perfect for those making Valentine cards, but would certainly work for many other occasions.

And how about our new badge? I think it's a wonderful way to reflect what the challenge is all about.  Also we have the talented Bobby Hagen joining us as guest designer!

I'm also joining my friends over at Just Us Girls, because their colors for this week's color challenge are also red and pink.


This time I tried something new - making a flat shaker!  It's not edge to edge but it still has lots of sparkly goodness when you shake, shake, shake it!


I started with the stencil, using a light pink ink on white cardstock, then applying the same ink to blend around the edges, darker on the outside and lighter in the middle.  I cut some old packaging to size, put Score Tape on the back of the stenciled panel, wrapped the acetate around three sides, waiting to seal the fourth side until after adding the clear sequins.


Next I put double sided adhesive on the back of a panel of Rich Red Matte cardstock, then die cut the sentiment.  This alleviated the problem with glue smearing on either the acetate or the metallic paper when adhering to the front of the shaker.  It was then layered on a slightly larger panel of the red metallic cardstock, adhered to the white card front, with the final touch of adding the red sparkly heart.  This was so easy to do and it's a great way to use up my sequin stash, which isn't large, but I don't use them as on my cards very often anymore.


I look forward to seeing what you make with this color combo!  Be sure to take a look at the beautiful cards created by our guest designer and the other DT members and hopefully are inspired to join us.  The challenge will remain open until 9 am 2/14.

Take care!

Stef


  • Simon Says Stamp Hugs & Kisses die, Hero Arts Nested Rectangles
  • SSS Heart Blooms stencil
  • SSS Bubblegum ink
  • SSS Rich Red Matte metallic cardstock
  • SSS Rainbow Splash Sparkly Hearts, Pretty Pink Posh Sparkling Clear sequins