Monday, April 30, 2018

Pink Butterflies Birthday

Hello friends!  It's time for a new Color Challenge at Splitcoaststampers!  Pam is hosting tonight and she has chosen Pink Pirouette, Basic Black and White for this weeks colors. The dessert option is to use vellum, which I completely forgot about, so no dessert for me this week!

I'm also entering my card in the "Anything Goes" challenges at Seize the Birthday and Simon Says Stamp Wednesday Challenge.


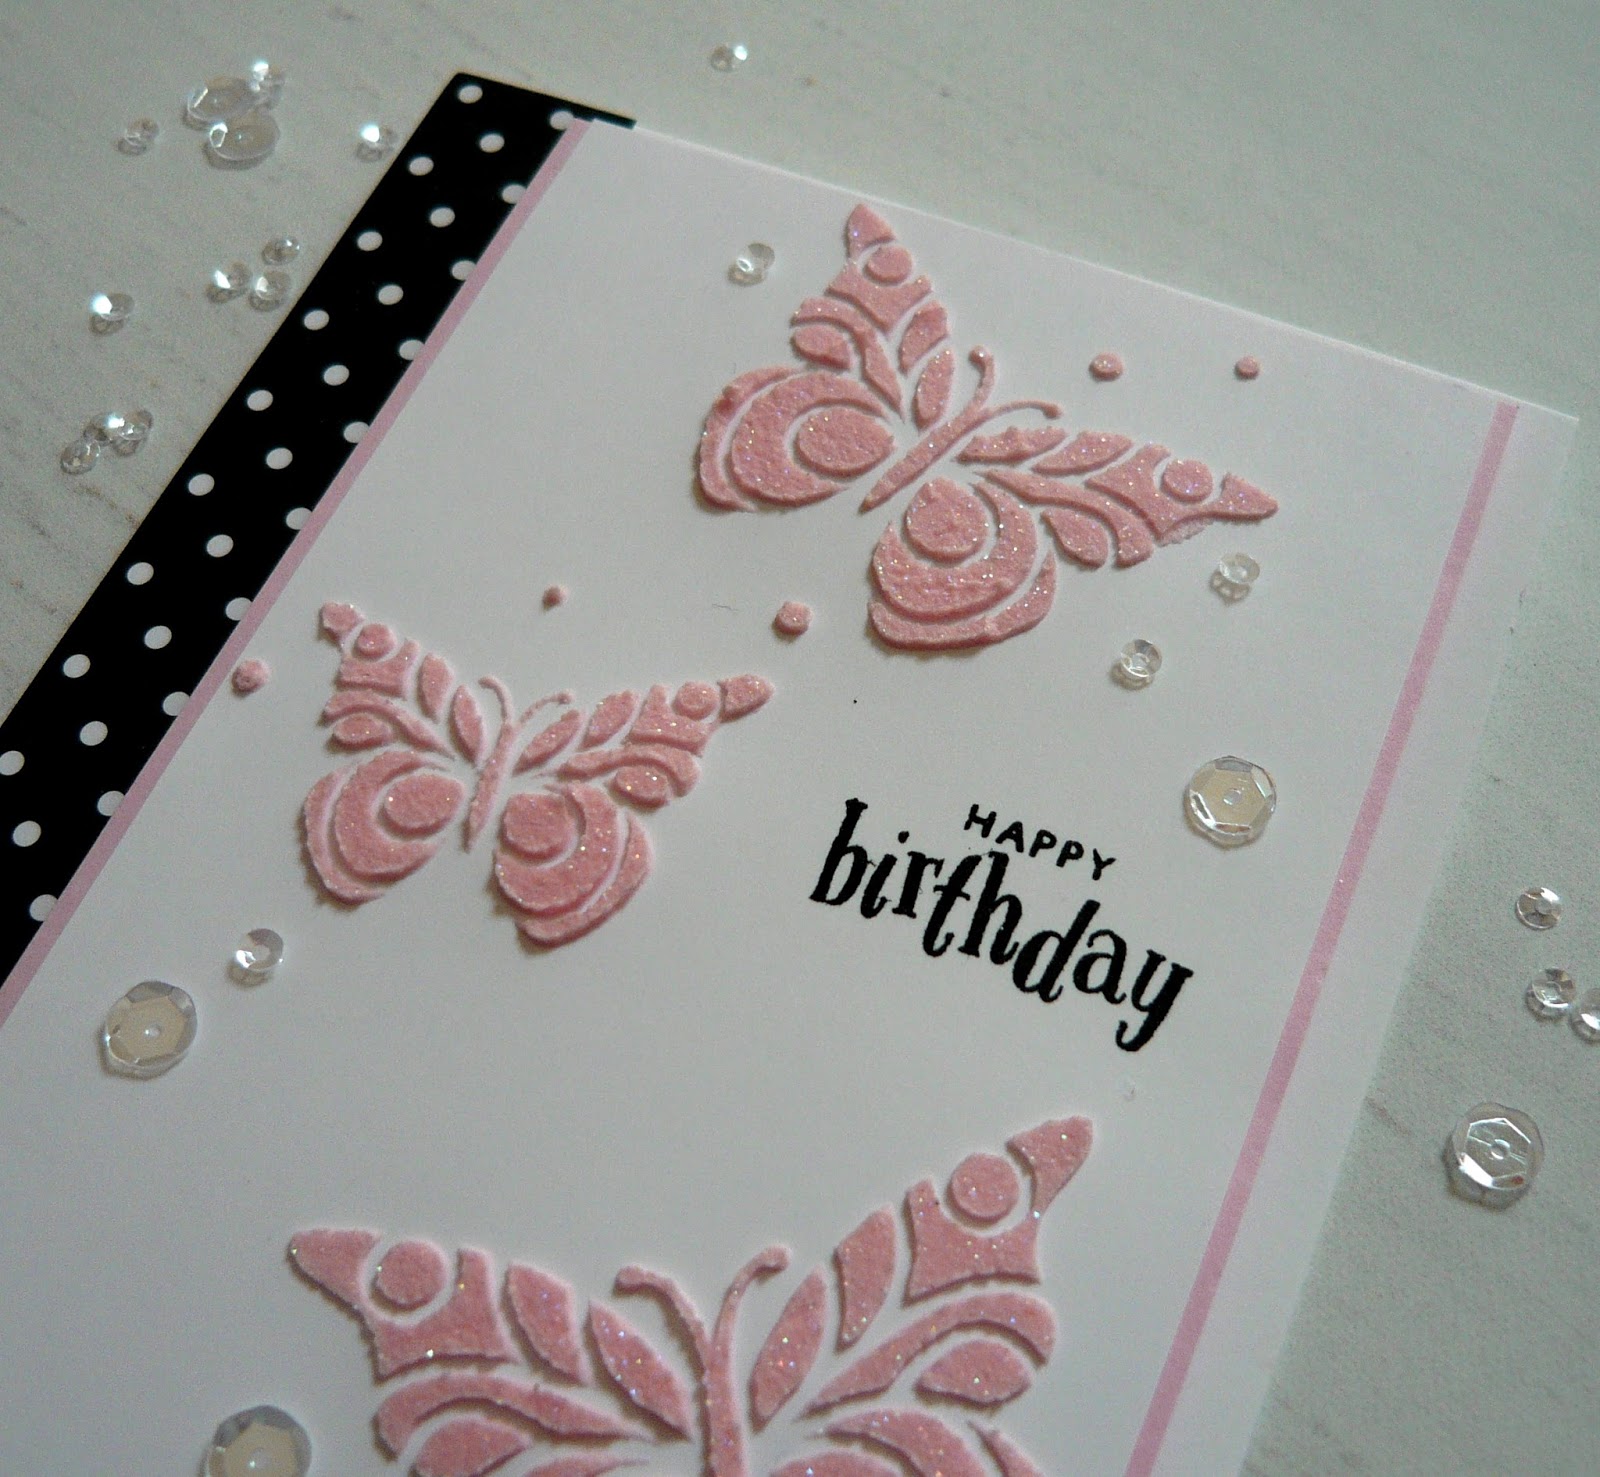
I kept debating about what I wanted to create with the Color Challenge colors and finally decided to make something fun by using a Butterflies stencil to create some pink butterflies with embossing paste.  I added several drops of Pink Pirouette ink from a reinker and then dumped a large amount of Dazzling Diamonds glitter in the mix before spreading over the stencil.  I love how the butterflies turned out, with lots of sparkle!


I let the embossing paste dry over night, trimmed down the panel and layered it on a slightly larger piece of Pink Pirouette card stock, then added the sentiment.  A strip of patterned paper was adhered to the card base, then the butterfly panel was popped up with foam tape.  Of course a few sequins were added to complete the look!


Thanks so much for visiting, it's always so appreciated!  I've added links to all the challenges so be sure to head over and check them out.  I hope you'll be able to join us at the SCS Color Challenge this week!

Stef


Product details
Stamps:  Spoken Bird (My Monthly Hero Card Kit Feb 2017)
Paper:  Whisper White, Thick Whisper White (base), Pink Pirouette, MFT Black and White Basics 6x6 paper pack
Ink:  Versafine Clair Nocturne
Other:  Dreamweaver White Embossing Paste, Pink Pirouette reinker, Dazzling Diamonds Glitter (SU), Butterflies stencil (SSS), Sparkling Clear sequins (PPP)
 

Monday, April 23, 2018

Mondo Hydrangea

Hello friends!  It's time for a new Color Challenge at Splitcoaststampers.  Barbara is hosting this week and she has chosen Rich Razzleberry, Sweet Sugarplum, and Tranquil Tide, with the dessert option to make a one layer card.  Well that dessert option was a little tricky.  I did get it done in a fashion but technically it's not a one layer card.

 
I started by heat embossing the large, lovely Mondo Hydrangea bloom in white embossing powder on a panel of watercolor paper.  I squeezed the top of the lids of the Rich Razzleberry and Sweet Sugarplum ink pads for coloring the flower petals.  I colored all the petals with the lighter color, Sugarplum, then went in with Rich Razzleberry at the base of each petal, added a bit of water and let the ink spread.  I was not concerned about getting the hard edges as the ink dried as it was the look I was going for.  Caveat:  I know that hydrangeas do not come in this shade of purple, but I thought the image lent itself so well to a one layer card, that I decided to claim a bit of artistic license to color it in these shades.  ; - ) 


After the petals dried I took a #12 round watercolor brush and spread clear water around the edges of the bloom, then dropped in Tranquil Tide ink, making sure to get it into the areas between the petals on the interior of the bloom.  I used Soft Suede as my neutral to color the woody stems.  Originally I wanted to add white to the flower centers but ultimately ended up using metallic gold watercolor paint, which looks much richer.

 
After stamping the sentiment, a Corner Rounder punch was used on the upper left corner of the panel and the card base, then the panel was directly adhered to the card base.  I wrapped a bit of Rich Razzleberry Cotton ribbon around the top and embellished with a few sequins, and that finished off my card.

Thanks for visiting and I hope you'll use the link above to check out the challenge and join us this week!

Stef


Product details
Stamps:  Mondo Hydrangea (Ellen Hutson)
Paper:  Canson XL watercolor
Ink:  Versamark, VersaFine Clair Nocturne, Sweet Sugarplum, Rich Razzleberry, Tranquil Tide, Soft Suede
Other:  Gansai Tambi Starry Colors Metallic watercolor paints, Rich Razzleberry Cotton ribbon, sequins, Corner Rounder punch

Saturday, April 21, 2018

Flowers in the Round

Hello friends!  I hope you're having a wonderful weekend.  I had some fun making the card I'm sharing with you tonight.  I don't typically make shaped cards, I'm not very practiced or skilled like some that make fantastic 3D or shaped cards.  In fact, it's been years since I made a round card but decided to give it a go for this card.


I dusted off, figuratively speaking, my old Stampin' Up Circle Collections framelits because the largest die has scallops.  I cut the card front with that scallop framelit from white card stock, then used the partial die cut technique with the same die to cut the card base.  Once cut the scallop piece was adhered, along with the bright green patterned paper.

Next I worked on the main image, stamping the jar and flowers on a piece of watercolor paper, heat setting with clear embossing powder, then watercolored with Distress Ink.  The funny thing is the last time I watercolored Sweet Peas (different image) I used the light pink mix as well.  After the flowers and water was colored, I added the light yellow background and a "wood" table for the vase to sit on.  I used a Misti to stamp the sentiment so I could get a good impression, then heat set it with clear embossing powder. 


The watercolored circle was adhered to a slightly larger circle of white card stock with strong adhesive then added to the card base with foam tape.  I used a little aqua shimmer pen along the edges of the flowers, then added some Nuvo Simply White Crystal drops and a small linen thread bow on the jar.

I've created this card for the current challenge at The Flower Challenge, where the theme this month is - you guessed it - to make a shaped card.  I've added a link below so be sure to take a moment to check it out, there's some amazing inspiration by the DT!


Thanks for visiting, it's always so appreciated!

Stef


Product details
Stamps:  Summer Flowers, Creative Vases (both Hero Arts)
Paper:  Neenah Solar White, both #80 and #100, Canson XL, patterned paper from my stash
Ink:  Versafine Onyx Black; Distress Ink:  Spun Sugar, Picked Raspberry, Squeezed Lemonade, Mowed Lawn, Tumbled Glass, Frayed Burlap
Other:  Circles Collection framelits (SU), Nested Circle Infinity dies (HA), Linen Thread, Tonic Nuvo Simply White Crystal Drops and Aqua Shimmer pen
 

Wednesday, April 18, 2018

Beautiful Birthday

Hello and welcome back!  I've had a bit more fun playing with the new Beautiful Day stamp set, using it to create a birthday card with lots of vibrant colors.

The butterfly and leaves were stamped on Neenah Solar White card stock, colored with Copic Markers and fussy cut (naturally, I bought the dies separately and they arrived the day after I made this card LOL!).  After adhering to the die cut circle, the piece was set aside as I made the card base. 


The bright pink card stock was trimmed into two pieces, embossed, layered on the white card base, then the black and white striped patterned paper was added down the right side.  I used my Misti to make sure I stamped my sentiment straight, then the butterfly piece was added.  Shimmer was added to the butterfly, and finally sequins and Nuvo crystal drops in both white and bright pink.


I'm entering my card into the 4 challenges below linked below.  Be sure to head over there and enjoy all the beautiful inspiration!


As always, thanks for visiting!

Stef


Product details
Stamps:  Beautiful Day (Simon Says Stamp), Happy Birthday Gorgeous (Stampin' Up)
Paper:  Neenah Solar White, Doll Pink (SSS), Black & White Basics paper pad (MFT)
Ink:  Memento Tuxedo Black, Versafine Onyx Black
Other:  Copic markers, Spring Flowers embossing folder (ret. SU), Layering Circle Framelit (SU), Hero Arts Ultrafine Clear Embossing Powder, Pretty Pink Posh Sparkling Clear sequins, Tonic Nuvo Simply White and Shocking Pink Crystal Drops, and Aqua Shimmer pen
 

Monday, April 16, 2018

Florals and Butterflies

Hi there!  It's time for a new Color Challenge at Splitcoaststampers and I am hosting this week.  We're going to watch Blackberries Growing in the Meadow Under a Soft Sky using the colors Blackberry Bliss, Mossy Meadow and Soft Sky.  The dessert option is to add butterflies to your card.  I've made two cards this week since this is one of my favorite color combinations.


I'm also excited to finally reveal that I have the honor of becoming one of the newest members of the Dirty Dozen Design team at Splitcoaststampers!  Whoo hoo!  Each month for the next 6, we twelve "dirty girls" will create projects for monthly themes, as a thank you to all the Fan Club members at SCS.  If you've never been to SCS, use the link above to check it out.  It is an amazing, supportive community of paper crafters with daily challenges, tutorials and so many resources.

Now on to the two cards made for the Color Challenge this week!


For this first card I started with a watercolor paper panel, heat embossed the two solid butterflies, spread clear water on it, then dropped in the Soft Sky and Blackberry inks to create the soft background.  When dry I flicked Soft Sky and Blackberry inks, plus Ranger Pearl Metallic Acrylic paint and gold from the Gansai Tambi Starry Colors paints.  I still had gold on my paintbrush, so I decided to go all around the edges of the panel to really help it stand out.  When the paint dried, the sentiment was heat embossed with gold ep.


The flower and leaves are layered stamps, and I purposely omitted the solid base image, instead just stamping the outline and "shadow" stamps.  Then, using a damp (not wet) paint brush, I gently pulled color down into the highlighted areas from the inked shadows.  Kind of a fake water colored look if you will!  The rest of the process to put the card together is pretty self explanatory.


For this card, I started with a watercolor paper panel, spread clear water then dropped in a bunch of Soft Sky ink.  I let the water move it around then helped by tilting the panel, then drying with a heat tool when I was happy with it.  Next the fern was inked up in Mossy Meadow, spray with a mister then stamped repeatedly on the panel.  Pearl acrylic paint was splattered on the panel, then once everything was dry the sentiment was added using my Misti.


Next I cut the sold butterfly image from vellum, then used a Blackberry marker and a waterbrush to paint the backside of the vellum.  I've never tried that before and was shocked to watch the vellum curl up as the fluids dried, but I flattened it out by placing it under a huge pile of heavy magazines.  The top layer was die cut from white glitter paper, adhered it to the flattened solid layer, then added to the watercolor panel adhered to the base, along with some sequins.


As always, your visit is so appreciated!  I hope you'll join us for the Color Challenge this week!

Stef


Product details
Card 1
Stamps: Beautiful Day-flower  and sentiment (Altenew) and Beautiful Day-butterflies (Simon Says Stamp)
Paper:    Neenah Solar White, Soft Sky, Ranger watercolor
Ink:  Blackberry Bliss, Mossy Meadow, Soft Sky, Versamark
Other:  Beautiful Day companion dies, Hero Arts White and Altenew Antique Gold embossing powders, Gansai Tambi Starry Colors metallic watercolor paints, Ranger Pearl Metallic Acrylic paint, sequins

Card 2
Stamps:  Butterfly Basics (SU)
Paper:  Blackberry Bliss, Canson XL, Vellum, White Glitter (SSS)
Ink:  Blackberry Bliss, Soft Sky, Mossy Meadow, Versamark
Other:  Bold Butterfly Framelit and Butterfly Thinlit (both SU), Stitched Rectangle die (SSS), Pretty Pink Posh Sparkling Clear and Spring Meadow Mix sequins, Ranger Pearl Metallic Acrylic Paint


Gull Friend

Hello friends!  Today I am sharing my second sample for April's CAS Watercolour challenge, where I have had the great honor of being a Guest Designer.  This month the theme is Bird.  I've added a link to the challenge below, so do be sure to check it out and hopefully join in the challenge!


I don't have many bird images but the February 2018 My Monthly Hero card kit featured the delightful Spoken Bird stamp and die set, so I decided it would work perfectly for this challenge.  I actually ended up using the dies to create silhouettes from card stock rather than the stamping the images.


I chose a panel I had previously created with Distress Oxide Inks, where the ink was applied to watercolor paper, sprayed with water, dried with a heat tool then repeat to get fabulous designs and color mixes.  I liked this panel because of the variety of green colors.


My husband kindly pointed out that the bird on my card is not a Gull but I informed him that she was simply saying hey to her friend, which happened to be a Seagull.  At least that's the story I had in my mind when I made the card!  For the first half of the sentiment, I stamped it on a piece of white card stock, then partially die cut with a circle die.  Since I wanted this to be a word bubble but don't own any dies like that, I hand cut the rest of it to create my own.


Thanks so much for visiting, it's always so appreciated!  And thanks to CAS Watercolour for asking me to be a Guest Designer this month, it was such a treat!


Stef


Product details
Stamps:  Spoken Bird (Hero Arts)
Paper:  Neenah Solar White, Black, Canson XL watercolor
Ink:  Versafine Onyx Black; Distress Oxide inks:  Twisted Citron, Cracked Pistachio, Peacock Feathers
Other:  Spoken Bird matching dies, Wonky Rectangle die (SSS), Layered Circle framelit (SU)

Monday, April 9, 2018

Flourish Birthday

It's time for a new Color Challenge at Splitcoaststampers!  Karen is hosting tonight and she has chosen the lovely color combination of Powder Pink, Wild Wasabi, Crumb Cake and Chocolate Chip, with a dessert option to watercolor.  Now, if  you follow my blog, you know I love to watercolor but for some reason my water coloring mojo left me as I tried to create a card for this challenge.  So I passed on dessert and instead went with a long neglected die set to create my card.


The Flourish Thinlits from Stampin' Up were used to cut the vines and flowers from Wild Wasabi and Powder Pink.  I used a Wonky Rectangle die to cut the white card base, worked out my layout with the Flourish die cuts, then adhered them to the panel.  An aqua shimmer pen was used on the flowers, then large pearls added to the centers.


The sentiment was stamped in Chocolate Chip ink, then trimmed down and mounted on slightly larger Powder Pink rectangles.  I added a few more pearls as a final bit of bling.


Thanks so much for visiting, it's always so appreciated!  I've added a link to SCS above, so be sure to head over there and check out the Color Challenge, and hopefully join us this week!


Stef


Product details
Stamps:  Happy Birthday Gorgeous (SU)
Paper:  Neenah Solar White and Desert Storm, Chocolate Chip, Wild Wasabi, Powder Pink
Ink:  Chocolate Chip
Other:  Wonky Rectangle die (SSS), Flourish Thinlits (SU), Basic Pearls, Tonic Nuvo Aqua Shimmer pen, Sizzix Precision Base plate

Monday, April 2, 2018

You Bring Sunshine

Hello friends!  I'm excited to be guest designing at the CAS Watercolour challenge for the month of April!!  I was thrilled when Loll emailed me to ask, and of course I couldn't say yes fast enough


With the April theme of "Bird" I knew I had to use this little chick (ETA: or maybe a baby duckling?).  I adore the umbrella and boots, and that she seems to be so enjoying those April showers!  After stamping on watercolor paper, I used Distress Inks to brightly watercolor this cutie.


I painted each part of the image separately to keep the colors from running (mainly because I tend to be a sloppy painter!), then let everything dry before applying very watered down Peacock Feathers in the background around the chick and the umbrella.  The raindrops coming from the sky were stamped as an afterthought, and I added the same colors as the puddle, then covered all the drops with a crystal glaze.


After the watercolored panel dried, I used a stitched rectangle die to trim it down, then layered that on a slightly larger piece of bright yellow card stock.  I used my Misti to stamp the sentiment so I could be sure it was straight and centered, then added the watercolored panel.


Thanks so much for visiting, it's always so appreciated!  I've added a link to the challenge above, so be sure to check out all the beautiful DT inspiration and join us this month!


Stef


Product details
Stamps:  Showers and Flowers, Choose Joy (both SSS)
Paper:  Bright Yellow, Ivory (both SSS), Arches cold press watercolor
Ink:  Versafine Onyx Black; Distress Inks:  Squeezed Lemonade, Mustard Seed, Fossilized Amber, Abandoned Coral, Ripe Persimmon, Blueprint Sketch, Chipped Sapphire, Peacock Feathers
Other:  Stitched Rectangle die (SSS), Tonic Nuvo Crystal Glaze