Friday, December 31, 2021

Hug In a Mug for Just Us Girls

Hello and welcome!  I am thrilled to be Guest Designer at Just Us Girls for the month of January!  Woo hoo!  And do we have some fun challenges for you, starting with Word Week and the word beverage.


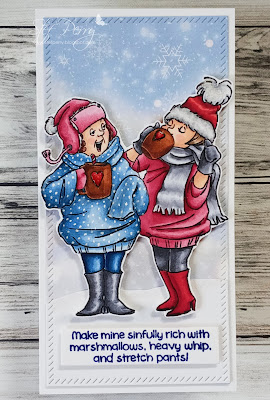
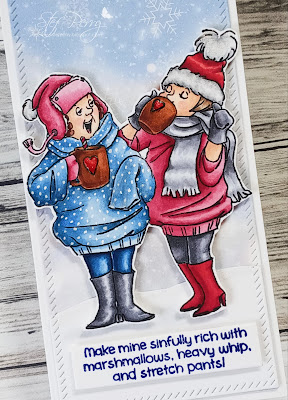
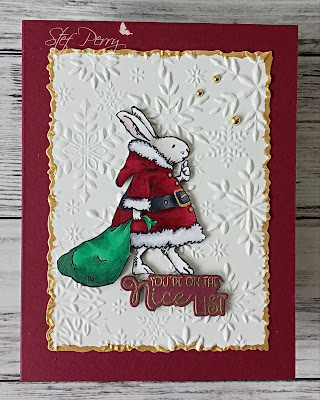
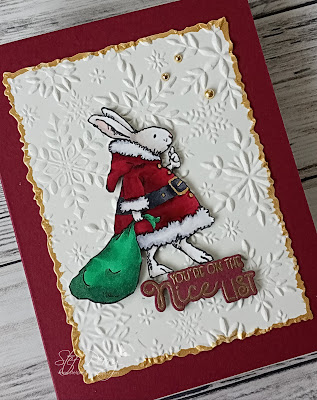
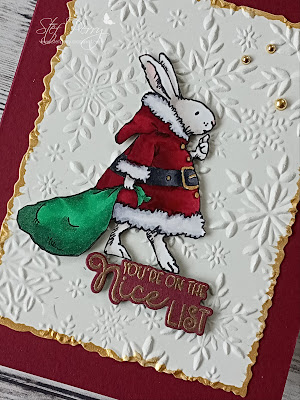
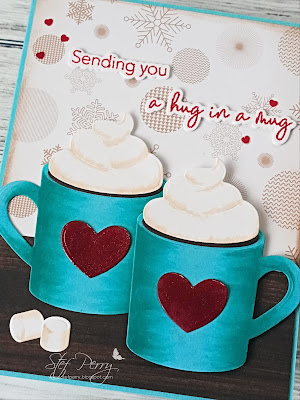
For my card, I decided to use the cute mugs from Honey Bee stamps.


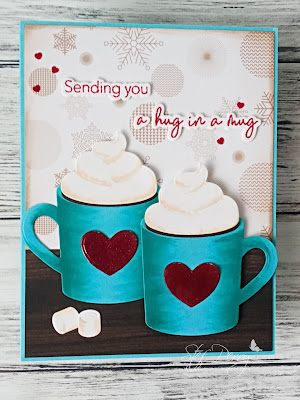
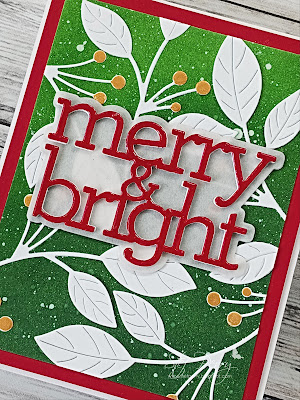
This card was so much fun to make because most of it was die cutting.  I used my Copic markers to add some dimension to the cups, whip cream and marsh mellows.  The hearts were die cut from red cardstock, painted with a shimmer pen, then coated with Glossy Accents.  The sentiment was heat embossed with red sparkle embossing powder, then die cut with the coordinating dies and layered on two additional die cuts for some dimension.


The card base was created with the same cardstock as the mugs.  The patterned paper is from a free gift with purchase from Honey Bee.  It was trimmed down slightly smaller than the card base, lightly inked around the edges with some brown ink, then I added a strip of wood design patterned paper to be the "table" for the mugs and marsh mellows to sit. All the components for the mugs were adhered then the mug in the back was glued directly to the panel, with the mug in front added with foam tape.  The sentiment was added above the mugs, and I thought I was finished, but then remembered I had some tiny red heart sequins, so I adhered those around the sentiment for the final touch.


Thanks for visiting, I always appreciate it!  Be sure to use the link above to check out the fabulous cards by the DT members and hopefully be inspired to join the challenge this week!

Stef


Stamps:  Hug In A Mug (Honey Bee)
Paper:  Neenah Solar White, Audrey Blue (Simon Says Stamp), Cherry Cobbler (SU), Harvest Festival 6x6 paper pad (HB), "Free Bee" patterned paper
Ink:  Mocha (Altenew), Versamark
Other:  Mugs & Kisses dies (HB), Hug In A Mug die, Poinsettia embossing powder (Brutus Monroe), Aqua Shimmer pen (Tonic), Glossy Accents (Ranger), Crimson Hearts sequins (Sizzix)
Copics:  E30, BG15, 13, 11

Wednesday, December 29, 2021

Born to Sparkle

Hello and welcome!  I have a card to share that I made for the current challenge at Double D, where the them is to use lots of white.  I'm also sharing at CAS Colours & Sketches, where they are celebrating their 450th challenge, with the theme of using either a sketch or color challenge from the last 11 months and create a seasonal card with it.  That last part...I kind of stretched the meaning of "seasonal" in that while my card has lots of sparkle and white (just like the snowy landscape outside my window!), it's not specifically a holiday or winter card.  So we'll see if the blog monitors are feeling kind lol!


I choose the sketch from challenge #425 as the inspiration for my card design.


I ended up making a slimline size shaker card, neither of which I've created for a while.


For starters, I used the Slimline Stitched Circle die from MFT to create the panel for the shaker elements.  It was trimmed down, then I added a strip of acetate to the back of the panel, adhered foam tape to create the shaker "wells" and put in clear sequins, then added the aqua panel to the back.  


Next, the circular floral frames were die cut once from white glitter and twice from plain white cardstock, then layered up for some nice dimension and adhered to the front of the panel.  Next I used a slimline sized cover plate to create a subtle background layer, adhered it to the white card base, then added the shaker element.  The sentiment was trimmed out from a set of encouragement sentiment strips and adhered with thin foam tape.  Lastly, a few additional clear and aqua sequins were added to the card front for a bit more bling.


Thanks so much for taking time to stop by, I really appreciate it!  Take care and have a safe, happy New Year!

Stef


Paper:  Neenah Solar White, White Glitter (Simon Says Stamp), Aqua Specialty (from an older Hero Arts card kit), Reverse Encouraging Words sentiment strip (SSS)
Other:  In Focus Floral Frames dies (MFT), Slimline Stitched Circle die (MFT), Bohemian Slim Plate cover die, Skinny Strips die (MFT), Arctic Aquamarine sequins (Little Things by Lucy's Cards), Sparkline Clear sequins (Pretty Pink Posh), Clear Acetate Sheet (SSS)

Sunday, December 26, 2021

Into the Woodland for Sunday Stamps

Hello and welcome!  I hope your holidays have been enjoyable.  It's time for a new color challenge at Sunday Stamps and wowzer do we have some beautiful colors to work with!


I'm also playing along with the Watercooler Wednesday Challenge, where the theme is Anything Goes.


I was truly inspired by the Bokeh look of the color board, but I encountered some issues trying to recreate that look and frankly ran out of time (I might still finish that card and share it later).  So instead, I pulled out a newer Altenew stamp set and used shades of purple, yellow/gold and navy from the color board plus I used a neutral gray. 


The floral stem was stamped then colored with Copic markers.  I was happy to find a blend of violet markers that seemed to match up fairly well with the color challenge purples and loved adding the dark blue background.  The leaves were colored in light grays.  Next I used white gouache for a bit of splatter and while that dried the sentiment from the same stamp set was gold heat embossed and cut out with an oval die.


The frame was die cut from gold pearl mirror cardstock and twice more from white then layered together.  The floral panel was trimmed down to fit behind the frame then glued in place.  It was adhered directly to the white card base, then the sentiment added with foam tape.  Once the coloring was complete this card was super quick to put together.


Thanks for taking time to stop by, I really appreciate it.  Be sure to use the link above to see all the really beautiful cards by the other DT members and hopefully join us for this color challenge!

Stef


Stamps:  Into the Woodland (Altenew)
Paper:  Neenah Solar White, Gold Pearl Mirror (Tonic)
Ink:  Memento Tuxedo Black, Versamark
Other:  Scallop Stitched Frames die (Poppystamps), Essential Oval die (Ellen Hutson), Antique Gold embossing powder (Altenew), White Gouache
Copics:  V05, 01, 00, T2, 0, YR24, Y26, 15

Wednesday, December 22, 2021

Special Delivery

Hello and welcome.  I have a card to share with you that I made for the current Inspired By challenge, where they are celebrating challenge #200!!  Congrats to the DT team!!.  The challenge is to make a card inspired by one of the previous 2021 winners, of which I was fortunate enough to be in February 2021.  However, for today's card I was inspired by Holly and Kailash's cards, which were the winners of IB170. 


Both Holly and Kailash's card designs that had beautiful wrapped floral bouquets (you can see one in the picture board above), and that was my primary inspiration.  I used different dies, colors and a different sentiment.


For starters, all the flowers and leaf sprigs were die cut from watercolor paper, then they were watercolored using Altenew's 24 pan watercolor set.  While those dried, a piece of kraft paper was stenciled with thin strips using white pigment ink, dried with a heat gun, then die cut with the wrapper die. I used a dot runner on the back of all the flowers and sprigs, arranged them in the wrapper, then tucked a piece of foam tape inside so the wrapper could keep its rounded shape. I then added hemp twine around it and tied a bow, then tied on the tag with the sentiment using linen thread.


Next a panel of white was embossed with the Pinpoint Leaf cover die, the die cut with a scallop rectangle die that was adhered to the light yellow card base.  I added glue to the back of the wrapper then angled it onto the white panel and securing the sentiment tag with a bit of foam tape.  This card is such a departure from all the Christmas/winter cards I've been making, it was quite a treat to enjoy the bright spring colors when it was complete.  


Thanks for taking the time to visit, I really appreciate it.  Take care and enjoy the holidays!

Stef


Stamps:  Special Delivery Sentiments (Waffle Flower)
Paper:  Neenah Solar White and Desert Storm, Lemon Chiffon (SSS), Fabriano Artistico watercolor
Ink:  Shadow Creek (Altenew), Sharktooth White Pigment (Ink on 3)
Other:  Special Delivery and Stems dies (WF), Scallop A2 rectangle die (Honey Bee), Pinpoint Leaf Plate (Memory Box), Slimline Stripes Stencil (Trinity Stamps), Altenew Artist's Watercolor 24 pan set, hemp twine, Linen Thread (SU)

Sunday, December 19, 2021

Hug In A Mug

Hello and welcome!  I hope your holiday preparations are going smoothly!  Today I have a card to share with you that I made for the current Festive Friday and Four Seasons challenges.


For Festive Friday, we are to use at least 3 items on the list.  My card includes sparkle, emboss and die cuts.


Art Impressions ladies keep me in stitches and this collaboration stamp set with Simon Says Stamp is no exception!  They were stamped, colored with Copic Markers then fussy cut, leaving a small white edge around the images.  Oh, so fun!  Next the sentiment was stamped with blue pigment ink and clear heat embossed.  It was die cut with a sentiment label die then both were set aside so I could create the background. 


I decided to go with a mini-slimline size card with a white card base measuring 3.25" x 6.25".  I found a perfect piece of patterned paper that conveyed the wintery scene I imagined for these ladies, and it was trimmed down with a mini slimline rectangle die that added the nice hash mark (is that what it's called?)  around the edges.  I also hand trimmed a piece of white cardstock for the "snowbank" then cut it down with the same mini slimline rectangle die so the edges would match that of the patterned paper. With those pieces attached to the base, I added the sentiment and ladies with foam tape.  The blue sweater was covered with polka dots using a white gel pen.  Then, using an aqua shimmer pen, sparkle was added to the white "fur" and the heart on the mugs, plus the heart was then covered with Glossy Accents for a nice shine.  The snowbank also got a touch of sparkle along the top and I added a bit of shading to ground the ladies. I think the picture below captures the sparkle a bit better.


Thanks so much for taking time to stop by, I appreciate it so much.  Take care and Happy Holidays!

Stef


Stamps:  Hug In a Much (Art Impressions/SSS)
Paper:  Neenah Solar White, Blurry Flurries 6x6 paper pack (Whimsey Stamps)
Ink:  Memento Tuxedo Black, Versafine Clair Bluebell
Other:  Mini Slimline Essential Bundle rectangle die (Pinkfresh Studio), Sentiment Label die (SSS), Clear embossing powder (Hero Arts), Sakura White Gelly Roll pen, Tonic Nuvo Aqua Shimmer pen, Ranger Glossy Accents
Copics:  B39, 37, 34, R89, 85 83, 81, 59, 46, 27, 20, 14, E29, 39, 33, 11, 21, 0000, C5, 3, 1, 0

Wednesday, December 15, 2021

Nice List

Hello and welcome! Today I'm sharing what I think is my final Christmas card for 2021 and I made it using the colors from The Paper Players' current challenge.  I'm also sharing at the Four Seasons challenge, Watercooler Wednesday Challenge and the current Simon Says Stamp Wednesday Challenge where the theme this week is "Bling it On".


LeAnne gave us the perfect traditional colors to use this week.  It was a happy surprise to find I still had some Merry Merlot cardstock!


I love this Santa Bunny image!  He was stamped on white cardstock and colored with Copic markers for everything except the gold buckle and buttons.  For that I used a paintbrush and gold metallic paint.  The sentiment grounding Santa is from the same set and was gold heat embossed on Merry Merlot then die cut with the matching die.  I also die cut Santa but when I decided to layer him directly onto the Ivory panel (my Very Vanilla sub), the white outline did not look good at all, so I ended up fussy cutting him.


Next, the Ivory panel was die cut to give it that deckled edge, embossed with a 3D snowflake embossing folder on the Ivory panel, then I used the same gold paint around the edges.  The panel was adhered directly to the Merry Merlot card base, then the sentiment and Santa Bunny were added with thin foam squares.  The last step was to add a bit of bling with the gold baubles.


Thanks for taking time to visit, I appreciate it very much.  Take care and have a very Merry Christmas!

Stef


Stamps:  Santa Bunny (Anita Jeram/Colorado Craft Company)
Paper:  Neenah Solar White, Ivory (Simon Says Stamp), Merry Merlot (SU)
Ink:  Memento Tuxedo Black, Versamark
Other:  Snowflake Visions 3D embossing folder, Santa Bunny sentiment die, Mix and Match Frames dies (Altenew), Finetec Gold Metallic paint, Antique Gold embossing powder (Altenew), Gorgeous Gold Baubles (Trinity Stamps)

Sunday, December 12, 2021

Jingle All the Way for Sunday Stamps

Hello and welcome!  It's time for a new challenge at Sunday Stamps and this time Heather has given us a great sketch to work with.

I'm also joining the following challenges:


In trying to design my card using the image I wanted, I ended up flipping the sketch on the side.


I don't know if I'll ever get tired of using this fun and energetic Santa LOL!  He was stamped, colored with Copic markers and die cut with the coordinating die.  Next the sentiment was red heat embossed on white and die cut with a fishtail sentiment die.  The die was too long for the sentiment, so I ended up cutting it twice, moving the end of the die up closer to the word on the right end on the second pass.  I hope that makes sense!


Next I trimmed down the patterned paper for the background and the horizontal strip.  The larger piece was adhered directly to the card base, and after matting the strip on white and wrapping with Baker's Twine (yay, my stash yielded just what I needed!), it was added to the card with thin foam squares.  Santa and the sentiment were also popped up with foam.  The snowflakes were die cut three times, once from white glitter and twice from scraps of white cardstock, layered and adhered to the panel.  Unfortunately, they did not photograph well, but adding the dimension helps make them stand out from the background better IRL. The final touch was a bit of glimmer pen added to the "fur" on Santa's hat.


Thanks so much for visiting, I really appreciate it!  Be sure to use the link above to check out the gorgeous cards by the other DT members and hopefully join our sketch challenge!

Take care!

Stef


Stamps:  Jingle All the Way (MFT)
Paper:  Neenah Solar White, Cool Colab 6x6 paper pack (MFT), White Glitter paper (Simon Says Stamp)
Ink:  Memento Tuxedo Black, Versamark
Other:  Jingle All the Way die, Fishtail Foundations die (MFT), Merry and Bright Snowflake dies (SSS), Red Hot embossing powder (Gina K), Baker's Twine (ret. SU), Tonic Nuvo Shimmer pen

Friday, December 10, 2021

More Christmas cards...

Hello and welcome!  I hope you're doing well in your holiday preparations!  I have one more Christmas card and a few gift card holders to make, and then some gift wrapping.  We are just over two weeks until Christmas - can you believe it?

So today I have two more Christmas cards to share with you for different challenges. The first was made using Karren's fabulous sketch at Freshly Made Sketches, plus I'm also sharing it at Watercooler Wednesday.


I decided to use some cute Birdie Brown images from MFT for this first card.


I started by stamping, coloring with Copic markers and die cutting Santa, the tree and the reindeer.  The sentiment was red heat embossed on white, then die cut with a fishtail sentiment die.  Next a panel of white was embossed with the Softly Falling embossing folder, then trimmed down and adhered to the card base.  I found a patterned paper that went well with the reds and green I used in the coloring and adhered it to the card.  Next a die cut strip of white was added to the card with foam tape, then the images adhered with adhesive and foam squares for the overhanging areas.  In hindsight I should not have and the tree over behind Santa so far, but it was firmly glued down so there was no moving it!  I'm sure the recipient (my younger grandson) will not even notice.  The last touch was to add some tiny stars that were punched out of white glitter paper.


The second card was created for the Color Hues Challenge, with their well-timed challenge of red and green.


For this card I started by ink blending two Distress Oxide greens on a panel of white and splattering with water and with white gouache.  While the panel dried, several of the Etched Berry Branches were die cut from white cardstock and the "berries" were painted with gold metallic paint.  The sentiment was die cut once from red and twice from white and layered together for dimension.  The branches were adhered in a random pattern on the green background and afterwards I realized I'd need a vellum shadow so the sentiment would better stand out.  Once that was all adhered together, it was matted on the red panel and adhered to the white card base.  Lastly, I used Glossy Accents on the die cut sentiment to make it nice and shiny.


Thanks for hanging in there for this long post!  Take care and happy holidays!

Stef


Card #1
Stamps: Jingle All the Way (MFT)
Paper:  Neenah Solar White, 9x4 Holiday Collection (Trinity Stamps), White Glitter (Simon Says Stamp)
Ink:  Memento Tuxedo Black, Versamark
Other:  Jingle All the Way dies, Fishtail Foundation die (MFT), Slim Lacy Layers die (Waffle Flower), Softly Falling embossing folders (ret. SU), Red Hot embossing powder (Gina K), Tonic Nuvo Aqua Shimmer Pen, Stars Border punch (ret. SU), Copic markers

Card #2
Stamps:  None
Paper:  Neenah Solar White, Cranberry (Concord & 9th), vellum
Ink:  Mowed Lawn, Rustic Wilderness Distress Oxide
Other:  Merry and Bright dies (Simon Says Stamp), Etched Berry Branch die (SSS), Gold Metallic paint (Altenew), White Gouache, Glossy Accents (Ranger)

Thursday, December 9, 2021

Birthday Tags for the Tic Tac Toe Challenge

Hello and welcome!  It's time for a new Tic Tac Toe challenge and I hope this great board will inspire you to join us this week.


I went across the middle row - birthday, ribbon, anything but a card - and made two tags.  Now, I still must have had the Christmas holidays on the brain because they did end up in green and a pinkish red, but still, using them singularly on a package or putting them on a card front would take away that holiday-ish look.


I started by cutting two tags from heavy white card stock then ink blended with pigment inks from darker to lighter up the tag.  After the ink dried, they were both embossed with 3D embossing folders.  Next, I used a pad of white pigment ink and lightly brushed it over the raised portions of the embossing.  I think it's such a spectacular look, especially with the florals.


Next, I created the sentiments.  For the pink tag, the word happy was die cut from gold cardstock and adhered to a white shadow, then layered directly on the tag. The word birthday was cut from a panel from the Reverse Birthday Sentiment Strips and adhered with thin foam squares. I finished the tag with gold thread and a white bow out of satin ribbon along with a scattering of gold glimmer gems.

For the green tag, the Happy Birthday sentiment was die cut 3 times, twice from white cardstock and once from silver holographic card stock, then layered together and adhered.  I used a few holographic stars, then added the green Baker's Twine and a silver bow.  

These were super easy to make, and I think it would be a nice to make a bunch of them for a gift.


Thanks for visiting, I appreciate it!  I hope you'll use the link above to check out all the fabulous creations by the other DT members and be inspired to play along this week!

Stef


Stamps:  None
Paper:  Neenah Solar White, Silver Holographic (Simon Says Stamp), Matte Gold (SSS), Reverse Birthday Sentiment Strips (CZ Design/SSS)
Ink:  Grapevine, Ruby Red, Coral Berry, Frosty Pink, Evergreen Forest Glades and Frayed Leaf pigment inks (Altenew), Sharktooth White pigment ink (Ink on 3)
Other:  Diamond Stars and Elegant Motifs 3D embossing folders (Altenew), Tag Trio die (Ellen Hutson), Happy Birthday die (SSS), Happy die (SSS), White Satin Ribbon (ret. SU), gold thread, Green Baker's Twine (EH), silver ribbon from my stash, Oh My Stars Confetti Mix (Trinity Stamps), Gold Glimmer gems (Studio Katia)

Saturday, December 4, 2021

Sprigs and Pine Branches

Hello and welcome!  I have a card to share that I've made for two challenges - Festive Friday and Color Hues. 

(It was fun to find out that in England a jumper is a Christmas sweater. Unfortunately, I didn't have a stamp with one but it's something to think about for next year!)


For I used red, green and gold which fits both challenges (gold is considered a neutral for the Color Hues challenge).  


I love the Holiday Sprigs stamp set from Simon Says Stamp, and it has seen plenty of use in making my Christmas cards as it is fairly easy to make multiples.  I started by stamping the images on multiple panels and coloring everything with Copic markers.  When the coloring was complete, I put the panels back in my Misti and restamped with black pigment ink for a nice black outline.  After die cutting, I painted the poinsettia centers with gold metallic paint, and added Glossy Accents to the berries on the one sprig.


Next, a panel of white was embossed with the Delicate Pine Branches 3D folder then adhered directly to the white card base.  The sentiment was die cut from Matte Gold cardstock and adhered to the white shadow die cut twice and layered to add a bit more dimension so it would stand out better against the white background.  The sprigs were adhered directly to the card, the candy canes on top of them, then the poinsettias added with thin foam tape.  Festive and pretty easy!


Thanks so much for taking time to stop by, I really appreciate it!  

Take care!

Stef

All products from Simon Says Stamp unless otherwise noted
Stamps:  Holiday Sprigs
Paper:  Neenah Solar White, Matte Gold
Ink:  Memento Tuxedo Black, Versafine Claire Nocturne
Other:  Delicate Pine Branches 3D embossing folder, Merry Christmas die (MFT), Holiday Sprigs dies, Metallic Gold paint (Altenew), Glossy Accents (Ranger)
Copics:  R39, 37, 35, BG 96, 93, 90, YG67, 17, 05, 03, T2