Wednesday, June 29, 2022

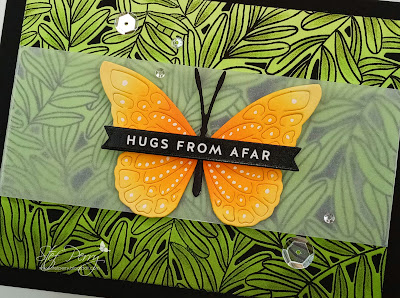
Hugs From Afar

Hello friends!  I've made a card to play along with The Paper Players because I just had to make something with this fabulous sketch that Joanne created.


I think it would be terrific for a slimline card as well, but I stayed with a landscape A2.


I started by stamping the Climbing Leaves 6x6 background stamp on white, then ink blended from dark to light.  When the ink dried, the image was die cut with the coordinating die, then cut down further with a rectangle die.  A piece of vellum was trimmed down to 2" wide, then wrapped around the leaf panel before adhering to a black panel.  The next day after making the card the ink color had dried back quite a bit and seemed a bit flat, so I used two colored pencils to add some shading for more depth.  


The butterfly was die cut from white, then I used three colors of orange, from dark in the middle to light on the outside.  The body was die cut separately, so I just colored it was a black Copic marker before adhering the butterfly pieces together.  I used tape runner on the back of the butterfly to adhere to the vellum except for the top of the wings, where a foam square was added for a little dimension.  The die cut sentiment strip was left unused from a previous project, so it was added with foam tape across the middle.  Next I used a white gel pen to create more interest to the butterfly with some white dots, then lastly added some clear sequins.


Thanks for visiting!  I hope the remainder of your week goes well.  Take care!

Stef


Stamps:  Climbing Leaves (Altenew)
Paper:  Neenah Solar White, Black (Simon Says Stamp), Vellum, Sentiment Strip (SSS)
Ink:  Limeade, Lime, Fresh Leaf, Green Opal, Sunray, Snapdragon, Marigold (all Altenew), Memento Tuxedo Black
Other:  Climbing Leaves die, Etched Butterfly die (SSS), Skinny Strips die (MFT), Nested Infinity Rectangle die (Hero Arts), Sparkling Clear Sequins (Pretty Pink Posh), Black Copic marker

Tuesday, June 28, 2022

Big Birthday Splash

Hello friends!  Today I have a fun card that I made for my great niece's upcoming birthday and I'm sharing it with three challenges - Seize the Birthday, Festive Friday and Double D, all with summertime themes.


(cat, hearts, tree)


I have four great nieces and one great nephew of various ages, but this card is for the youngest who is turning nine.


Oh my, I had so much fun making this card!  I just can't get enough of that sassy cat struttin' her stuff down the beach lol!  To begin, all the main images were stamped then colored with Copic markers.  After they were die cut, I started working on the scene.  I used masking paper atop a white panel to mark off the sections which were then ink blended, using a bit darker blue for the water than the sky.  A white gel pen was used to create "waves" and foam along the water's edge, and light brown Copic markers to create the dunes and dots for texture.  My wave drawing skills could probably use some work ;-) but I'm pretty sure my niece won't care!


As I was building the scene and adhering the images with foam tape, I used the same brown markers to create shadows.  Then I bravely put the panel in my Misti and stamped the sentiment just under the sun. I did test on a scrap piece of acetate to ensure the sentiments were straight before finally stamping on the panel.  After it was adhered to the white card base, I found some small, bright pink hearts that were saved after die cutting a cover die.  Three were adhered, then I covered them with Glossy Accents for shine and that was it.


I hope you're having a great week and are able to get yourself out and enjoy some summer activities!  Thanks for taking time to stop by!

Take care!

Stef


Stamps:  Beach Best Friends (MFT), Rain or Shine (sun image/MFT), Summertime Birthday (sentiment/Colorado Craft Company)
Paper:  Neenah Solar White, Distress White Heavystock (Tim Holtz), Polished Pink (SU)
Ink:  Memento Tuxedo Black, Versafine Clair Nocturne, Latte and Marine (Simon Says Stamp), Tumbled Glass and Antique Linen Distress
Other:  Beach Best Friends dies, Heart Cover Plate die (Gina K), Rain or Shine die, Glossy Accents (Ranger), Sakura White Gelly Roll pen
Copics:  Y26, 19, 15, 11, G09, YG07, 01, B05, 02, 00, RV06, 04, 02, 00, R59, 46, 27, 05, E37, 35, 34, 33, 31, 30

Sunday, June 26, 2022

Happy Flowers for Sunday Stamps

Hello and welcome!  It's time for a new challenge at Sunday Stamps.  This week the lovely Claire has created this wonderful sketch that is just so versatile, I can definitely see myself using again it in the future.


We are also introducing our newest Design Team member, Erin Simpson from Daily Dose of Craft! Erin's clever and creative card making will bring even more inspiration for our followers!  Welcome Erin!

For my card, I ended up combining both modern and vintage looks.  I hope you like it!


I had this floral image stamped out and finally decided to use it.  I colored both the flower and leaves with Copic markers then cut them out with the coordinating die.  You may notice that the top four petals and flower center are popped up.  This is because I messed up the flower center on the original image and it was not repairable (arrrggghhh).  So I stamped and colored just the four smaller petals and center, used a white gel pen on the ends of the stamen, fussy cut it and popped it up on the flower center with a thin foam square. 


Next I went looking for some patterned paper to match my images (you'd think after all these years of card making I'd do that before coloring but nope, not today lol!).  I did find a subtle pattern that matched, but it was on ivory rather than white.  But I've gotten over not wanting to mix my neutrals, so the paper was die cut, adhered to a Desert Storm card base, then I used a little bit of crochet trim from my stash for the horizontal strips in the sketch.  I pulled out a previously created foiled hexagon, adhered it and trimmed off the overhang, then layered the flower, leaves and two additional die cut leaves on top.  I tried to add a sentiment but I didn't like the placement, so I will wait until I use the card and add something to the inside.


Thanks for taking time to stop by, I appreciate it!  Be sure to use the link above to check out the amazing cards by the other DT members and hopefully be inspired to join us for this great sketch challenge!

Take care!

Stef


Stamps:  Happy Flowers (Gina K Designs)
Paper:  Neenah Solar White and Desert Storm, Hammermill, Spring Flowers Collection (Moda Scrap)
Ink:  Memento Tuxedo Black
Other:  Happy Flowers dies, Decorative Swirls die set (white leaves/Altenew), Diagonal Stitched Rectangle die (Pinkfresh Studio), Nested Hexagons Hot Foil Plate and Die, Venetian Crochet Trim (ret. SU), Sakura White Gelly Roll pen
Copics:  RV99, 69, 66, 55, 52, BG49, 15, 32, 11, E49, 59, 57, 55

Thursday, June 23, 2022

Hello There for the Tic Tac Toe Challenge

Hello friends!  It's time for a new Tic Tac Toe Challenge and this week I am the Feature Designer bringing you a new tic tac toe board!  I hope you're inspired and will play along with us this week!


I'm also joining the Happy Little Stampers Anything Goes with Dies challenge for June.


I created this board without a specific card or design in mind, so I finally settled on coloring, bright colors and scallops.


I love these pretty, delicate and somewhat whimsical wildflowers and while there are several images in the stamp, it was fairly quick to color.  To get some of those bright colors, I mixed a few Copic markers that 1) I don't use very often and 2) I never use together.  I was quite inspired by a recent You Tube video that the lovely Kelly Taylor created here.  In it she showed how to mix just a small number of markers to get a variety of colors.  I used one of the combinations (RV4 and V4) on the purple and pink bell shaped flowers and on my, those colors are almost florescent together!


Once the coloring was complete, the image was die cut with the coordinating die.  Next I started working on the card base.  I used an A2 sized stitched diamond cover plate on a panel measuring about 3 1/8" x 8 1/8" running each end of the panel through the die cutting machine after lining up the design in the middle for the second run.  It was then attached to the back of the scallop frame and both were adhered to the white 3 1/2" x 8 1/2" card base.  I ran liquid glue up the main stem, added it to the card front, then used thin foam tape under most of the flowers and glued down the floppier leaves.  The sentiment was stamped in black pigment ink, die cut then added with foam tape to complete this card!


Thanks for taking time to stop by, I appreciate it!  Be sure to use the link above to check out the fabulous cards by the other DT members and I'd love to see your card in the gallery this week!

Take care!

Stef


Stamps:  Wildflower Slimline (Pinkfresh Studio), Circled Sentiments (Altenew)
Paper:  Neenah Solar White
Ink:  Memento Tuxedo Black, Versafine Clair Nocturne
Other: (all Pinkfresh Studio) Stitched Diamonds Cover die, Slim Stitched Scalloped Rectangle die, Nested Circle die, matching Wildflower Slimline die
Copics:  FV2, V04, RV04, 02, 00, BG45, YG17, FYG2, YG01, YR18, 16, Y17, 35

Wednesday, June 22, 2022

Hole In One Kind of Day

Hello and welcome!  I'm back with another post today, this time for the great color challenge over at Just Us Girls, where Elizabeth chose red, blue, yellow and a color of your choice, which for me was green.  That combo worked perfectly for two BIL birthday cards I needed. 


My BILs and my husband are lifelong golfing buddies, so I always try to grab stamp sets with those types of images, because they seem to be so rare.  Gina K Designs just came out with a fun set and I used one of the stamps for these cards.


I started by stamping and coloring the 18th tee image.  The "grass" was a bit tricky because I wanted to give it some dimension but since greens (the putting area for those of you non-golfers) are so closely mowed that there can't be long grass blades, I resorted to making dots and squiggles with 3 consecutively darker colors over the lightest color, then blending it all with the 2nd lightest color.  While not perfect, my husband gave them a thumbs up, so I figured it looked satisfactory lol!


The sentiments were stamped with black pigment ink, then the Happy Birthday portion cut out with a label die and I ended up fussy cutting around the sub sentiment.  I settled on a mini-slimline design and used a die set to cut out the white and red layers, ink blending a bit of bright yellow on the white before adhering everything with thin foam squares.  I couldn't decide whether to use navy or the bright blue for the base so I made one of each.  Super simple but I think the guys will like their cards, because, you know, golf... ;-)


Thanks for visiting, I appreciate it!  I hope the rest of your week ahead is nothing but fabulous!  

If you're interested you can check out my prior post here.

Take care!

Stef


Stamps:  Hole in One (Gina K)
Paper:  Neenah Solar White, Real Red and Pacific Point (SU), Soft Navy (SSS)
Ink:  Memento Tuxedo Black, Versafine Clair Nocturne, Squeezed Lemonade Distress
Other:  Hole in One dies, Mini Slimline Essentials dies (Pinkfresh Studio), Featured Sentiment die (Altenew)
Copics:  R59, 46, 17, T8, 6, 4, 2, 0, YG67, 17, 03, 01

Big Hugs

Hello friends!  I hope you're having a good week.  Today I'm sharing a card that is a bit unusual for me but I thank Jaydee at The Paper Players for pushing me to revisit making a one-layer card!  I used the beautiful color combo of green and blue from over at the Color Hues challenge and am also joining Addicted to CAS where I'm hoping the dots on the leaves work for that challenge and sharing with the June CAS challenge at Happy Little Stampers, where the theme is Hugs.


For my card, I used a small, sweet floral image.


I love the fun illustration of this floral image, especially the details on the leaves and the flower centers.  It was stamped and colored with Copic markers, using some color combos I hadn't put to paper for a while. 


I gravitate more towards aquas and pinks, so I loved coloring the flowers in blues.  And the greens were just a different grouping of markers than I normally use to get that bright yellow-green color combo.  When the coloring was done, the card was slipped back into my Misti to stamp the sentiment and I was done.  I really like the simplicity of this, so much so that I have 2-3 other one layer projects going on my desk.  Jaydee, you really inspired me!


Thanks for taking time to stop by!  Take care!

Stef


Stamps:  Floral Henna (Altenew)
Paper:  Neenah Solar White
Ink:  Memento Tuxedo Black
Other:  Copics-B18, 16, 14, 12 G17, 09, YG07, 01

Wednesday, June 15, 2022

Peony Birthday for The Flower Challenge

Hello and welcome!  It's time for our mid-month reminder post at The Flower Challenge.  This month the challenge is to use the color blue and yellow to honor and support the people of Ukraine.  You have until the 25th of the month, so I certainly hope you'll join us!


I'm also playing along with the Simon Says Stamp Wednesday Challenge, where the current theme is "Add a Sentiment" and with Seize the Birthday, with a "topping" challenge to use our favorite technique.  I have many techniques that I love to use, but I guess my favorite is coloring with Copic markers and especially combining it with my newest fav, foiling!


While making this card I fell totally in love with Cobalt blue foiling!  Oh, be still my heart!


The beautiful Peony Prints was foiled in Cobalt blue on white, then the flowers were colored using Copic markers.  The print nearly fills an A2 panel but I decided to trim it down to 2 3/4" x 4".  Next I foiled a panel of white cardstock with a sheet of the Cobalt foil to use as the matte for the main image and it was trimmed down to 3 1/4" x 4 1/2".  From those remains, I was able to create a strip upon which to place the sentiment, also foiled in the blue.

BTW, the color variation in the foiled matte is the result of the natural lighting I used to photograph the card; it really is all one color.


Next, the Geo Tiles image was hot foiled in Cobalt, then die cut.  What I learned from that is next time I will die cut the Geo Tiles then foil it, as it was a trick to get the die lined up with the foiled design.  The frame was adhered to the white cardstock, then the remaining layers were added with foam tape.  As a final little touch of bling, I added some pretty glossy dots.


Thanks so much for taking time to stop by, I appreciate it!  Be sure to use the link above to see the amazing cards by the other DT members and hopefully have time to join us this month!

Take care!

Stef


Paper:  Hammermill, Neenah Solar White
Other:  Peony Prints Hot Foil Plate (Pinkfresh Studio), Yana's Sentiments Hot Foil Plate and die (Spellbinders), Geo Tiles Hot Foil Plate and die (PS), Nested Infinity Rectangle die (Hero Arts), Silver Glossy Dots (Pink & Main)

Sunday, June 12, 2022

Hello for Sunday Stamps

Hello friends!  It's time for a new challenge at Sunday Stamps and this week it's a color challenge, with a lovely array of choices to design with!  I ended up using blue, poppy and yellowish green.


We are also introducing our newest Design Team member, Deb Horst of Sendable Sentiments!  Deb has been a long-time crafter and particiant at Sunday Stamps and we are thrilled to have her join us.  Be sure to use the link above to check out Deb's card along with those of the other DT members and hopefully be inspired to join us for this challenge!


With these colors I thought about using poppies for the flowers, but then I saw my new Nature's Harvest stamp set, begging to be used, so that's the route I took!  They were colored with Copic markers, then die cut with the coordinating dies.  


I loved the blue table top in the photo, so I decided to go with a woodgrain background.  A panel of white watercolor paper was embossed with a 3D embossing folder, then I pulled a blue ink pad up and down the panel to get color just on the raised part of the panel.  While that dried, I die cut the sentiment 3 times from white cardstock, layered them up then decided to color the top one with one of the Copic markers used for the flowers to make it pop against the background.  

After the embossed panel was dry, I trimmed it down and adhered the flowers to the bottom, using a bit of thin foam tape just under some of the flower heads, the rest was adhered with glue.  The panel was wrapped with hemp twine that was tied in a bow, then the sentiment adhered above.  At the last minute, I decided to top the sentiment with Glossy Accents, which seemed to make the color lighter?  I love the shine, I wish the color was a bit darker to better match the flowers.


Thanks for stopping by today, I appreciate it!  Be sure to pop over and check out the beautiful cards by the other DT members and hopefully play along with our color challenge!

Take care!

Stef


Stamps:  Nature's Harvest (SU)
Paper:  Neenah Solar White, Tim Holtz Distress Watercolor
Ink:  Memento Tuxedo Black, Tumbled Glass Distress Ink
Other:  Nature's Harvest die, Plank 3D embossing folder (Tim Holtz), Bold Hello die (Simon Says Stamp), Hemp Twine (Lawn Fawn)
Copics:  RV23, R59, 46, 24, 05, YG99, 97, 95, 93, 00, E29, 37, 34

Thursday, June 9, 2022

Art Is...

Hello friends, thanks for stopping by!  Today I'm sharing a sweet little card that I made for two challenges.  The lovely Lisa has chosen Paintbrush for Word Week at Just Us Girls, and the talented ladies at Addicted to Stamps and More are celebrating 10 years of challenges with a Make Your Mark challenge.  Big congrats to them!


I've admired all the beautiful paintbrush dies but haven't made that plunge...yet lol!  But I remembered I had a sweet Anita Jeram illustrated stamp set that worked perfectly.


Those two little bunnies watching the artist at work just make me smile!  There are some additional cute critters in the set, but I was in a hurry to get this card completed by the deadline, so I opted not to make an elaborate scene this time.  I colored the stamped image with Copic markers and used them to create a little sketched scene for the bunny to be "painting".  The image was then die cut with matching dies.


Next a panel of white was ink blended with light blue and tan, then die cut with a deckled rectangle die.  The sentiment was stamped then I fussy cut around it.  The panel was adhered to the ivory card base with thin foam tape, then the main image and sentiment added on top, also with foam tape and I was done!


Thanks again for visiting!  Take care and enjoy the upcoming weekend!

Stef


Stamps:  Art Is (Anita Jeram/Colorado Craft Company)
Paper:  Neenah Solar White, Antique Ivory (Hero Hues)
Ink:  Memento Tuxedo Black; Latte and Seafoam (Simon Says Stamp Pawsitively Saturated Ink)
Other:  Art Is dies, Deckle Layers Rectangle die (Waffle Flower)
Copics:  W5, 3, 1, 0, C3, 2, R20, B45, 52, E29, 37, 34, 42, 41, 000, G28, 24, 21, BG11, 10, 0000

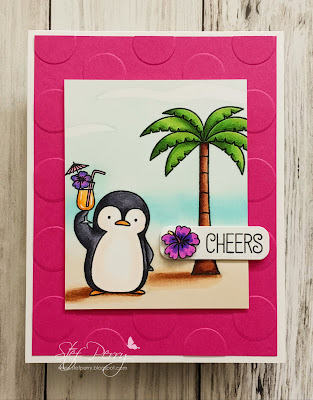
Cheers for the Tic Tac Toe Challenge

Hello and welcome!  It's time for a new Tic Tac Toe Challenge and this week Claire has created this fabulous board to spark your mojo!


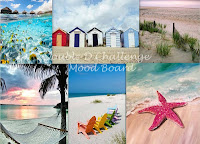
I'm also joining The Paper Players, where Anne Marie has chosen the theme of food and/or beverages, and the Simon Says Stamp Wednesday Challenge with a theme of Bright and Cheerful.


I went down the right column of the Tic Tac Toe board - drink, bright colors, circle.


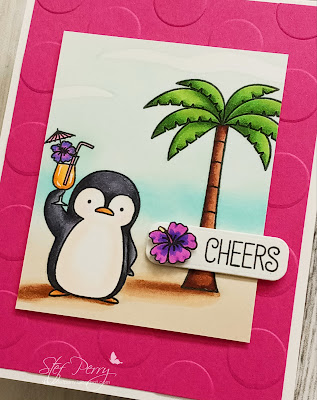
Claire's board certainly is evocative of summer, so I took this as an opportunity to use my new Birdie Brown Penguins in Paradise stamp set.  Probably everyone in the stamping universe that likes MFT stamps has this stamp in their collection, but I didn't so I bought it recently when MFT opened the Birdie Brown "vault" and made it available for sale.  SO darn CUTE!  Anyway, with drink in hand, this little penguin was perfect to be the main figure in my little scene.


Originally the scene included another penguin and a beach ball (which was to be the "circle").  I stamped it out using masks, die cut a couple of cloud masks as well, then ink blended the sky, water and sand. When that was done, I realized something had put a dent in the paper right above the head of the other penguin and no matter how I tried to disguise it, nothing worked to my satisfaction.  So I Copic colored the rest of the scene, then trimmed it down as you see it now. But the trimming also removed the beach ball, so now I had to come up with another circle, hence the large polka dot embossed background!  With those two layers complete, I decided to stamp and die cut the sentiment to leave room for the hibiscus, which I colored then fussy cut.  The last step was to use my white gel pen on the drink glass for a reflection.


Thanks so much for visiting, I really appreciate it!  The other DT members have fabulous cards to inspire you, so be sure to head over to the Tic Tac Toe Challenge and hopefully join us this week!

Take care!

Stef


Stamps:  Birdie Brown Penguins in Paradise (MFT)
Paper:  Neenah Solar White, Magenta Madness (SU)
Ink:  Memento Tuxedo Black; Sand Dunes, Sea Breeze and Ocean Waves (Altenew)
Other:  Large Polka Dot embossing folder (ret. SU), Cloud Cover dies (MFT), Featured Sentiment die (Altenew), Sakura White Gelly Roll pen
Copics:  E29, 37, 35, 34, 33, 31, 30, 0000, RV20, V04, YG67, 17, 05, 03, BG0000, YR18, 16, Y17, 38, 35, FY1, FV2, FRV1

Saturday, June 4, 2022

Thinking of You for The Flower Challenge

Hello and welcome!  It's time for the June challenge at The Flower Challenge and this month the prompt is to use Blue and Yellow for your floral images as we continue to honor Ukraine.  You may also use green for the leaves along with black and white as neutrals, as long as the challenge colors are the most prominent.


My card uses a newer set from Pinkfresh Studio, using the hot foil plate, dies and stencils.  I actually received the stamp, dies and stencils in late March when I attended a card making event and then was happy to add the hot foil plate when it became available in April.


Starting with the hot foiling, I used Gold Glimmer hot foil for the image outline.  Next, out came the stencils, using three shades of blue and two of green.  The image was die cut then layered on two additional dies cuts in white for dimension.  I love to color but stenciling sure does make creating quicker.


Next I ink blended a lively yellow on a panel of white, then it was trimmed down using diagonal stitched rectangle die.  It was matted on a panel of blue, then added to the white card base with foam tape.  The floral image was adhered to the card, as was the foiled sentiment I had in my stash.  Lastly I added a few pearls and gems from a newer Lucy's Cards collection that I was happy to discover included blues and yellows.


Okay, now it's your turn to get creative with these colors!  You have until the 25th of the month and for more inspiration, be sure to take a look at all the beautiful Design Team cards!

Take care!

Stef


Paper:  Neenah Solar White, Hammermill, Pacific Point (SU)
Ink:  Citrus Burst (Altenew); Seaside, Summer Shower, Sky Blue, Fresh Pear and Key Lime (Pinkfresh Studio)
Other:  Simple Gestures Hot Foil Plate, Die and Stencil set (PS), Everyday Sentiments II Hot Foil Plate (Spellbinders), Skinny Strips die (MFT), Diagonal Stitched Rectangle die (PS), Gold Glimmer Hot Foil (Spellbinders), Crystal Collection - Bouquet (Lucy's Cards)