Sunday, November 27, 2022

Jingle All the Way for Sunday Stamps

It's time for a new color challenge at Sunday Stamps and this one is very timely for those of us still working on making our Christmas cards!


I'm also slipping in at the last minute to the current Color Hues challenge, which is still open until tomorrow morning for anyone that might care to join!


For my card, I stayed very clean and simple. 


The background panel was created using a retired Stampin' Up embossing folder called Softly Falling, die cut with one of the Altenew Mix & Match Frames dies (love that deckled edge), then adhered directly to the white card base.


Santa, Rudolph and the tree (from MFT's Jingle All the Way stamp set) were all stamped, colored with Copic markers, and then cut out with the coordinating dies.  I used an Altenew gold gel pen to color Santa's belt buckle, the bells on Rudolph's collar and the star on the tree.  A Sakura White Gelly Roll pen was used to create the "fluff" on Santa's hat.  The sentiment, which is from the same stamp set was red heat embossed on white then die cut with MFT's Fishtail Foundation sentiment dies.  All the elements were added with foam tape, then I used a light gray Copic marker to create shadows and I was done!  This was a great card to reproduce in multiples once all the coloring was complete.


Thanks so much for visiting, I appreciate it.  The link above will take you to the blog post with all the DT member's fabulous cards.  I hope you'll join us for this challenge!

Take care!

Stef

Inks:  Memento Tuxedo Black, Versamark
Embossing Powder:  Gina K Red Hot
Copics: R59, 46, 27, 05, 20, E29, 39, 37, 35, 33, 31, 30, 21, 11, 00, YG67, 17, 03, C9, 6, 3, 1, 00, W1, 0

Thursday, November 24, 2022

Christmas sELFies for the Tic Tac Toe Challenge

Hello friends!  It's time for a new Tic Tac Toe Challenge and this week Carol has created a fabulous board with loads of holiday card-making inspiration.

For my card I went across the bottom row - patterned paper, stamped image, sparkle/shiny.

I was doing some Copic coloring mass production for Christmas cards and the MFT Christmas sELFies stamp set is absolutely perfect for quick and fun holiday cards.  


The stamped images were colored with Copic markers and I also used a light green Copic marker for the background.  Next, a piece of MFT Color Collab patterned paper was die cut with the Selfie Square die, as was the colored image. The paper was trimmed down then two layers of white cardstock were adhered for stability, then the stamped and die cut image popped into place.


The entire piece was added to a Shaded Spruce panel then adhered to a white cardbase.  The sentiment was stamped, die cut and added with foam tape, then then I used a white gel pen to add some texture to the white bands around the hats and the elf's sleeve.  The sparkle came by using an aqua shimmer pen on both hats and Rudoph's red nose.  The last step was to add a few little snowflake embellies.


Thanks for visiting and I hope you'll use the link above to take a peek at the fabulous cards by the other DT members.  We'd love it if you'd come join us this week!

Take care and Happy Thanksgiving to all those in the US celebrating today!

Stef


Stamps:  Christmas sELFies (MFT)
Paper:  Neenah Solar White, Shaded Spruce (SU), Cool Colab 6x6 paper pack (MFT)
Ink:  Memento Tuxedo Black, Versamark Clair Nocturne
Other:  Selfie Square and Fishtail Foundations dies (MFT), Tonic Nuvo Aqua Shimmer pen, Trinity Stamps Vanilla Sugar Snowflake embellishments, Sakura White Gelly Roll pen
Copics:  Santa hat and Rudolph's nose:  R39, 37, 35; Elf hat and shirt:  G28, 17, 03; White trim C3, 1, 00; Santa's beard and brows: T2, 0; Skin: E11, 21, 00, R20; Elf hair: E29, 19, 35, YR18, 14; Rudolph: E29, 37, 35, 33, 31; Background: G000

Wednesday, November 23, 2022

Merry & Bright

Hello friends!  I'm back with a card to share that I made for the challenges at Just Us Girls and The Paper Players.


I actually made my card about 4 weeks ago when I was in a foiling frenzy but never used it for a challenge or DT assignment, so when I saw these two challenges, I thought it would work well.


This card was super easy to put together since I had previously foiled the sentiment and background.  The background was created by foiling Gold Glimmer foil onto a panel of white using Spellbinders Plaid Tidings plate.  The large sentiment was foiled with Sparkle Red Glimmer foil then die cut with the coordinating die.  The foliage was created using the Pinkfresh Festive Leaves Background stencils and dies.


With all the components complete, it was just a matter of adhering everything to the card.  The leaves were glued directly to the card front, then I die cut the sentiment twice more and layered them together with the foiled sentiment on top, then added to the card.  The last step was to use an R59 Copic marker to darken the berries, then cover them with Glossy Accents for some nice shine. 


Thanks for taking time to stop by.  Have a great week and if you're in the US, have a wonderful Thanksgiving!

Take care!

Stef


Stamps:  None
Paper:  Hammermill, Neenah Solar White
Ink:  Simon Says Stamp Sage and Pine, Altenew Lime, Fresh Leaf, Green Opal, Fayed Leaf, Forest Glades and Evergreen, Pinkfresh Studio Berryliscious and Candy Apple
Other:  Pinkfresh Studio Merry & Bright Foil Plate and die, PS Festive Leaves Background Stencils and dies, Spellbinders Plaid Tidings Background Hot Foil Plate, Spellbinders Sparkle Red and Gold Glimmer Hot Foil, Glossy Accents, R59 Copic marker

Wednesday, November 16, 2022

Happy Thanksgiving

Hello and welcome!  My card today is one I made for the current challenge at Just Us Girls, where we are to create a matching envelope.  I'm also joining the Anything Goes challenge at Four Seasons Challenge and the Simon Says Stamp Monday Challenge, where this week's theme is Thanks/Thanksgiving.


I was just completing the very few Thanksgiving cards that my husband and I send out when I saw the challenge at Just Us Girls, so I created a rather simple matching envelope with gold heat embossing on the front.


I started by stamping the SSS Full of Thanks stamps set on white cardstock, then coloring with Copic markers.  I put a pale halo around the image using my lightest BG marker then put the panel back in my Misti and gold heat embossed it along with the sentiment.  Next, the panel was die cut with a mini slim rectangle die then I applied gold metallic paint around the edges.  Once that dried, the panel was adhered directly to an Early Espresso die cut panel, which was then adhered to the white card base and finishing by adding the die cut sentiment with thin foam squares.


I made five of these cards but had only four pre-made envelopes, so I used an old Memory Keepers Envelope punch board to create an envelope that would fit with the 6"x 3" card.  I popped that into my Misti so I could stamp more than once for good inking, then heat embossed it with Antique Gold embossing powder.  I only embossed part of the image on the envelope so that I'd have plenty of room to add the recipient's address.


Thanks for taking time to stop by, I appreciate it!  Take care and have a wonderful Thanksgiving next week if you celebrate!

Stef


Stamps:  Full of Thanks (SSS)
Paper:  Neenah Solar White, Early Espresso (SU), CutCardStock Super Smooth White (AMZ/used for the envelope)
Ink:  Memento Tuxedo Black, Versamark
Other:  Pinkfresh Studio Mini Slimline Essential Bundle dies, Waffle Flower Designer Template 1 sentiment label die, Altenew Metallic Gold paint and Antique Gold embossing powder, WR Memory Keepers Envelope Punch board
Copics:  Corn Husk: YG67, 17, 03; Sunflower Greens:  G28, YG45, G21; Corn: Y28, 18, 06, 02; Sunflowers:  YR27, 24, 15, 11, E59, 57, 55; Pumpkin:  E09, YR18, 07, 16, Y17, E29, 37, 33; Leaves #1: YR18, 07, 16, Y17, E33; Apple and Leaves #2: R39, 37, 35; Halo BG000 and 0000; for the grapes I used Sketchmarker Brush Pro markers in V61, 62, 54

Tuesday, November 15, 2022

Congratulations for The Flower Challenge

Hello and welcome!  It's mid-month, which means I'm sharing a reminder card for The Flower Challenge.  This month we're asking participants to use embellishments, along with their beautiful floral creations, which couldn't be a much easier challenge!  There's still plenty of time to join us - you have until the 25th of the month.

Recently I attended the Altenew Spec-Tech-ular Florals 2022 Craft Your Life Retreat (and btw the classes were wonderful!), and as part of that retreat, the participants received two new stamp sets (plus related products) that Altenew won't be releasing until later this year.  I was thrilled to receive permission to use some of the products for my DT card today.


I started by stamping one of the two very large, gorgeous florals from the Ambridge Rose stamp set,  coloring it with Copic markers, then die cutting with the coordination die.  From the same stamp set I used the sentiment that was gold embossed on dark green cardstock then die cut with a label die.


For the background and the sentiment, I decided to use the beautiful Concord and 9th Evergreen cardstock.  The A2 background panel was embossed with the Simon Says Stamp Mandala Plate Cover die before adhering it directly to the card base.  Next, a frame was die cut from Brushed Gold cardstock along with two additional layers of black cardstock.  They were adhered together and added to the card front (the frame is part of the Lotus Frame stamp and die set, the second set from the retreat).  The flower was adhered directly to the frame, using foam squares for the parts that were hanging outside of it.  The sentiment was added along with the gold sparkle crystals to finish things off.  


Thanks so much for stopping by and I do hope you'll use the link above to check out the beautiful cards by the other DT members and hopefully join us by the 25th!

Take care!

Stef


All products were from Altenew except as noted above.  The Copic markers used were RV69, 66, 55, 52, G28, 17, 14 and 03.

Sunday, November 13, 2022

Be Merry for Sunday Stamps

Hello friends!  It's time for a new challenge at Sunday Stamps, with a sketch by the amazing Lisa!  


I'm also joining the current Anything Goes challenge at the Peace on Earth Christmas Challenge.


Lisa gave use such a great sketch with so many possibilities!  For my card, I decided to substitute the middle circle with a large die cut sentiment.


This was a fun card to make with the cute reindeer and the clever die cut sentiment.  Even my husband, who is not prone to liking "cute", really liked it! ;-)  I started with the background, die cutting a piece of Hero Arts Mist cardstock with the Slim Lacy Layers die, then taping off around the scallop edge.  I used Ink on 3 Shark Tooth White pigment ink over Simon Says Stamps' Peace Joy Hope Love stencil, moving it once to fill the entire panel.  When done I removed the tape and set it aside to work on the rest of the card component.


The reindeer from MFT's Reindeer Love stamp set were stamped, colored with Copic markers then die cut with the matching dies.  I used green Copics for the scarf and bow, then used a white Gelly Roll pen for add polka dots to the bow.  The Be Merry sentiment, also from MFT, was die cut twice from white cardstock and once with a piece from the SSS Glitter Assortment Pack, using a color that was between red and pink for something different. The layers were adhered together, then the sentiment and reindeer added to the card front.  I thought the card needed just a little something more, so a few Vanilla Sugar Snowflakes from Trinity Stamps were added and that finished it off!


Thanks for visiting, I always appreciate it.  Be sure to use the link above to check out the wonderful cards by the other DT members and hopefully be inspired to join us at Sunday Stamps!

Take care!

Stef


Copics:  E29, 37, 35, 33, 31, 30, G28, 17, 03, R20, W7, 5, 3

Thursday, November 10, 2022

Snowflake Visions for the Tic Tac Toe Challenge

Hello friends!  It's time for a new Tic Tac Toe Challenge and this week I am the featured designer.  Oh my gosh, can you believe how quickly Christmas is approaching?  If you still have Christmas cards to make for this year, I hope my board inspires you! 

For my card I went down the middle column - snow, free, blue.


This card was so easy to put together after spending an afternoon playing with pastes, embellishment mousse and embossing folders!  I shared some other creations using this same process last week - use this link if you haven't already seen that post.

Anyway, for the background I used a 3D embossing folder with a panel of Midnight card stock, then applied some Simon Hurley Clear Skies Lunar Paste using a Ranger ink blending foam and handle, making sure to leave a bit of the dark cardstock showing around the snowflakes for some contrast. The paste dries quickly so I was able to trim down the panel, adhere it to a larger panel of silver then add to a white card base.


Next I added a large snowflake die cut from silver glitter cardstock, topped it with another snowflake die cut from matte silver cardstock, then layered the sentiment across the middle.  Making things even simpler was that the sentiment was from a package of pre-foiled and die cut sentiments.  Super quick to make with nearly all the components made ahead of time.


Thanks for visiting, I really appreciate it!  Be sure to use the link above to check out the beautiful cards from the other DT members and hopefully be inspired to join us this week!

Take care!

Stef


Stamps:  None
Paper:  Neenah Solar White, Concord and 9th Midnight, Simon Says Stamp Matte Silver and Silver Glitter, Pinkfresh Studio Foiled Sentiments 4 holiday
Other:  Simon Says Stamp Dainty Snowflake die, Filigree Snowflake Emboss & Cutting die, Snowflake Visions 3D embossing folder, Simon Hurley Clear Skies Lunar Paste

Friday, November 4, 2022

Friends Like You for The Flower Challenge

Hello friends!  It's time for a new challenge at The Flower Challenge!  This month, along with your beautiful flowers, you need to add embellishments - how easy is that?  And thank you to all those that joined the challenge last month for our 6th birthday celebration; there were soooo many beautiful cards!


I've been seriously working on my Christmas cards, so I took this opportunity to make another one.


This was a fun, if messy, card to make.  I used a wonderful poinsettia die set from Concord and 9th, die cut all the flower and branch components from watercolor paper, then sprayed them with Distress Mica Stain sprays.  While you can see the shimmer in the photos, it is just remarkable IRL, and doesn't look splotchy like the photos make it out to be.  I also die cut a few pine branches from white cardstock and leaves from dark green cardstock, then sprayed them with sheer shimmer spray.  The flower center was painted with gold metallic paint.  When all the parts and pieces were dry, I put the flower together by adhering the layers just in the middle so I could get some dimension from the petals.


Next the sentiment was gold heat embossed, then fussy cut for kind of a fun look.  I really love what it says and plan to use on several cards to friends!

For the base, I die cut three layers of a trellis cover die, adhered them together, then onto the card base.  The floral arrangement was adhered directly to the front and the sentiment popped up with thin foam squares.  I then added a gold glitter drop to the flower center and scattered about a few Leaf glitter drops that conveniently arrived the day I was putting this card together.  It was just meant to be!


I hope you'll join us this month for this easy challenge and in the meantime, be sure to use the link above to pop over and see all the gorgeous cards from the other DT members!

Take care!

Stef


Stamps:  Christmas Sparkle (Poppystamps)
Paper:  Neenah Solar White, Midnight Green (Simon Says Samps), Canson XL watercolor
Ink:  Versamark
Other:  Peppermint Stick, Winterberry and Tree Lot Distress Mica Sprays, Concord and 9th Fresh Cut Florals Edition 4 dies, Altenew Garden Trellis Cover Plate die, Metallic Paint and Antique Gold embossing powder, Studio Katia Gold Glimmer Crystal, Pinkfresh Studio Leaf Glitter Drops, Imagine Crafts Sheer Shimmer Spray

Thursday, November 3, 2022

Fall Birthday and a Christmas Tag

Hello friends!  Today I'm sharing a card and a tag made for two separate challenges, but both using the same technique with embossing folders and gorgeous paste.


First up is my card for Anne Marie's terrific Tic Tac Toe challenge at The Paper Players.  Although I used a few of the elements in the board, my three in a row is down the middle column - die cut, texture and birthday.


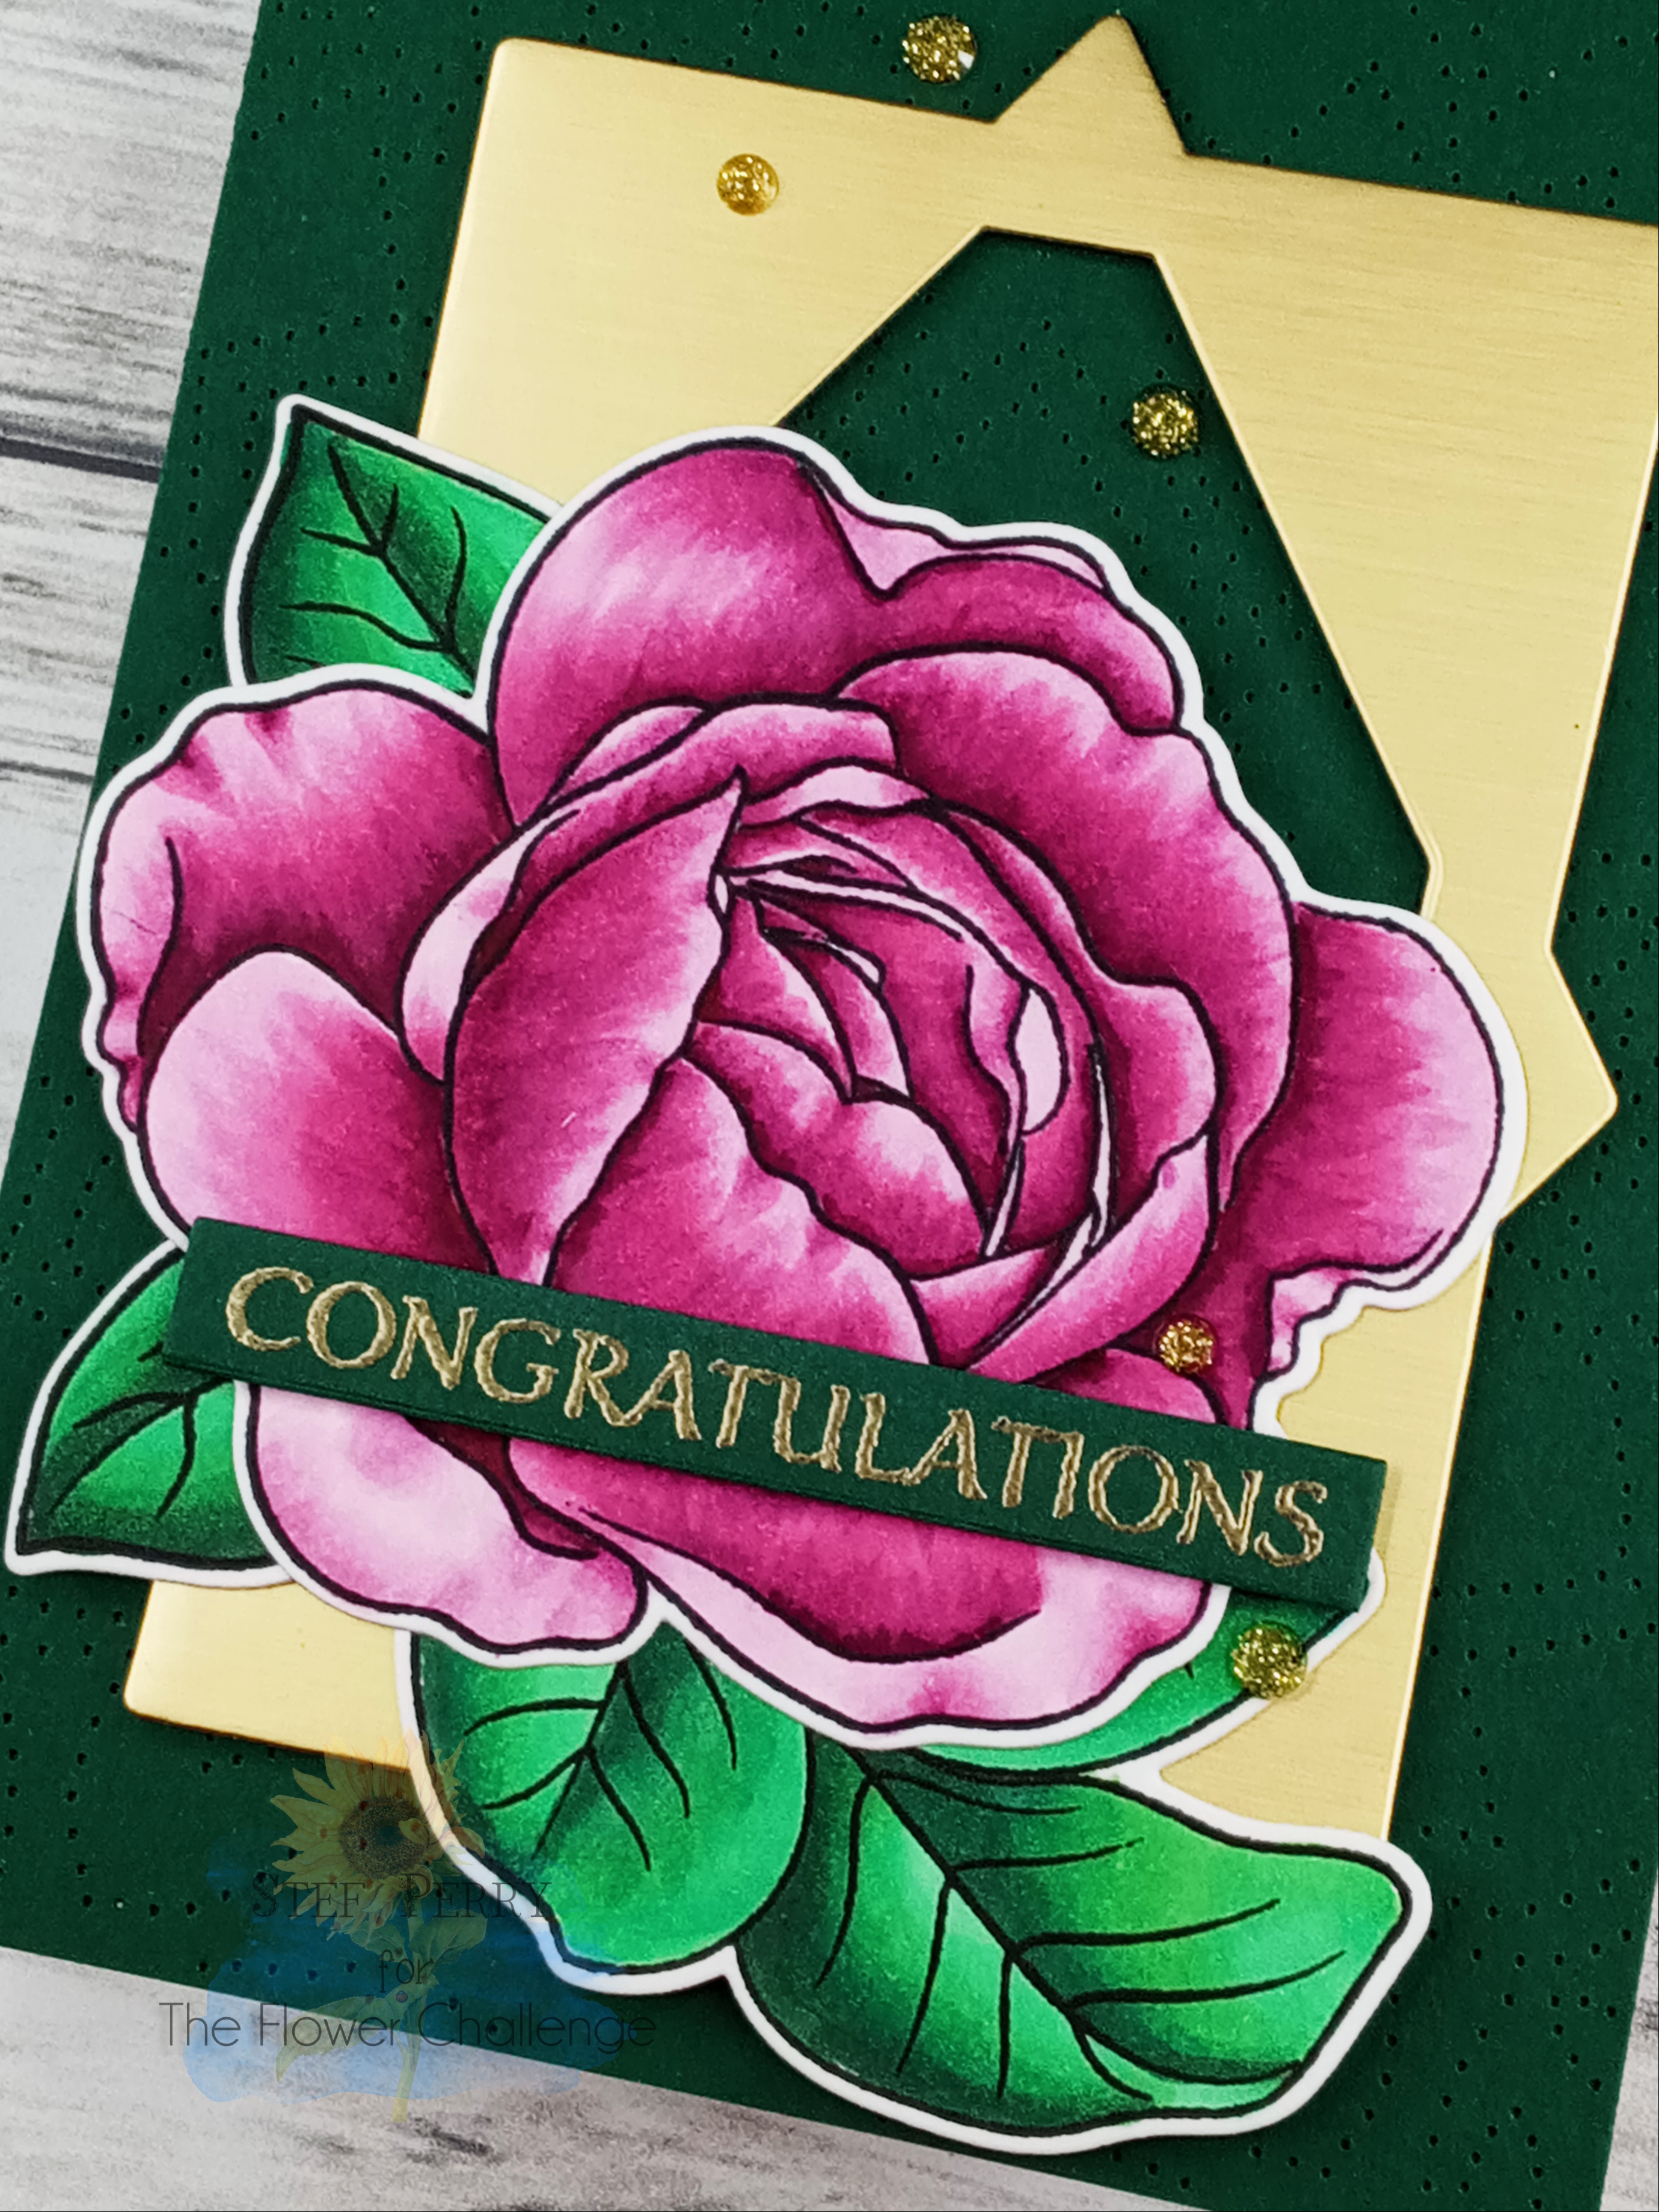
I so love how this card came out!  I started with a panel of dark brown cardstock and used the Forest Floor 3D embossing folder to get that fantastic impression.  Next, I applied Tonic Nuvo Fresh Copper Embellishment Mousse to the card using just my finger, touching the tops of the embossed detail but also letting some get in-between the images to give a rustic look.  I actually have a stack of embossed panels that I made one afternoon with various pastes/mousses.  The embellishment mousse dried quickly so I was able to trim the panel down and adhere it to a Desert Storm card base.  

I applied an adhesive sheet to the back of a piece of vellum, die cut it with a circle die and adhered it to the front of the panel, along with some die cut Desert Storm leaves also covered with the copper mousse and a die cut sentiment.  My SIL will receive this for his birthday later this month and since he's a woodsy sort of fellow, I think he'll appreciate it.


Next I have a Christmas gift tag made from one of those embossed panels, which I'm sharing at Just Us Girls for Carol's fabulous challenge!


I love making handmade gift tags but don't always take much time to make them super decorative (mostly because they seem to just get tossed lol!), but the embossing plus Simon Hurley's Lunar Paste on this tag certainly gives it a bit more of a wow factor I think.


This time a panel of Peacock was embossed using the Snowflake Visions 3D embossing folder and I used my finger to apply Clear Skies Lunar Paste over it (my camera always seems to adjust the color when I use teal products, so the tag appears much more blue than in real life).  The panel was die cut using a large tag die, then I added two sparkly die cut snowflakes to anchor the sentiment, which came in a pack of pre-foiled holiday sentiments from Pinkfresh Studio.  Next I die cut a second tag from white cardstock, silver embossed "to" and "from", and a row of snowflakes, then attached the white tag to the back of the embossed one using some satin ribbon from my stash and tying them together with some silver twine.


Here's a little close up of the front.


Thanks so much for stopping by, I appreciate it!  Take care!

Stef


Birthday Card
Stamps:  None
Paper:  Dark Chocolate Brown (Simon Says Stamp), Neenah Desert Storm and Natural White, Vellum
Ink:  None
Other:  SSS Forest Floor 3D embossing folder, Altenew Essential Sentiment Strips die, Hero Arts Nested Infinity Circle die, SSS Berry Stems dies, Tonic Nuvo Fresh Copper Embellishment Mousse
Noel Tag
Stamps:  Tag, You're It: Holiday (Honey Bee Stamps)
Paper:  SSS Peacock and Silver and White Glitter paper, Pinkfresh Foiled Sentiments 4 holiday
Ink:  Versamark
Other:  SSS Snowflake Visions 3D embossing folder, Simon Hurley Clear Skies Lunar Paste, SSS Daphne and Eliza Snowflake dies, Ellen Hutson Tag Trio die, Hero Arts Silver embossing powder, retired SU White Satin ribbon and silver twine