Sunday, July 31, 2016

Peachy Thanks

Welcome back, friends!  Tonight I have a fun card made for 3 challenges - the gorgeous color challenge at Color Throwdown, the sketch challenge at Stamps Ink Paper and a watercolor challenge for one of the annual Dare to Get Dirty challenges at Splitcoaststampers (SCS DTGD Forum).  Unfortunately I just missed the deadline for the SIP challenge but I've included links below to it and Color Throwdown so you can go visit and enjoy all the beautiful inspiration.


The CTD challenge is to use Peach, Yellow, Light Pink and White - yum!  I started by water coloring one of the flowers from Remarkable You using Peekaboo Peach.  I wanted to have a bit of depth of color to the shaded areas, but I didn't have a darker peach color so I added a tiny bit of Calypso Coral.  After the image dried, it was fussy cut and adhered to the tag.  The tag itself was made with Whisper White card stock, punched at the top with the Ornate Tag Topper punch and then stamped along the bottom with a border stamp in So Saffron ink.  Some Gold Cording was added to the top.


The top part of the background was created by wetting a panel of water color paper with a wet paintbrush section by section, dropping one of the challenge colors and moving it around, drying with a heat tool, then adding the next color.  After all three colors were added I took a wet paint brush and splattered the panel to add the water drops.  After drying, both the water colored and textured card stock pieces were adhered to a card stock panel slightly smaller than 4.25 x 5.5 inches, wrapped with some peach ribbon and mounted on a same size card base.


Thanks so much for looking - as always your visit and comments are so appreciated!  Have a great week.

Until next time...

Stef


Product details
Stamps:  Remarkable You, Tin of Cards, Mixed Borders
Paper:  Whisper White, Textured Pink Pirouette, Watercolor
Ink:  Pink Pirouette, So Saffron, Peekaboo Peach, Calypso Coral
Other:  Ornate Tag Topper and Small Oval punches, Peekaboo Peach ribbon, Gold Cording

Friday, July 29, 2016

For A Friend

Hello again!  I'm back with my card made for the current challenge at Freshly Made Sketches.


I began with a panel of Whisper White card stock, using the corner stamps from Helping Me Grow to add some definition to this very CAS focal point.  It took me a couple of tries after realizing I just could not stamp them even without measuring.


Next the beautiful bamboo image from Artistically Asian was inked in Pear Pizzazz then stamped over with one of the sentiments from Helping Me Grow.  Then I had this "brilliant" idea of using the Asian inspired brad from the retired Antique Brads.  I added it to the top left corner and realized I didn't like how it looked AT ALL, so then I had to find a way to save my panel, now with a hole in it.


After mulling over this dilemma for a few minutes I decided to strategically add a couple of butterflies.  I love how Pear Pizzazz and Pool Party compliment one another, and I couldn't believe that I found in my card stock scraps a couple of Pool Party butterflies previously created using the retired Beautiful Wings embosslit.  Must have been meant to be, right? After they were added, the panel was adhered to the Pear Pizzazz base with Dimensionals.

Thanks so much for visiting today and of course I would love to hear from you if you have a moment to leave a comment!  I've included a link above to the current FMS challenge, so do be sure to use it to check out all the wonderful inspiration.

Until next time...

Stef


Copper Leaves

Welcome back!  I was in my craft room for part of the day making a couple of cards, one of which is the masculine birthday card I'm sharing in this post.  Global Design Project (#GDP046) has a wonderful sketch for it's challenge this week, so I decided to use it for my card design.


I liked the wide border around the main panel in the sketch, so I cut my piece of Very Vanilla to 3.25 x 4.5".  Next I stamped and embossed three of the gorgeous images from Vintage Leaves with the new Copper Stampin' Emboss Powder.  Trying to think of what color would look striking with the copper, I landed on the Dapper Denim, which I used for my card base.


The photo doesn't really do justice to the gorgeous copper color of the leaves.  The images are so detailed I think they are just stunning.  The little banner at the top was embossed with the Woodgrain folder and then wrapped with a bit of Linen Thread.  The sentiment, from the Wetlands stamp set, was stamped on Very Vanilla in Dapper Denim then it and the layer of Cajun Craze underneath were die cut with one of the Layering Ovals framelits.  A little acorn from last year's holiday catalogue was added as the final embellishment.


Please be sure to use the link above to visit the challenge and enjoy all the beautiful inspiration.  As always, your visit and comments are so appreciated!

Until next time...

Stef


Product details
Stamps:  Vintage Leaves, Wetlands
Paper:  Very Vanilla, Dapper Denim, Cajun Craze
Ink:  Dapper Denim, Versamark
Other:  Copper Stampin' Emboss Powder, Linen Thread, Layering Ovals framelit, Woodgrain TIEF, Into the Woods Embellishment


Wednesday, July 27, 2016

For the Newlyweds

Hi there!  I have a card to share that was made using LeAnne's sketch challenge at The Paper Players.  It worked perfectly for the shabby chic/vintage card I had in mind.  I was also inspired by this gorgeous card that I found on Pinterest  https://www.pinterest.com/pin/501869952208149130/


Starting with a 5 x 7 inch Thick Whisper White card base, it and the musical staff designer series paper were distressed and sponged with 3 different Ranger Distress inks.  I found a lovely retired piece of Afternoon Picnic dsp to use as the vertical panel, then layered on a trimmed doily that acted as the base for my floral bouquet.


Before adding the flowers I tucked in a piece of Burlap ribbon and crochet trim, and the sentiment banner.  I started with Vellum leaves die cut with a Flourishes Thinlit, then added pieces trimmed from a length of Jute ribbon.  Finally paper blooms from Prima and Maya Road were glued on top to complete the bouquet.


Thanks for your visit and I'd love to hear from you if you have a moment to leave a comment.  I've included a link to the challenge above, so be sure to use it to see all the beautiful inspiration.

Until next time...

Stef


Product details
Stamps:  Teeny Tiny Wishes
Paper:  Thick Whisper White, Vellum, Newsprint and Afternoon Picnic designer series papers
Ink:  Memento Tuxedo Black; Antique Linen, Tea Dye and Vintage Photo Distress inks (Ranger)
Other:  Venetian Crochet Trim, 5/8" Burlap Ribbon, Jute Ribbon, Flourished Thinlits, Delicate White Doily, Pearl Basic Jewels, Prima and Maya Road paper blooms


Sunday, July 24, 2016

Grunge Butterfly

Hi there!  Today I'm sharing a card made for the current ColourQ challenge, were we are to use Midnight Muse, Concord Grape, Bermuda Bay, Gold and White.  Don't you love that color combo?  I did have to substitute a couple of colors (Night of Navy and Elegant Eggplant for Midnight Muse and Concord Grape) but I think they worked well.


I started with a panel to Textured Whisper White card stock, which was stamped using a couple of Gorgeous Grunge splatter/dot stamps in Elegant Eggplant and Bermuda Bay.  I then took a paint brush loaded with some water, picked up Night of Navy ink from the lid of the stamp pad, and then splattered fine dots on the panel, mainly on the left side.  Gold Wink of Stella was also splattered around the panel.


I went with "wonky" panels, layering Night of Navy beneath the white panel.  The butterfly was die cut twice, once in Gold Foil and then in Vellum card stock.  I used a glue dot to adhere the Vellum butterfly which was strategically covered up with a gold enamel dot.  Finally I added some sequins and pearls - I may have gotten a little carried away with that - what do you think?


Thanks for looking, and as always your visit and comments are sooo appreciated!!  I've included a link above to the challenge, so be sure to use it to check out all the beautiful inspiration!

Until next time...

Stef


Product details
Stamps:  Gorgeous Grunge
Paper:  Thick and Textured Whisper White, Night of Navy, Bermuda Bay, Gold Foil, Vellum
Ink:  Elegant Eggplant, Bermuda Bay, Night of Navy
Other:  Gold Wink of Stella, Metallic and Bermuda Bay Sequins, Butterfly Framelit, Flourish Thinlit, Pearl Basic Jewels

Saturday, July 23, 2016

Bloomin' Love

Hi there!  I'm back with a card for the current Global Design Project challenge to use the colors Basic Black, Smoky Slate, and Melon Mambo.  With this lovely combination I ended up making a wedding shower card.


A few months ago I cut the gorgeous Bloomin' Heart thinlit heart from a card stock base of thick Whisper White but never ended up using it.  I now am in need of a wedding shower card and thought this card and the color challenge would end up yielding the card I need.


I wanted to use Melon Mambo for the flowers, so I decided the way to incorporate Smoky Slate was to die cut a second heart from Smoky Slate card stock and layer it in the die cut opening in the card base, and then adhered another layer of card stock behind the heart.  Then the flowers were die cut and added to the front of the heart.  To dress it up a little, pearls were added to the flower centers.


I knew I had a shower sentiment in one of my stamp sets  but it needed to be small enough to fit in the label in the Bloomin' Love stamp set.  Teeny Tiny Wishes to the rescue!  Since my stamp set is would mounted, I stamped the sentiment first then used the photopolymer banner stamp to accurately stamp it around the sentiment.  Paper snips were used to fussy cut it then Dimensionals secured it to the card base.  The final addition to this CAS card is the bit of Basic Black ribbon wrapped around the top.

Thanks for looking.  As always, your visit and comments are so appreciated!  I've included a link above to the challenge, so be sure to use it and feast your eyes on all the beautiful inspiration!

Until next time...

Stef


Product details
Stamps:  Bloomin' Love, Teeny Tiny Wishes
Paper:  Whisper White, Smoky Slate, Melon Mambo
Ink:  Memento Tuxedo Black, Melon Mambo
Other:  Bloomin Heart Thinlits, Basic Black  1/8" Grosgrain ribbon, Pearl Basic Jewels, Paper Snips

Tuesday, July 19, 2016

Scenic Birthday

Hi there!  I've made a birthday card for a niece who is an avid hiking and camping enthusiast using the great In the Meadow stamp set to create a nice mountain scene.  I'm entering it into this week's challenge at Paper Players, where Jaydee has challenged us to create a clean and simple watercolor card.


I stamped the scene on water color paper and used reinkers to color the scene.  I started with the meadow, using Wild Wasabi, then colored the grass in the darker Garden Green for contrast.  Next the mountains were painted with a light layer of Crumb Cake, then shaded using Tip Top Taupe.  After each step I used my heat tool to dry the ink.  While not totally eliminating bleeding, it helps prevent it and also helps minimize warping of the card stock.


Next I moved on to the blues, using Island Indigo for the river and Soft Sky for the sky.  I lightly penciled in a couple of clouds which I erased after water coloring around them.  To finish the scene I painted the butterflies, flower petals, stems and leaves and added a bit of white gel pen to the top of one of the wildflowers.


The sentiment was placed on the card stock base with the aide of a Stampamajig, then Soft Sky ribbon was wrapped around the top.

Thanks for visiting and I would love to hear from you if you have a moment to leave a comment.  I've included a link above and I encourage you to use it to see all the beautiful inspiration!

Until next time...

Stef


Product details:
Stamps:  In the Meadow, Fairy Celebration
Paper:  Whisper White, Island Indigo, watercolor
Ink:  Archival Basic Black, Memento Tuxedo Black, Soft Sky, So Saffron, Melon Mambo, Crumb Cake, Tip Top Taupe, Garden Green, Wild Wasabi, Island Indigo
Other:  Soft Sky 1/8" grosgrain ribbon, Uniball white gel pen, Stampamajig

Saturday, July 16, 2016

Tuscan Vineyards

Welcome!  Today I'm sharing two cards that were inspired by the current sketch challenge at Fab Friday.  One closely follows the sketch but I included an added element to the second one for some needed balance.


The new Tuscan Vineyards stamp set has several beautifully detailed stamps, including a lovely vineyard scene that was not used here today.  Instead, two of the smaller images were used for the focal points and all the other stamps in the set were inked up in Delightful Dijon to create a collage on the panel beneath.


The first card uses this lovely grape bunch.  It was water colored with Perfect Plum, Elegant Eggplant and Old Olive reinkers.  After drying it with my heat tool, a little Delightful Dijon was used to add a little glow around the image.


To keep things from being too busy with the stamped collage on the Dijon panel, the embellishments were kept to a minimum, with just a bit of Jute Ribbon under the main image and the wooden sentiment.


For the next card, the basket and bottle stamp was colored with Soft Suede, Old Olive and Crumb Cake markers and stamped on Shimmery White paper.  After mounting on the Cajun Craze rectangle, it really seemed to need a little something more, so an Antique Brad was added.


For this card you can see I included an embossed horizontal piece wrapped with Linen Thread.  No sentiment was added on the front, leaving options as to how it could be used, maybe as a masculine birthday card or just inking a note to let someone know you're thinking of them.

Thanks for looking and I hope you'll be sure to use the link above to Fab Friday and check out all the wonderful inspiration. As always your visit is so appreciated and I'd love to hear from you if you have a moment to leave a comment!

Until next time,

Stef


Product details
Stamps:  Tuscan Vineyard, Timeless Textures
Paper:  Delightful Dijon, Cajun Craze, Watercolor, Shimmery White
Ink:  Archival Basic Black, Perfect Plum, Elegan Eggplant, Old Olive, Delightful Dijon
Other:  1 1/4" Jute Ribbon, Burlap Ribbon, Linen Thread, Antique Brad, Woodgrain Textured Impression Embossing Folder, Expressions Natural Elements, Corner Rounder punch

Monday, July 11, 2016

Amazing Birthday

Hi again!  My card today was made for the current color challenge at The Paper Players, where Nance has chosen the gorgeous combination of Mint Macaron, Island Indigo, and Sweet Sugarplum.  Now those of you that are familiar with my blog know that I'm not overly fond of Mint Macaron, however, I found that it matches up very nicely with Island Indigo, so I was set to go.


I decided to use a lovely vine design in Mint Macaron from the retired Pretty Petals designer series paper that was adhered to the Very Vanilla card base.


Next, two of the border stamps from Mixed Borders were layered in Sweet Sugarplum and Mint Macaron on a strip of Very Vanilla, then the sentiment was added in Island Indigo.  Because these stamps are photopolymer, they are easy to line up and stamp accurately.  After stamping I went back in with a wet paint brush and a little bit of ink and colored in the leaves and flowers.  The strip was then mounted on a larger border cut strip of Island Indigo.


The dsp seems so feminine and rather old fashioned so adding the doily and the crochet trim seemed to work well.  Pearls and enamel dots were the finishing touches.  (BTW, the dots are the In Color Dapper Denim but look super close to Island Indigo).

Thanks for stopping by and as always, your visit and comments are so appreciated!  Be sure to use the link to the current challenge above and check out all the wonderful inspiration.

Until next time...

Stef


Product details
Stamps:  Mixed Borders
Paper:  Very Vanilla, Island Indigo, Pretty Petals dsp
Ink:  Mint Macaron, Sweet Sugarplum, Island Indigo
Other:  Eyelet Border Punch, Delicate White Doily, Venetian Crochet Trim, In Color Enamel Shapes, Pearl Basic Jewels

Sunday, July 10, 2016

Fabulous Flora

Yep, I'm back with another post this afternoon!  Pals Paper Arts is featuring a wonderful sketch by Ann Schach this week, so I knew I wanted to join in.


I found an image in the new Host set Fabulous Flora that I thought would work well with the oval focal point.  It was stamped in Archival Basic Black on Watercolor paper, then water colored with various reinkers.  Old Olive was used for the leaves, with the flowers first colored with Hello Honey, then topped with some Gold Wink of Stella for a little sparkle, although it's not evident in the photo as well as it is on the butterfly. Soft Suede and Lost Lagoon were used to color the ground and sky, respectively.  After drying it was cut with a Layering Oval framelit and mounted on a Whisper White scalloped oval cut from the same framelit collection.


The Lost Lagoon base was layered with a piece of Wildflower Fields designer series paper.  Next, an embossed square of Vellum card stock was adhered and layered with a horizontal strip of scalloped Lost Lagoon.  A piece of Lost Lagoon Stitched Satin ribbon and Hello Honey twine were topped with a Circle of Spring sentiment punched out with a 1 1/4" Scallop Circle punch.  The final touches were to add the butterfly, sequin and White Enamel Dots.


That's it for today!  I've added a link above to the PPA challenge - do be sure to use it and check out all the wonderful inspiration!  Thanks for the visit and as always I'd love to hear from you if you have time to leave a comment.

Until next time...

Stef


Product Details
Stamps:  Fabulous Flora, Circle of Spring
Paper:  Whisper White, Lost Lagoon, Hello Honey, Watercolor, Vellum, Wildflowers Fields dsp
Ink:  Archival Basic Black, Lost Lagoon, Old Olive, Hello Honey, Tip Top Taupe, Soft Suede, Memento Tuxedo Black
Other:  Bitty Butterfly, Scallop Border and 1 1/4" Scallop Circle punches, Layering Ovals, Leaf Burst Textured Impression Embossing Folder, Lost Lagoon Stitched Satin Ribbon, Hello Honey twine, Gold Wink of Stella, White Enamel Dots, Metallic Sequins

Always There

Hi there!  Hope you're having a great afternoon.  The card I'm sharing in this post will just slip in under the deadline for the current sketch challenge at Stamps, Ink, Paper.


Since I was limited on time this afternoon, I wanted something fairly easy to complete for my focal point, so I pulled out one of the super cute images from the new Host set, Love You Lots.


After stamping those adorable Lady Bugs in Archival Basic Black, they were water colored with Watermelon Wonder and Calypso Coral.  I colored a bit of Old Olive under them and added a light glow of Lost Lagoon.  Once that was done the card was put together starting with a strip of designer series paper on the 4.25 x 5.5 inch base.  A panel of Textured Whisper White was cut to 3.5 x 5.5 inches, then a smaller panel of Basic Black, with a different design from the same dsp collection was added, slightly overhanging the edge.  The focal point was added with Dimensionals, a piece of baker's twine was wrapped around the top layer, then the entire thing added to the base, also with Dimensionals.


What a fun sketch, glad I had time to play along even if time was a little tight!  I've added a link above so do be sure to use it to check out all the wonderful  inspiration!

Thanks for looking and I hope you have a great week ahead!

Until next time...

Stef


Product details
Stamps:  Love You Lots
Paper:  Thick and Textured Whisper White, Basic Black, Watercolor, Wildflower Fields dsp
Ink:  Archival Basic Black, Old Olive, Lost Lagoon, Watermelon Wonder, Calypso Coral
Other:  Basic Black Baker's Twine

Thursday, July 7, 2016

Textured Birthday

Hi, I'm back again tonight, sharing two cards, one made last weekend using the prior week's sketch challenge at Splitcoaststampers and one made a couple of weeks ago.  Both are for my grandchildren's birthdays.

The first card was made for my oldest grandson.  The new Timeless Textures stamp set provides a lot of great images with which to create a collage.  I started by taking a Very Vanilla square panel, stamped the flourish and spots images from the set in Versamark, then heat embossed them using clear embossing folder.  Next various inks including Baja Breeze, Crumb Cake and Basic Gray were sponged over the embossed images, then other images from the set were stamped randomly, including a few more spots.  The final steps included wiping ink off the embossed images, then distressing and sponging the edges.


The 5 x 5 inch base is Baja Breeze card stock (yes I still have a bit of a stash!) then layered with Elegant Soiree Designer Series Paper after both layers were distressed and sponged.  I'm crazy for the new Labeler Alphabet used for the sentiment - awesome for a funky look that doesn't require perfect accuracy, although because the stamps are photopolymer, you could be much more accurate thank I was with a steadier hand and a little bit of practice.  : -)


Here's the SCS sketch and the link to the challenge:


My next card was made and sent a couple of weeks ago to my granddaughter who just turned 11 the end of June.  I used one of the adorable images from the new Fairy Celebration stamp set.  I really struggled through several iterations of this water colored image, some of which was just trying to get a good stamped image, then going back and forth between water color and Shimmery White paper, finally landing on former.


I started by water coloring the fairy's dress in Pool Party and wings in Pear Pizzazz.  So Saffron was then lightly added to the hair, then layered with Soft Suede.  Due to the color palette I was working with, I thought a neutral colored mushroom would work best, so a light layer of Tip Top Taupe was used.  After it dried, a Uniball White Gel Pen was used to brighten the spots.  The delightful new In Color Peekaboo Peach was used to color the flowers, Old Olive the grass and stems and Soft Sky in the background.  To go with the Glitter Ribbon, Clear Wink of Stella was added to the fairy's dress and wings and to the embossed butterfly background panel.

Thanks for looking!  I would love to hear from you if you have a moment to leave a comment!

Until next time...

Stef


Product details
Card #1
Stamps:  Timeless Textures, Labeler Alphabet
Paper:  Very Vanilla, Baja Breeze, Soft Suede, Elegant Soiree dsp
Ink:  Crumb Cake, Soft Suede, Baja Breeze, Basic Gray, Versamark
Other:  Clear Stampin' Emboss Powder, Crumb Cake Baker's Twine, Hemp Twine, Woodgrain Textured Impression Embossing Folder, retired button

Card #2
Stamps:  Fairy Celebration, Circle of Spring
Paper:  Pool Party, Peekaboo Peach, Watercolor
Ink:  Old Olive, Pear Pizzazz, Pool Party, Peekaboo Peach, Tip Top Taupe, Soft Sky, Pink Pirouette, So Saffron, Soft Suede
Other:  Clear Wink of Stella, White Gel Pen, Pool Party Glitter Ribbon, Fluttering Textured Impression Embossing Folder

Christmas in July

Hi there!  Tonight I'm sharing a card made for two challenges - the Christmas in July theme at Paper Players and the current sketch challenge at Sunday Stamps.

This was a super quick and easy card to make, in part because the sketch enables one to keep it that way, but also because the tag was nearly complete in my Christmas stash.  All I did was die cut some snow flakes, add shimmer with Clear Wink of Stella and pop up on some great retired wood grain designer series paper.  You gotta love it when it all comes together so easily!


Unfortunately, the Wink of Stella is hard to see, even in the close up.  I added it to the berries as well but it's not visible in the photo.


Here are the links to both challenges.  Please be sure to use them and check out all the wonderful inspiration!


Glad you could take time to come by and take a look.  As always, your visit and comments are so appreciated.!


Until next time...

Stef


Product details
Stamps:  Peaceful Wishes, Happy Scenes
Paper:  Whisper White, Cherry Cobbler, Frostwood Lodge dsp
Ink:  Soft Suede, Cherry Cobbler, Mossy Meadow
Other:  Cherry Cobbler Baker's Twine, Northern Frost Decorative die, Clear Wink of Stella

Sunday, July 3, 2016

Hey There, Friend!

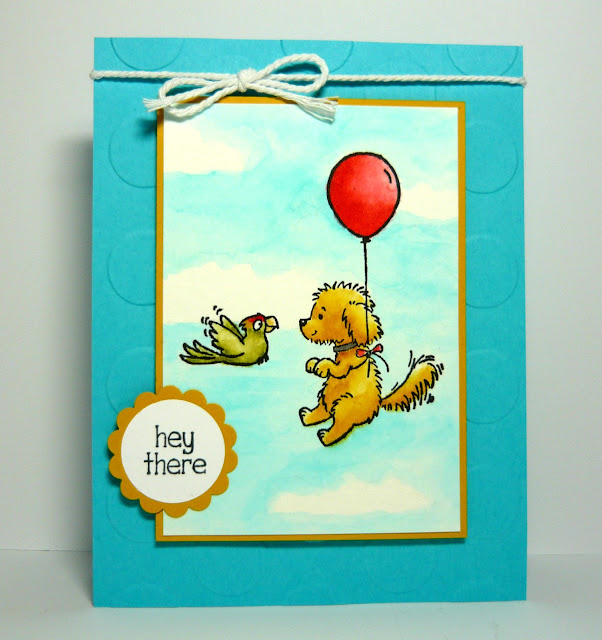
Hello!  I hope you're having a nice holiday weekend.  I took a little bit of time this afternoon to finish this card made for the current challenge at Freshly Made Sketches.


I used this adorable stamp from Bella & Friends, inking it up in Basic Black  and stamped it on watercolor paper.  In coloring this piece, I used Crushed Curry and Delightful Dijon for the little doggy.  For the parrot, Old Olive was used for the body and a bit of Crushed Curry and Watermelon Wonder around the head.  The balloon was also colored with Watermelon Wonder.  After the stamped images were dry, the sky was water colored in Tempting Turquoise using the Cloudy Background technique recently covered in a tutorial on Splitcoaststampers (SCS Cloudy Background Tutorial ).


Once the watercolored panel was completely dry it was backed with a slightly larger piece of Crushed Curry card stock then mounted on an embossed panel of Tempting Turquoise.  The Bella & Friends stamp set has lovely sentiments with it, but none fit well for this card, so I searched and searched and finally found a retired sentiment that was fitting for the scene and the perfect size.

Here's the sketch and a link to Freshly Made Sketches.  Be sure to visit the blog and check out all the amazing inspiration!


Thank you so much for visiting and I'd love to hear from you if you have a moment to leave a comment!  Happy July 4th to those in the US!

Until next time...

Stef


Product details
Stamps:  Bella & Friends, Hey There Buds
Paper:  Whisper Whtie, Tempting Turquoise, Crushed Curry, Watercolor
Ink:  Crushed Curry, Delightful Dijon, So Saffron, Watermelon Wonder, Tempting Turquoise, Old Olive, Archival Basic Black
Other:  1" Circle and 1 1/4" Scallop Circle punches, Large Polka Dot Textured Impression Embossing Folder, Thick Whisper White Baker's Twine

Saturday, July 2, 2016

Friendship Math

Hello and welcome back!  I had fun in my craft room today, using a lovely new Stampin' Up! stamp set called Artistically Asian.  The sentiment is so sweet and very true, and is the basis of the name of this post.


I love the mix of Sweet Sugarplum and Peekaboo Peach, and discovered that Mint Macaron actually goes well with them, especially the peach color.  The A2 peach base was layered with a slightly smaller panel of plum that was cut with one of the scalloped Layering Circles framelits.  On a piece of white card stock, the orchid image was stamped after inking up with Peekaboo Peach, Mint Macaron and Tip Top Taupe, using the markers directly on the rubber.


I was going along, stamped and punched the butterfly, created the sentiment and banners, added the flower image to the back of the plum panel, when I realized something more was needed.  I pulled out the framelit cut scallop circle of card stock and used it as a mask, then took a paintbrush, dipped it in water, then a bit of Sweet Sugarplum ink from the lid of the stamp pad, then tapped it across another paint brush to create the scatter of dots.  You can't really see it in these photos, but the butterfly was covered with Clear Wink of Stella so I also added some dots of that to the panel as well. The bottom of the panel scored, then the sentiment banners, butterfly, sequins and pearls were added.


This was a quick and relatively easy card to make, and in large part its because I used the awesome sketch from this week's challenge at Global Design Project.  I've added a link below so do be sure to use it and enjoy all the amazing inspiration!


Thanks for looking, and as always, your visit and comments are so appreciated!

Until next time...

Stef


Product details:
Stamps:  Artistically Asian, Kinda Eclectic
Paper:  Whisper White, Sweet Sugarplum, Peekaboo Peach, Mint Macaron
Ink:  Sweet Sugarplum, Mint Macaron, Peekaboo Peach
Other:  Markers:  Tip Top Taupe, Peekaboo Peach, Mint Macaron; Framelits:  Layering Circles, Gift Card Envelope & Trims (banner), Circle Card (banner); Wink of Stella, Bitty Butterfly punch, Stampin' Up! Simply Scored, Metallic Sequins, Pearl Basic Jewels