Showing posts with label Valentine's Day. Show all posts

Monday, February 9, 2026

Time for Valentines!

Hello friends!  I finished making and mailing my grandchildren's Valentine cards and thought I'd share them with three challenges.  My grands are all adults now but they still like getting cards from their grandparents. 

I'm joining in over at Time Out Challenges (1st card - I used sparkle, pink, heart), Just Us Girls and the Simon Says Stamp Wednesday Challenge.


I'm sharing the two styles of cards I created.  The first one is for my granddaughter.  


I used the Kirstina Werner Jumble of Hearts stencil to create the background.  One of the wonderful things about it is that one of the stencils masks the hearts and colors in the background.  I used the Altenew Rose Petals quad to ink blend the hearts and used one color, Purple Wine, for stamping the sentiment, which is from KW's Love & Adore You stamp and die set.  

The panel was cut with KW's Essential Dies scallop rectangle and I used the small heart die from the same set. The large white glitter heart was cut using the Simon Says Stamp Nested Rounded Heart die set.  After the card was all put together, I thought it needed a little something more, so I created a fun design around the heart with some Prism Dazzling Gems from SSS.


I used the same design for both of my grandson's cards.  I found some very old plaid patterned paper (SU Plaid Tidings) in black and white, which worked great with red accents.


Both the plaid paper and the red cardstock were cut with Simon's A2 Postage Rectangle dies and adhered together.  Before adding to the card base, I wrapped red Baker's Twine around it.  

The sentiment is from KW's You Are the Best stamp set, which was die cut with a heart die (same set as above) after white heat embossing.  The little hearts were cut using the KW Essential dies set.


That wraps up Valentine's Day for this year (you can see the card I made for my husband here using Stamping Bella's Oddball Cupid).  Thanks so much for stopping by!

Take care!

Stef

Sunday, February 1, 2026

You're Mine for the Paper Players and Color Hues

Hello friends!  It's time for new challenges at both the Paper Players and Color Hues, so I've created one card for both challenges.  At the Paper Players, the lovely Claire chosen a timely theme and at Color Hues, the amazing Julie has chosen a perfectly complementary color combo.  Check it out!


The obvious choice was to use this opportunity to get one of my Valentine's Day cards completed.  I used a fabulous Oddball stamp set from Stamping Bella for my husband's card.  It's pretty quirky with the Oddball image, but I know he'll like it.


I used a stencil to create pink clouds around the Oddball Cupid, then colored her with Copic markers.  I used red, of course, and also used a combination of markers to color her wings, bow and the arrow feathers gold.  As always, the stamp packaging provided great guidance for shading. These images always humor me because they are so, um, odd. I especially like her boots with wings.

I did give her a landing spot amongst the clouds and since she has wings, of course she can stay above ground. I thought that was a fun way to use Claire's theme of love is in the air... 😉

The panel was cut with a postage rectangle die, matted with a red panel and added to the card base with foam tape.  The sentiment was also added with foam squares and the card was complete!


What are you inspired to create with these two challenges?  I encourage you to visit both challenges for the amazing inspiration by the respective design teams and our CH guest designer JoAnne.  The Paper Players challenge ends Friday February 6th at 3pm EST and the Color Hues challenge stays open until Saturday February 14th at 9 am EST.  Hope to see you there!

Thanks for stopping by!

Stef

  • Stamping Bella Oddball Cupid Stamps
  • MFT Cloud stencil
  • Simon Says Stamp A2 Postage Rectangle die
  • Altenew Baby Pink and Vineyard Berry inks
  • Copics - R59, 39, 37, 35, E79, 57, 35, 33, 04, 21, 00, C0, 1, 3, 5, YR24, 23 Y15, 11, T2, 0

Sunday, February 2, 2025

Hugs & Kisses for The Paper Players

Hello friends! It's Sunday and time for a new challenge at The Paper Players.  This week, the lovely Ann has chosen a theme of love to start off the month of February.

The stamp set I used for this card is not new but it was unused until I was reminded of it and inspired by the lovely and talented Donna Mikasa when she posted this card. I initially used the stamp set for my card posted here yesterday and had so much fun making it that I created another with a slightly different layout for this challenge.


I started with the stamp set, which has three stamps that create different designs on nine hearts.  I then used the matching die to cut them all out.  I did this twice, once with the reds and once with the aquas.  

I thought I would layer them on a panel sprayed with Distress Mica spray but it was too busy.  So I searched through my unused embossed panels and decided on one with a wavy pattern, using the debossed side for adding the hearts.  All the layers were added to the card base with foam tape, including the hearts and sentiment, which is from the same stamp set.  Easy peasy (kind of) and I'll be sending this one off to one of my grandsons.  All three of my grands are adults but they still like getting Vday cards from their grandmother. 😍 


Thanks so much for stopping by. I hope you'll take a moment to visit the challenge blog (linked above) and see all the amazing cards the rest of the DT created.  The challenge remains open until Friday February 7th at 3pm EST and we hope to see your card in the gallery!

Take care!

Stef

  • Simon Says Stamp Printmaking Hearts stamps and dies
  • Stampin' Up Seaside embossing folder (ret.)
  • Spellbinders Postage Edge Rectangle die
  • Shiny Bauble Distress Mica Spray
  • SSS Guava, Watermelon, Cherry, Seafoam, Surf and Ocean inks

Saturday, February 1, 2025

A Valentine for Color Hues

Hello friends!  Did the month of January fly by as quickly for you as it did for me?  Wow!  But the good news is that it's time for a new challenge at Color Hues! The amazing Tracey will be hosting for the next two weeks and has chosen the timely colors of red and pink.

We are also excited to share with you that we are partnering up this challenge with the Inkspirational Challenge!

Inkspirational is a two-week challenge that features a rotation of: Word Prompt, Designer's Choice, Mood Board, Clean and Simple, Use Stencils and Seasonal.  We are teaming up together in order to perhaps introduce challenge participants of both to another challenge that maybe they weren't familiar with.  We hope you'll play along with us by linking up to both challenges!  

I'm also playing along with the lovelies over at the Time Out Challenge, where they have a fun new challenge called Pick Two.  I've chosen heart and layers.


So, now after all that, let's get on to the card!


A little back story here too...I purchased this stamp set last year but never used it.  I was reminded of it and inspired by the lovely and talented Donna Mikasa where she shared this card for CH101.  And since it was hearts, I knew it would make the perfect Valentine card for Tracey's pink and red challenge.

I started by stamping the hearts with the three layering stamps that create nine hearts with different designs, six of which you can see above.  I just love that!  And then there is a single die that cuts them all out.  

I decided to make a square card, so I cut a white panel that was large enough to include the sentiment in the middle, layered that panel on a black mat, which was added to the pink scallop square and popped up on a white 5"x 5" card base.  Rather than add embellishments, I painted the hearts with a shimmer pen then covered them with glossy accents to make them shiny and pretty!  This card will be heading off to my granddaughter in Oregon (yes, my adult grands still like getting Valentine's from me lol!).


So what are you inspired to create with these colors?  It doesn't have to be a Vday card, just as long as it includes pink, red and neutrals of your choice.  For an abundance of incredible inspiration, please visit both challenge blogs (linked above) to see what our two very talented design teams and guest designer Trina Phan, have created.  

The CH challenge will remain open until 9 am EST February 14th. We hope to see your card in the gallery and don't forget to link up over at Inkspirational too!

Stef

  • Simon Says Stamp Printmaking Hearts stamps and dies
  • SSS Love You Greetings stamp and die
  • Pink and Main Layered Square dies
  • Hero Arts Nested Scallop Square dies
  • SSS Guava, Watermelon and Cherry inks
  • C&9th Pink Lemonade cardstock
  • Glossy Accents

Thursday, February 1, 2024

Flat Shaker Valentine for Color Hues

Hello friends!  I'm here with my card for the new challenge at Color Hues!  This time the lovely Sheri has chosen red and pink, so perfect for those making Valentine cards, but would certainly work for many other occasions.

And how about our new badge? I think it's a wonderful way to reflect what the challenge is all about.  Also we have the talented Bobby Hagen joining us as guest designer!

I'm also joining my friends over at Just Us Girls, because their colors for this week's color challenge are also red and pink.


This time I tried something new - making a flat shaker!  It's not edge to edge but it still has lots of sparkly goodness when you shake, shake, shake it!


I started with the stencil, using a light pink ink on white cardstock, then applying the same ink to blend around the edges, darker on the outside and lighter in the middle.  I cut some old packaging to size, put Score Tape on the back of the stenciled panel, wrapped the acetate around three sides, waiting to seal the fourth side until after adding the clear sequins.


Next I put double sided adhesive on the back of a panel of Rich Red Matte cardstock, then die cut the sentiment.  This alleviated the problem with glue smearing on either the acetate or the metallic paper when adhering to the front of the shaker.  It was then layered on a slightly larger panel of the red metallic cardstock, adhered to the white card front, with the final touch of adding the red sparkly heart.  This was so easy to do and it's a great way to use up my sequin stash, which isn't large, but I don't use them as on my cards very often anymore.


I look forward to seeing what you make with this color combo!  Be sure to take a look at the beautiful cards created by our guest designer and the other DT members and hopefully are inspired to join us.  The challenge will remain open until 9 am 2/14.

Take care!

Stef


  • Simon Says Stamp Hugs & Kisses die, Hero Arts Nested Rectangles
  • SSS Heart Blooms stencil
  • SSS Bubblegum ink
  • SSS Rich Red Matte metallic cardstock
  • SSS Rainbow Splash Sparkly Hearts, Pretty Pink Posh Sparkling Clear sequins

Wednesday, February 8, 2023

Love Ya!

Hello friends!  Today I have a quick post sharing a Valentine card that I made for my oldest grandson. I'm joining the challenges at Double D, where the theme is hearts, along with the Simon Says Stamp Monday Challenge's Love is in the Air theme and the Simon Says Stamp Wednesday Challenge, where the theme is fun with dies.


My card has all sorts of hearts on it!


This was a quick and easy card to make.  Starting with a panel of Neenah Desert Storm, I stamped the Simon Says Stamp Lace Heart Kaleidoscope Background stamp using Versamark ink, then white heat embossed it and die cut it with the largest Hero Arts Nested Infinity rectangle die.  I then blended Ink on 3 Shark Tooth White around the edges of the panel to give it a softening effect and then used an R46 Copic marker to color in the little hearts.


Next came all the die cutting!  I used the SSS Nested Round Hearts dies, cutting from white and their gorgeous new Rich Red Matte Metallic cardstock.  I also die cut the largest heart from a vellum panel covered on the back with double sided adhesive so I could adhere it to the card front without any glue showing.  Next the two white hearts were adhered to the vellum heart, then the smaller red hearts adhered randomly.  Finally, the sentiment, also die cut from the red metallic paper and two layers of white, was added to the middle of the hearts and I was done!


Thanks for stopping by!  Take care!

Stef

Sunday, January 8, 2023

Love You for Sunday Stamps

Hello friends!  Today's post for Sunday Stamps is pretty special as we are celebrating the 300th challenge!  Woot woot!  And we're doing so with a fabulous sketch by the amazing Claire plus we'd love to see you make your card a celebration card as a bonus.

And a big thank you to everyone that has joined our challenge for the last 300, we wouldn't be here without you! 💓


I'm also joining the current Time Out Challenge where the theme is Romantic.  While my card will be sent to one of my grandchildren for Valentine's Day, it certainly could be used to give to a romantic partner lol!


For my card, I followed the sketch very closely.


This card came together so easily, once I made the decision on which patterned paper to use.  The paper was die cut with a rectangle die then layered on a scallop rectangle die cut from red foil.  But, before layering the pp on top, I die cut the large heart from the panel, which was then covered up by the pp.


Sorry about the photo quality, metallics are the worst for getting a crisp image.  Next, I adhered the scallop panel to the white card base, then cut a strip bright pink patterned paper from the same pad, layered it on a strip of white cardstock to give it some heft, then adhered it on the card.  I did the same with the heart and the sentiment dies, added a layer of white cardstock underneath before adhering to the card.  The last step was to add some cute pink clay hearts around the sentiment.  I know, they kind of get lost in the photo but IRL they look fine.


Thanks for stopping by, I appreciate it!  I do hope you'll use the link above to check out all the beautiful cards by the other DT members and hopefully help us celebrate our 300th challenge!

Take care!

Stef


Stamps: None
Paper:  Neenah Solar White, Memory Box Polished Foil 6x6 pad, Simple Stories Sweet Talk 6x8" patterned paper pad
Ink: None
Other: Ellen Hutson Folk Heart die, Honeybee Stamps Scallop A2 rectangle die, Hero Arts Nested Infinity Rectangle die, Altenew Versatile Greetings dies, Pretty Pink Posh Pink Hearts Clay Confetti

Sunday, January 23, 2022

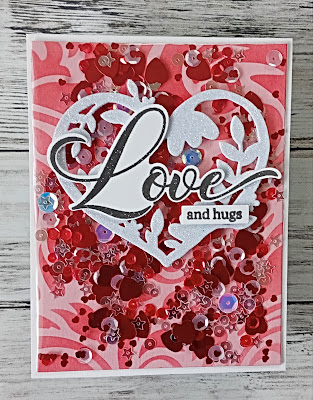
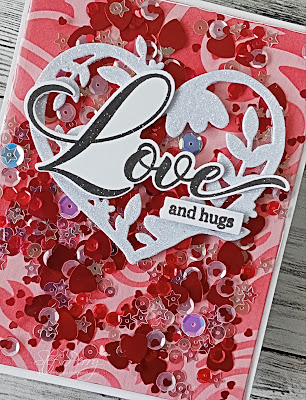
Shaker Love for Sunday Stamps

Hello and welcome!  It's time for a new color challenge at Sunday Stamps!  I love these beautiful colors, perfect for winter or Valentine's Day cards.


I'll also be sharing my card at Time Out Challenges, where the current theme is "in love".


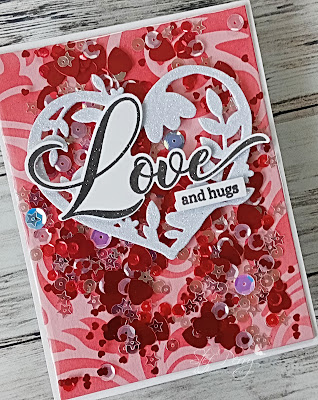
For my card, I created my first edge to edge shaker card.  Shaker cards are a design I rarely make, but I was intrigued by all the YT creators making these cards and had to try it out.


I started by stenciling the Elegant Swirls stencil in red on pink cardstock.  The red color ended up not being as vibrant as I wanted, but the bits in the shaker more than make up for it.  Next, I repurposed some stamp packaging, cutting it down to about a half inch larger on each side than the pink stenciled panel.  I used Score Tape to adhere three sides to the back of the panel, added all the sequins and heart confetti, then sealed up the fourth side.  I then adhered the shaker to the white card base.


Next, the heart wreath was die cut twice from white cardstock and once from white glitter cardstock, layered up for dimension and adhered to the card front.  The sentiment was stamped in gray pigment ink then clear heat embossed.  The word love was cut with the coordinating die and the secondary part of the sentiment with a label die.  Once those were adhered the card was complete.  It really did come together rather quickly, and I love how it turned out!


Thanks for taking time to visit, I appreciate it!  Be sure to use the link above to check out all the gorgeous cards by the other DT members and hopefully join us for the color challenge!

Stef


Stamps:  So Much Love (Simon Says Stamp)
Paper:  Neenah Solar White, Cotton Candy and White Glitter (both SSS)
Ink:  Ruby Red (Altenew), Versafine Clair Morning Mist
Other:  Wreath of Love die (SSS), Skinny Strips die (MFT), So Much Love die (SSS), Nested Infinity Rectangle die (Hero Arts), Elegant Swirls Stencil (Altenew), Sizzix Pinks & Reds sequin set, Cupid's Kiss sequins (SSS), Sparkling Clear sequins (Pretty Pink Posh), Hero Arts clear embossing powder

Tuesday, February 9, 2021

Loads of Love

Hello, friends!  I hope all is well with you.  Today I'm sharing a card made for the current theme challenge at The Paper Players, where lovely Anne Marie has asked us to use hearts or stars.  I'm also joining the Double D challenge, where the theme is Valentine Love, and the current Just Us Girls Word Week Challenge, which is "Valentine".


I recently bought the Big Pickup Tailgate stamp and die set, knowing it would be a fun one for lots of cards for different occasions, especially since we have lots of friends and family members that love cars and trucks. Using the big die, I made a shaped card for my husband for Valentine's Day, because he's one that loves his pickup. There's also a separate stamp set with the front of the truck, which just might have to make its way to my craft room one day in the near future LOL!


How fun is that?  I started by stamping the pick up along with the pile of hearts that came from another coordinating stamp set.  They were colored with Copic markers then cut with the matching dies. Next I took a sheet of white card stock for the base, folded it in half and die cut the pickup except for the very top, leaving a top fold hinge.  The colored tail gate was also die cut with it's own separate die, then I stamped and white heat embossed the large LOVE U.  After that cooled down, I used a Copic marker to add a bit of shading on the right side of the letters so they would stand out a bit better.


The colored pickup was adhered to the pickup card base, then the tailgate and pile of hearts added with foam tape.  I used a white gel pen to add highlights to the hearts, the rear lights and the windows to finish things off.  Below is a photo of the card standing up and taken at an angle so you can see part of the card base.  This was so much fun to make, I look forward to doing more in the future!


Thanks so much for visiting, I always appreciate it!  Take care and stay safe!

Stef


Stamps:  Big Pickup Tailgate, Loads of Love (Honey Bee)
Paper:  Neenah Solar White
Ink:  Gina K Obsidian Amalgam, Versamark
Other:  Coordinating dies for the truck and heart pile, Sakura White Gelly Roll Pen, Simon Says Stamp Fine Detail embossing powder
Copics:  BG49 13, 11, 72, 000, 0000, R59, 46, 39, 37, 35, 24, 05 C7, 5, 3, 1, T8, 6, 4, E41, 40

Sunday, February 7, 2021

Love & Kisses for Sunday Stamps

Hello friends, I hope this finds you doing well!  It's time for a new challenge at Sunday Stamps where Lisa has created this fun sketch.


I'm also joining the current challenges at Double D, with a theme of Valentine Love, and the current Simon Says Stamp Wednesday Challenge, where the theme is Love Is In The Air.


When I saw Lisa's sketch, I knew exactly what I wanted to do.


These little heart balloons just tickle me and are perfect for a valentine or for birthdays, weddings, you name it.  I stamped and colored them with Copic markers, then used the coordinating dies to cut them out.  The sentiment was stamped with black pigment ink then cut out with matching dies.  The words "and kisses" is separate from "love" so it can be paired up with "hugs" as well.


To put the card together, the red heart patterned paper was layered on a slightly larger panel of black and then adhered directly to the card base.  The panels under the heart balloons were centered on the card base, then the heart balloons were added with a bit of foam tape just under the balloon part, then a strip of black and white heart paper adhered horizontally. The sentiment was then added using thin foam squares. A few tiny red hearts were scattered about then the balloons were covered with Glossy Accents for some wonderful shine.


Thanks so much for visiting, I really appreciate it!  Be sure to use the link above to check out the beautiful cards by the other DT members and hopefully join us for the challenge as well!

Stef


Stamps:  Loads of Love, Pickup Lines (Honey Bee Stamps)
Paper:  Neenah Solar White, Black, Stacked with Love (ret. SU), Sweet Talk 6x8" paper pad (Simple Stories)
Ink:  Gina K Obsidian Amalgam, Versafine Claire Nocturne
Other:  Honey Bee Coordinating dies, Sizzex Love Struck sequins, Glossy Accents
Copics:  RV25, 23

Thursday, February 4, 2021

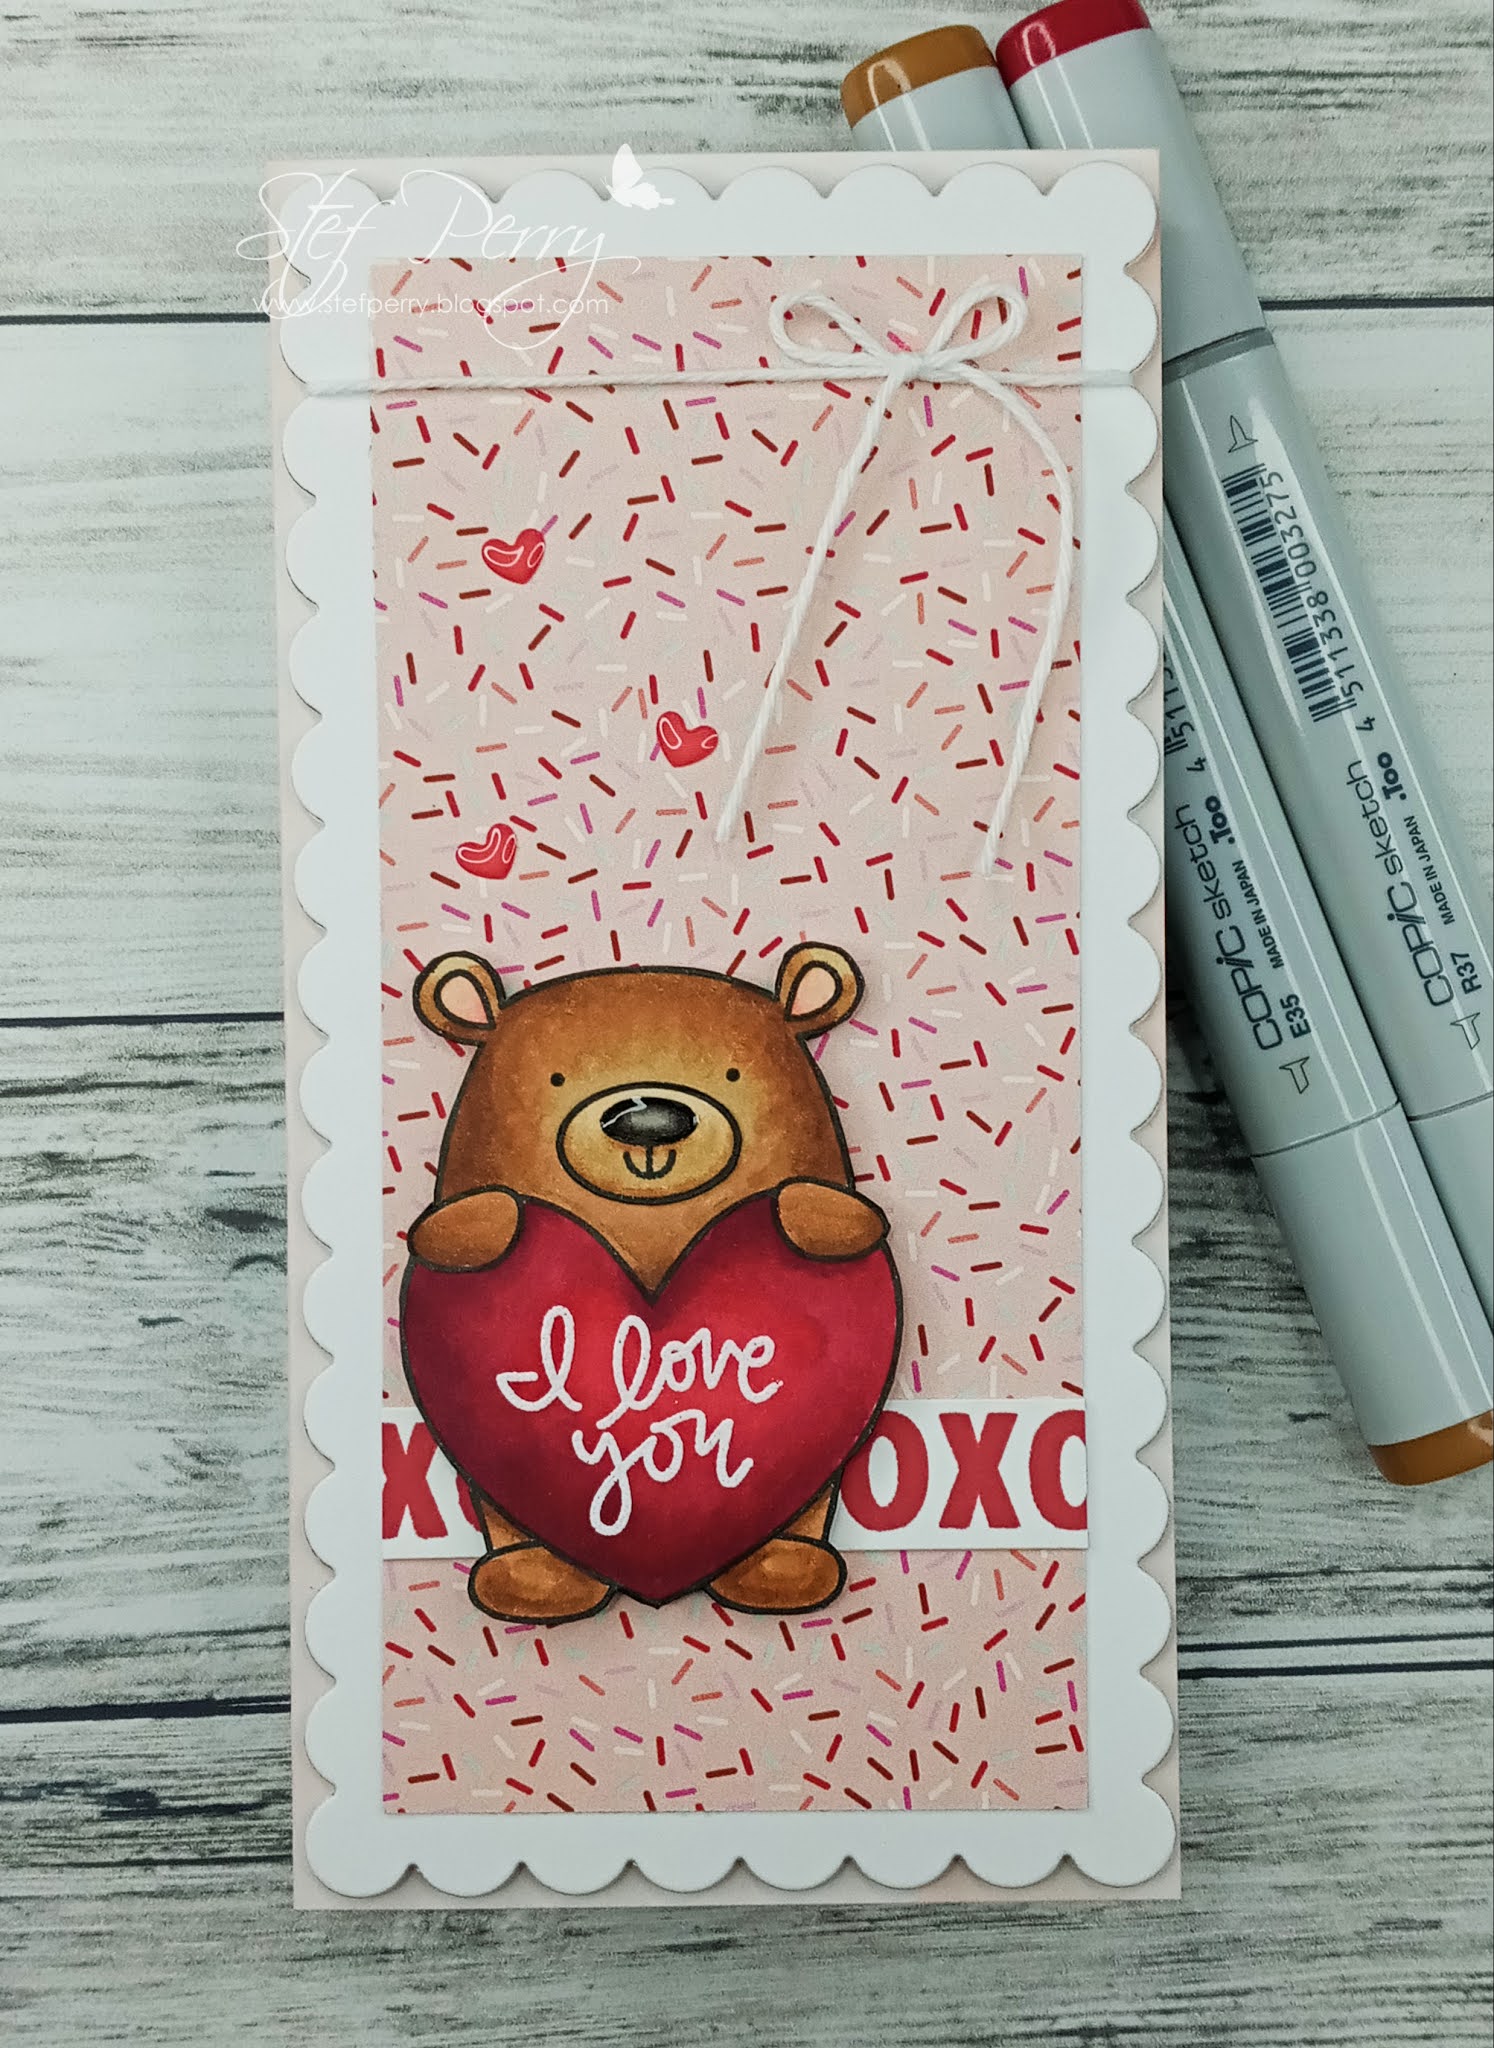
Love You Beary Much

Hello friends, I hope this finds you doing well!  Today I have a cute Valentine card to share with you that I've made for the Valentine Love challenge at Double D Challenges.


I'm also joining the Love Is In The Air challenge over at Simon Says Stamp Wednesday Challenge.


I created a pretty simple card to showcase this cute bear.  It's a mini-slimline size, so it's smaller than the regular slimline, measuring 3 1/4" x 6 3/8".  I used a scallop die meant for a slimline size card, but I just used partial die cutting to cut one end of the panel, then flip the die around to cut the other end of the panel so it came out to the shorter length.  

Next a piece of cute confetti patterned paper was trimmed down and layered on the top of the scallop panel, then I tied on a bow of white Baker's Twine.  I decided to create a little contrast between the scallop panel and the white card base, so the front of the card base was ink blended with Tattered Rose Distress Oxide Ink before adding the panel with foam tape.


The bear was stamped and colored with Copic markers.  He's so cute and cuddly, I just love him!  I used Versamark to stamp the sentiment on the heart, then heat set it with white embossing powder.  Because I didn't have the matching dies at the time, the image was then fussy cut.  To ground him on the card, the XOXO border was stamped in red then trimmed down and added to the panel, then the bear was popped up with from tape.  The last touch was to add three tiny hearts for a little embellishment and cover his nose with Glossy Accents.


That wraps it up.  Thanks so much for visiting, I really appreciate it!  Take care and have a great weekend!

Stef


Stamps:  Love You Beary Much (Simon Says Stamp)
Paper:  Neenah Solar White, Sweet Talk 6x8" paper pad (Simple Stories)
Ink:  Gina K Chocolate Truffle Amalgam, Versamark, Candy Apple (Pinkfresh Studios), Tattered Rose DOX
Other:  Slimline Scallop Frame die (SSS), White Baker's Twine, Tiny Hearts Shaped Sprinkles (Doodlebug), Glossy Accents, Wow Superfine embossing powder
Copics:  R39, 37, 35, 20 E37, 35, 33, 31, 30, W7, 5, 3