Showing posts with label Inspired By. Show all posts

Wednesday, December 22, 2021

Special Delivery

Hello and welcome.  I have a card to share with you that I made for the current Inspired By challenge, where they are celebrating challenge #200!!  Congrats to the DT team!!.  The challenge is to make a card inspired by one of the previous 2021 winners, of which I was fortunate enough to be in February 2021.  However, for today's card I was inspired by Holly and Kailash's cards, which were the winners of IB170. 
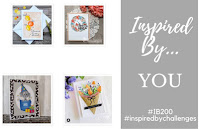


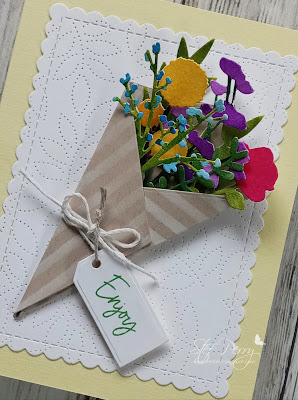
Both Holly and Kailash's card designs that had beautiful wrapped floral bouquets (you can see one in the picture board above), and that was my primary inspiration.  I used different dies, colors and a different sentiment.
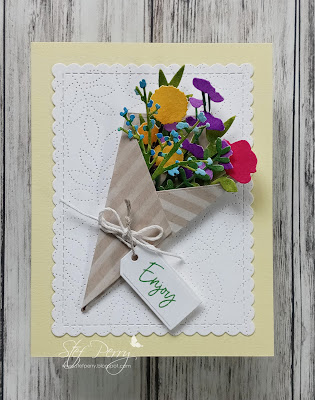

For starters, all the flowers and leaf sprigs were die cut from watercolor paper, then they were watercolored using Altenew's 24 pan watercolor set.  While those dried, a piece of kraft paper was stenciled with thin strips using white pigment ink, dried with a heat gun, then die cut with the wrapper die. I used a dot runner on the back of all the flowers and sprigs, arranged them in the wrapper, then tucked a piece of foam tape inside so the wrapper could keep its rounded shape. I then added hemp twine around it and tied a bow, then tied on the tag with the sentiment using linen thread.
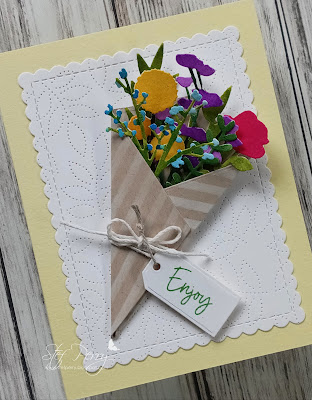

Next a panel of white was embossed with the Pinpoint Leaf cover die, the die cut with a scallop rectangle die that was adhered to the light yellow card base.  I added glue to the back of the wrapper then angled it onto the white panel and securing the sentiment tag with a bit of foam tape.  This card is such a departure from all the Christmas/winter cards I've been making, it was quite a treat to enjoy the bright spring colors when it was complete.  

Thanks for taking the time to visit, I really appreciate it.  Take care and enjoy the holidays!

Stef


Stamps:  Special Delivery Sentiments (Waffle Flower)
Paper:  Neenah Solar White and Desert Storm, Lemon Chiffon (SSS), Fabriano Artistico watercolor
Ink:  Shadow Creek (Altenew), Sharktooth White Pigment (Ink on 3)
Other:  Special Delivery and Stems dies (WF), Scallop A2 rectangle die (Honey Bee), Pinpoint Leaf Plate (Memory Box), Slimline Stripes Stencil (Trinity Stamps), Altenew Artist's Watercolor 24 pan set, hemp twine, Linen Thread (SU)

Tuesday, October 26, 2021

Peace Joy Hope Love

Hello and welcome!  I have a card to share that I made for the current Inspired By Challenge, using their Christmas inspiration board.


I'm working on my Christmas cards, as I'm sure many of you are as well, and I was inspired by the soft, muted colors of the board that I thought would work well with one of my Stamping Bella stamps.


The sweet image was stamped on a panel of white then, without masking, the background was stenciled using the Peace Joy Hope Love stencil with Polar Bear ink and using a light hand.  I also took the blending brush and lightly went over the background going around our cute little Bundle Girl and the bird, but I also wasn't too worried as I knew the Copic markers would cover up any unwanted ink. Copics are typically not muted colors but I found a salmon pink marker (RV42) I bought last summer and had never used that worked for a less saturated pink.  It also went well with the muted blue greens used on her scarf, boots and the snow as well as the inked background.


When the coloring was complete, I put the panel back in my Misti where I'd left the stamp and reinked it with black pigment ink to get a better outline.  I've seen many a YT crafter do this but I rarely remember to do it myself, so I'm glad I did here as it made a difference.

Next the panel was trimmed down to be layered on the slightly larger white scallop panel but I thought it needed a mat to make it stand out a bit more.  A white panel was cut slightly larger and colored around the edges with one of the blue green markers then all the layers were adhered together.  After adding to the card base with foam tape, Glossy Accents was used to bring a nice shine to the star and tree ornaments.  I was going to add a sentiment on the front but I didn't want to cover up the stenciled words, so I left it as is.  What do you think?  Should I add a sentiment before sending out?

Thanks for stopping by, I appreciate it!  I'll be back later today with another post, so drop back by if you have a chance.

Take care!

Stef


Stamps:  Bundle Girl With A Christmas Tree and a Birdie (Stamping Bella)
Paper:  Neenah Solar White,
Ink:  Memento Tuxedo Black, Versafine Clair Nocturne, Polar Bear (Altenew)
Other:  Peace Joy Hope Love stencil (Simon Says Stamp), A2 Scallop rectangle die (Honey Bee), Glossy Accents (Ranger)
Copics:  Girl - E11, 21, 51, RV93, 42, R30, 20, E11, 21, 51; Bird - BG72, 70; Tree - BG96, 90, YG93, E44; Star and ornaments - YR23, 21, E09, R46

Sunday, October 17, 2021

Autumn Birthday

Hello and welcome!  For my 2nd post today, I'm sharing a card that started as an experiment and it turned out pretty well, so I am sharing it with the challenges below.  (If you're looking for my Sunday Stamps DT card, you can find it here)


The Four Seasons Challenge is new to me and I love the concept!  Of course it is the brainchild of Diane and Darlene from the Double D Challenge and Peace on Earth Christmas challenge and looks like it is equally as successful.  


So, on to my card.  A few weeks ago I was fortunate enough to score the Tim Holtz Halloween Distress Mica Stain Sprays trio (unfortunately it was a limited time offer - they are now sold out but the regular Distress Stain and Distress Oxide sprays are still available) and I decided to experiment with them and here's one of the results.


I began with a sheet of Stonehenge Black Watercolor paper and a leaf stencil.  I used 4 different colors of sprays and let them mix a little bit but not too much so one can see the orange, green, yellow and a little bit of the brown.  This is the first time I've used sprays through a stencil and I love the texture and kind of artsy finish.  It's really impossible to capture the sparkle from the sprays on black but it almost has a velvet look to it.  After the panel dried, I trimmed it down to fit on a mini slimline card.


Finishing the card was pretty easy.  The sentiment was die cut three times from black cardstock and once from gold matte cardstock, then layered together and adhered to the vellum shadow.  I also cut two thin strips of the same gold paper and added it to the top and bottom of the leaf panel before adhering to a black card base.  The vellum sentiment shadow had double sided adhesive on the back so it was easy to adhere to the front of the card.  The last little touch was to add some gold satin baubles.  While they are a different shade of gold than the gold cardstock, it seemed to mesh nicely with the background colors.


Thanks for taking the time to visit!  I hope you're having a good weekend.  Take care!

Stef


Stamps:  None
Paper:  Black, Matte Gold (Simon Says Stamp), Stonehenge Black Watercolor, vellum
Ink:  Jack O'Lantern, Flickering Candle, Bubling Cauldron and Crooked Broomstick Distress Mica Stain Sprays
Other:  Tim Holtz Autumn stencil, Big Happy Birthday dies (SSS), Trinity Stamps Gold Satin Baubles

Saturday, October 9, 2021

Just a Hello

Hello and welcome! The card I'm sharing today was made for three challenges - Inspired By, As You See It and Color Throwdown.


I'm kind of on a kick of pairing of white and ivory/cream, so that's what I used on my card again today. Plus it worked so well with the color challenge colors. I hope you guys aren't tired of seeing it yet 😄.


I was indeed inspire by the white pumpkin photo, so I pulled out a cute fall border stamp set from Pretty Pink Posh.  I trimmed a panel of white cardstock to 3" x 4", then stamped the leafy image on the bottom and the pumpkins above, leaving room for the strip holding the sentiment.  Copic markers were used to color the images, then the gray strip layered across.  The sentiment was stamped and die cut then added to the strip with thin foam tape.


The base was made from the same gray cardstock, then an embossed panel of ivory was adhered directly to the base after adding the strip of textured Pumpkin Pie paper.  The colored panel was added with thin foam tape and I finished things up with some white enamel dots and an orange enamel heart! Quick and easy!


Thanks for visiting, I always appreciate it so much.  I hope you're having a great weekend - take care and stay safe!

Stef


Stamps:  Fall Borders (PPP), Just a Hello Floral (Pinkfresh Studio)
Paper:  Neenah Solar White, Ivory, Smoke (Simon Says Stamp), Textured Pumpkin Pie (ret. Stampin' Up)
Ink:  Gina K Chocolate Truffle Amalgam, Versafine Clair Pinecone
Other:  Lumber embossing folder (Tim Holtz), Lilly White Sprinkles (Doodlebug), Warm & Cozy enamel heart (Altenew), Just A Hello Floral die
Copics:  E29, 37, 35, 33, 19, YR27, 24, 23, 18, 16, 14, 21, W5, 3, 1

Sunday, October 3, 2021

You Are Wonderful

Hello and welcome!  I hope your weekend has gone well.  This afternoon I'm back with a card that I made for three challenges - Freshly Made Sketches, Inspired By and Festive Friday.  

(My first post today was my Sunday Stamps DT card which you can find it here.)


(apples, red, green, circles, harvest)

Back in August I was able to remedy my lack of fruit stamps to a small degree by purchasing a stamp set that included a barrel of apples and I was so happy to be able to ink it up!


Don't you just love fall?  Pumpkins, sunflowers, fresh apples, beautiful leaves and definitely cooler weather (at least here in Idaho), thank heavens!  Copics were used to color the images, then matching dies were used to cut them out.  Next two scallop circles were die cut and the center removed from one so the patterned paper could be added to the back. These dies are kind of cool because the inner and outer scallop circles and the center come apart so one can use them separately or together.  After the colored pieces were adhered to the white circle, they were set aside so I could create the rest of the card.


I took an A2 panel of ivory cardstock and embossed it with a wood 3D embossing folder, then trimmed it down 1/8th inch on each side and wrapped it with linen thread.  It was mounted on the white card base with thin foam tape, then the circles were adhered in layers.  The sentiment was added and that finished things off!  It's hard to discern in the photos, but the ivory embossed panel adds a nice bit of warmth to this fall themed card.


Thanks so much for taking time to visit, I really appreciate it!  

Take care and stay safe.

Stef


Stamps:  Loads of Fall (Honeybee Stamps), Friends Like You (MFT)
Paper:  Neenah Solar White, Ivory (Simon Says Stamp), Harvest Festival 6x6 paper pad (HB)
Ink:  Memento Tuxedo Black, Versafine Clair Nocturne
Other:  Loads of Fall dies, Skinny Strips die (MFT), Nested Infinity Circle die (Hero Arts), Stitched Scallop Circle die (Pinkfresh Studio), Tim Holtz Lumber 3D embossing folder, Linen Thread (Stampin' Up)
Copics:  R59, 46, 27, 14, YR24, 18, 09, 16, Y38, 17, 15, 11, G46, 43, E47, 44, 43, 42, 41, 37, 33, 31

Saturday, July 3, 2021

Stay Chill!

Hello friends and welcome back!  I have a fun card to share today that I made for my oldest grandson's upcoming birthday. I'm sharing it at three challenges - Inspired By, Addicted to Stamps and Double D.


My grandson is in his 20's and I think this card is Just.So.Him. 😎


Isn't that gnome fun?  Since my grandson has a brown beard, which has been at varying lengths over time, I think this worked perfectly. And the sentiment too.  I started by coloring the mushroom and gnome, using Copic markers in colors from the Inspired By board (plus he has polka dot shorts lol!). Once complete they were cut out with the matching dies and also die cut the stamped sentiment. 


I wanted to keep the background simple, so I first inked up the sun using a stencil.  Next, I die cut two rows of grass from green cardstock and adhered that at the bottom of the stenciled panel. The mushroom was tucked between the rows of grass and adhered directly to the panel, then the sentiment and gnome were added with foam tape.  The entire panel was popped up on foam tape on the card base, then the final touch was to use a white gel pen to add some reflection to his sunglasses.   


Thanks for taking time to visit, I appreciate it!  I hope your summer is going well so far and for those in the US, have a happy 4th of July!

Stef


Stamps:  Chillin' Gnomes (Simon Says Stamp)
Paper:  Neenah Solar White
Ink: Memento Tuxedo Black, Versafine Clair Nocturne, Citrus Burst, Maple Yellow and Autumn Blaze (Altenew)
Other:  Chillin' Gnomes dies, Featured Sentiment die (Altenew), Sun Stencil (Erin Lee Creative), Slimline Grassy Hills (MFT)
Copics:  BG57, 53, 11, YG23, 01, 00, Y26, 19, 17, 15, 13, YR18, 07, 16, E29, 27, 25, 23, 21, 11, 00, 51, W9

Wednesday, April 7, 2021

Spring Blooms Birthday

Hello friends!  I hope you're doing well.  Today I'm sharing a bright floral bloom card that I made for four challenges. My card design incorporates the colors of orange and green from Inspire By, the sketch at Fusion, the Springtime Flowers theme at The Paper Players and the Happy Birthday theme at Simon Says Stamp Wednesday Challenge.


For my card, I used one of my favorite vivid color combinations to create some bold blooms.


I absolutely love orange when paired with strong pinks or purples and for this card I was in a purple mood I guess LOL! The image is part of a gorgeous floral 6"x 6" background stamp drawn by the incredibly talented Emily Midgett for Honey Bee stamps.  I decided to narrow down my coloring to just the section that would fit the bottom half of my card, otherwise I might still be at the coloring!


With the coloring complete, I put the panel back into my Misti, then restamped with black pigment ink for a bolder black outline, since the Copics can sometimes mute the stamped lines.  The panel was then trimmed down to 3"x 4.25".  For the top half of the card I wanted something more than just plain white, so I used a debossing cover plate die on a panel of white for a subtle design.  The colored portion was adhered below, then a strip of orange card stock added just above that.  The sentiment was heat embossed in white on black then cut with a fishtail die.  I trimmed off the right end and added it to the card base with foam tape.  The final steps were to add the look of white stamen ends on the orange flowers with a white gel pen, then scatter around a few clear sequins.


That's my card for today. I really appreciate you stopping by and taking a look!  Take care!

Stef


Stamps:  Spring Blooms Background, Pickup Lines (both Honey Bee)
Paper:  Neenah Solar White, Black, Orange Peel (SSS)
Ink:  Gina K Obsidian Amalgam, Versafine Claire Nocturne, Versamark
Other:  Dotted Scales Debossing Cover die (Altenew), Fishtail Foundations die (MFT), Fine Detail White embossing powder (SSS), Sparkling Clear Sequins (Pretty Pink Posh), Sakura White Gelly Roll pen
Copics:  YR09, 16, Y17, RV69, 66, 55, 52, YG67, 17, 03, W9, 7, 5

Sunday, March 28, 2021

Wild Meadow

Hello friends and welcome back!  I hope you're doing well.  Today I'm sharing a card that I was inspired to make by three challenges, one a sketch challenge and two with spring themes. 


When I saw the sketch I thought of a stamp set that would work perfectly for the strip at the bottom and would incorporate lots of spring colors and flowers.


I love the variety of flowers in this stamp and it worked perfectly to incorporate lots of bright colors.  It was colored with Copic markers then cut out with the matching die.  For the background, a panel of white card stock was gently ink blended with a light green from the bottom to the middle and then a bit of light blue at the top. I ended up trimming it down to 3.5" x 4.75", added the flowers with foam tape then trimmed off the ends of the stamped image in order to fit the panel size. 


The panel was matted on a slightly larger die cut piece of white card stock, then adhered to the blue card base with foam tape.  After adding the sentiment to the panel with foam tape I thought I was done but felt the card was lacking something.  So I searched through my stamp sets and found this sweet butterfly left over unused from another project and adhered it to the panel to finish things off!


So glad you made time to visit, I always appreciate it!  Take care and have a great week!

Stef


Stamps:  Wild Meadow (Mama Elephant), Beautiful Butterflies (Simon Says Stamp), Birdie Brown Glorious Greetings (MFT)
Paper: Neenah Solar White, Sea Glass (SSS)
Ink:  Gina K Obsidian Amalgam, Versafine Clair Nocturne, Grass Field (Altenew), Blue Sky (Pinkfresh Studios)
Other:  Wild Meadow and Beautiful Butterflies matching dies, A1 Stitched Rectangle Stax die (MFT), Sakura White Gelly Roll pen
Copics:  RV14, 13, 10, V28, 25, 22, 20, R46, 24, 05, 21, Y26, 08, 04, 00, G46, 43, 40, YG67, 63, 61, 17, 03

Thursday, March 18, 2021

Happy Easter for the Tic Tac Toe Challenge

Hello friends!  So glad you came by to visit and I hope you're doing well.  It's time for a new Tic Tac Toe Challenge!  This week Claire has brought us a spring/Easter board to inspire us!  For my card, I went down the left column - bunny, pastel colors and die cuts.


I'm also joining the challenge at Inspired By, where the prompt is this CUTE bunny roll! 


I have been totally smitten with the line of Anita Jeram stamps from Colorado Card Company, one of which I used for this card.


I love this precious scene with the mama (or papa) helping the two young bunnies collect Easter eggs! The image was stamped on white cardstock then colored with Copic markers.  I used warm greys to color the bunnies - it's a pretty simple scene and didn't take much time to color. I used a white gel pen to add polka dots to the pink egg and strips to the blue one.


Next, the sentiment was stamped in black pigment ink.  When that dried, both the main panel and the yellow mat were die cut with the Elegant Rectangle die, then added to the pink card base with foam tape.  The final touch was to add some pink clay hearts, which helped balance out the whole scene.


Thanks for visiting, I always appreciate it so much!  Be sure to check out the fabulous cards by the other tttc DT members and hopefully you'll be inspired to join us this week!

Stef


Stamps:  Happy Easter (Colorado Craft Company)
Paper:  Neenah Solar White, Lemon Chiffon and Cotton Candy (Simon Says Stamp)
Ink:  Gina K Obsidian Amalgam, Versafine Claire Nocturne
Other:  Elegant Rectangle Stax dies (MFT), Pink Hearts Clay Confetti (Pretty Pink Posh), Sakura White Gelly Roll pen
Copics:  W3, 1, 0, B00, 000, 0000, RV91, 21, 00, Y19, 13, 00, YG03, 01, 00, BG000, 0000, R20

Tuesday, February 23, 2021

The Beginning of Something Else

Hello, friends!  I hope you are doing well.  I have two posts to share with you today, so be sure to come back a little later and check out the second one.  For this post, I'm sharing a card made for Inspired By, where the theme is to use a quote on your card.  The other challenge is Color Hues, where they have the delightful combination of peach and green.


My card is what I consider fairly clean and simple, without a lot of background busyness.  Maybe it's too spare?  I don't know, you tell me in the comments.


I find the sentiment quite a lovely note of encouragement. Of course, Mr. Rogers had many, many good and uplifting things to say during his lifetime.  My daughter used to watch his show when she was young and loved it.  He just had a way, didn't he?  

Anyway, the sentiment was stamped on the upper left of a panel of white, then the dogwood flowers were originally stamped onto the same panel. However, when I started to color with my Copics, I made a big mistake in my color blending.  So, I move to "Plan B", stamped the flowers again on a separate piece of white cardstock, colored them up and die cut with the coordinating dies. 


The main panel was trimmed down and layered on a panel of peach cardstock.  Originally, I was going to make this an A2 sized card, but couldn't bear to cut off any of the dogwood image, so it became a 5x7"/A7 sized card. The floral image was popped up on the panel with thin adhesive squares, then the entire thing was added to the white card base with foam tape.  A few clear dew drops were added as the final touch.


Thank you for visiting, I really appreciate it!  I hope you enjoy the remainder of your week.  Take care!

Stef


Stamps:  Thank You Dogwood Tree (Colorado Craft Company), Beginning (sentiment/Impression Obsession)
Paper:  Neenah Solar White, Peekaboo Peach (ret. SU)
Ink:  Gina K. Chocolate Truffle Amalgam
Other: Thank You Dogwood Tree matching dies, Small Clear Dew Drops (Honey Bee)
Copics:  R02, 12, 00, YG67, 25, 17, 03, 01, E97, 47, 44, 42