Showing posts with label Addicted to Stamps. Show all posts

Thursday, August 1, 2024

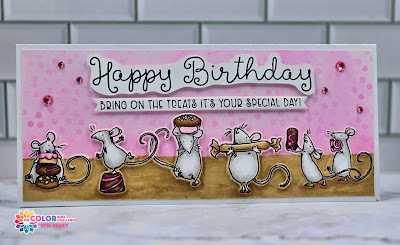
Bring On the Treats for Color Hues

Hello friends!  Welcome to August and to the latest Color Hues challenge!  This time I am your hostess and have chosen pink and brown as our hues of color.

I'm also sharing my card over at Addicted to Stamps, where the current theme is "Birthdays".


I had fun making a "sweet" slimline birthday card with cute mice!  


Yes, we have some mice bringing treats for the birthday party!  The first step was to find ink and Copic marker colors that went well together.  Once that was done, the background was ink blended with pink and brown, then I went over the pink with a polka dot stencil.  I varied my inking pressure to create a non-uniform look.  I then splattered the stenciled portion of the background with white iridescent shimmer spray using a paint brush reserved specifically for that task.

Next, all the mice were stamped, colored and die cut.  I used gray for the mice so they would stand out from the background and used various light and dark pinks and browns for the treats.  After stamping the sentiments, the sub-sentiment was cut out with a label die and I fussy cut the happy birthday to give it a fun look.  

The card was assembled with the three middle mice popped up on foam tape, as well as both sentiments.  I used a brown marker to darken the "ground" as it was too light with just the ink blending.  I then colored over the white borders of the die cut images with a brown and pink marker so the die cuts would blend into the background.  I have mixed feelings about doing that; I think next time I would stamp and mask where necessary rather than add die cuts.  But all in all, it still turned out as cute as I'd hoped.  Pink gems were added and an aqua shimmer pen was painted on all the confections for a bit more sparkle.


What are you inspired to create with these colors?  My super talented teammates have a bevy of fabulous cards that will spark your creativity, so be sure to visit the challenge blog before heading off to your crafty space!  The challenge will remain open until 9am EDT Wednesday August 14th.  Hope to see your card in the gallery!

Take care!

Stef

  • Colorado Craft Company/Anita Jeram So Sweet Slimline stamps and dies
  • Simon Says Stamp Slimline Borders Stencil
  • MFT Slimline Skinny Strips die
  • SSS Latte ink
  • Altenew Baby Pink ink
  • Altenew Pink Tourmaline Gem Sparkles
  • Hero Arts White Iridescent Shimmer Mist
  • Tonic Aqua Shimmer pen
  • Sakura White Gelly Roll pen
  • Copics:  E59, 57, 53, 37, 35, 33, 31, 30, RV06, 04, 02, 10, T2, 0

Monday, September 4, 2023

Fragrant Peony for The Flower Challenge

Hello friends!  It's the fourth of the month, which brings a new challenge over at The Flower Challenge!  This month we are asking everyone to use a die.


I'm also playing along with Addicted to Stamps and More where the challenge is to make a birthday card.


Finally, I'm also joining the Anything Goes Challenge at Simon Says Stamp Wednesday Challenge.


For my card, I went all in with dies, using the lovely Fragrant Peony dies from Altenew, along with a couple others.


I recently decided to buy a few of the new Altenew Fresh Dye inks and this card was the perfect way to test them out, and quite honestly, they are wonderful.  I love my Crisp Dye inks and they work fine, but I did see a bit brighter results from ink blending and a clearer image when stamping the sentiment.

I started by ink blending the lightest blue, Water Hyacinth and the lightest green, Silver Sage, on white cardstock, then die cut the petals and leaves.  I then used the next two darkest inks from both ink families to add shading to the die cuts.  The center was die cut separately from a scrap of white and blended with Sunray and Yellow Ochre.  Putting the flowers together is easy with Altenew's keyhole design for lining up the layers.


With the flowers and leaves ready to go, I die cut the Waffle Flower Ring Panel die from white and layered it on a panel of Simon Says Stamp Fog cardstock, which was then added to a white card base.  The sentiment, from MFT's Stylish Sentiments stamp set, was stamped in Indigo Skies, the darkest blue, then die cut with label die.  The flowers were arranged around the sentiment and I was done.


No doubt you have a die in your collection and we'd love to see what you create with it.  But before you head off to your crafty place, be sure to check out the stunning array of cards the design team has created over at the challenge blog!

Take care!

Stef


Stamps:  MFT Stylish Sentiments
Paper:  Neenah Solar White, SSS Fog
Ink:  Altenew Yellow Ochre Crisp Dye ink, Sunray, Water Hyacinth, Alpine Aster, Crystal Violet, Indigo Skies, Silver Sage, Jade and Eucalyptus Fresh Dye inks
Dies: Altenew Fragrant Peony and Featured Sentiment dies, Waffle Flower Ring Panel die

Saturday, July 3, 2021

Stay Chill!

Hello friends and welcome back!  I have a fun card to share today that I made for my oldest grandson's upcoming birthday. I'm sharing it at three challenges - Inspired By, Addicted to Stamps and Double D.


My grandson is in his 20's and I think this card is Just.So.Him. 😎


Isn't that gnome fun?  Since my grandson has a brown beard, which has been at varying lengths over time, I think this worked perfectly. And the sentiment too.  I started by coloring the mushroom and gnome, using Copic markers in colors from the Inspired By board (plus he has polka dot shorts lol!). Once complete they were cut out with the matching dies and also die cut the stamped sentiment. 


I wanted to keep the background simple, so I first inked up the sun using a stencil.  Next, I die cut two rows of grass from green cardstock and adhered that at the bottom of the stenciled panel. The mushroom was tucked between the rows of grass and adhered directly to the panel, then the sentiment and gnome were added with foam tape.  The entire panel was popped up on foam tape on the card base, then the final touch was to use a white gel pen to add some reflection to his sunglasses.   


Thanks for taking time to visit, I appreciate it!  I hope your summer is going well so far and for those in the US, have a happy 4th of July!

Stef


Stamps:  Chillin' Gnomes (Simon Says Stamp)
Paper:  Neenah Solar White
Ink: Memento Tuxedo Black, Versafine Clair Nocturne, Citrus Burst, Maple Yellow and Autumn Blaze (Altenew)
Other:  Chillin' Gnomes dies, Featured Sentiment die (Altenew), Sun Stencil (Erin Lee Creative), Slimline Grassy Hills (MFT)
Copics:  BG57, 53, 11, YG23, 01, 00, Y26, 19, 17, 15, 13, YR18, 07, 16, E29, 27, 25, 23, 21, 11, 00, 51, W9

Thursday, May 27, 2021

grill.all.the.things for the Tic Tac Toe Challenge

Hello friends!  I hope you're doing well.  It's time for another Tic Tac Toe Challenge and this week Claire has given us a fun board that would be perfect for Father's Day or a masculine card.


I'm also joining Addicted to Stamps ATSC #406  and the current Simon Says Stamp Wednesday Challenge, where the theme is Anything Goes


For my card, I went diagonal - die cut, twine/ribbon, texture.


A while back, Ellen Hutson had a wonderful sale on all her Essentials by Ellen products, and I used the opportunity to scoop up some stamps and dies I have had my eye on for over two years.  I LOVE this cute bear and all the accessories you can use to create fun scenes! I started by stamping and coloring the barbeque, bear, sun and hot dog, using Copic markers.  After die cutting with the matching dies, I moved on to creating the background.


I used stencils to create the ink blended grass and clouds. Next a panel of Desert Storm cardstock was embossed with the Corrugated 3D embossing folder, then the stenciled panel was trimmed down and adhered to it.  Before adding to the Desert Storm card base, I wrapped some hemp twine around the panel and tied on a bow.  The BBQ, bear, sun and sunglasses were adhered directly to the panel.  The grilling fork was glued under the bear's paw (the die cuts the paws away from the body so he can hold things) but I used a small amount of foam tape to pop up the wienie portion.  The sentiments were stamped, die cut and added to the card front with foam tape, then the last step was to use my white gel pen on his sunglasses.  This will be perfect to send to one of our grill-loving friends!


Thanks so much for visiting, I really appreciate it!  Be sure to use the link above to check out the fabulous cards by the other DT members and hopefully join us this week!

Take care!

Stef


Stamps:  All Inside and Bear Ware 3 (EH)
Paper:  Neenah Solar White and Desert Storm
Ink:  Memento Tuxedo Black; Versafine Clair Nocturne; Fire Fly, Grass Field and Sea Glass (Altenew)
Other:  All Inside and Bear Ware 3 matching dies, Skinny Strips die (MFT), Grassy Edges and Rolling Clouds stencils (MFT), Corrugated 3D embossing folder (ret. SU), Hemp Twine
Copics:  E79, 57, 35, 33, 31,30, 29, 09, R59, 46, 24, 05, 22, 20, Y26, 19, 15, 13

Friday, May 21, 2021

Vitamin Sea

Hello friends, I hope you're doing well!  I have a card to share that I made for two challenges - Addicted To Stamps where the current theme is die cuts and/or stencils, and the current Simon Says Stamp Wednesday Challenge with a theme of using dies and/or punches.

ATSC #405

The lastest card kit from Hero Arts was just too awesome to pass up and I used it for this card, creating a slimline ocean scene.


The stamp set in the kit has one main image, the large coral reef, along with the fish, seahorse and jelly fish you see on the card.  I'm not gonna lie, this took me a couple of afternoon sessions to complete but I love how it turned out!  I started with the background, stenciling the "water" on a panel of white cardstock with three shades of blue, starting with the darkest at the bottom.  After washing the ink off the stencil, it was realigned to the inked portion and I used white glitter gel over the blue for some outstanding sparkle (in real life it looks amazing!).  While that dried, I colored the images with Copic markers then die cut them with the coordinating dies.


I search the internet for coral reef images so I could stay a bit realistic in my coloring and was amazed at the variety of colors of the coral reefs, especially in warm water oceans (obviously I've never done much diving lol!).  With the stenciled panel dry, it was adhered to the card base.  Before adding all the images to the base, I created the "sand" ocean bottom by smearing Versamark over a piece of white cardstock then heat embossing with Sand embossing powder.  I hand cut the embossed panel into a couple of pieces and layered them at the bottom of the card with foam tape.  I began adding all the colored and die cut images mostly popped up with foam tape. Lastly, I used a couple of Violet Copic markers to color a small panel of white cardstock.  The sentiment was white heat embossed on it, then it was trimmed down and added to the panel. 


Thanks for taking time to visit, I really appreciate it!  Take care and enjoy your weekend!

Stef


Stamps:  0521 My Monthly Hero card kit (Hero Arts)
Paper:  Neenah Solar White
Ink:  Versamark; Memento Tuxedo Black; Sea Glass, Ocean Waves and Dusk (Altenew)
Other:  Waterflow Slimline Stencil (HA), MMY card kit dies, Gina K White Glitter Glitz gel, White and Sand embossing powders (HA), Copic markers

Sunday, May 16, 2021

Just A Note for Sunday Stamps

Hello friends, I hope you're doing well!  It's time for a new challenge at Sunday Stamps! We have a beautiful color board to inspire you.


I'm also playing along with Watercooler Wednesday and Addicted to Stamps.


Recently I purchased a big, beautiful floral bouquet stamp from Altenew and thought a mini slimline size card would work to show most but not all the image (it is big!).


I love this beautiful floral image, it is definitely my newest favorite!  I stamped the image on a piece of  5 1/2" x 8 1/2" card stock, then trimmed off a portion of the image on the left so it would fit my card size.  I colored the image with Copic markers similar to the challenge colors, then trimmed off a bit more of the panel for a final size of 3 1/8" x 6 1/8" then adhered to the 3.25" x 6/25" white cardbase.


The sentiment was stamped with black pigment ink, then die cut with the coordinating die.  I die cut it twice more from white card stock, then layered them together for some nice dimension.  After adhering the sentiment to the card, I used a white gel pen to create the ends of the stamen on the poppies and create the centers of the small pink flowers.  Super simple, I didn't even add any bling!


Thanks so much for the visit, I always appreciate it!  Be sure to use the link above to check out the beautiful cards by the other DT members and hopefully join us for this color challenge!

Take care and have a good week!

Stef


Stamps:  Simply Spring (Altenew), Perfect Sentiments (Pinkfresh Studio)
Paper:  Neenah Solar White
Ink:  Gina K Obsidian Amalgam, Versafine Clair Nocturne
Other:  Perfect Sentiment die, Sakura White Gelly Roll pen
Copics:  RV14, R43, 32, 20, YR18, 07, 16, Y17, 32, BG18, 72, 70, W9, 5

Thursday, May 6, 2021

Special Delivery

Hey friends, I hope you're doing well!  I have a card to share with you that was inspired by the current challenge at The Paper Players.  Joanne has chosen a fun theme of cards for boys, which I never have a enough of, so this worked perfectly.


I'm also joining Addicted to Stamps, where the current challenge is any occasion.


My husband and I have two great nephews that are young, so I'm constantly looking for fun stamp sets appropriate for their age.  Recently I found a cute space themed set at Ellen Hutson, which worked well for this theme.


I began by making an easy galaxy background.  I used Distress Oxide inks to blend the colors, starting with the lightest in the middle and working my way out to the darkest.  Next a Distress sprayer was used to add water drops to simulate stars, then I added white gouache splatter for good measure, with both a small paintbrush and a toothbrush for the smallest size dots.  I set that aside to dry and went to work on all the stamped images.


The rocket ship and planets were colored with Copic markers and cut out with the coordinating dies.  The thing that probably took me the longest was deciding what sentiment to use.  The stamp set has several fun sentiments but none for birthdays so I pulled out several other sets and finally settled on "special delivery", which it would be if it were from space, right?  

After the ink blended panel was dry, it was die cut with the deckled rectangle die and adhered to the white card base.  Next, all the images were positioned on the panel, adhering the planets directly to it, then popping up the rocket ship with foam tape.  The main sentiment was die cut then the birthday greeting sentiment strip trimmed down and both added with foam tape.  I still wanted more stars, so I tried making white dots with a white gel pen but it didn't stand out as well as I'd hoped.  Then I remembered I had some fun holographic stars, which ended up being the perfect final piece.  You can see them really well in the closeup below.


Thanks for coming by and taking a look!  Take care and have a great weekend!

Stef


Stamps:  Space Out (Ellen Hutson), Pickup Lines (Honey Bee)
Paper:  Neenah Solar White, Strathmore Bristol, Sentiment Strips (Simon Says Stamp)
Ink:  Gina K Obsidian Amalgam, Versafine Clair Nocturne, Tumbled Glass, Salty Ocean, Blueprint Sketch, Chipped Sapphire and Black Soot Distress Oxide
Other:  Space Out and Pickup Lines matching dies, Deckled Frames die (Waffle Flower), White Gouache, Sakura White Gelly Roll pen, Oh My Stars Confetti Mix (Trinity Stamps)
Copics:  R59, 46, 24, B28, 26, 24, 23, 21, 18, YG67, 17, 03, YR18, 09, 16, 21, 31, Y17, 06, 00, C5, 3, 1, 0

Saturday, April 24, 2021

Spring Flowers Birthday

Hello again!  I hope you're doing well.  Today I'm sharing a card that I made for three challenges - Seize the Birthday, The Flower Challenge and Addicted to Stamps (my second entry for this current challenge).


ATSC #403

One of my favorite spring flowers is the cherry blossom, so I thought no better way to go than to use Ellen Hutson's Mondo Sakura. I decided to watercolor these big, beautiful blooms using my Karin markers.  I use the term "watercolor" loosely as what I did was such an simple technique.  


After gold embossing the floral image on watercolor paper, I used a #8 round brush to bring water to each petal, use the marker to drop in some color at the petal base, then mostly let the water do the work, with a bit of help with my brush to get the color moving.  After the petals and leaves were done, water was added around the image and water colored in light blue.

When dry, the panel was trimmed down, splattered with the pink marker color and white gouache (both watered down), then added to the Ivory card base with foam tape.  The large sentiment was die cut from gold once and white twice then layered together and added to the panel.  I trimmed down a sentiment strip and adhered above the die cut, then added a few sparkling clear sequins for the final touch.


Thank you for taking time to visit, I really appreciate it!  Take care and enjoy the remainder of your weekend!

Stef


Stamps:  Mondo Sakura (EH)
Paper:  Ivory (Simon Says Stamp), Arches Cold Press watercolor, Gold Pearl (Tonic), Reverse Sentiment Strips (SSS)
Ink:  Versamark
Other:  "You" die (MFT), Rose Gold embossing powder (Altenew), Karin Brushtip Pro markers, White Gouache, Sparkling Clear Sequins (Pretty Pink Posh)

Wednesday, April 21, 2021

Sweet Birthday Wishes

Hello friends, I hope you're doing well!  Today I'm sharing a card made for two challenges - Addicted to Stamps where the current theme is birthdays and with The Paper Players, were the challenge is to make a CAS birthday card.


I essentially made a one layer card with some embossing and just a bit of splatter for a little added interest.


In my stash I had two components of this card, one the embossed background and the other a piece of Bristol previously ink blended with shades of Distress Oxide Ink.  I decided to keep it simple, in line with the challenge, with just one die cut image.  I used a leaf die to cut it out, maximizing the as much color difference as I could.


Next I adhered the embossed panel directly to the white card base, then gently added the black and gold splatter, first to the panel alone, then a bit more after laying the leaf die cut on it.  When the splatter dried, the leaf branch was glued to the base just along the main stems so the leaves could pop up a bit.  The sentiment was gold embossed on black paper, die cut then added to the base with foam tape. The last touch was to add three sequins.  Very simple and easy, especially using things from my stash!


Thank you for taking time to visit, I appreciate it very much!  Take care and have a great week!

Stef


Stamps:  Sentiment Strips (Altenew)
Paper:  Neenah Solar White, Black, Strathmore Bristol
Ink:  Versamark; Cracked Pistachio, Peacock Feathers and Mermaid Lagoon DOX
Other:  (All Altenew unless otherwise noted) Just Leaves die, Featured Sentiment dies, Modern Squares 3D embossing folder, Antique Gold embossing powder, Jet Black Ink Spray, Starry Colors Gold Metallic Paint (Gansai Tambi), sequins

Sunday, March 21, 2021

Just For You for Sunday Stamps

Hello friends, I hope you're doing well!  It's time for a new challenge at Sunday Stamps!  We have a beautiful bright color palette for you to play with this time.  What are you inspired to make?


I'm also joining the current Addicted to Stamps Challenge where the current theme is Make Your Mark, using your markers, pencils, pens, inks, etc.


For my card I went with spring flowers colored with Copic markers.


These tulips are so easy to color.  I used my Copic markers to bring the in the challenge colors of yellow, light and dark green. The bouquet was die cut with the coordinating die and set aside while I worked on the background.  

I took a panel of white cardstock and blended two light greens over the Watercolor Stripes stencil, then gently went over most of the panel with the same colors to lessen the contrast of the white.  I know the color looks more yellow than green, but that's the result of my phone camera not picking up the true colors.


Next the white frame was die cut three times, glued together, then adhered to the stenciled background. I also tucked the bottom of the tulip image under the frame after trimming off about a half inch - it's a large image!  Thin foam squares were placed under the tulips heads, then the sentiment added along with a little yellow heart.
 

Thanks for visiting, I always appreciate it so much!  Be sure to head over to the challenge to check out the beautiful cards by the other DT members and I sure hope you'll join us for this challenge!

Take care and have a great week!

Stef


Stamps:  Sketch Tulip Bouquet (Simon Says Stamp)
Paper:  Neenah Solar White
Ink:  Gina K Obsidian Amalgam, Versafine Clair Nocturne, Olive and Parrott (Altenew)
Other:  Sketch Tulip Bouquet matching die, Stitched Rectangle Frames die (MFT), Essential Stitched Sentiment die (MFT), Watercolor Stripes Stencil (Altenew), Doodlebug Heart Sprinkle
Copics:  Y26, 19, 13, 00, YG67, 17, 03

Tuesday, February 23, 2021

Big Birthday Wishes

Hello friends and welcome to my second post for today, where I am sharing a card created for Seize the Birthday and Addicted to Stamps! If you want to take a peek at my other card you can find it here.


I made a festive birthday card for a dear friend who is a big car lover.  Originally I was going to make it a scene card, which is the "Toppings" option at Seize the Birthday, but it just didn't come together, so I'm going with the Anything Goes option.


I love those balloons floating out of the back of the pickup tailgate.  We can only assume they are strongly tied down so they won't fly away as the pickup merrily drives down the road LOL!  The pickup was stamped and colored with Copic markers, as was the group of balloons, then both were cut with their coordinating dies.  To add the balloons to the back of the pickup, I used an Exacto knife to cut a slit at the top of the tailgate and slid in the string tails, then adhered to the pickup underside with a bit of washi tape.


To create the base I ink blended a 5x7" panel of white with a light blue/aqua ink, then added stenciled stars to the top two-thirds using a stronger application of the same ink.  Next a frame was created using two sizes of A7 rectangle dies and adhered on the panel.  The first part of the sentiment was stamped at the top then the panel was added to a white card base.  Foam tape was added to the back of the pickup and the balloons floating above the truck, then adhered to the base.  The second half of the sentiment was die cut and added to the back of the tailgate.  Finally, to finish off the card, Glossy Accents were added to the balloons to make them shiny.


Thanks so much for visiting, I always appreciate it!  Take care and I hope the rest of your week is wonderful!

Stef


Stamps:  Big Pickup Tailgate (Honey Bee), Pickup Lines (HB), Balloon Bundle (MFT)
Paper:  Neenah Solar White
Ink:  Gina K Obsidian Amalgam, Versafine Clair Nocturne, Dew Drops (Altenew)
Other:  Big Pickup Tailgate and Pickup Lines Coordinating dies (HB), Balloon Bundle Coordinating die (MFT), Scattered Stars stencil (Simon Says Stamp), A7 Rectangle dies (Waffle Flowers)
Copics:  R39, 29, 24, 14, BG23, 11, 10, Y15, 04, 00, W9, 7, 5, 3, 1, C7, 5, 3, 1, RV69, 19