Tuesday, May 31, 2022

Peony Birthday

Hello and welcome!  I'm popping in with a card for four different challenges, finally using my new Lovely Layers Peony die set!


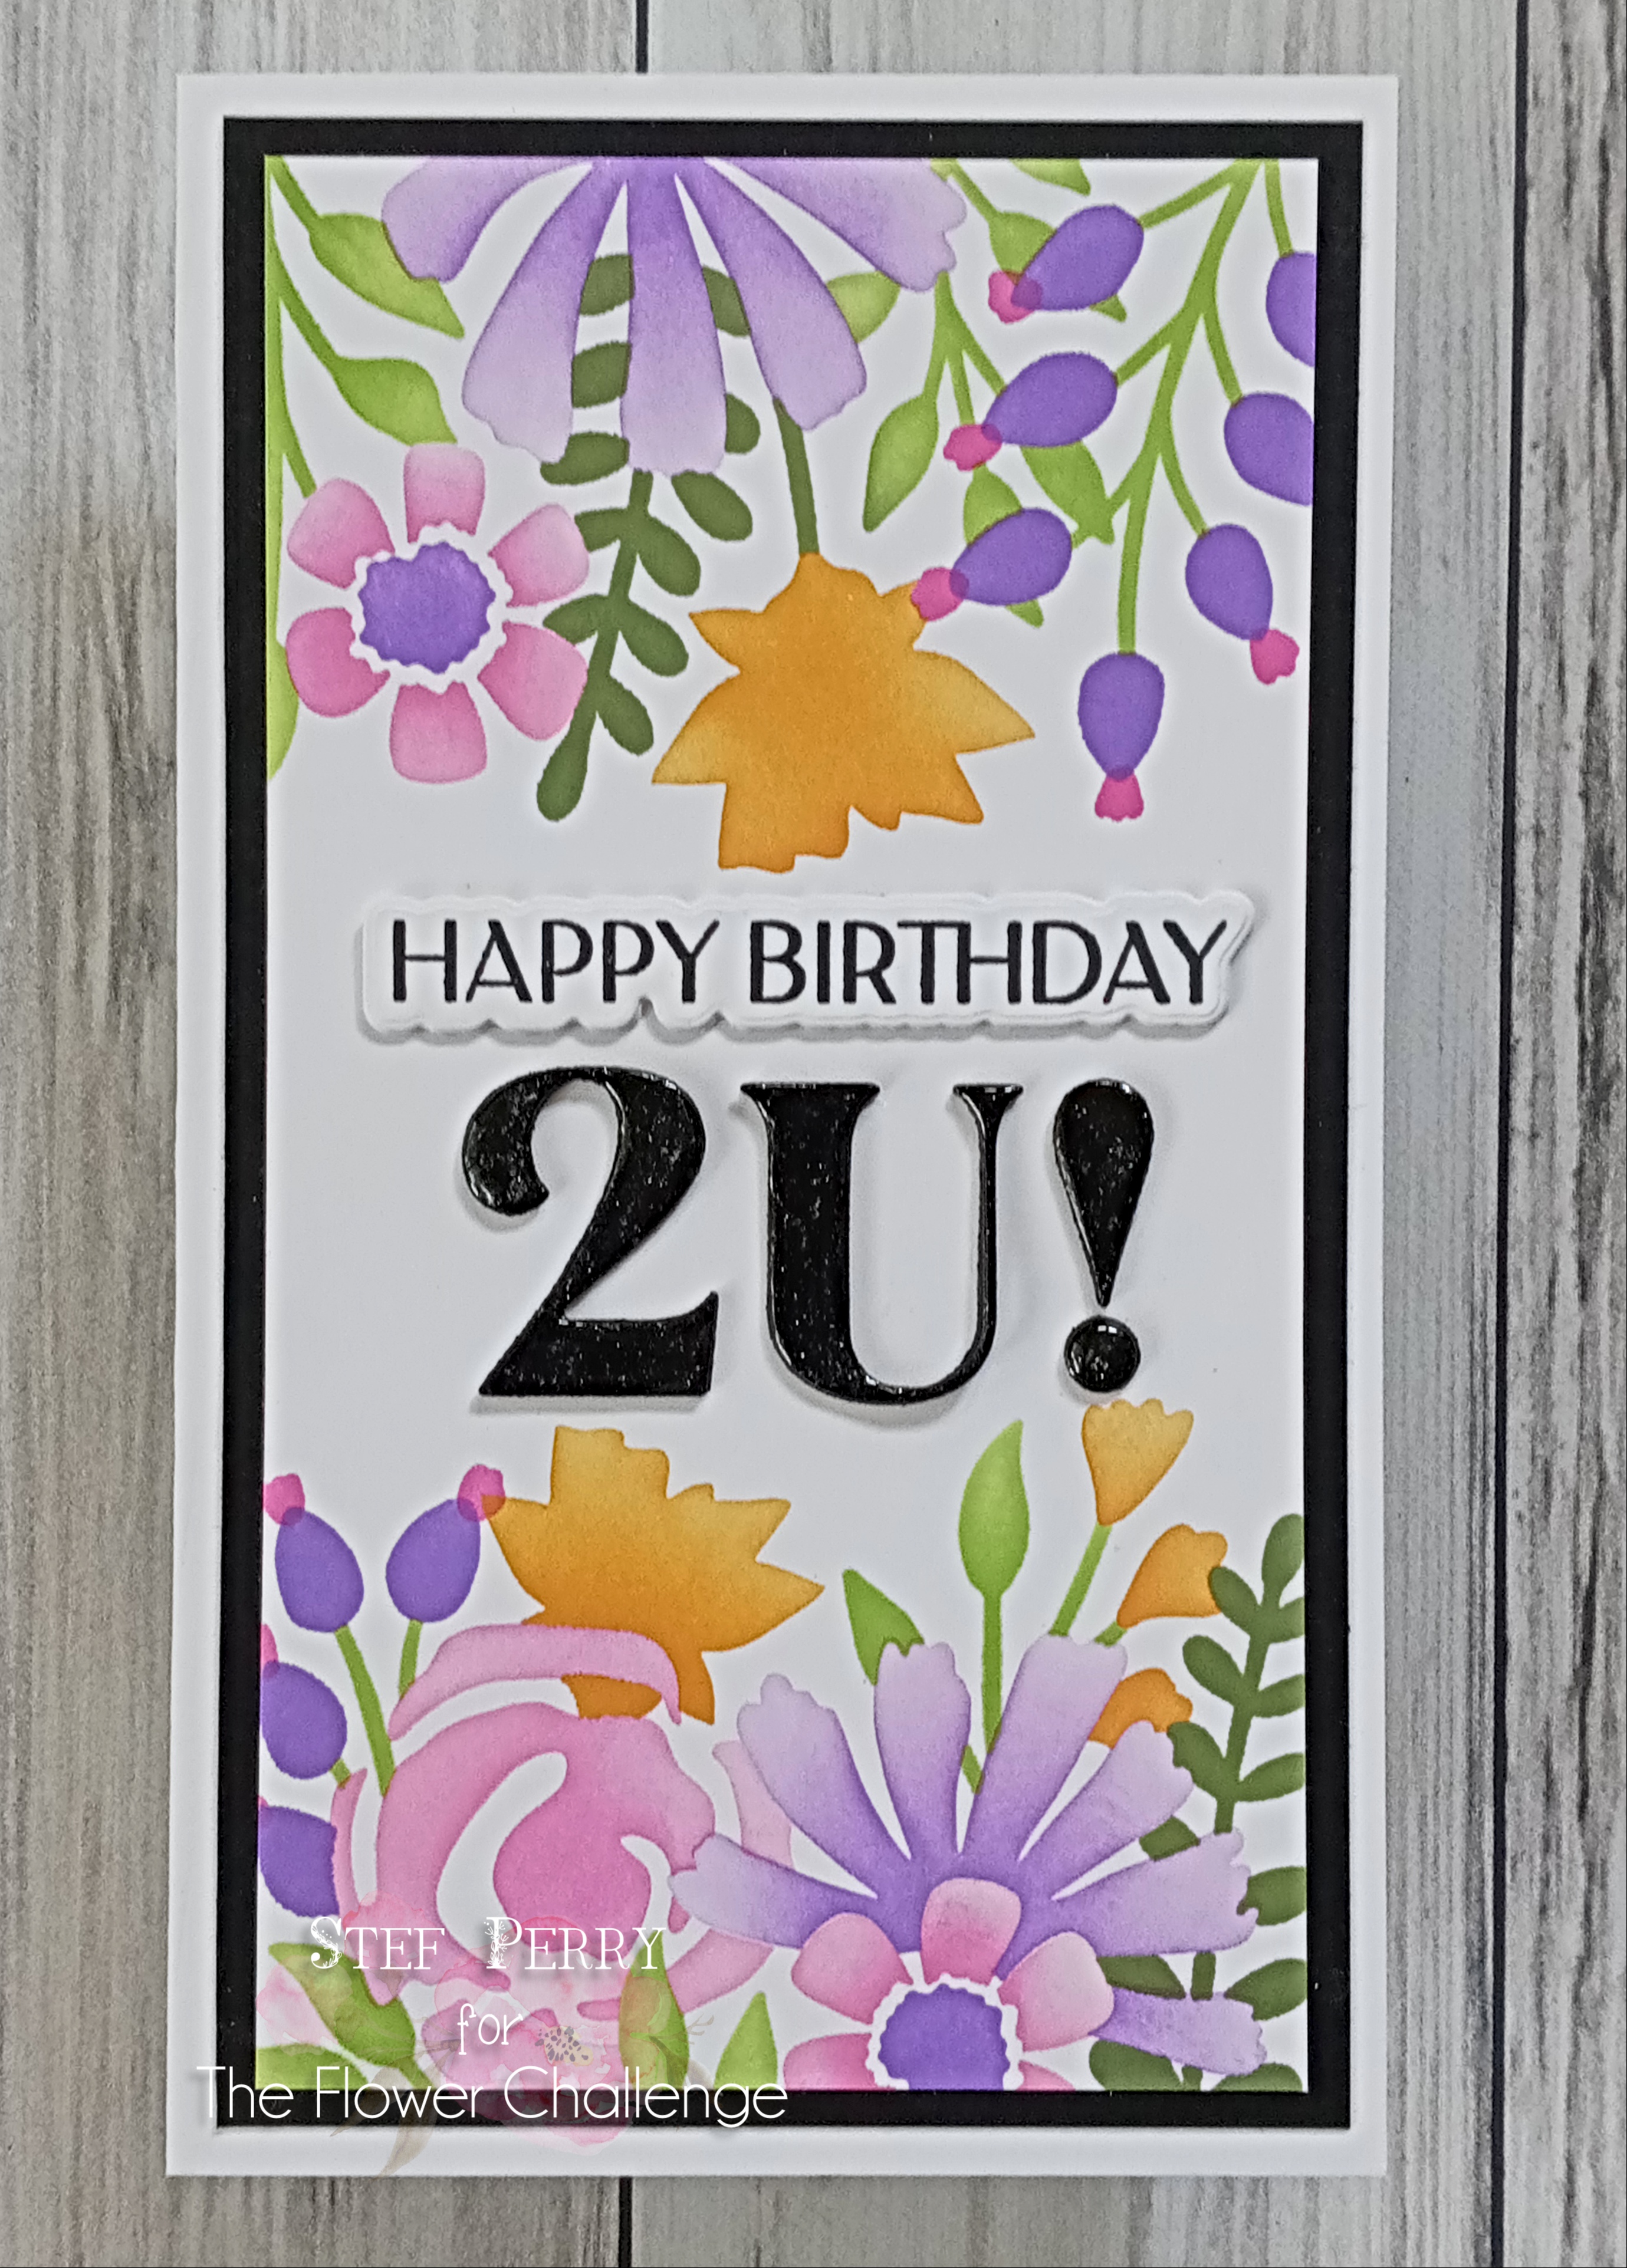
I went down the left column (birthday, slimline, die cut/punch) for Ann's Tic Tac Toe Challenge, as I knew a slimline birthday card would work well with the large die cut blooms, which were colored in pinks to go with Carol's photo challenge at JUGS.  Plus, die cuts also for the ATSC and finally a stenciled background for the STB challenge.


I just love it when you have a vision and it all works out, because quite honestly, it doesn't always for me lol!  The flower petals and leaves were all die cut from white card stock, then ink blended with several inks to achieve this blend.  Originally I was going for pink with yellow edges on the petals but then on one I accidently blended the lightest pink over the yellow and loved the peachy color it created, so I went with it!  Of course, since it's ink blending each petal varies in coor, but the end result with these layering dies is amazing.


Pink was added to a white panel using the Fanfare stencil, trimmed down, then adhered to the back of the slimline scallop frame, which had been die cut twice and layered for a bit of dimension.  That piece was layered on a fuchsia panel and added to the card base.  I arranged the flowers and leaves, leaving room for the foiled sentiment, then adhered everything, including a few antique gold sequins.  As you can imagine, there's lots of dimension on this card with the layered die cut flowers, so I'm sure it will end up being mailed in a box or padded envelope if not hand delivered.


I'm so glad you took time to stop by!  Take care and happy crafting!

Stef


Stamps:  None
Paper:  Hammermill, Neenah Solar White, Doll Pink (SSS)
Ink:  Citrus Burst, Baby Pink, Fuchsia, Magenta, Lime, Fresh Leaf and Green Opal (Altenew)
Other:  Lovely Layers Peony dies (Honeybee Stamps), Happy Birthday Duo Foil Plate and Die (Waffle Flower), Fanfare Stencil (SSS), Slimline Scallop Frame (included in the Envelope Builder die set by Trinity Stamps), Antique Gold sequins (Altenew), Gold Glimmer Hot Foil (Spellbinders)

Sunday, May 29, 2022

Special Delivery for Sunday Stamps

Hello and welcome!  It's time for a new challenge at Sunday Stamps and this time Heidi has given us a very interesting and fun sketch to work with.

I love the diagonal cut in the top rectangle to give it a different look, and initially I thought of using a flower die (what a surprise, right?) across both sections but then I was inspired to go a different direction.


I've had this cute little set from Stamping Bella for months and hadn't yet used it, so I thought it would be a fun way to use the sketch.  Initially I was going to use patterned paper but when I decided on the paper, I didn't want to cut it up so I used it for the background.  The sweet little owl with her special delivery envelope was colored with Copic markers then fussy cut, as there are no coordinating dies.  The sentiment was stamped, trimmed down, cut in two then rimmed with one of the Copic markers used to color the envelope.


The floral panel was die cut with a stitched rectangle die, then added to a white woodgrain card base, which is also the same paper I used for the diagonally split rectangle.  I used a brown Copic marker to color a strip of cardstock, matted it on a slightly larger white one, then adhered to the card.  The parts of the split rectangle were added with foam tape, as were the own and sentiment.  I debated about adding any embellishments as the background is already pretty darn busy, but in the end I liked how it looked with the addition of a few silver pearls.


Thanks for taking time to stop by!  I hope you'll use the link above to see how the other DT members used this sketch in spectacular fashion and also take time to join us!

Take care!

Stef


Stamps:  Special Delivery (Stamping Bella)
Paper:  Neenah Solar White, White Woodgrain (Ellen Hutson), Honey Bee Stamps "Free Bee" patterned paper (gift with purchase)
Ink:  Memento Tuxedo Black, Versafine Clair Nocturne
Other:  Stitched Rectangle die (MFT), Aqua Shimmer Pen (Tonic), Pearls - Silver Mix (Lucy's Cards)
Copics:  E77, 19, 15, 13, 11, 01, 000, 0000, YR14, R59

Thursday, May 26, 2022

Thanks for the Tic Tac Toe Challenge

Hello and welcome!  It's time for a new Tic Tac Toe Challenge and this week we have a fun one created by the lovely Silke.  The Design Team has outdone themselves this week so be sure to use the link below to see their amazing cards!

I'd spent some time playing around with some Nuvo Shimmer Powders and decide to use some of the panels for my card, going diagonal from lower left to upper right - thank you, ribbon, vase.


The powder colors are quite vibrant, so sprinkling just a little bit around on a panel (I used watercolor paper) then spraying with water created some delicious results!  I made a solid teal, which I used as the background on my card, then did some that were half purple or yellow, with the other half green or teal.  Once those were completely dry (I think I let them dry overnight), I die cut the all the stems and trimmed down the background panel.


Next, I wrapped a piece of black satin ribbon around the panel and added it to the white card base with foam tape.  The sentiment and vase were die cut from black glossy cardstock, then adhered along with the die cut stems.  With all the shimmer on the panel and stems (sorry the photo does not do it justice), I decided to leave the card as is without any further embellishments.


Thanks for taking time to stop by, I always appreciate it!  I hope you're inspired to join us this week at the Tic Tac Toe Challenge!

Take care!

Stef


Paper:  Neenah Solar White, Glossy Black (Simon Says Stamp),Tim Holtz Distress Watercolor
Other:  Sunray Crossette, Solar Flair, Falling Leaves, Lilac Waterfall and Atlantis Burst Nuvo Shimmer Powders (Tonic); Script Thanks die (SSS), Vase Variety and Stems dies (Waffle Flower), Nested Infinity Rectangle die (Hero Arts), Black Satin Ribbon (ret. SU)

Wednesday, May 25, 2022

Hello

Hello and welcome!  Today's card is one that I made for the current challenge at The Paper Players, where LeAnne has created a wonderful sketch.


I'm also joining the Simon Says Stamp Wednesday Challenge with an Anything Goes theme, the As You See It Challenge with their Recipe for Subtle Beauty and the current Addicted to Stamps Challenge to use die cuts and/or stencils.


I started with a panel of flowers and leaves that I'd previously foiled in gold and had in my stash.


The matching stencil made coloring the images easy and quick, then I used the matching die to cut them out.  A white panel was stenciled in blue on the bottom third, trimmed down and a corner cut with my trusty old SU corner rounder punch.  A shiny gold foiled strip was adhered across the top of the stenciling, then the flowers and sentiment arranged and adhered. 


 As I was preparing to add the main panel to a Flirty Flamingo card base, I realized I'd forgotten to emboss the top of the panel is the white space. So instead, an A2 size panel of Flirty Flamingo was embossed, adhered to the base, then the main image added with thin foam tape.  A few gems were added, and I was done!


Thanks so much for taking time to visit!  Take care!

Stef


Stamps:  None
Paper:  Neenah Solar White, Hammermill, Flirty Flamingo (SU)
Ink:  Coral Reef, Passion Fruit, Fresh Pear and Key Lime (Pinkfresh Studio); Honey Drizzle and Sea Breeze (Altenew)
Other:  Brighter Days Hot Foil Plate, Stencils and Dies (PS), Fancy Script Words Hot Foil Plate and Die (Spellbinders), Arches Stencil (Simon Says Stamp), Sentiment Labels die (SSS), Tasteful Texture 3D embossing folder (SU), Corner Rounder punch (ret. SU), Crystal Collection - Bouquet (Lucy's Cards)

Sunday, May 22, 2022

Hello Lovely

Hello and welcome!  I have a card to share that I made for the current challenge over at Color Hues.  Cindy chose the fabulous combination of red and aqua, so I couldn't resist playing along.


I had some fun using an older floral frame die and doing a bit of paper piecing using colored cardstock.


The Carnation Frame die was cut three times, once each from red, aqua and white.  I layered the white frame on two additional rectangles of the same size to give it stability and dimension, as well as provide a place to glue the interior pieces.


After puzzle piecing and adhering all the image components, I worked on the card base.  A panel of white was cut with a cover die, then adhered to the red card base.  I found some long retired textured red cardstock that was cut down with a rectangle die and layered atop the white panel.  The main image was adhered, then the sentiment stamped, die cut with a circle die and popped up with foam tape.  Although not really visible from the photos, I finished things off by painting the red flower petals with a shimmer pen.


Thanks for stopping by, I appreciate it!  Take care!

Stef


Stamps:  Mini Everyday Messages (Mama Elephant)
Paper:  Neenah Solar White, Real Red (SU), Aqua Sky (Concord and 9th)
Ink:  Vineyard Berry (Altenew)
Other:  Carnation Frame die (Simon Says Stamp), Floral Grid Cover die (Pinkfresh Studio, Nested Infinity Rectangle and Circle dies (Hero Arts), Tonic Nuvo Aqua Shimmer pen

Sunday, May 15, 2022

Corner Rose Birthday for The Flower Challenge

Hello friends, so glad you've come by to visit! Can you believe we're halfway through May already?  As such, it's time for our reminder post at The Flower Challenge.  The challenge ends on the 25th so I hope you'll find time to join us - this month, all you have to do is use a number along with your flowers.

I'm also joining the fabulous crew at the As You See It Challenge.  This time we are to fill in the blank for "The Best Thing About Mothers is: ________."  When I think about the mothers I have known as friends, my daughter and of course my own Mother, is the unconditional love they give.  


And I'm also sharing my card at the Addicted to Stamps Challenge, where the theme is any Occasion.


My Mom passed away many years ago and I decided that my DT card would honor what would have been her 100th birthday this June.


My Mom's favorite flower was the deep red Mr. Lincoln rose, so that is what I chose to create for this card.  The image is from a newer stamp illustrated by the amazing Emily Midgett and was a dream to color with my Copics.  It is very large, so the card size ended up being 5"x 7".  After completing the coloring it was die cut with the coordinating die, layered upon two additional die cuts from white paper, then cut down to fit the background panel.


For the background panel, Antique Linen was applied using the Spring Boho Circle stencil, then I lightly ink blended the rest of the background to achieve an aged look.  When the floral image was adhered to the panel, I lightly ink blended a bit more to soften the white edges of the die cut.  The sentiment was stamped and trimmed down then adhered with the gold numbers.  I find it a bit tricky to get it all lined up but I think it is centered pretty well and I was happy with how the gold kind of dressed things up.


For more inspiration, head over to The Flower Challenge and take a peek at all the amazing cards by the other DT members!

Take care!

Stef


Stamps:  Celebrate Rose Corner (Simon Says Stamp), Elegant Sentiments (Waffle Flower)
Paper:  Neenah Solar White, Matte Gold (SSS)
Ink:  Memento Tuxedo Black, Versafine Clair Nocturne, Distress Antique Linen
Other:  Celebrate Rose Corner die, Sentiment Labels die (SSS), Festive Alpha & Numbers dies (Scrapbook.com), Spring Boho Circle Stencil (SSS), A7 Layers Rectangle die (WF)
Copics:  R89, 59, 29, 17, G28, 17, 03

Thanks for Sunday Stamps

Hello and welcome!  It's time for a new challenge at Sunday Stamps and this time we have some pretty colors to inspire you.


That photo of berries sure looks scrumptious, doesn't it, but at first I was a little stumped as to what to make with the colors.  In the end, I used three of them - light reddish pink, red and navy - to create a plaid mini slimline thank you card.


I started by ink blending Coral Bliss to the top and middle of a panel of Bristol, then came in with the darker red Vineyard Berry at the bottom.  Once that was complete, I slipped the panel into my Misti and used Tanzanite to ink up the plaid background stamp.  My original intention was to make a birthday card for a BIL whose birthday is right before Independence Day but I didn't like how it was coming together, so I went a totally different direction.


I often like to pair organics/florals with geometrics, so I decided to do it with this plaid.  I found a pretty floral stem die in my "collection" that had gone as yet unused, so I changed that by cutting the stem from white cardstock.  The plaid panel was die cut with a mini slimline rectangle die, then matted on a slightly larger white panel that was cut with a die that created the hash mark border.  After adhering the die cut stem, I wrapped gold twine around the matted panels before adding to the white card base.  The sentiment was stamped in Vineyard Berry, die cut with a tag die, then added to the card front along with a gold bow.  I decided the card needed a little more "something", so some glossy dots were adhered at the top right and on the tag.  Super simple card to make.


Thanks for visiting, and I hope you'll take a moment to head over to Sunday Stamps and see the fabulous cards by the rest of the design team!

Take care!

Stef


Stamps:  Special Delivery Sentiments (Waffle Flower), Soft Plaid Background (Simon Says Stamp)
Paper:  Neenah Solar White, Strathmore Bristol
Ink:  Coral Bliss, Vineyard Berry and Tanzanite (all Altenew)
Other:  Caserta Bloom die ( Memory Box), Special Delivery tag die, Mini Slimline Essential Bundle dies (Pinkfresh Studio), Silver Glossy Dots (Pink & Main), gold twine from my stash

Thursday, May 12, 2022

Celebrate For the Tic Tac Toe Challenge

Hello and welcome!  It's time for a new Tic Tac Toe Challenge and this week Jeanne has given us a great board to play with.


I'm also joining Just Us Girls, where Vicki has chosen "Flowers" as the prompt for Word Week, which works perfectly for my card.


Whimsical flowers, foiling and bright colors are what I chose to use for my card, going diagonal left to right up the Tic Tac Toe board - floral, blue and embossing.


I started with hot foiling the floral image on smooth white cardstock and the leaves on vellum.  The foiling came out pretty well on the vellum except for the bottom of the leaf stems, which I hid behind the flowers.  The flowers were colored with a variety of Copic markers and then both foiled images were die cut with matching dies.


For the background I used Ocean Waves from Altenew to lightly ink blend a panel of white, then trimmed it down to 3.75" x 5" before embossing it.  The panel was then adhered to the white card base, then the flowers and leaves added atop that.  The sentiment was created from a previous foiling and die cutting session, so all I had to do was adhere it to finish things off.


Thank you for taking time to stop by, I really appreciate it.  Be sure to head over to the Tic Tac Toe Challenge and check out the fabulous cards by the other DT members and hopefully join in the fun this week!

Take care!

Stef


Stamps: None
Paper:  Hammermill, Vellum
Ink:  Ocean Waves (Altenew)
Other:  Intricate Rose and Blooms Hot Foil Plate and die, Sketched Leaf Branches Hot Foil Plate and die (both Simon Says Stamp), Perfect Sentiments Hot Foil Plate and die (Pinkfresh Studio), Gold Glimmer Hot Foil (Spellbinders), Diamond Stars 3D embossing folder (Altenew)
Copics:  RV17, 09, 06, 04, 02, YR09, 16, Y38, 27, 23, 17, E39, V17, 15, 12, YG67, 17, 03

Friday, May 6, 2022

Just A Note With Fruit

Hi there!  I have a card to share that I made for the current Festive Friday challenge.  I thought celebrating National Eat What You Want Day was fun, and perfect timing since I only recently acquired a stamp set with food items that I wanted to get inked up.

The stamp set I used is one I received as part of a three-day card making event back in March, and I didn't know if I'd use it because it wasn't quite my "style" I guess, but thought it was a fun one to have in my stash.  And sure enough, it worked great for this challenge, where my three items from the Inspo List are Food, Red and Twine.


I started by stamping each piece of fruit three times.  The stamps are layering stamps, so using a stamp positioner was very helpful.  After the stamping was complete, the fruit pieces along with the scallop circle and sentiment circle were all die cut.  I cut two additional circles to layer under the sentiment circle to give it some girth, colored the letters with a red Copic marker then inserted it into the die cut openings.


To go along with the scallop circle, I used a scallop rectangle die to cut a white panel.  A separate white panel was trimmed down to fit just inside the stitching on the scallop rectangle, then I adhered all the fruit pieces, trimming off the excess before adhering to the scallop rectangle.  The sentiment circle was added with foam tape, the panel wrapped with black Baker's Twine, then the panel was adhered to the card base.  The die cut sentiment letters looked a little flat, so I used Glossy Accents to add shine and I was much happier with how it turned out.


Thanks for visiting, I always appreciate it!  

Take care!

Stef


Stamps:  Just A Note (LDRS)
Paper:  Neenah Solar White
Ink:  Versafine Clair Nocturne; Lime, Fresh Leaf, Forest Glades, Green Opal, Coral Bliss, Heartbeat, Citrus Burst and Maple Yellow (Altenew)
Other:  Just A Note dies, Black Baker's Twine (old SU), Scallop A2 Rectangle die (Honey Bee), Copic marker R46, Ranger Glossy Accents

Thursday, May 5, 2022

Hibiscus and Hummingbird Birthday

Hello friends!  I haven't been joining many challenges as of late, but I was inspired to join both the Paper Players and Seize the Birthday (my second card for the current challenge) with a theme that included birds, and the Simon Says Stamp Wednesday Challenge, where the theme this week is "Feminine".

I have a couple of stamp sets that have both flowers and birds but decided to use one that has not seen much ink and included hummingbird stamps.


I spent some time on googling photos of both hibiscus and hummingbirds to get some inspiration for coloring using my Copic markers.  I saw oodles of bright color combinations, but I knew it would take some time to get the tricky color blending just right, and since I had a short window of opportunity to get my card made, I opted for single colors for both the flowers and the little hummer.  Next the sentiment was stamped in black pigment ink, then everything was die cut with matching dies. 


For the background, I softly ink blended light blue onto a panel of white, adhered a white die cut trellis, then adhered to a white card base.  I used foam tape to adhere the flower, hummingbird and sentiment, then added a few dew drop looking embellishments.  The final touch was to use a shimmer pen on the hummingbird, which I tried to capture in the photo, but no luck.


So glad you stopped by to take a look!  Take care and enjoy the rest of your week!

Stef


Stamps:  Hibiscus Blooms, XL Birthday Greetings (both Simon Says Stamp)
Paper:  Neenah Solar White
Ink:  Memento Tuxedo Black, Versafine Clair Nocturne, Ocean Waves (Altenew)
Other:  Hibiscus Blooms and XL Birthday Greetings dies, Garden Trellis Cover die (Altenw), Aqua Shimmer pen (Tonic), Bubble Blow Out Embellishments (Trinity Stamps)
Copics:  RV29, 25, 23, 21, 00, R59, G29, 2, YG67, 45, 17. 05, 01, 00, BG90, Y15, 06, 000

Wednesday, May 4, 2022

In the Garden for The Flower Challenge

Hello and welcome!  It's time for a new challenge at The Flower Challenge and this month our theme is to add a number.  The design team has oodles of beautiful inspiration to show how they added numbers to their floral cards!


I'm also sharing my DT card with the Anything Goes challenge at Seize the Birthday and the Birthday challenge at Addicted to Stamps.


To create my card, I used a really amazing layering stencil from Taylored Expressions that results in three separate mini-slimline cards and was super easy to use!


The stenciling starts on a 5.75" x 9.75" panel of cardstock, and after you apply each layer, you cut the panel at 3.25" and 6.25" to end up with three card fronts with different floral designs.  I just think it's a brilliant design, especially if you need to make multiples.  I ended up trimming this stenciled panel down in size so I could mat it on black before adhering to the card front which ended up being 6"x 3.5".

I chose this design so I could add the birthday greeting in the center.  The Happy Birthday was already stamped and die cut, so that left die cutting the number 2, exclamation point and letter U from black cardstock three times to layer them up for dimension.  Once everything was adhered to the card, I used a shimmer pen to add sparkle, then covered the 2U! with Glossy Accents.


Here's a look at the other panels, which I'm saving for future use.


Thanks for taking time to stop by, I appreciate it!  Please be sure to use the link above to see all the beautiful cards by the other DT members and hopefully join us this month.

Come back by on the 15th when I'll have my Flower Challenge reminder card to share.

Take care!

Stef


Stamps:  Elegant Sentiments (Waffle Flower)
Paper:  Neenah Solar White, Black
Ink:  Versafine Clair Nocturne; Picked Raspberry, Wilted Violet, Spiced Marmalade and Wild Honey Distress; Limeade, Lime and Fresh Leaf (Altenew)
Other:  In the Garden Triple Slim Layering Stencils (TE), Elegant Sentiments die, Festive Alphabet & Numbers dies (Scrapbook.com)