Showing posts with label die cuts. Show all posts

Thursday, September 4, 2025

Good Day for The Flower Challenge

Hello friends!  The fourth of September brings us to a new month for The Flower Challenge.  This time we have a sketch to inspire you!


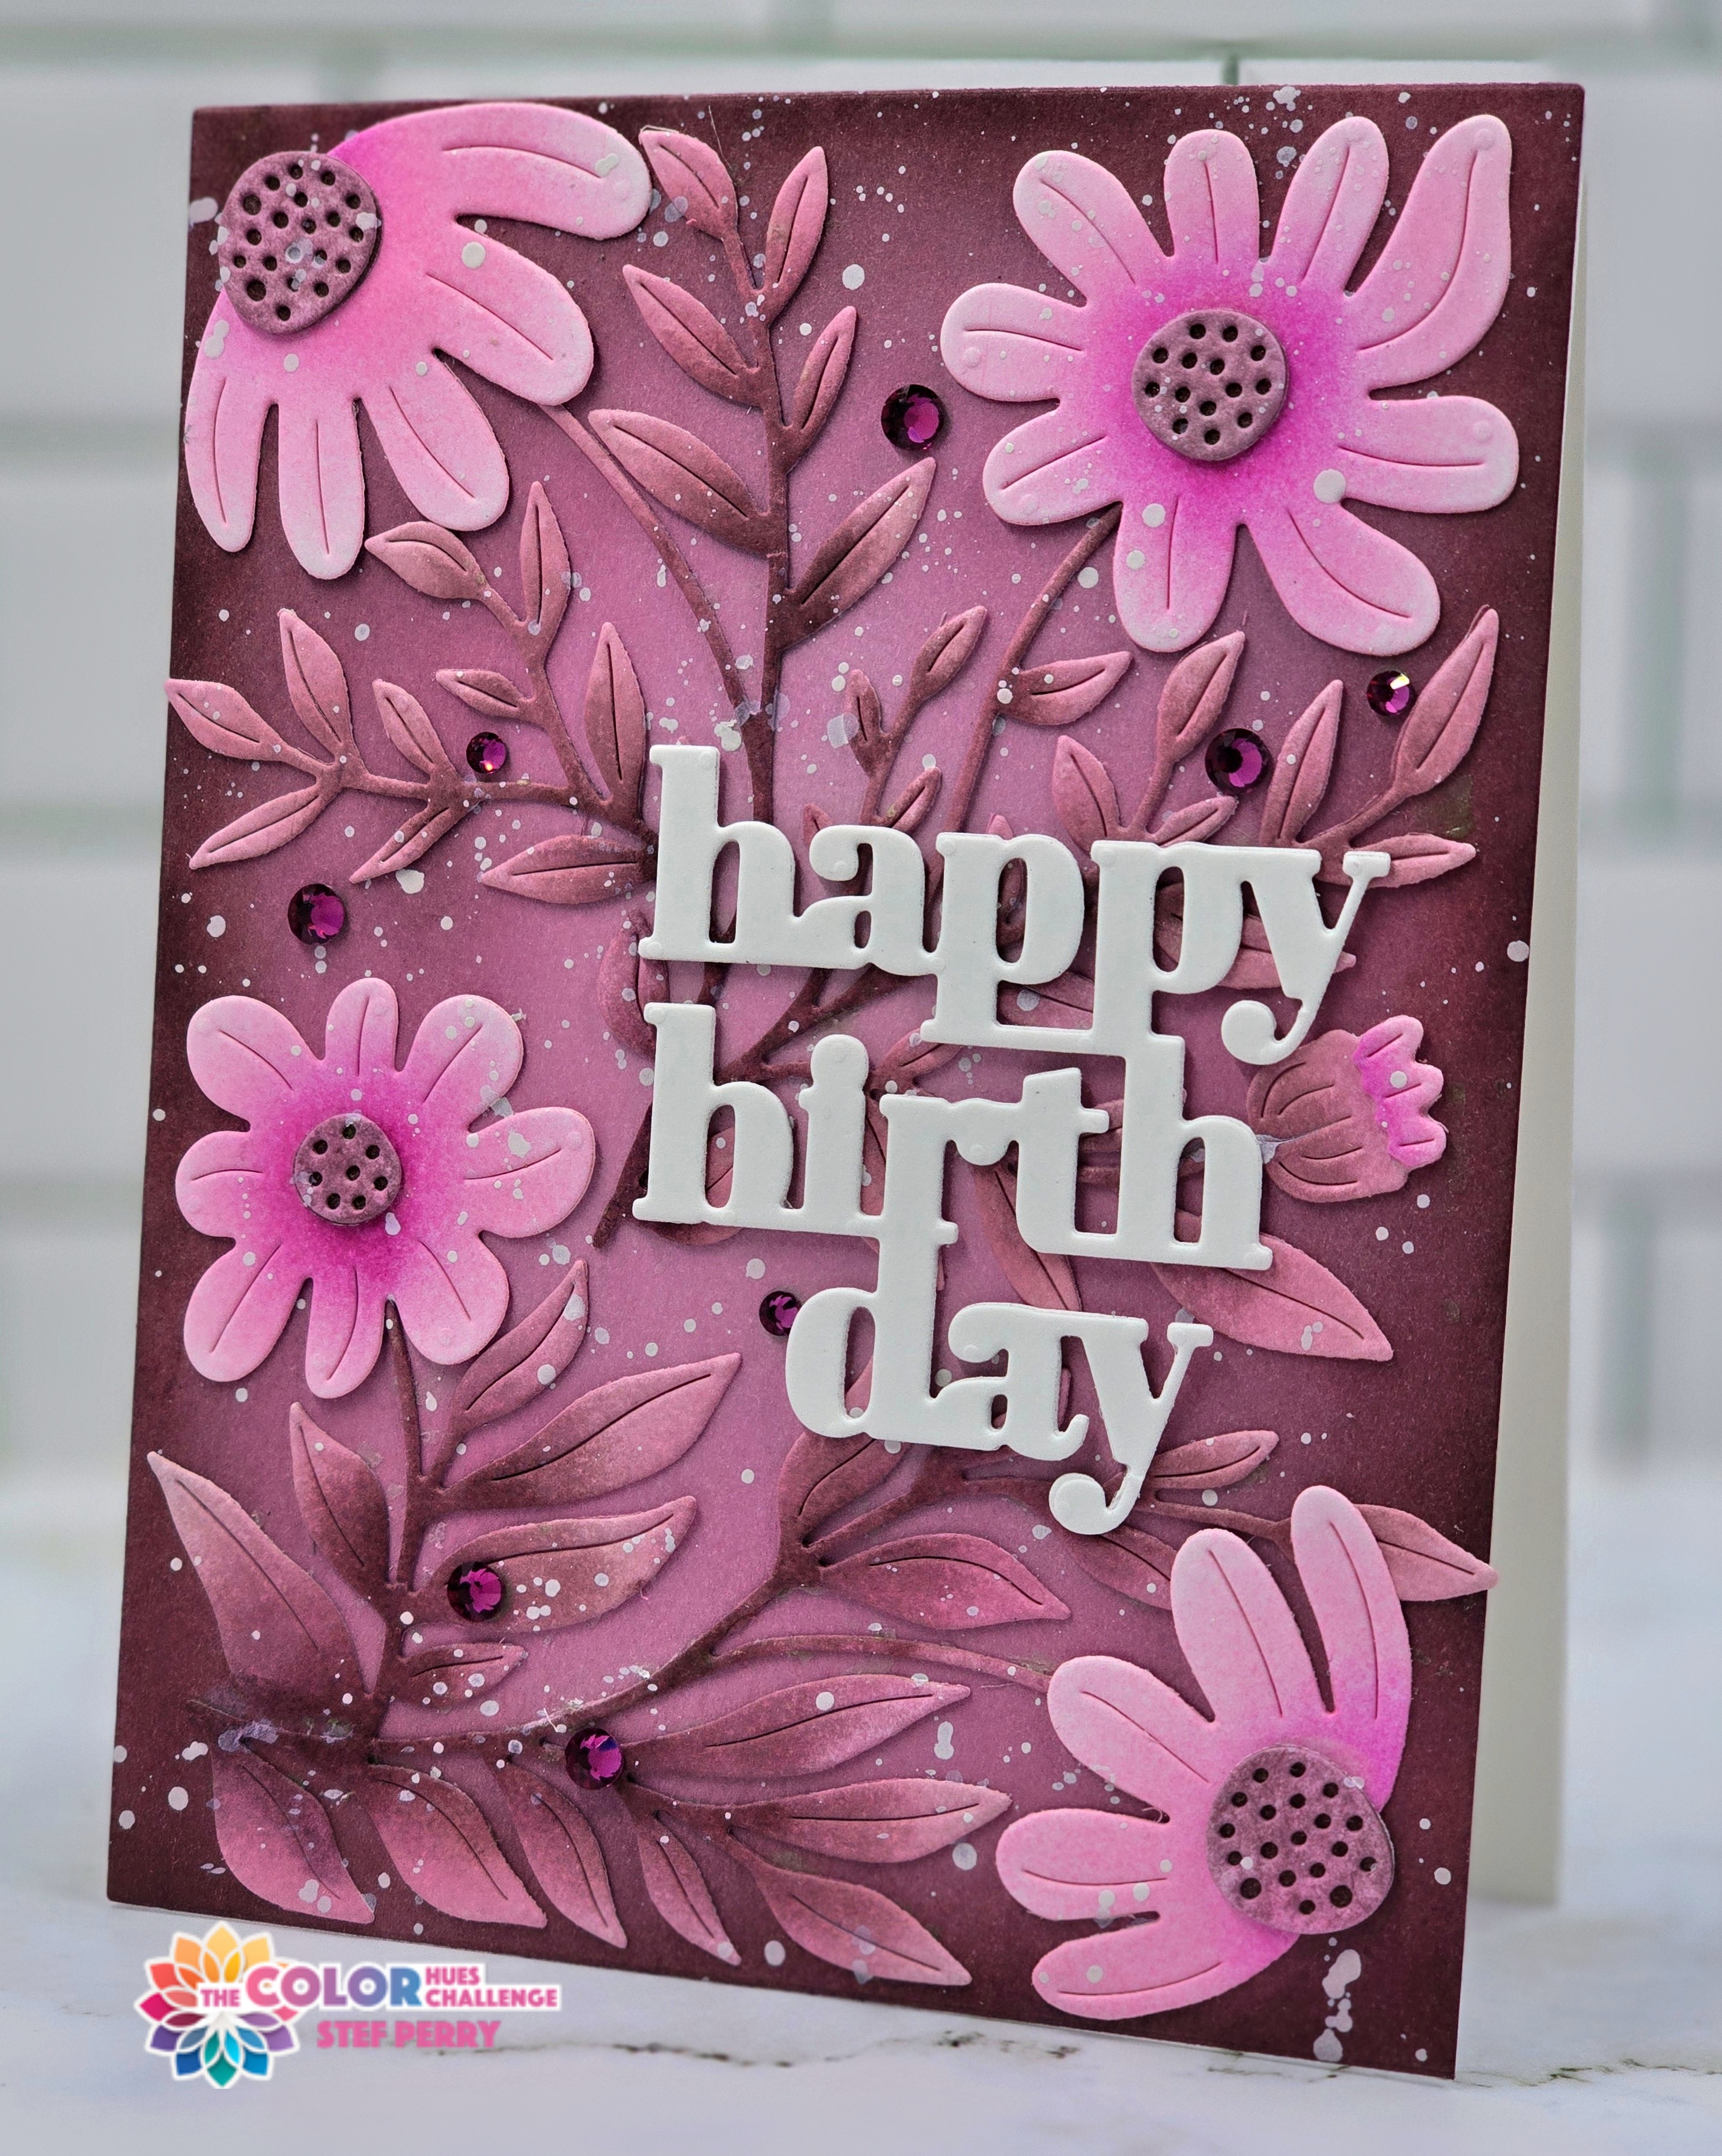
Great sketch with lots of potential, don't you think?  For my card, I pulled out an older favorite floral die and a newer sentiment die. 

I'm also joining in with my friends over at Just Us Girls since it is die week and my card is loaded with them.


Let's take a look!


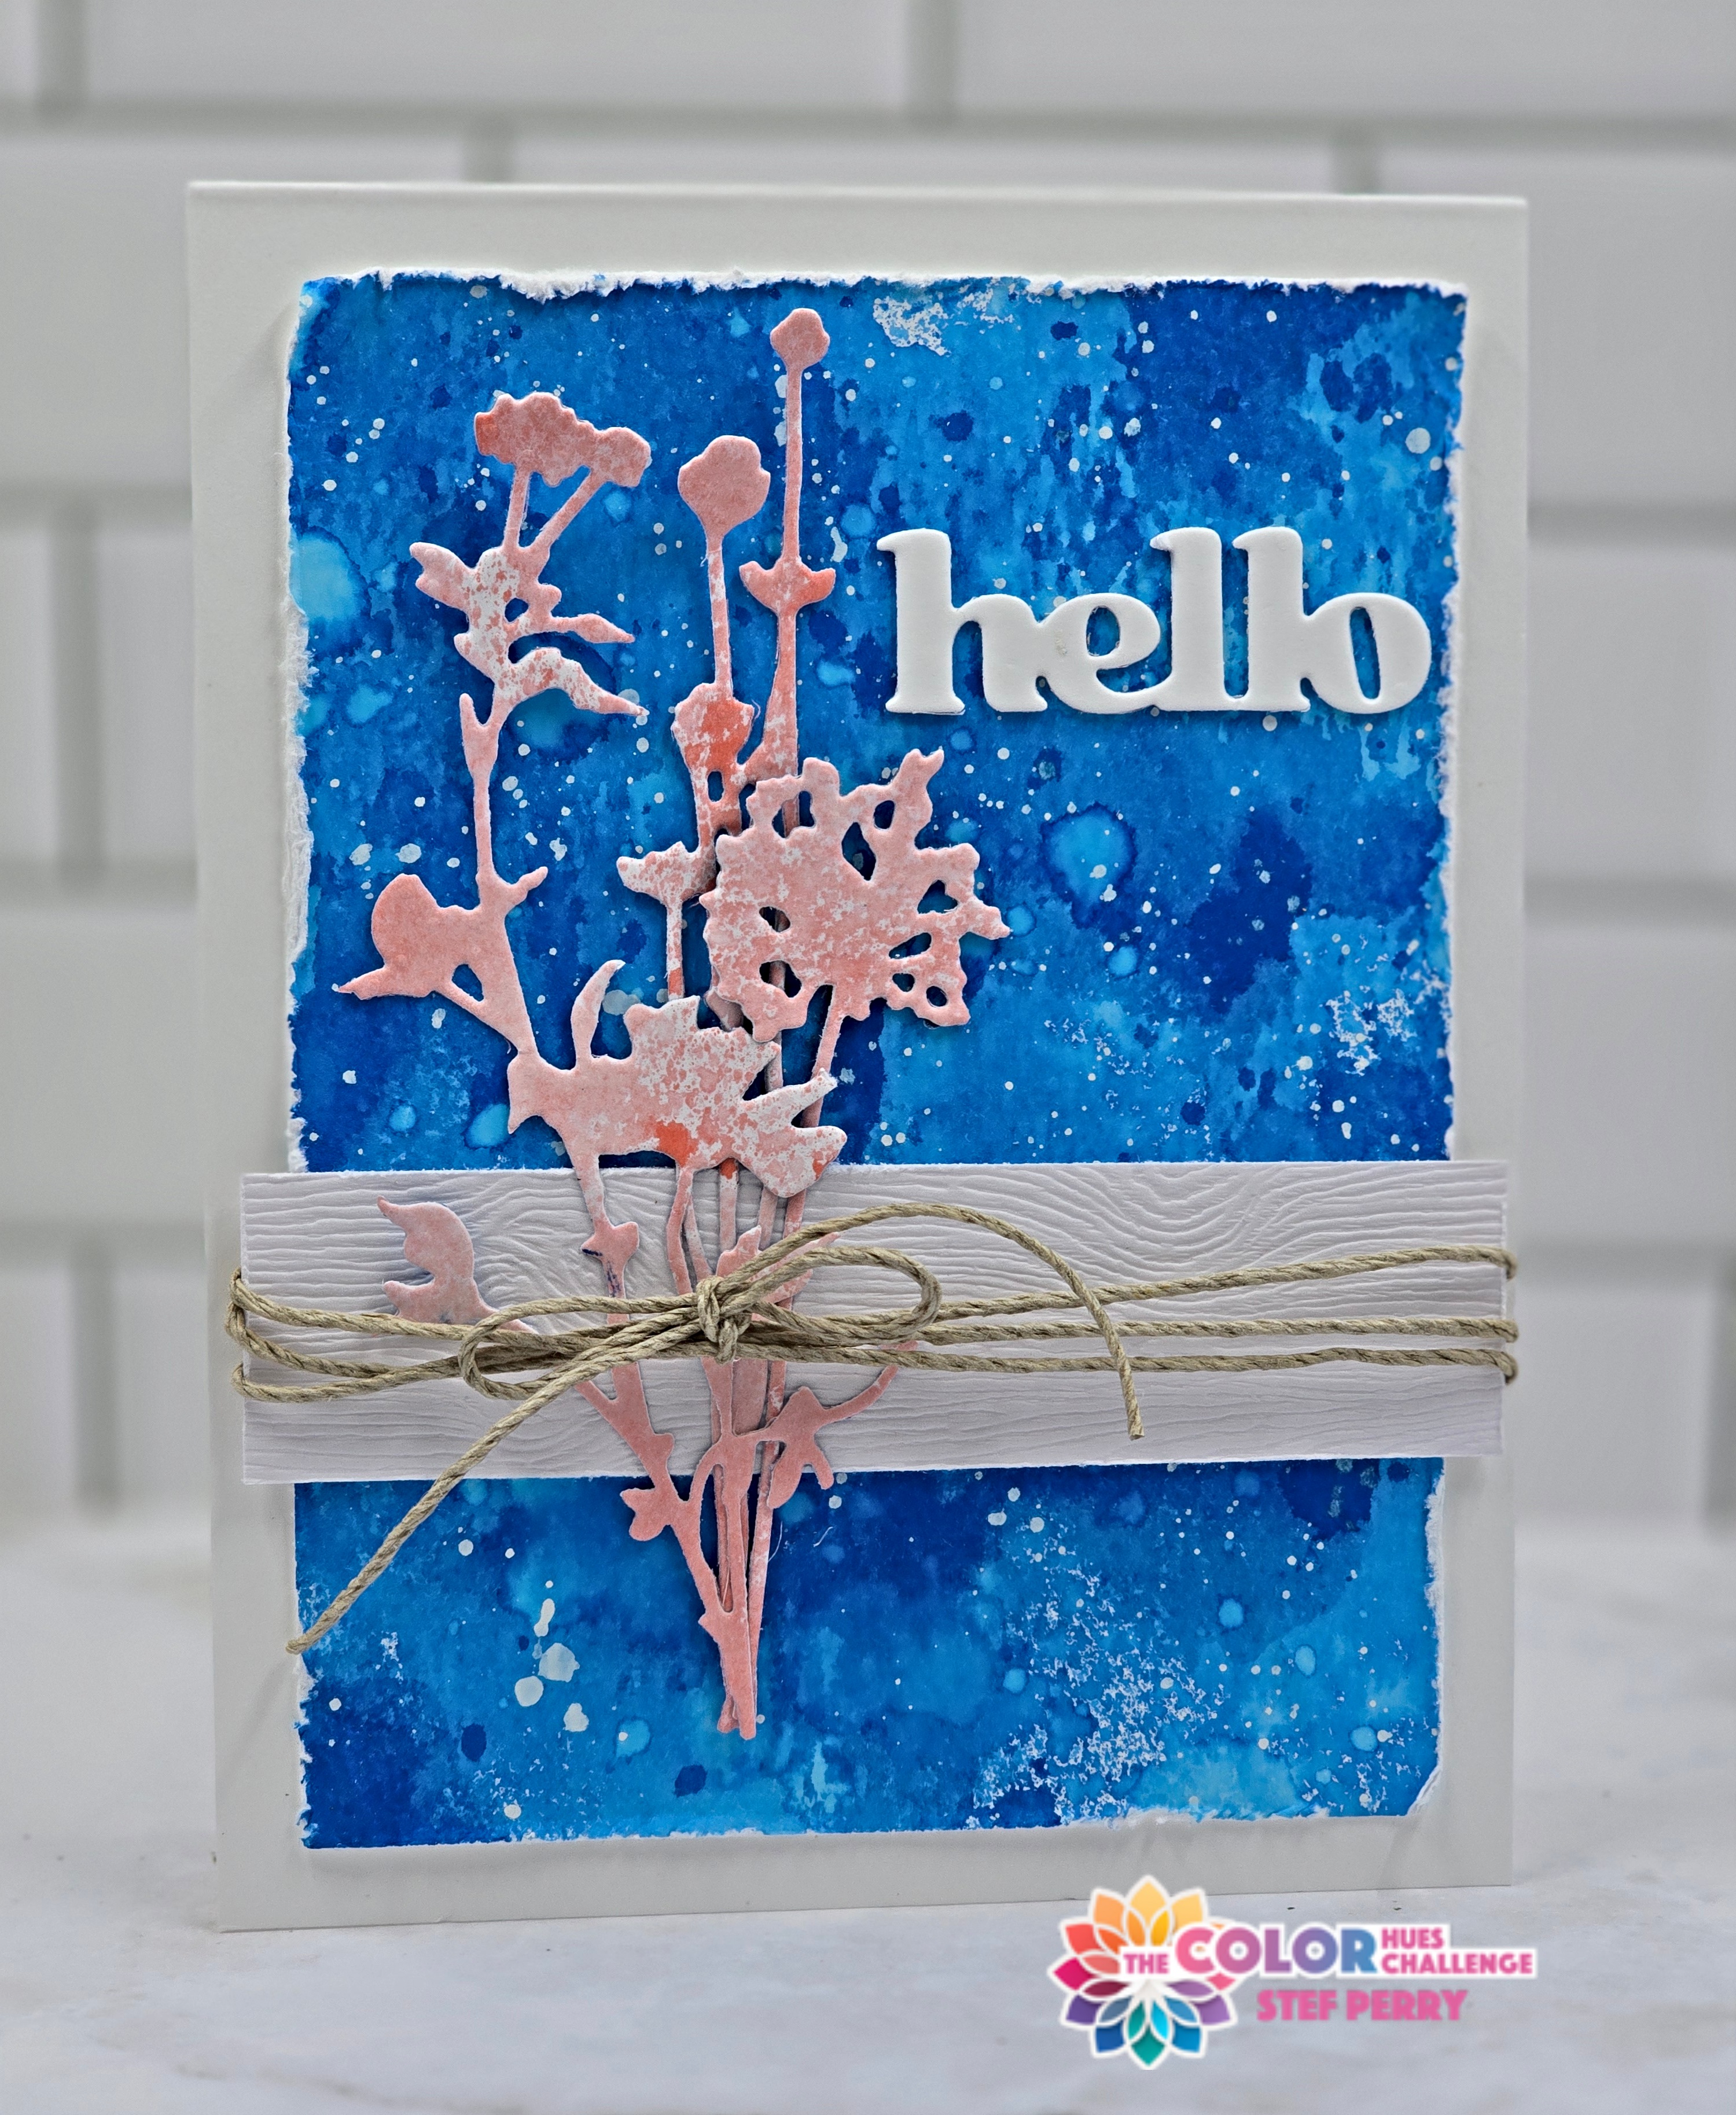
After I chose the floral and sentiment dies, I looked through my collection of cardstock and settled on a couple from Concord and 9th for the flower and one from Spellbinders (one of my new favs!).  After die cutting, I ink blended some shading on both the flower petal layers and the leaves, although that's mostly hidden.  The flower was put together then set aside as I worked on the sentiment and background.

An A2 panel of Blue Spruce was die cut with an Altenew frame die, ink blended with a dark blue and a dark teal around the edges, then adhered it to an A2 kraft panel.  After die cutting the sentiment and flower center from matte gold, all the elements were added to the card front.  I found some gold sequins that matched the metallic paper, and that finished things off.


What are you inspired to create with our sketch?  For more inspiration, I encourage you to visit the challenge blog, where my talented teammates have some amazing cards to share.  The challenge remains open until the 25th of the month; I hope to see your card in the gallery!

Thanks for stopping by!

Stef

  • Honey Bee Stamps Lovely Layers:  Coneflower
  • Altenew Timeless Sentiments 2 and Mix & Match Frames dies
  • C&9 Sprout and Nectar cardstock and Nectar and Grapefruit ink
  • Spellbinders Blue Spruce cardstock
  • Altenew Brushed Gold cardstock and gold sequins
  • Simon Says Stamp Limelicious, Pearfection, Ocean and Galaxy inks

Friday, August 1, 2025

Cozy Birdhouse for Color Hues

Hello friends!  The summer is sure cruising by and here it is, August 1st! Over at Color Hues we have a new challenge, this time hosted by the amazing Carol.  She has chosen a lovely combo of pink and gray.

Making a bunny with these colors definitely crossed my mind but instead I decided to use a couple of cute die sets to make a fun little scene.  Since the dies are new, I'll be linking up to Darnell's NBUS as well.

I started out by inking the background using a cloud stencil and a light pink ink on an A2 panel of white.


Next all the elements were die cut from white, which were colored with a variety of inks in pink, gray and brown.  For the sentiment, I took the inkpad direct to paper, let it dry overnight, then die cut it.  

I started creating the card front with the branch, which I layered on two additional die cuts, then wrapped some hemp twine on it before adding it to the top of the panel.  The twine was pulled taut, then I used a little tape to hold it in place.

Then came the birdhouse and fun little birdies.  I put the house together first, added foam tape to the back and positioned it so that the roof hid the taped twine.  The interior panel is also cut from the die but it's hard to get it exactly centered, so next time I think I'll create a slightly larger one.  After adding the birdies, the layered die cut sentiment was centered and I was done.


I encourage you to use the link above to see what my oh, so talented teammates have created with this color combination.  After seeing all that great inspiration, I hope you'll head off to your crafty space and join us!  The challenge will remain open until Thursday, August 14th at 3pm EDT.  

Thanks for visiting and take care!

Stef

  • Simon Says Stamp Birdies and Cozy Birdhouse die sets
  • MFT Mini Cloud Edges stencil*
  • MFT Hello There Dienamic set*
  • SSS Mocha Cappucino and Latte inks
  • Altenew Baby Pink, Pinkalicious, Rubellite, Idustrial Diamond and Pure Graphite inks

*Sadly, MFT has closed but I am guessing there may be products available online or other retailers.

Sunday, July 27, 2025

Through the Window Birthday

Hello friends!  Just popping in with second post today (you can find my Paper Players DT card here).  I haven't been playing along with challenges outside of my DT duties very often lately, so I decided to join in with a couple.

The toppings option at Seize the Birthday is to use your favorite color but my card doesn't amplify my favorite so I'm joining in the Anything Goes option.


I made this card a while ago for my dear SIL's birthday but never posted it and I thought it was a pretty one to share.  I used Altenew's House Plants, Boho Vases and Through the Window dies along with their Masonry Wall 3D embossing folder to create this little scene.  

I started by die cutting the window in a panel of white, then embossing it.  For the window scene, I just die some simple ink blending to create the sky and ground, adhered it behind the panel then added the dark gray window frame.  I used the same dark gray cardstock to create the big vase and backed the openings with a light blue scrap.  

The leaves were all die cut from white then ink blended with a trio of greens.  The pot was also ink blended with a light gray.  The wood shelf was cut from light brown cardstock, then I added shading with ink.  With everything added to the card, I finished things off with matte gold flower centers and a foiled sentiment.  This was a fun card to make - these dies are fabulous!


Thanks for taking time to stop by!  I'll be back at the end of the week with a new DT card for Color Hues.  In the meantime, take care!

Stef

  • Altenew Houseplants, Boho Vases and Through the Window dies
  • Altenew Masonry Wall 3d ef
  • Simon Says Stamp Wood Plank die
  • Spellbinders Fancy Sentiment Betterpress plate
  • Altenew Rhodolite, Silver Stone, Sea Breeze, Moss, Fresh Leaf and Lime inks

Sunday, July 6, 2025

For the Record for the Paper Players

Hello friends! Today begins a new challenge at the Paper Players and I am hosting this week, stepping in for the lovely Joanne so she could enjoy a well-deserved vacation.  She chose the theme of using circles on our cards.  Very easy to do, with sooo many ways to use circles.

I hit some crafty sales a couple of months ago and found the perfect stamp and die sets for this challenge, so I'll be sharing once again with Darnell over at NBUS #76 (which stands for Never Before Used Schtuff).


Isn't that a fun card?  All the stamps and dies are from Concord & 9th. I thought these were such a clever products that could be used for most ages.  

I started with the background stamp.  It's a rather clever design where you stamp it one direction then turn it 180 degrees then stamp it again to fill in the entire background.  I also used a little stamp around some of the records, which to me looks like the record player beneath of it. 

Next all the dies were cut, the sub-sentiment stamped, then everything added to the card front.  This card will be headed to my BIL next month but I think the products are generic enough to use for anyone. 


I'm looking forward to seeing all the gallery cards and how everyone chose to use circles.  I hope you'll join us this week, the challenge remains open until 3pm EDT Friday July 11th.  But before you dash off, please make a stop at the challenge blog where my talented teammates have used circles in a wide of array of designs.

Thanks for visiting and take care!

Stef

  • C & 9 For the Record stamps and dies
  • C & 9 Greatest Hits stamp
  • C & 9 Oceanside and Sunflower cardstocks
  • Altenew Aqualicious and Lemonade Stand inks

Monday, June 16, 2025

Wildflower Hello for Color Hues

Hello friends!  We have a new challenge at Color Hues and this time I am hosting.  I love this color combo and, as my talented teammates and our wonderful Guest Designer Teresa have demonstrated over at the challenge, it can be used for many different types of designs.


I decided to use some Distress products that I have long neglected for my card.  I watched a Tim Holtz Live video and was soooo inspired.  Although I only used a very simple technique with sprays for my card, the video gave me many more ideas I hope to use in the future.  I based my card layout on one by a Sizzix maker that Tim shared during the live.


I started with two A2 panels of Distress watercolor paper, textured side up.  On one I used Saltwater Taffy Distress Spray Stain, which is a nice pinky peach, and on the other used Salty Ocean.  I did the spray, water and dry method on both then repeated it a couple more times with the Salty Ocean, also smooshing color from my glass board mat.  To finish the Salty Ocean panel, I added splatter using the Distress spray along with water and white paint.  

When the panels were dry, the cobalt one was trimmed down then I used a distressing tool all around the edges.  I found a strip of white woodgrain cardstock to anchor the die cut wildflowers and then wrapped hemp twine all around before adhering everything to the card base.  The sentiment was layered three time the added to the card front.  


Thank you for visiting today and I do hope you'll join us for this challenge.  For further ideas and inspiration, I encourage you to visit the blog.  The challenge will remain open until Sunday, June 29th at 3pm EDT.  Hope to see you there!

Stef

  • Tim Holtz/Sizzix Wildflowers #1 dies
  • Altenew Versatile Greetings die
  • Ellen Hutson Woodgrain cardstock
  • Spellbinders Splatter White paint

Sunday, June 15, 2025

Paper Posy Birthday for The Flower Challenge

Hello friends!  I'm back with a new card for our reminder post at The Flower Challenge.  This month we're using embossing on our floral cards.

I'm also playing along with the SSS Wednesday Challenge where are cards are to feature fur, feathers or flowers, along with the AG portion of the challenge at Seize the Birthday.


For my first card this month I added dry embossing to the background. This time I added dry embossing to both the card background and to some of the flowers and leaves.


I used the relatively new Paper Posy set from Concord & 9th, which includes an embossing folder to use with some of the flowers and leaves.  All the elements for the floral spray were cut from Spellbinders gorgeous cardstock, with the exception of the yellow and white flower centers.  

After die cutting, I used the embossing folders on the dark green leaves and the petals of the largest flower, then assembled the spray on a panel embossed with Spellbinders Tiny Dots folder.  The sentiment and the label die are from the same set.  I referenced the packaging for some of my flower and leaf colors, along with arrangement, which I altered to fit the 5" square card and include the sentiment.  It's such a cute set with lots of ways to use some or all the elements.  I did notice that I neglected to add gems to the small flower centers, so I'll do that before sending.


Thank you for stopping by and I hope you'll take a moment to visit the challenge; as always my talented teammates have some amazing inspiration for you.  I also hope you'll join us if you haven't yet or add a second card to the gallery, if you have already joined in.  Plenty of time left, the challenge ends Wednesday, June 25th.  

Take care!

Stef

  • C&9th Paper Posy stamp, die and embossing folder set
  • Spellbinders Sicily, Coral, Bellini, Rainforest, Fern, Blue Spruce and Breeze cardstocks
  • C&9th Sunflower cardstock
  • Spellbinders Tiny Dots ef

Friday, May 16, 2025

Plum Happy for Color Hues

Hello friends!  We're at mid-month and that means brings us to a new Color Hues challenge.  This time, the amazing Karen is hosting and has chosen a wonderful pairing.

For my card, I went back to a die set that I used earlier this year for another CH challenge.  I saw a video here by Kelly Taylor using this die set and two others to create monochromatic cards and although we have two colors, it worked just the way I hoped it would.


I used Bristol paper for the background and all the flowers and leaves, which makes ink blending a little smoother.  Four inks from the Altenew Sugarplums set were used on the background and leaves.  I inked the background with the darkest shades around the outside of the panel, then did the reverse for the leaves, darker at the stem and lighter towards the end of the leaves.

The plums are very desaturated in color. I found some pinks for the flowers that I thought would play nice with the plums but the colors were just bit too bright.  Soooo, I took the second lightest of the three pinks and basically color glazed everything that was plum and it made all the difference.  

To finish things off, the panel was splattered with white paint and when dry, the die cut sentiment and a few sparkly gems were added.


Be sure to head over to the blog where my talented teammates and our lovely guest Rachel have some fabulous cards in a variety of designs for your inspiration.  I hope you'll join us for this challenge, it will remain open until 9am EDT Thursday, May 29th.  See you there!

Stef

On a personal note, earlier this month I traveled to spend a week visiting family and close friends that I hadn't seen in two years (and 8 years since I'd seen one cousin).  It just reminded me that time passes so quickly, that we all need to take every opportunity to be with the ones we love. 

  • Spellbinders Fresh Picked Daisies die set
  • Simon Says Stamp Basic Box Card Happy Birthday die
  • Altenew Baby Pink, Puffy Heart, Purple Wine, Pale Mauve, Amethyst, Grape Agate and Plum inks
  • SSS Taffy Dazzling Gems
  • Spellbinders Splatter White Opaque Watercolor paint

Sunday, May 11, 2025

Meadow Swag Birthday for the Paper Players

Hello friends!  It's time for a new color challenge at the Paper Players and this week the lovely and talented Ann is our host and has chosen a beautiful color trio.

My card uses no stamping, just stenciling, die cuts and foiling.


I didn't have cardstock that was an exact match for the SU colors but I found pieces that were close.  The swag is actually made from two die sets.  After cutting from cardstock, I used a bit of ink blending to create some shading, but in the photos it's really noticeable on the pink flowers.

Next, a panel of white was stenciled with a light ink, with some areas darker than others.  The panel was added to a card base, then the swag was adhered after layering on the flowers and berries.  The sentiment is one created during a previous foiling session.  It's foiled in black, which gives it a shiny appearance.  Easy peasy card, but I think the sentiment font and the stenciling really step it up.


Please head over to the blog where my talented teammates have some wonderful inspiration for you, and hopefully you'll join us this week.  The challenge remains open until 3pm, Friday May 16th.

Thanks for stopping by and take care!

Stef

  • Simon Says Stamp Meadow Swag and Lush Leaves dies
  • Altenew Cascading Elegance stencil
  • Your Are Everything BetterPress sentiment set

Sunday, April 27, 2025

Warm and Merry Christmas for the Paper Players

Hello friends!  For the final Sunday of the month, the Paper Players brings you a sketch challenge!  This time the lovely Claire has created a highly versatile sketch.


I decided to add to my holiday card stash using this sketch and a cute die set that I bought and never used last year.  Time to change that!


I started by putting together the Old Fashioned Rocking Horse die from Honey Bee Stamps.  It has multiple little layers, but my handy reverse tweezers helped me when attaching them.  The rocking horse was added to the white scallop circle, which was then matted on a gold circle before adding to the card.  Here's a close up of the rocking horse:


I love all the embossed texture and the well though-out details.  The patterned papers are also from Honey Bee and the sentiment is from a retired packet of pre-foiled holiday sentiments.  The card ended up being A7 because it was more proportional to the rocking horse and circles.


Thanks so much for visiting!  I hope you'll join us this week and show what you're inspired to make with this great sketch.  In the meantime, for more ideas, head over to the challenge where my talented teammates have some great examples to share!  The challenge remains open until Friday, May 2nd at 3pm EDT.  

Take care!

Stef

  • HBS Old Fashioned Rocking Horse die set
  • Hero Arts Nested Circle and Scallop Circle dies
  • Spellbinders A7 Matting die
  • HBS Gingerbread Village patterned paper

Sunday, March 16, 2025

Hugs for Color Hues

Hello friends!  I'm here today with my card for the new challenge at Color Hues.  This time the lovely Julie is hosting and has chosen wonderful pair of colors.

I'm also sharing over at Just Us Girls, where Bobby has chose the word green for their word week challenge.


My intention in the new year was to limit buying of crafty products but this die set was too fun to resist.


I can't grow them but I sure have fun creating them with paper!  I chose three shades of lime-y cardstock along with yellows for the flowers and grays for the pot.  I then ink blended each die cut to create a bit of dimension, then put everything together to create my hanging houseplant!

When my husband and I bought our current home a few years ago, we were delighted that it had nicely textured walls and that's what inspired me to emulate it with an embossing folder.  I used a rectangle die to cut the white panel before embossing it.  I layered it on a panel of the same yellow that was used for the flowers, then "hung" the house plant and added the sentiment, which is part of the die set.  Lastly, I added a gold pearl as a "hanger".  


What does this color pairing bring to mind to you?  For more inspiration, head on over to the challenge (link above) where my super talented teammates and Guest Designer Michele have their lovely creations to share with you.  The challenge remains open until Saturday March 29th at 9am EDT and I hope you will join us!

Thanks for visiting and take care!

Stef

  • Altenew Houseplants Layering die set
  • Spellbinders A2 Matting Basics Rectangle die
  • Stampin' Up Painted Texture 3D embossing folder (retired)
  • Altenew Honey Drizzle, Lime, Moss and Silverstone inks


Saturday, March 15, 2025

Especially for You for The Flower Challenge

Hello friends!  We're halfway through the month and I'm back with my reminder card for The Flower Challenge.  This month, along with florals, we're adding circles to our cards. And because it's our 100th challenge, there are prizes to be won! 

I'm also joining the Anything Goes option at Seize the Birthday.


This time I opted for a pretty die cut floral that needed a little love, since it's been a long time since I last used it.


I started with the embossed background and used a large blending brush to softly add some light green to the raised areas of the panel.  It's not easy to see in the photos but it's there.  Then I trimmed the panel down to leave a nice frame around it from the A7 card base.

The flowers were die cut from white cardstock, then ink blended.  I really love the peachy colors with the muted greens and the metallic gold center.  A white circle was added as a landing spot for the die cut flowers then before adding the foiled sentiment, I splattered the card front with gold metallic paint. 


So many ways to add circles, what is your favorite?  I hope you'll show us by posting your card to the gallery!  The challenge is open until Tuesday March 25th, so there's plenty of time to join in.  I encourage you to visit the challenge blog (linked above) to see what my super talented teammates have created to inspire you and get all the info about the prizes to be won.

Thanks for stopping by and take care!

Stef

  • Simon Says Stamp Divine Peony dies
  • Spellbinders Origami Folds embossing folder
  • Pinkfresh Studio Folk Edge Circle die
  • Spellbinders More Sentiments Foilplate and die
  • SSS Cabbage, Artichoke and Kale inks
  • Altenew Peachy Glow, Golden Honeycomb, Amber Blaze and Melted Butterscotch inks
  • Gansi Tambi Starry Colors gold metallic paint

Saturday, March 1, 2025

Especially For Color Hues

Hello friends!  Here we are at the first of March and we have a new challenge for you at Color Hues.  This time the amazing Carol is hosting and has chosen a lovely color combo as we edge closer to Spring.

I'm also sharing over at Seize the Birthday, where my CH teammate Jules is hosting with a toppings theme of No Stamping.  I used dies and a foiled sentiment on my card.


Today I have another one of the modern floral die cuts to share, this time it's one from Spellbinders.


The leafy vines were die cut from sage cardstock, then I used Copic markers to add shading.  For the flowers, I added a light of amount of shading before adhering the matte gold centers.

Next came the background.  For that a panel of Neenah Natural White was die cut with the Simon Says Stamp Double Plaid Cover die.  It's an off white paper and stands out a little more against the white card base, and I like that the die cut looks like a trellis.  The floral die cuts were adhered to the card, then the sentiment and some sparkly gold gems were added to finish things off.


What are you inspired to create with these two colors?  If you need more ideas, then pop over to the challenge (linked above) where my immensely talented teammates and wonderful guest designer Nance have loads of beautiful cards to inspire you!  The challenge remains open until Friday, March 14th at 9 am EST and I hope you'll take time to join us!

Thanks for visiting and take care!

Stef

  • Spellbinders Fresh Picked Daisies die set
  • SSS Double Plaid Cover die
  • Spellbinders Fancy Sentiments Press Plate 
  • SSS Sage and Matte Gold cardstock
  • Honey Bee Stamps Marvelous Moments gems
  • Copics - YG67, 45, 41, W1


Sunday, February 16, 2025

Whimsical Flower Vine for Color Hues

Hello friends!  Yes, a second post for me today because it's time for a new challenge at Color Hues. (If you're here for my DT post for the Paper Players, you can find it here)  The amazing Bonnie is hosting this week and has chosen the color combo of coral and yellow.

I love nearly all colors, but I have to admit coral is a bit of a struggle for me, and I have no idea why.  But nevertheless, I made a fun little card using my default - flowers!


Last fall I'd purchased a couple of these modern floral design die sets and thought I'd use this one from Altenew (watch for the other one from Spellbinders, it will be coming soon!).  It certainly was easy to put together once the die cutting was complete and I added it to a panel where I'd inked up a bit of light yellow ink blending so the white leaves would be more visible.  But the card needed a little somethin' somethin' since die cut doesn't fill a full card front, so I layered up a frame and the helped a lot.

Since the frame was black I thought a black sentiment strip would work well along with a few black enamel dots.  But still...it needed something more, so I added the Baker's Twine and called it good!  


We'd love to have you join us for Bonnie's challenge and I encourage you to visit the challenge blog for loads of wonderful inspiration from my very talented teammates and our guest designer,  Teresa.  The challenge remains open until Thursday 2/27 at 9 am EST.  I do hope you'll play along!

Thanks for stopping by and take care!

Stef

  • Altenew Whimsical Flower Vine and Picture Frames dies
  • Simon Says Stamp sentiment strip
  • Concord & 9th Sorbet cardstock
  • SSS Lemon Chiffon cardstock
  • Altenew Lemon Ice ink
  • Altenew Essential Black and White enamel dots

Sunday, February 9, 2025

Flamazing Day for The Paper Players

Hello friends!  I'm back with my card for this week's challenge at the Paper Players.  It's color week and LeAnne has chosen a beautiful combination that offers lots of options for creativity.

What immediately leapt to my mind with these colors was a tropical scene of some kind and below is what I came up with.  I didn't have all the papers and/or inks in these colors, so I tried to come as close as possible. 


As soon as I saw Flirty Flamingo as one of the colors, I knew I had to use this fun flamingo die from Ellen Hutson.  It was cut from Flirty Flamingo cardstock, then I used a bit of ink blending on the body and top wing but it doesn't show up well in the photo.  I cut a second flamingo from white, colored the legs with yellow Olo markers, removed the pink legs and added the pink body to the white die cut.  The beak was cut from white and colored the same as the legs, then the black die cut piece was layered on top.

The arch panel was ink blended with Distress Inks to simulate a beach scene, then I stamped the sentiment and added the flamingo.  I used a tropical leaf die that had a larger and smaller leaf, cutting it four times from what I think is Coastal Cabana cardstock, used some Distress inks for shading, adhered them around the edges of a white panel, then added the beach layer.  This really was an easy card to make thanks to all the dies and using some colored cardstock.


Thanks for stopping by and I hope you'll do the same over at the challenge blog (linked above) where my talented teammates have some wonderful inspiration for you!  The challenge will remain open until Friday, Feb 14th at 3 pm EST.  Hope to see your card in the gallery!

Stef

  • Ellen Hutson Flockstar die and Inner Flamingo sentiment stamp
  • Simon Says Stamp Tropical Leaf Bunch die
  • SSS Nested Domed Arches die
  • Evergreen Bough, Peacock Feathers, Squeezed Lemonade and Antique Linen Distress Inks
  • SU Flirty Flamingo and Coastal Cabana (?) cardstock