Wednesday, December 28, 2016

Little Star

Hi there!  I thought I would quickly slip in tonight and post a card I made with the new Moon Baby stamp set, available in the upcoming Stampin' Up! Occasions catalogue.  I'm in love with the sweet images in this set and hope to make some more cards with it soon.  I've used the current sketch from Freshly Made Sketches for my card layout.  I'm also entering it in the current challenge at Stamp Ink Paper, where the theme is Anything But Christmas.


I had this idea of creating a sky behind the baby on the moon and decided I would sponge it with Distress inks.  I began with a panel of watercolor paper, used a liquid mask over the parts that I wanted to keep clear of ink and sponged away.  However, after everything dried and I peeled off the mask, it also peeled off pieces of the watercolor paper!!  So, the next step was to stamp the baby and moon image on a separate piece of card stock, which I water colored with Distress inks, fussy cut and mounted with tape foam on the sponged panel.


Picking up on the lilac colored sleeper and the Dusty Concord in the background, the retired Blackberry Bliss and Pale Plum card stock seemed to work nicely for the vertical panel and base, respectively.  I used the Stars embossing folder on the Blackberry panel, then painted Clear Wink of Stella on the raised images. 


That image just makes my heart happy (must be part of being a grandma or something) and I loved water coloring it.  I realize this scene is probably not as "clean" as the FMS team is seeking for the challenge but I hope it's not a disqualifier for the challenge!  😉 

Sorry, not too many other details about the water coloring and sponging, or the embellishments but I've listed all the products used down below.  I've also added links above to both challenges, so be sure to head over to them and check out all the amazing inspiration!!

Have a great remainder of the week and of course, Happy New Year this weekend!

Stef


Product details
Stamps:  Moon Baby
Paper:  Pale Plum, Blackberry Bliss, Watercolor
Ink:  Versafine Onyx Black; Ranger Distress Inks:  Tumbled Glass, Mermaid Lagoon, Chipped Sapphire, Dusty Concord, Shaded Lilac, Scattered Straw, Dried Marigold, Spun Sugar, Tombow 850 marker (skin tone)
Other:  Fancy Frost Sequin; Pretty Pink Posh Clear Droplets, 3MM Sparkling Clear and Wisteria Blossom Mix Sequins, Star embossing folder, Clear Wink of Stella

Sunday, December 25, 2016

The Last Christmas Cards of 2016

Hi there friends!  Merry Christmas and Happy Hanukkah...and Happy Festivus for the rest LOL!  I hope your holidays have been wonderful.  My daughter and her family joined us yesterday and we had lots of fun, then today my husband and I enjoyed a quiet day together.  Tonight I thought I would share the final two Christmas cards I made this year.

The first card was made with the cute Holiday Home stamp set from Stampin' Up! that came out a couple of years ago.  The variety of stamps are amazing for making cute scenes like this one.  I started by taking a small panel of Neenah Solar White card stock, stamping the stars and Santa in Versamark and Versafine Onyx Black inks, respectively, heat embossed with clear embossing powder, then sponging the sky with various Distress inks (listed below).  I hand cut the snowy hills from white card stock, then stamped that cute little snowman.


The little house was colored using a Blender pen, using Abandoned Coral for the door, Worn Lipstick for the frames and chimney, and Hickory Smoke for the roof.  I added Scattered Straw to brighten up the window interiors.  The string of lights stamp was first stamped in Mowed Lawn, then went over the "string" with a Basic Black marker.  It was then die cut with the matching Homemade Holiday Framelit and mounted on foam tape. 

Next I created the frame from a panel of Riding Hood Red card stock that was cut in the middle with a Wafer Stitched Rectangle from Simon Says Stamp, the frame then adhered to the white card stock base, and then the inked panel centered in the middle and mounted with foam tape.  The sentiment is from the old tried and true Teeny Tiny Wishes stamp set and was punched out with the Word Window punch.  Snow flakes from Frosted Sequins were the final addition.


The next card was made without any stamps.  Starting with a panel of Crumb Cake card stock and using the Tim Holtz Woodland Stencil, Pineneedles and Peeled Paint Distress inked up the stencil fir trees, adding a bit of Ground Espresso for the tree trunks.  After letting that thoroughly dry, I took a tool and smoothed embossing paste over different images of the same stencil to create snow on the trees.  I removed the stencil and added snow drifts underneath the trees, then covered all the embossing paste with Dazzling Diamond Glitter before it all dried.  I've based my card largely on the design of this gorgeous card from Kristina Werner, who first presented it as part of her Holiday Card series (Holiday Card Series - Day 16).  In her video she indicates that the Distress inks will seep into the embossing paste, but I forgot about that when making my card, and of course it happened.  So, to cover up the rather greenish tint of the "snow" on the trees, I took a small paint brush and added some Ranger Pearl Metallic Paint, which pretty much took care of that problem.  Evidently, using Tim Holtz Grit Paste eliminates this problem.  So maybe for next time...


Isn't that pretty with all the glitter and metallic paint?  After everything dried, I used a white gel pen to add snowflakes in the background, die cut the sentiment from Dazzling Diamonds glitter paper and adhered to the panel, then mounted the panel with foam tape onto a Crumb Cake card stock base that was sponged with Craft Whisper White pigment ink around the edges.


Thanks so much for looking - as always, your visit and comments are so appreciated.  I hope to be back in the next few days with another card to share. 

Stef


Holiday Wishes
Stamps:  Holiday Home, Teeny Tiny Wishes
Paper:  Neenah Solar White, Riding Hood Red
Ink:  Versafine Onyx Black, Versamark, Chipped Safire, Mermaid Lagoon, Tumbled Glass, Abandoned Coral, Worn Lipstick, Hickory Smoke, Mowed Lawn, Scattered Straw
Other:  Homemade Holiday Framelit, Clear Stampin' Emboss Powder, Basic Black marker, Wafer Stitched Rectangle, Frosted Sequins, Word Window punch

Peaceful Pines
Stamps:  None
Paper:  Crumb Cake, Dazzling Diamonds Glitter Paper
Ink:  Pineneedles, Peeled Paint, Ground Espresso, Craft Whisper White
Other:  Tim Holtz Woodland Stencil, Stampendous Dreamweaver Embossing Paste, Dazzling Diamonds Glitter, Ranger Pearl Metallic Paint, Christmas Greetings Framelit

Saturday, December 17, 2016

Beautiful You

Hi there!  Hope you're having a great weekend and have all of your holiday chores out of the way.  I still have some last minute shopping to do and I'm hoping the snow we've had two weeks in a row is finally done, so I can finish up!

On the positive side, I had time to play with the new Beautiful You stamp set that will be available in January as part of the upcoming Stampin' Up! Occasions catalogue.  I fell in love with the images and the wonderful sentiments, especially the ones I've included in the card today.  I've used the sketch from the current challenge at Freshly Made Sketches for my card layout.


Starting with a small panel of water color paper, I stamped the image and then colored it with the new Stampin' Up Watercolor pencils and a Blender Pen.  I used Bermuda Bay for her dress, Daffodil Delight for her hat and added a little Old Olive for the ground.  Because there are only 16 watercolor pencils, your color choices are somewhat limited, so I ended up using Blushing Bride ink for her skin and Soft Sky ink in the background.

I absolutely love this dancing woman.  She exudes such Joie de Vivre, I find the image very uplifting.  I think maybe because that French phrase popped into my head, I subconsciously decided to use the retired En Francais background stamp on the Soft Sky card base.  ;-) 


After stamping the sentiment, I adhered a small piece of Daffodil Delight 1/8" Grosgrain ribbon to the bottom of the panel but it looked rather plain, so I added some white Baker's Twine and tied a little bow.  Of course I had to finish with some sequins!

Thanks so much for visiting!  I've added a link above to the challenge, so be sure to pop over there and check out all the gorgeous inspiration.

Stef


Product details
Stamps:  Beautiful You, En Francais
Paper:  Soft Sky, watercolor
Ink:  Versafine Onyx Black, Soft Sky, Blushing Bride
Other:  Stampin' Up! Watercolor Pencils, Blender Pen, Daffodil Delight 1/8" Grosgrain ribbon, White Baker's Twine, White Gel Pen, Fancy Frost Sequins, Pretty Pink Post Sparkling Clear Sequins, Clear Wink of Stella

Thursday, December 15, 2016

Pop of Pink

Hello and welcome back!  I've made a clean and simple card for the current sketch challenge at Global Design Project. 


I broke out my new Watercolor Pencils and grabbed a stencil to create the background for the main panel of watercolor paper.  I scribbled the pencil in the stencil shapes, then used a paintbrush and clear water to activate the watercolor properties of the pencil.  I LOVE the result!


After I pulled away the stencil, the irregularities around the edges give it that "watercolor" effect, then I took the damp paintbrush and drew some of the color into the spaces between.  Once the panel was completely dried I added a strip of washi tape from the Pop of Pink collection.  Then I decided a bit of metallic was called for so I used a stamp from Timeless Textures to add some Encore Gold splotches over and around the hearts.  I also added a bit of the beautiful Gold Baker's Twine along the washi tape and used it to make a bow attaching the tag.


Thanks so much for taking time to visit!  I've added a link above to the Global Design Project challenge, so be sure to head over there and enjoy all the amazing inspiration.

Stef


Product details
Stamps:  Circle of Spring, Timeless Textures
Paper:  Watercolor, Thick Whisper White (base)
Ink:  Versamark, Encore Gold
Other:  Hearts & Stars Decorative Mask, Stampin' Up! Watercolor Pencil, Tags & Labels Framelit, Baker's Twine Trio Pack, watercolor paintbrush, Pop of Pink Designer Washi Tape

Peaceful Stag

Hi there!  I've made a card for the current challenge at Paper Players, where Jaydee has chosen the colors of Gold, Silver and Whisper White.


I've finished making Christmas cards for this year, but decided those beautiful metallic color would work perfectly for one, so I'll just hold onto it until next year.  I pulled out some long neglected Brushed Gold card stock that Stampin' Up! no longer carries and thought it would work beautifully with silver and white.  I ran it through the big shot with the Woodland embossing folder and love how it turned out!


I spotted an old favorite Christmas stamp set that hasn't seen the light of day in a few years and decided to use the beautiful stag silhouette by stamping it in Versamark and heat embossing with Pewter embossing powder.  After all these years, I still don't have Silver embossing powder because I've found the Pewter works fine (although my photo doesn't fully capture who shiny it is).  After die cutting and adding to the Silver Foil scallop circle, I fiddled around with how and where to add it to the embossed base.  I then decided to ground it atop Silver Baker's Twine wrapped around the gold panel.  Even thought the Baker's Twine isn't pure white, I thought it added a nice warmth.


I apologize for the photos, the metallics make it challenging to get a good picture.  I wanted the sentiment to be sparkly silver but I don't have Silver Glimmer paper either (!?) so I layered some silver metallic washi tape on a piece of card stock, die cut the sentiment and punched out the stars, then adhered the them among the trees and branches, centering the sentiment in between.  The finished panel was layered on a Thick Whisper White card base.

Thanks for visiting!  I've added a link to the Paper Player's challenge above, so be sure to head over there and enjoy all the beautiful inspiration.

Stef


Product details
Stamps:  Winter Post
Paper:  Whisper White, Thick Whisper White, Brushed Gold, Silver Foil
Ink:  Versamark
Other:  Silver Metallic Washi Tape, Christmas Greetings Thinlit, Layering Circles and Stitched Shapes Framelits, Silver Baker's Twine, Confetti Stars Border punch, Woodland embossing folder, Pewter Stampin' Emboss powder

Sunday, December 11, 2016

Peony Bouquet

Hi there!  Today the card I'm sharing with you was made for the current sketch challenge at Stamp Ink Paper.  I'm running right up to the deadline again, but that's mainly because my creative endeavors have been, um, disaster laden this week.  But I finally got a card finished and I'm pretty happy with how it turned out.


I recently purchased the beautiful stamp set Peony Bouquet from Altenew.  It's a multi-stamp image but I decided just to water color the outline image for the large flower and leaves rather than use the layers of stamps.  I need to play around with the layering a bit more and find colors that I like together.  So here's what I ended up with.


The images were heat embossed with white embossing powder then water colored with Abandoned Coral and Peeled Paint Distress inks.  I 💓💓💓 that coral color and the distress inks are really great to work with.  If you're familiar with this stamp set, then you may notice a flower petal was missing and instead a leaf is popping out in its place.  I had completed water coloring and was using the matching dies to cut out, with a piece of Post It tape to hold them in place and as I was getting ready to place the flower and leaves on the die cut circle realized one of the flower petals had green ink on it (!), which I think the tape transferred to it when I was die cutting them.  So then it was a matter of cutting off the petal and fussy cutting off the white edge left by the die.  Talk about making things hard on oneself!


The sentiment was stamped in Stampin' Up! Archival Basic Gray using my Misti so I could be sure it was not crooked and that it got good coverage by stamping it twice.  After adding the ribbon and twine and mounting the flower and die cut circle, I finished the card off with some Pretty Pink Posh sequins and clear dots.
 
Thanks so much for the visit!  I've added a link above to the SIP challenge, so be sure to head over there and check out all the beautiful inspiration.

Stef


Product details
Stamps:  Peony Bouquet, Painted Greetings (both Altenew)
Paper:  Neenah Solar White 80#, Tim Holtz Watercolor, Thick Whisper White (base under Neenah panel)
Ink:  Versamark, Abandoned Coral, Peeled Paint, Archival Basic Gray
Other:  Stitched Shapes Framelits (SU); Burlap Ribbon (SU); White Cotton Twine (SU); Pretty Pink Posh Sequins:  Sparkling Clear and Sweet Pea Mix, and Clear Droplets; Water color brushes, Misti, Paper Snips

Sunday, December 4, 2016

Flora Thanks and Hyacinth Birthday


Hi there and welcome back!  I haven't posted for a couple of weeks due to the holiday, family visit and just otherwise attending to other things.  But tonight I have two cards to share that I made as part of a birthday gift for a friend.  I've used the colors from Color Throwdown for both cards and the current challenge from Freshly Made Sketches for the first one that I will share with you.


I especially love this weeks colors for the CTD challenge (purple, aqua and green - my heart be still!)and that it would finally be the opportunity for me to use the fig stamp from the Fabulous Flora stamp set.  It is a Host set from the current annual Stampin' Up! catalogue.  I began by stamping the image in Versafine Onyx Black on Strathmore Mixed Media paper.  It's a pigment ink so I let it dry, then used a blender pen and Ranger Distress inks to color the flowers and fruit.  My husband tells me that figs are more of a dark ruby color, but I decided to use a little artistic license in my creation.  ;-)  Finally, I used Tempting Turquoise around the edge of the image.


Next, a piece of Textured Tempting Turquoise card stock (long retired) was die cut with a Layering Circles die then the floral image was adhered underneath with foam tape.  The sentiment was cut from Basic Black card stock with a die from Simon Says Stamp.  Once that was glued in place, I added a few sequins.  Pretty easy!

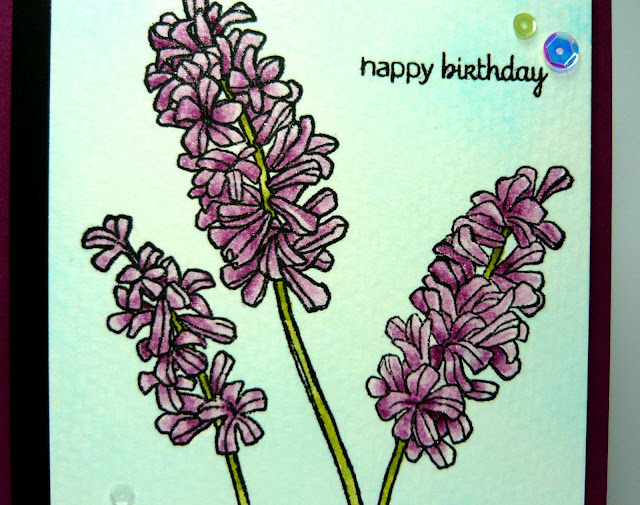
My second card uses the hyacinth image from the Helping Me Grow stamp set.  I really struggled with this image when I first got the stamp set.  I just could not get a good image despite inking well and found water coloring with reinkers and paint brushes was challenging due to the detail.  And I guess I'm enough of a control freak that I haven't comfortable with the water on water method of water coloring, where the color moves outside the image.  Since I first tried using this stamp I purchased a Misti, which has been the answer for me to stamping good images, and I decided to use a blender pen to color it rather than water coloring and that worked out great.


This image was colored with the same inks as the first card but this time I lightly sponged Tempting Turquoise in the background after using masking fluid to cover the flowers and stem.  The sentiment is from a sweet Verve stamp set that has a lovely variety of greetings.  Again a few sequins were added after mounting on a panel of black and a Rich Razzleberry card base.  The final touch was to apply clear Wink of Stella to the blossoms which you can see better in the next image.


Thanks for visiting and taking time to read this somewhat lengthy post.  I've added links to both challenges above, so be sure to head over to both and enjoy all the beautiful inspiration!

Stef


Product details
Card #1
Stamps:  Flora Thanks
Paper:  Whisper White, Textured Tempting Turquoise, Strathmore Mixed Media
Ink:  Versamark Onyx Black; Tempting Turquoise;  Distress:  Twisted Citron, Peeled Paint, Seedless Preserves
Other:  Layering Circles Framelits, Thanks Die (Simon Says Stamp), Pretty Pink Posh Sequins, Blender pen

Card #2
Stamps:  Helping Me Grow, Small Phrases (Verve)
Paper:  Rich Razzleberry, Basic Black, Watercolor
Ink:  Same as Card #1
Other:  Clear Wink of Stella, Pretty Pink Posh Sequins, Blender Pen, Ranger Blending Tool, Colourless Art Masking Fluid (Winsor & Newton), Misti

Sunday, November 20, 2016

Glitter Wishes

Hi there!  Hope you're having a great weekend!  I always say this every year, but I can't believe Thanksgiving is this week and Christmas not too far around the corner.  Crazy how the last part of the year always seems to speed by.  And with that comes the need for Christmas cards and I have one to share today that was made using the fun sketch at Freshly Made Sketches.  I'm also entering this into the current CAS Christmas Card challenge at The Paper Players.


I knew I wanted to use snowflakes for the circles but I couldn't decide how I wanted to do the background.  Then I saw a video on the Internet just yesterday where the person sprinkled glitter over embossing paste before it dried and I had my plan.  I pulled out the Seasonal Decorative Masks from the current holiday catalogue and used the mask with the different size circles to create the "snow" fall on half of the Whisper White panel.


The snowflakes were popped out of Dazzling Diamonds Glimmer paper with an old Martha Stewart punch, with foam tape then adhered underneath to layer them above the glittery dots.  For the fourth circle on the sketch I made a tag for the sentiment, using a Tags and Labels Framelit along with the banner Framelit included in the Circle Card Framelit set.  The Emerald Envy ribbon and silver cording finished it off.


This card came together in less than an hour - I love the efficiency of clean and simple cards (when everything works the first time, that is ha ha!).

Thanks for visiting today!  I've added a links to both challenges above, so be sure to head over there and see all the amazing inspiration!

Stef


Product details
Stamps:  Endless Wishes
Paper:  Thick Whisper White, Emerald Envy, Dazzling Details Glimmer paper
Ink:  Emerald Envy, Versamark
Other:  Seasonal Decorative Mask, Tags & Labels and Circle Card Framelits, Silky Taffeta Ribbon Combo, Silver Cording Trim, Dazzling Diamonds Glitter, Snowflake punch (MS), Dreamweaver Embossing Paste

Saturday, November 19, 2016

CAS Christmas

Hello friends!  Today I have a fun card that was an experiment which I think turned out nice.  I wanted to make a CAS Christmas card with a watercolor background.  I started out trying to use Koi Watercolors but I wasn't thrilled with the results (read:  Need More Practice!) so I opted to use some Distress inks and I was much happier with that.


I was inspired to make this card by three different challenges.  I used the sketch from Fusion Card Challenge, the colors from Just Us Girls, and the CAS concept from Stamp Ink Paper.


I swooned when I saw the JUGS colors of purple, teal and gold - perfect for a rich looking but untraditional Christmas card.  To start I heat embossed the snowflake and sentiment with gold embossing powder on a panel of water color paper.  Then, for the background, I mixed some Dusty Concord with Seedless Preserves, and used a nice wet brush to add it to the paper.  Next I added Peacock Feathers for my teal color and worked the middle of the two colors to get a really cool blending of colors.  I let the water carry the inks a bit and before it dried I added water droplets and splatters of both colors.


I took a gold gel pen and added gold dots to the background, then finished the panel with sequins, enamel circles and a couple of pearls.  I added foam tape to the back of the panel and mounted it to a base of Taken With Teal card stock.

That's it!  As always, your visit and comments are so appreciated!  I've added links to the challenges above, so be sure to visit each one and enjoy all the beautiful inspiration by the respective DTs.

Stef


Product details
Stamps:  Tin of Tags, Endless Wishes
Paper:  Taken With Teal, Watercolor
Ink:  Versamark, Peacock Feathers, Seedless Preserves and Dusty Concord (Ranger)
Other:  Gold Stampin' Emboss powder, Metallic Sequins, Metallic Enamel Shapes, Pearl Basic Jewels, Sparkling Clear Sequins (Pretty Pink Posh)

Friday, November 11, 2016

Fairy Birthday


Hello again!  Tonight I'm sharing a birthday card made for a soon to be 2 year old.  I used the sweet Fairy Celebration stamp set and went about coloring a couple of the images in the set.  I used the current challenge at Freshly Made Sketches for my design inspiration.


I began with a 4 1/8 x 5 3/8 inch panel of Shimmer card stock and stamped the larger of the two images on the left side of the panel.  After coloring her with reinkers and a Blender pen, I stamped the second fairy on a scrap of the same card stock, also colored and then fussy cut and added to the panel on the right of the first fairy.  I have to give credit to Ann Schach who inspired me by using similar colors (Soft Sky, Sweet Sugarplum and Pear Pizzazz among others) with this stamp set on her delightful card for Pals Paper Arts (Stampin Chic Fairy Celebration)


After wrapping the panel with the lovely Sweet Sugarplum Glitter ribbon, the scallop circles with the sentiment was popped up on dimensionals and the entire thing added to a Shimmer card stock base. I would have added some sequins for additional interest but with the recipient so young I didn't want to add anything that could be a swallowing hazard.  While the paper has such a nice shimmer to it, some Wink of Stella was painted on the wings and clothes of the fairies for some additional sparkle.


Thanks for dropping by!  I've added a link to the challenge above, so be sure to use it and check out all the incredible inspiration by the design team!

Stef


Product details
Stamps:  Fairy Celebration
Paper:  Soft Sky, Shimmer paper, Dazzling Diamonds Glimmer paper
Ink:  Basic Black, Soft Sky, Sweet Sugarplum, Old Olive, Pear Pizzazz, So Saffron, Delightful Daffodil, Soft Suede, Crumb Cake, Chocolate Chip
Other:  3/8" Glitter Ribbon Combo Pack, Clear Wink of Stella, Layering Ovals, Paper Snips, Blender pen

Thursday, November 10, 2016

Count Your Blessings

Hello again!   Today I'm sharing a card made with the current sketch at Mojo Monday.  I'm also joining the challenges at The Paper Players and Stamp Ink Paper, where the theme is being thankful or grateful, certainly appropriate for this time of year and works perfectly for my card, where I've put together my final Thanksgiving card.  I don't send many but I do send them to immediate family members. 


Last month I made a number of fall scenes using the Happy Scenes stamp set that were then cut out with a Leaflet framelit, and I've used them with various card designs to create the Thanksgiving cards I needed  this year.


Having previously water colored the leaf scene with reinkers, putting together this card was pretty quick.  Probably the most tedious part was layering the die cut sentiment (I cut it twice then glued one on top of the other), which was cut from Pumpkin Pie card stock.  Initially I had it to the right where the oval is in the sketch, but it just looked like an orphan up there, so after trying various things, I finally landed on anchoring it with the wood element.


The More Mustard layer under the die cut leaves was embossed with the Petal Burst embossing folder, cut out with the largest Scallop Layering Square framelit, then ever so lightly sponged with More Mustard ink to bring out the texture.  The Early Espresso card base was layered with a piece of Spice Cake dsp and then the remaining elements were attached.

Thanks for visiting!  I've included links to all the challenges above, so please be sure to use them to check out all the amazing inspiration.

Stef


Product details
Stamps:  Happy Scenes
Paper:  Pool Party, More Mustard, Early Espresso, Cajun Craze, Pumpkin Pie, Spice Cake dsp
Ink:  Pumpkin Pie, Pear Pizzazz, Cajun Craze, More Mustard, Soft Sky, Stazon Timber Brown
Other:  Leaflets Framelit, Seasonal Frame Thinlit, Petal Burst embossing folder, Pool Party Thick Baker's Twine, Into the Woods Element

Wednesday, November 9, 2016

Holiday Trim

Hi there!  Well, those cute little Merry Mice made it back onto my desk so I just had to use them for the card I made for the current sketch challenge at Fab Friday.


I started out by stamping the trio of mice on a panel of Strathmore Mixed Media paper, then masking the one on the right before stamping a tree from the Foxy Friends stamp set so it appears to be behind him.  Next I used reinkers and a watercolor paint brush to color the mice.  Once dry, I added some Smoky Slate to the "floor" and added shadows, then lightly painted So Saffron in the background.

I was a little unsure what element to use for the star in the sketch then I remembered I had a whole unused package of wood snowflakes so I added one along with a double bow of Baker's Twin.  Since I left the sentiment to the last, I was a bit nervous about stamping it right on the panel, so I played it safe and heat embossed it on a piece of Garden Green card stock then cut it out with one of the trims from the Gift Envelope and Trims Framelits.


When the panel was complete, I mounted it on a couple of layers of card stock, popped it up on Dimensionals and added to the card base covered with a piece Warmth and Cheer dsp.

Thanks for visiting!  I've added a link to Fab Friday above, so be sure to head over there and see all the wonderful inspiration.

Stef


Product details
Stamps:  Merry Mice, Foxy Friends
Paper:  Cherry Cobbler, Garden Green, Warmth and Cheer dsp, Strathmore Mixed Media
Ink: Versamark Watermark and Black Onyx, Cherry Cobbler, Garden Green, Early Espresso, Dapper Denim, Soft Sky, Smoky Slate, Crumb Cake, So Saffron, Encore Gold
Other:  3/8" Silky Taffeta Ribbon Combo, Snowflake Element, Cherry Cobbler Baker's Twine, Regal Candy Dot, Gift Envelope and Trims Framelit

Sunday, November 6, 2016

Deck the Halls

Hi there!  I have a card to share with you tonight that I made with the current sketch challenge at Stamp Ink Paper.  I'm bumping up against the deadline to upload to the challenge, so this will be an abbreviated post.


I've used this great sketch to make another Christmas card with the Merry Mice stamp set.  I'm having a lot of fun with these cute little critters!


After stamping the mouse on watercolor paper, he was colored with reinkers (inks listed below).  When complete, the circle was mounted on a slightly larger scallop circle cut from Cherry Cobbler card stock.  Here's a close up.


Thanks for visiting today!  I've added a link to the challenge above, so be sure to check out all the wonderful inspiration.

Have a great week!

Stef


Product details
Stamps:  Merry Mice
Paper:  Thick Whisper White, Cherry Cobbler, Garden Green, Watercolor, Warmth & Cheer dsp
Ink:  Archival Basic Black, Garden Green, Cherry Cobbler, Dapper Denim, Crumb Cake, Flirty Flamingo, Sahara Sand, Soft Sky, Versamark, Encore Gold
Other:  Baker's Twine Trio Pack, Layering Circle Framelits, Gift Envelope and Trims Thinlit, Gold Stampin' Emboss powder, White Gel Pen