Sunday, March 26, 2023

Peonies and Butterflies

Hello friends!  Today I'm playing along with two challenges - Jacquie's fabulous sketch at Freshly Made Sketches and Nancy's fun Things in a Garden theme at Seize the Birthday.


I thought I would use some patterned paper in the background, as I have several pads but don't use them often, and I was fortunate to find one that I liked, that worked with the STB theme and would be colors I could work with for my Copic coloring.  Peonies and butterflies are two things that eventually will be in my garden.


The patterned paper is from Simple Stories Simple Vintage Cottage Fields 6x8" pad.  I really like the small graph design in the background, along with the script and of course the butterflies.  While most of the butterflies on the paper are more neutral, there are a couple that have a hint of peach, so that and the aqua background formed my coloring choices.


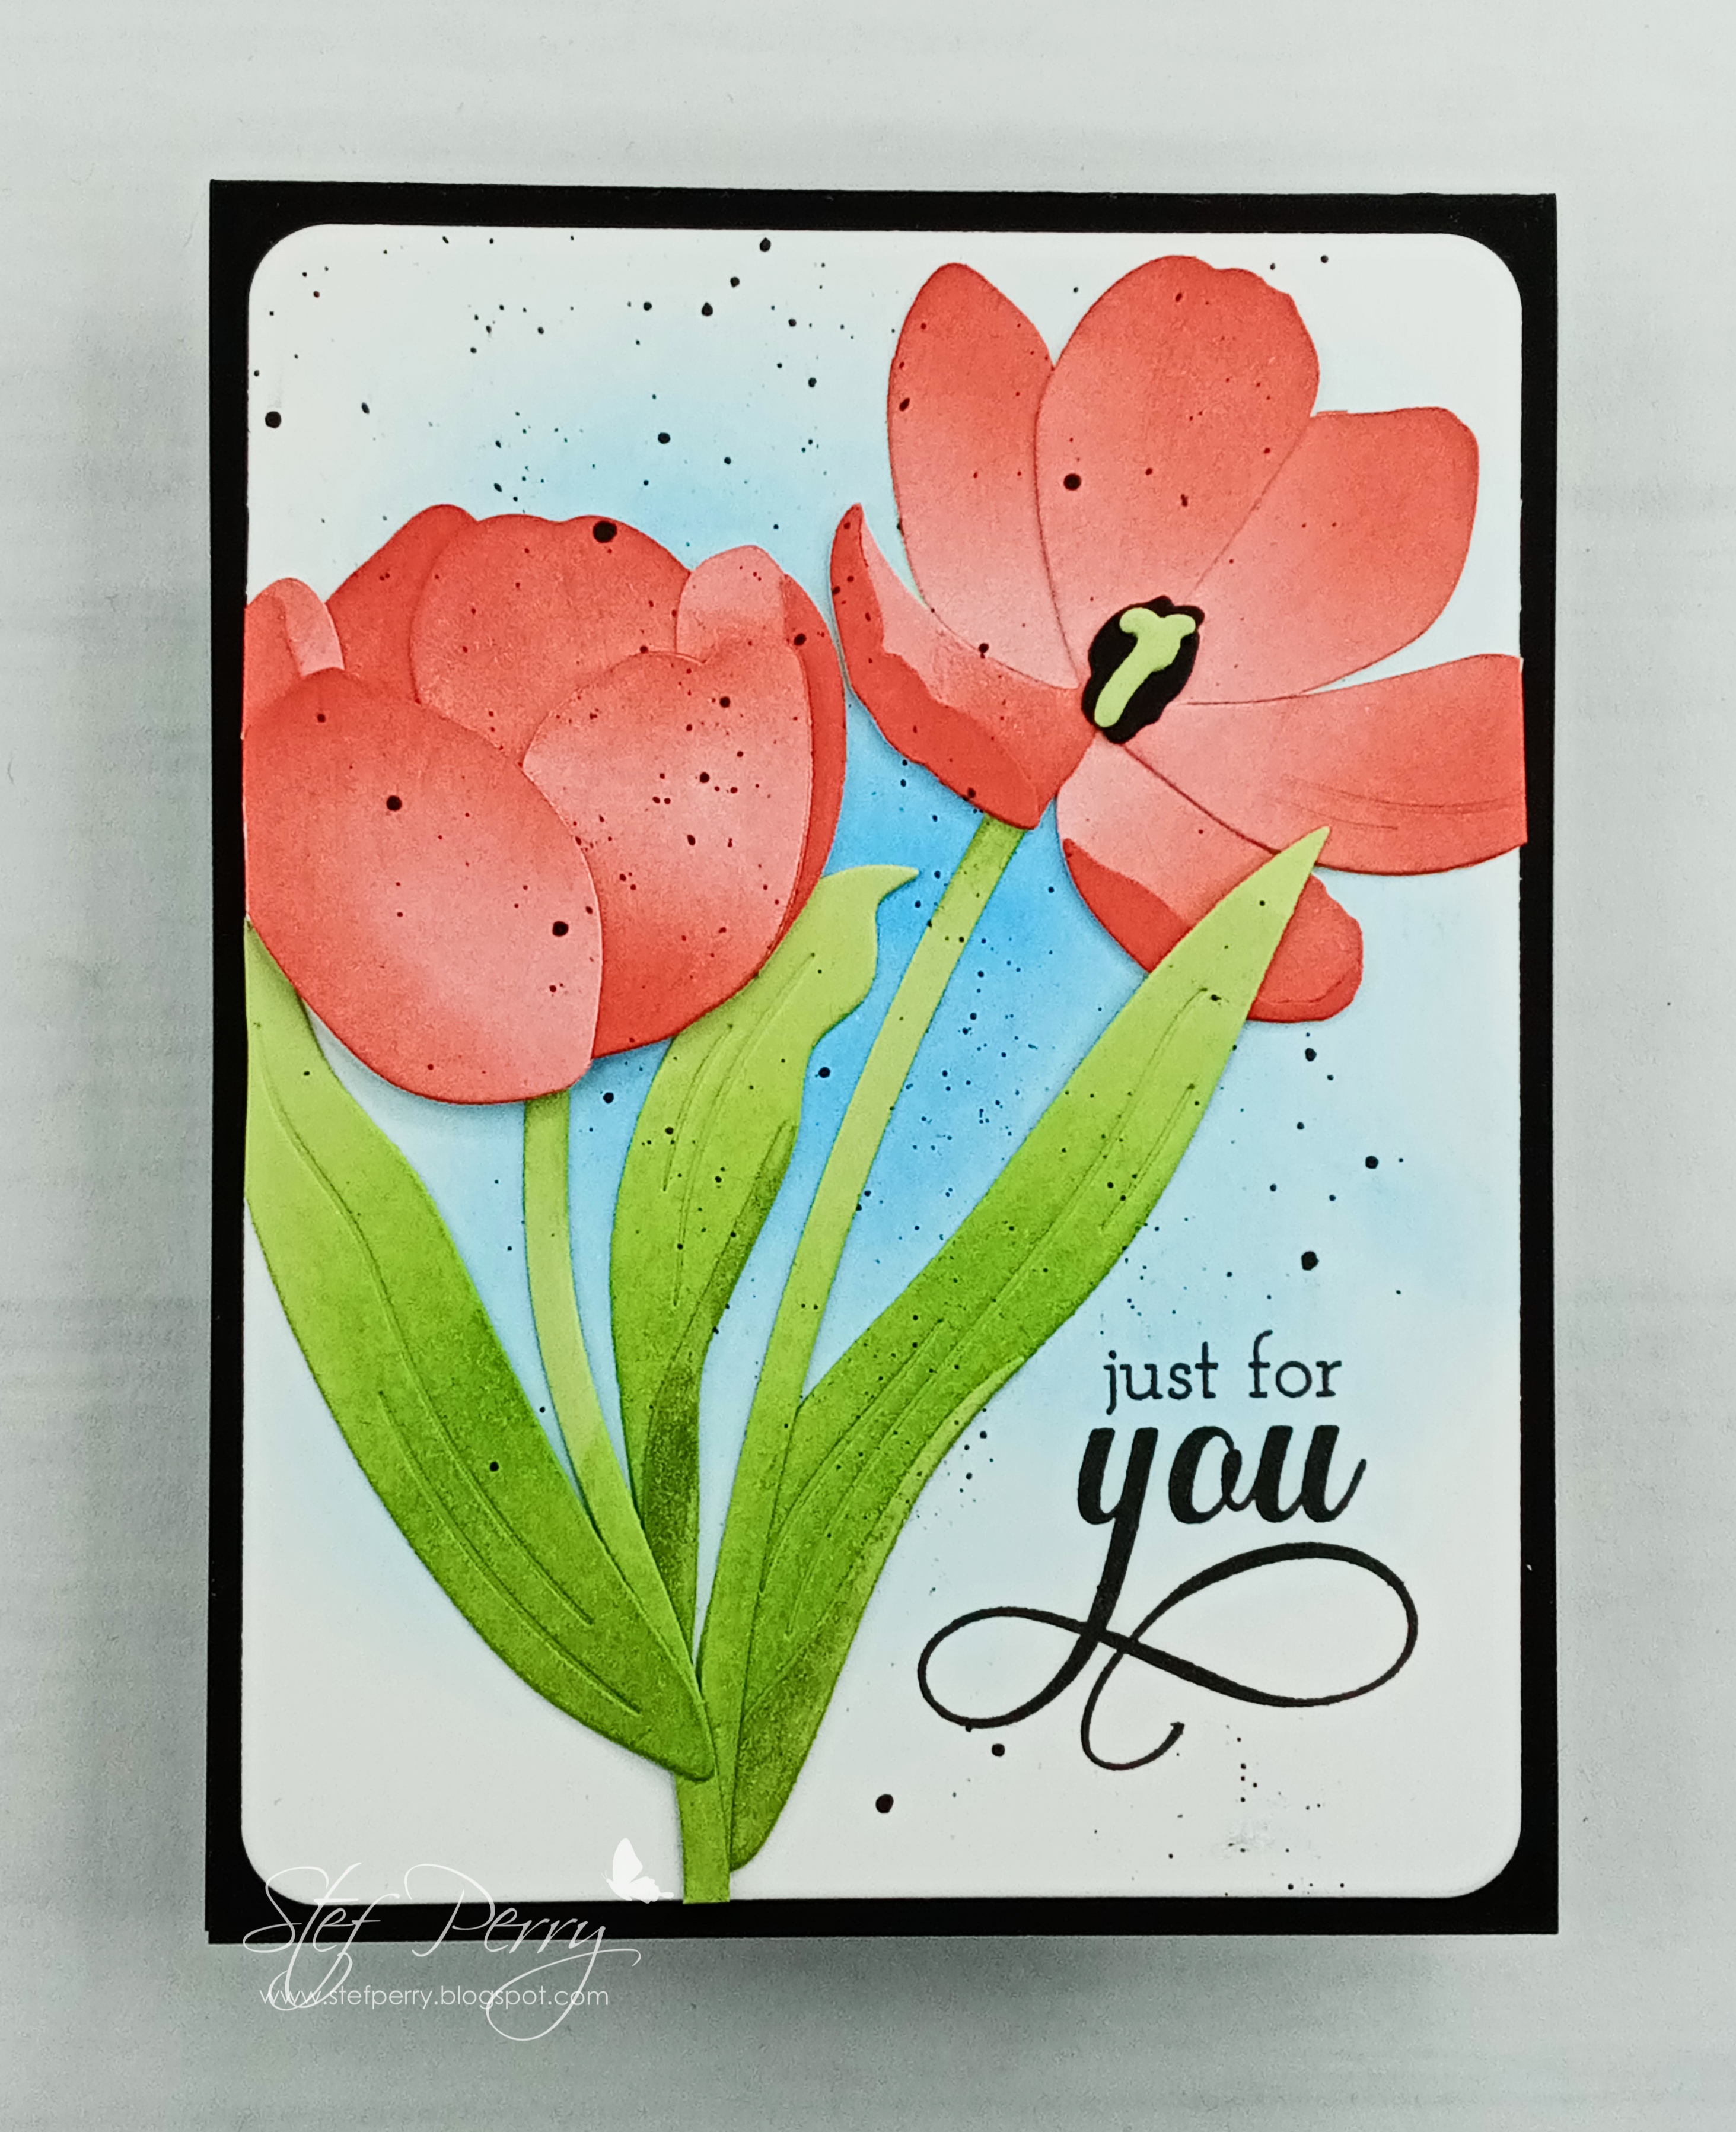
I used one of the two floral images in the Build-A-Garden: Precious Peonies set from Altenew, stamping in Memento Tuxedo Black and coloring with peachy and blue-green markers.  The peach markers are ones I rarely use because it's hard to achieve a deep contrast between light and dark, but when I was done, I was really happy with how it turned out.  After coloring, I used the matching dies to cut out the image.

The sentiment is from Waffle Flower's Elegant Sentiments, die cut the the coordinating die.  I lightly ink blended some Salvaged Patina Distress Ink on the white panel then added the flowers and sentiment with thin foam tape.  After adhering the patterned paper to the card base and adding the black horizontal strip, I also used thin foam tape to add the panel to the card and that was it!  


Thanks for taking time to stop by.  I hope you have an enjoyable week ahead!

Take care!

Stef

Copics:  R32, 12, 00, 000, BG57, 53, 11, YR24, Y19, 15

Wednesday, March 22, 2023

Dogwood Blooms

Hello friends!  Today I'm playing along with Ann's Spring-themed CAS challenge at The Paper Players, along with Simon Says Stamp Monday Challenge and Simon Says Stamp Wednesday Challenge, where they both have the theme of Spring and/or Easter.


One of my favorite flowers in Spring is from the Dogwood tree. There are different patterns to the petals depending on the tree, but most that I've seen are either pink or white.  I did a simple watercolor version for my card today.


I used the beautiful Big and Bold Dogwood stamp from Colorado Craft Company, and as it's name implies, it's a big stamp.  Using a Misti, I stamped a portion of it onto Distress Watercolor Paper with Versamark ink, then heat embossed it in white.  I used several Distress Watercolor Pencils (listed below) to do a simple water coloring adding a very pale aqua around the outside for better definition of the image.


When the panel was dry, it was cut down with a Hero Arts Rounded Rectangle die, then adhered to a white card front.  The die cut sentiment is from the Honey Bee Stamps Birthday Wishes set.  It was stamped in Versamark Clair Nocturne pigment ink, then die cut 3 times and layered together for a bit of dimension, since the main image was adhered flat.  Lastly, a few pink pearls were added around the sentiment.


I'm so happy for spring, although we aren't anywhere near springtime temperatures - even my Crocus have not popped up yet!  But it will be here soon and that's something to look forward to.

Thanks for taking time to stop by.  Take care!

Stef


Distress Watercolor pencils - Kitsch Flamingo, Picked Raspberry, Twisted Citron, Rustic Wilderness, Fossilized Amber, Crushed Olive and Salvaged Patina.

Holiday Cheer for Christmas Craft Creations

Hello friends!  It's time for the Christmas Craft Creations reminder post and this month we are asking everyone to make a "true" one layer card, decorating just your card base without additional layers of any kind, except for embellishments such as sequins, etc. 


I found this to be quite a challenge but I was determined to find a design that worked and I ended up CASEing the very talented Miriam Prantner's card design, just changing up the color and the sentiment.


As you can see, this is a super easy design, even if you don't use these exact stamps.  The snowflake borders are from Snowflake Edges stamp set and the sentiment from Christmas Blessings stamp set, both by Simon Says Stamp.  I started with 110# Neenah Solar White cardstock, which is what I use for almost all of my card bases, stamped the top border with Versamark, then heat embossed with Distress Embossing Glaze in Salvaged Patina.  I did the same for the bottom border as well.


Next, Salvaged Patina Distress Ink was blended over the embossing, then I added the sentiment using Versafine Clair Morning Mist pigment ink.  Almost done!  Lastly I dug through my drawer of embellishments and found these pearls from Lucy's Cards Harmony Crystal Collection that matched perfectly!  And that was it!  This will definitely be one of those mass production card designs come fall.


Thanks for taking time to stop by.  How is your Christmas card stash coming along for this year?  If you want to get a jump on it, you can find oodles of inspiration at Christmas Craft Creation every month.  Be sure to use the link above and see what delights the other team members have created for this challenge!

Take care!

Stef

Sunday, March 19, 2023

Just For You for Sunday Stamps

Hello and welcome!  It's time for a new challenge at Sunday Stamps and this time we have lots of bright colors for you to choose the three minimum to use on your card.


I used the blue, bright green and coral in creating my tulip die cut card.


The Altenew Craft-A-Flower: Tulip Full Bloom dies worked perfectly with this color combo.  The leaves and stems were first die cut from Concord and 9th Sprout cardstock, then I ink blended Altenew Lime and Fresh Leaf inks towards the bottom to get a little shading and color variation.  For the flower petals, I started with white cardstock then ink blended them with Altenew Coral Bliss and Heartbeat inks.  When the inks dried all the pieces were adhered together using the packaging instructions.


Next I ink blended Simon Says Stamp Pawsitively Saturated inks in Marine and Cadette primarily in the middle of a white panel, then die cut it with a Hero Arts Rounded Rectangle die.  The sentiment from Altenew's Fancy Greeting fit perfectly in the lower corner and was stamped in their Obsidian Pigment ink.  After adding the panel to a Hero Arts Pitch Black card base, the flowers were adhered then I added just a small amount of black splatter, using my Black Soot Distress Watercolor pencil.


So which colors will spark your creativity?  I do hope you'll join our color challenge, and for more inspiration, head over to the challenge blog to see all the lovely cards by the other DT members.

Take care!

Stef

Thursday, March 16, 2023

Persian Motifs for Color Hues

Hello friends!  It's mid-month and time for a new challenge at Color Hues.  Marcia has chosen a beautiful color combination of blue and turquoise.  


For my card I used a long neglected stamp set from Altenew.  I think Persian Motifs was one of the very first stamp sets I bought from them years ago and I decided it was high time I revisited this set.


I used all three floral images from the set, along with a few other small stamps, stamping around the edge of a white panel. I was so pleased with how well the dark blue and blue-green Copic markers blended, it made it fun to color.  I didn't worry about a light source per se, I just wanted the centers to be nice and dark before moving out to the lighter turquoise.


The rest of the card was a snap to put together.  The Altenew Fancy For You sentiment was die cut twice, once from Concord and 9th Midnight and once from Simon Says Stamp Matte Silver, then layered with the dark blue acting as a shadow.  The panel was trimmed down, adhered to a Midnight card base, then the sentiment attached along with a few Lucy's Cards Dark Sapphire Mix Jewels.  


Please be sure to head over to the challenge blog for some incredible inspiration from the other Design Team members and hopefully be inspired to join us!  The challenge lasts until 9 am EST on March 29th.

Take care!

Stef

Copics:  B39, 26, BG07, 05, 02, 01, 000

Wednesday, March 15, 2023

Special in Every Way for The Flower Challenge

Hello friends!  I'm back with my reminder card for The Flower Challenge.  This month the theme is die cuts and/or stencils with flowers as the primary images and the challenge is open until Saturday 3/25.


My card today uses a floral stamp from a new-to-me company - Alex Syberia Designs.  I was familiar with her from the past as a designer and illustrator, plus I believe she sold digital images, but now she has her own line of stamps and dies, and they do not disappoint!  All products on my card are from this company.


This stamp set is called Life is Good and the sentiment is also from the same set.  As usual, I stamped and colored the image with Copic and Sketchmarker Brush Pro markers.  I was really in the mood for some vibrant colors when I sat down to make this card, so I used some different marker combos to brighten things up.  When the coloring was complete, the image was die cut with the coordinating die.  The sentiment was white heat embossed on black and also die cut with a coordinating die.


Next - more die cutting.  I used the Classic Foliage die set to cut out leafy branches from Lawn Fawn Pearlescent vellum. Next, a panel of white was die cut with the Modern Stripes Cover die, then adhered to the white card base.  The foliage was arranged to stick out from behind the main floral image, then everything was adhered directly to the card front.  Lastly the sentiment was added with some thin foam squares.


I think most of us do have stencils and/or dies, so I do hope to see your card in the gallery!  In the meantime, the link above will take you to the reminder post so you can see the absolutely gorgeous card by my talented teammates!

Thanks for visiting and take care!

Stef


Copics:  YG67, 09, 05, 01, YR24, 23, Y08, 04, 02, BG15, 23, 10, RV69, 00

Sketchmarker Brush Pro markers:  V111, 114

Sunday, March 5, 2023

Hugs for Sunday Stamps

Hello and welcome!  The first of March is already upon us (wait - where did February go??) and it's time for a new sketch challenge at Sunday Stamps.  This time Amy has given us a terrific sketch to work with so I hope you'll be inspired to join us!


My card turned out to be very quick and easy to put together because the main image had been previously completed in a class I took recently.


In February I attended the Distress Watercolor Pencil class taught by the amazing Jenn Shurkus (link to her website here).  We learned to use the pencils in a variety of watercoloring applications, including using the pencils directly on our stamps along with water.  I was so thrilled with how this image from Stampin' Up's Nature's Harvest turned out I knew I had to use it on a card.  It was stamped multiple times onto Distress Watercolor paper using my Misti.  When I went to create this card, the panel was die cut with a MFT Stitched Modern Rectangle Stax die.


Next a piece of patterned paper from MFT's Plaid Patterns 6x6 paper pad was die cut with a larger size of the same die set and adhered directly to white card base.  I strayed from the sketch a little bit by wrapping Lawn Fawn hemp twine around the floral panel, then attaching a tag with the sentiment.  Both the sentiment and tag die are from Waffle Flower's Special Delivery Sentiments and Dies set.  Finally, I attached a Doodlebug Tiny Hearts Shaped Sprinkle to the tag.  There were green and yellow hearts in the packet but I liked the pop of red.


Lots of options with this sketch, I do hope you'll join us for this challenge!  In the meantime, be sure to pop over to the blog linked above and take a peek at the beautiful cards by the other DT members!

Have a great week and take care!

Stef


Distress Watercolor Pencils - Fossilized Amber, Wild Honey, Vintage Photo, Twisted Citron, Rustic Wilderness.

Saturday, March 4, 2023

Thank You for The Flower Challenge

Hello and welcome!  It's time for a new challenge at The Flower Challenge and this month the theme is to use die cuts and/or stencils, so pull out your favorite dies or stencils (of flowers, of course!) and share with us this month!


For my card I did a little stenciling and quite a bit of die cutting.


I started by stamping the sweet Pinkfresh Studio Inky Bouquet in Memento Tuxedo Black, then colored the flowers and leaves with Copic markers.  Next I used one of the 6 layering stencils and colored the vase with Simon Says Stamp Surf and Seafoam inks.  I have really been on a kick with peach and aqua, but I'm lovin' it!  When the ink was dry, I put the image back in my Misti where I'd left my stamp in place, restamped with Versamark ink and gold heat embossed both the floral image and the sentiment.


After using the companion dies to cut out the floral vase and sentiment, I went to work on the background.  This time I used the Ring Panel cover die from Waffleflower, die cut from white cardstock and layered it directly on the white cardbase.  Next I used the companion dies to cut additional layers for the vase and the sentiment, adhered them together, then added them to the card front and I was done!


Thanks so much for stopping by.  Be sure to do the same with the challenge to check out the absolutely gorgeous cards by the other DT members and hopefully join us this month!

Take care!

Stef


Wednesday, March 1, 2023

Rain or Shine

Hey friends!  I'm back with a second post today, playing along with the lovelies at The Paper Players and Just Us Girls (you can find my Color Hues DT card here).


Even though we had snow the last three days, I still wanted to make a spring card with pastel colors, so I pulled out a cute Birdie Brown stamp set from MFT.


To create my card, I started by stamping and Copic coloring all the images from Rain or Shine.  I have to say the ducks in this set tickle me to no end and especially this happy little cutie!  After coloring, I used the matching dies to cut them out.


In an effort to minimize layers for a CAS look, instead of adding a background on a separate panel, I created my "shape" for the sketch by using a square die to emboss a smaller square on the card base, then masked off outside of it to add a bit ink blending in blue for the sky and gray for the ground.  Next, the puddle, splashes and cloud behind the sun were glued directly to the card front, then I used thin foam squares to pop up the remaining images and the sentiment.  The last touch was to add three raindrop clear enamel stickers from the Spring Enamel Stickers from Hero Arts.


Thanks for taking time to stop by!  Have a great week and take care.

Stef


Copic markers:  B02, 00, 000, V05, 01, 000, RV23, 21, 10, 00, YR24, 16, Y08, 04, 02, T2, 0, E29, 37, 33, 31, 11, 21, 00, 000, R20

Say Cheese for Color Hues

Hello friends!  A new month and a new challenge at Color Hues, and this time the fabulous Carol has given us timely combination of green and gold!  I can hardly wait to see what you do with this color duo!


I shopped my stash and came up with a never used die set, so I'm joining Darnell's NBUS (Never Before Used Schtuff) Challenge as well.


The die set is from Spellbinders' Large Die of the Month Club for April 2022 called Say Cheese.  It was sooo fun to put together, I don't know why I waited so long!


So cute, right?  Seriously, this reminds me of one of the very old cameras my Dad had, and he had a number of them, both for work and for personal use.  If you look up 1950's Brownie camera on the internet, this is a near perfect match.  

All the pieces/parts were die cut from four shades of green (Concord and 9th Evergreen, Parsley, Sprout and Clover) along with Simon Says Stamp Matte Gold and Hammermill white cardstock.  It took me a while to figure out what all the pieces were for, but Spellbinders had great examples on their website, so I finally put it together.  


The die set also comes with a large "flash" unit that could be attached at the top, but I decided not to use it so my card could remain A2 sized.  The background was created with gold foil using the Waffle Flower Sunburst Foil Plate, trimmed down and added to Parsley panel that was adhered to the white cardbased.  I added the camera with foam tape than tucked in all the stems and flowers, plus added three small flowers to the front to finish things off.


Please be sure to pop over to the challenge (linked above) to see all the amazing cards by the other DT members and I certainly hope to see YOUR card in the gallery!  You have until 9 am on Tuesday, March 14th.

Take care!

Stef