Sunday, March 28, 2021

Wild Meadow

Hello friends and welcome back!  I hope you're doing well.  Today I'm sharing a card that I was inspired to make by three challenges, one a sketch challenge and two with spring themes. 


When I saw the sketch I thought of a stamp set that would work perfectly for the strip at the bottom and would incorporate lots of spring colors and flowers.


I love the variety of flowers in this stamp and it worked perfectly to incorporate lots of bright colors.  It was colored with Copic markers then cut out with the matching die.  For the background, a panel of white card stock was gently ink blended with a light green from the bottom to the middle and then a bit of light blue at the top. I ended up trimming it down to 3.5" x 4.75", added the flowers with foam tape then trimmed off the ends of the stamped image in order to fit the panel size. 


The panel was matted on a slightly larger die cut piece of white card stock, then adhered to the blue card base with foam tape.  After adding the sentiment to the panel with foam tape I thought I was done but felt the card was lacking something.  So I searched through my stamp sets and found this sweet butterfly left over unused from another project and adhered it to the panel to finish things off!


So glad you made time to visit, I always appreciate it!  Take care and have a great week!

Stef


Stamps:  Wild Meadow (Mama Elephant), Beautiful Butterflies (Simon Says Stamp), Birdie Brown Glorious Greetings (MFT)
Paper: Neenah Solar White, Sea Glass (SSS)
Ink:  Gina K Obsidian Amalgam, Versafine Clair Nocturne, Grass Field (Altenew), Blue Sky (Pinkfresh Studios)
Other:  Wild Meadow and Beautiful Butterflies matching dies, A1 Stitched Rectangle Stax die (MFT), Sakura White Gelly Roll pen
Copics:  RV14, 13, 10, V28, 25, 22, 20, R46, 24, 05, 21, Y26, 08, 04, 00, G46, 43, 40, YG67, 63, 61, 17, 03

Friday, March 26, 2021

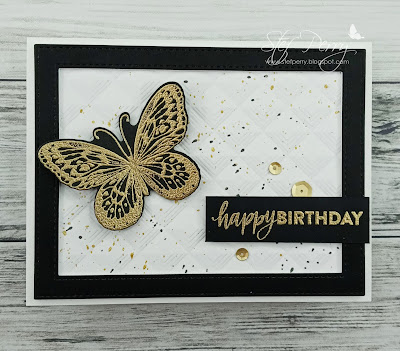
Butterfly Birthday

Hello friends!  I hope you're doing well!  Today I'm sharing a card made for the challenge at Color Hues, where we are to use black and white, and Seize the Birthday, where the toppings option is a sketch.


To start, I used a 3D embossing folder on a panel of white to get a really terrific pattern.  Next I splattered the panel with black ink spray and gold metallic paint.  I did get a bit carried away (I always seem to forget less is more when it comes to splatter LOL) but in real life it doesn't seem quite as stark as it is in the photos.


While the splatter dried, the sentiment and butterfly were heat set with gold embossing powder on black cardstock and die cut.  The frame was die cut three times from white cardstock and once from black, layered together then adhered to the embossed panel.  The panel was then adhered to the white card base, then the sentiment and butterfly added using foam tape.  Gold matte sequins were added around the sentiment to finish things up.  Pretty quick and easy!


Thanks for looking, your visit always means a lot to me!  Take care and have a wonderful weekend!

Stef


Stamps:  Beautiful Butterflies and Brush Stroke Messages (both Simon Says Stamp)
Paper:  Neenah Solar White, black
Ink:  Versamark
Other:  Modern Squares 3D embossing folder (Altenew), Gold Matte sequins (SSS), Jet Black Ink Spray (Altenew), Gansai Tambi Starry Colors metallic paint, Antique Gold embossing powder (Altenew)

Sunday, March 21, 2021

Just For You for Sunday Stamps

Hello friends, I hope you're doing well!  It's time for a new challenge at Sunday Stamps!  We have a beautiful bright color palette for you to play with this time.  What are you inspired to make?


I'm also joining the current Addicted to Stamps Challenge where the current theme is Make Your Mark, using your markers, pencils, pens, inks, etc.


For my card I went with spring flowers colored with Copic markers.


These tulips are so easy to color.  I used my Copic markers to bring the in the challenge colors of yellow, light and dark green. The bouquet was die cut with the coordinating die and set aside while I worked on the background.  

I took a panel of white cardstock and blended two light greens over the Watercolor Stripes stencil, then gently went over most of the panel with the same colors to lessen the contrast of the white.  I know the color looks more yellow than green, but that's the result of my phone camera not picking up the true colors.


Next the white frame was die cut three times, glued together, then adhered to the stenciled background. I also tucked the bottom of the tulip image under the frame after trimming off about a half inch - it's a large image!  Thin foam squares were placed under the tulips heads, then the sentiment added along with a little yellow heart.
 

Thanks for visiting, I always appreciate it so much!  Be sure to head over to the challenge to check out the beautiful cards by the other DT members and I sure hope you'll join us for this challenge!

Take care and have a great week!

Stef


Stamps:  Sketch Tulip Bouquet (Simon Says Stamp)
Paper:  Neenah Solar White
Ink:  Gina K Obsidian Amalgam, Versafine Clair Nocturne, Olive and Parrott (Altenew)
Other:  Sketch Tulip Bouquet matching die, Stitched Rectangle Frames die (MFT), Essential Stitched Sentiment die (MFT), Watercolor Stripes Stencil (Altenew), Doodlebug Heart Sprinkle
Copics:  Y26, 19, 13, 00, YG67, 17, 03

Thursday, March 18, 2021

With Sympathy

Hello friends, I hope you're doing well!  Today I'm sharing a card made for the current color challenge at The Paper Players.  The lovely Joanne has given us three lovely, soft colors to play with.


For my card, I decided to depart from my normal Copic Coloring and instead did some stamp layering and ink blending. My card is a case of one made by Therese Calvird here after seeing her video tutorial on how to create the water in the vase.  I changed the colors, card layout, used different floral stamps and sentiment.


I started with the two floral images and the leaves.  The flowers have three stamped layers - the outline then a light layer and a dark layer.  I found the two Altenew inks matched remarkably well to Highland Heather. I then used gray Copic markers to color the flower centers. The leaves were stamped in Olive and Moss, then all the images were die cut.


The vase was stamped off the bottom of the white cardstock panel so I could keep this an A2 sized card.  I then used the matching stencils and two shades of muted blue to create the water.  After the water was complete, I hand drew two stems and colored them with Copic markers, then added the rings in the water with a Copic Fineliner pen.  The background is a soft blend of the lightest purple and a little bit of the blue. 

The panel was trimmed down and adhered more on the right side of the Highland Heather card base, to give it an offset feel.  The flower and leaves in the back were adhered to the panel, then the flower and leaves in front added with foam tape.  Lastly the heat embossed sentiment was added to the side of the panel.  I felt these colors and the image worked beautifully for a sympathy card, and that is one category in my card stash that always seems to be in low supply because I don't make very many.


Thanks for visiting, I appreciate it so much!  Take care and I hope you have a great weekend!

Stef


Stamps:  Airbrushed Flowers, Versatile Vases 2 (Altenew)
Paper:  Neenah Solar White, Black, Highland Heather
Ink:  Gina K Obsidian Amalgam; Versamark; Wisteria, Hydrangea, Moss, Olive, Caribbean Sky and Cloudy Sky (Altenew)
Other:  Airbrushed Flowers matching dies, Versatile Vases Masking Stencils, White Fine Detail embossing power (Simon Says Stamp).
Copics:  W5, 3, 1, YG95, 93

Happy Easter for the Tic Tac Toe Challenge

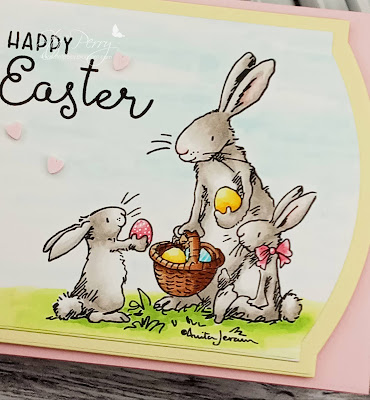
Hello friends!  So glad you came by to visit and I hope you're doing well.  It's time for a new Tic Tac Toe Challenge!  This week Claire has brought us a spring/Easter board to inspire us!  For my card, I went down the left column - bunny, pastel colors and die cuts.


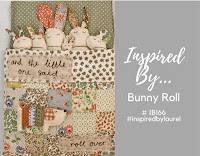
I'm also joining the challenge at Inspired By, where the prompt is this CUTE bunny roll! 


I have been totally smitten with the line of Anita Jeram stamps from Colorado Card Company, one of which I used for this card.


I love this precious scene with the mama (or papa) helping the two young bunnies collect Easter eggs! The image was stamped on white cardstock then colored with Copic markers.  I used warm greys to color the bunnies - it's a pretty simple scene and didn't take much time to color. I used a white gel pen to add polka dots to the pink egg and strips to the blue one.


Next, the sentiment was stamped in black pigment ink.  When that dried, both the main panel and the yellow mat were die cut with the Elegant Rectangle die, then added to the pink card base with foam tape.  The final touch was to add some pink clay hearts, which helped balance out the whole scene.


Thanks for visiting, I always appreciate it so much!  Be sure to check out the fabulous cards by the other tttc DT members and hopefully you'll be inspired to join us this week!

Stef


Stamps:  Happy Easter (Colorado Craft Company)
Paper:  Neenah Solar White, Lemon Chiffon and Cotton Candy (Simon Says Stamp)
Ink:  Gina K Obsidian Amalgam, Versafine Claire Nocturne
Other:  Elegant Rectangle Stax dies (MFT), Pink Hearts Clay Confetti (Pretty Pink Posh), Sakura White Gelly Roll pen
Copics:  W3, 1, 0, B00, 000, 0000, RV91, 21, 00, Y19, 13, 00, YG03, 01, 00, BG000, 0000, R20

Sunday, March 14, 2021

All About You

Hello friends!  I hope you're doing well and enjoying your weekend. We're have unseasonably warm weather in the mid 60's today, which is such a treat after a very cold February. I know there's been some crazy weather across the country the last few days, I hope you've managed to avoid that! 

On to the reason you're visiting! Today I'm sharing a card made for two challenges - Just Us Girls where we are to use embossing folders and the Watercooler Wednesday Challenge, where the theme is All Things Feminine.


3D embossing folders seem to be all the rage right now and rightfully so, in my mind, as they produce some beautiful results.  Today I used one from Altenew that has gorgeous floral images.  


As I started working on my project, I pulled out a bunch of ink blended and painted backgrounds I'd made many months ago and went into full Jennifer McGuire mode (if you've ever watched her videos, she always uses the technique she is sharing to make oodles of backgrounds that she then turns into cards), and used various embossing folders, mostly 3D on these panels. I probably ended up with about 10 or so.  Then I used a white pigment ink pad to lightly go over the top of the embossed images which picked up the ink just on the ends of the images.  Oh, I had so much fun!


The panel I used for my card today had been ink blended with Ripe Persimmon, Picked Raspberry and Wilted Violet Distress inks.  After the panel was embossed, I sprayed it with a shimmer spray, which my camera really picked up in these photos.  After the spray dried, I used the white pigment ink pad to lightly apply ink to the edges of the flowers, leaves and the tips of the stamen.  While the ink dried, the word you was die cut from black three times then glued together, and I stamped and trimmed out the remaining part of the sentiment.  

I trimmed down the embossed panel to just shy of 3", adhered it to a panel of white, then added the 1/8th inch strips of black on each side. It was trimmed down to just slightly smaller than an A2 size, then adhered directly to the white card base.  After adding the sentiment, the last touch was to add clear sequins.  I love how this turned out with the vibrant colors and the beautiful embossed flowers!!


Thanks for visiting, I always appreciate it so much!  Take care and have a great week!

Stef


Stamps:  All About You (MFT)
Paper:  Neenah Solar White, Black, Strathmore Bristol
Ink:  Versafine Claire Nocturne, Hero Arts Unicorn White, Ripe Persimmon, Picked Raspberry and Wilted Violet Distress
Other:  Beautiful Berginia 3D folder (Altenenw), Sheer Sparkle Shimmer Spray, You word die (MFT), Sparkling Clear sequins (Pretty Pink Posh)

Friday, March 12, 2021

Bunny Love

Hello friends and welcome back!  Today I'm joining the current Freshly Made Sketches challenge, using this wonderful sketch from Linda Callahan.

For my card I flipped the sketch from the top of the card to the bottom so it would work better with the sweet bunny I used.


I am totally smitten with the Anita Jeram line of stamps from Colorado Craft Company.  Isn't that the sweetest bunny????  The stamp comes with a scene of mom (or dad) with two little bunnies collecting eggs, then a stand along bunny holding an egg facing left.  Because I wanted a bunny facing right, I stamped the scene, colored this cutie with Copic markers, then fussy cut him.  I also stamped two additional eggs and used the coordinating die to cut them out.


The rest of the card came together super easy.  I cut three one-quarter inch strips of pastel cardstock, adhered them to the card base, then stamped, die cut and added the sentiment to the bottom right corner with foam tape.  The sweet bunny was also popped up with foam tape, then the eggs adhered directly to the card.  Finally, I added some pink clay hearts to show all the love being sent :-).  Super quick and easy!


Thanks for visiting, I always appreciate it so much!  Take care and I hope you have a great weekend!

Stef


Stamps:  Happy Easter (Colorado Craft Company)
Paper:  Neenah Solar White, Lemon Chiffon and Cotton Candy (Simon Says Stamp)
Ink:  Gina K Obsidian Amalgam, Versfine Claire Nocturne
Other:  Happy Easter matching die (egg), Pink Hearts Clay Confetti (Pretty Pink Posh)
Copics:  W3, 1, 0, R22, 20, 00, Y19, 13, 00, B00, 000, 0000


Wednesday, March 10, 2021

Spring Gnome

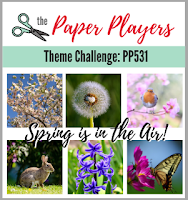
Hello and welcome back!  I hope you're doing well.  Today I'm sharing a card made for three challenges.  First, the Paper Players, where the amazing Claire has chosen the Spring is in the Air theme, the Festive Friday challenge where we're celebrating World Frog Day, and the current Simon Says Stamp Challenge, where the theme is A Bit O' Green.


I decided to have a little gnome fun with these challenges.  For FF0079, the three elements from the inspo list used on my card are green, circle and twine.


I just love this image with the gnome and his bird friend!  They were stamped on white cardstock, colored with Copic markers and die cut with the coordinating die.  In continuing my mission to try to use up old patterned papers, I used a green floral pattern from an old Graphics 45 paper pad.  I love the pattern in yellow greens and it certainly worked well for the challenges! Before adhering the paper strip to the white panel, I lightly ink blended some Twisted Citron Distress Ink, which helped the white circle stand out against the background.


Next I cut the white circle from a panel that had been embossed with a leaf pattern, but it's tough to see in the photo.  The sentiment was heat embossed in white on a piece of bright green cardstock then die cut with a fishtail label die. A bit of white Baker's Twine was then tied around the left end.  The patterned paper strip was adhered to the ink blended panel then the white circle popped up with foam tape.  Our sweet gnome was adhered directly to the circle, then the sentiment was added also with foam tape.  Finally the entire thing was added to the white card base with fun foam.  Super easy!


Thanks for visiting, I always appreciate it so much!  Take care and have a great week!

Stef


Stamps:  Spring Gnomes (Simon Says Stamp)
Paper:  Neenah Solar White, Greenleaf (SSS), Mother Goose Collection 8" x 8" paper pad (G45)
Ink:  Gina K Obsidian Amalgam, Versamark, Twisted Citron Distress
Other:  Spring Gnomes matching die, Fishtail Foundations die (MFT), White Baker's Twine, Fine Detail White embossing powder (SSS), 3D leaf embossing folder (ret. SU)
Copics:  BG07, 45, 53, Y26, 19, 13, 00, YG67, 17, 03, W3, 1, 0, E44, 43, 42, 11, 21, 51

Sunday, March 7, 2021

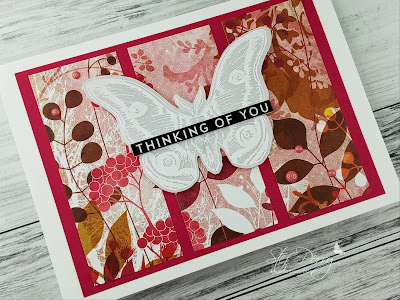
Beautiful Wings for Sunday Stamps

Hello friends, and welcome back!  It's time for a new challenge at Sunday Stamps where Heidi has given us two fun sketch options.


For my card, I decided to use the one on the left.


This was such a simple card to pull together once I made a decision about what papers to use LOL!  I decided to use a sheet from one of my old Basic Grey paper pads (the date on the front of the pad is 2009!!)  I love the colors and thought the botanical background would be perfect for the heat embossed moth.


I started by heat embossing in white on pearlescent vellum that fabulously detailed large moth, then it was die cut with a coordinating die.  I also die cut a second moth from vellum to layer underneath.  To put the card together, I started with a 5 x 7" white card base, directly adhered a panel of Rose Red, then added the three strips of patterned paper.  The moth was added with discretely hidden small pieces of foam tape.  The sentiment was adhered to the top of 3 layers of white card strips, then added to the moth.  A few enamel dots were scattered about to finish things off.


Thanks so much for visiting, I really appreciate it!  Be sure to use the link above to check out the challenge and all the beautiful cards by the other DT members.  I hope you'll be inspired to join us for this great challenge!

Take care, stay safe and healthy, and enjoy the coming week!

Stef


Stamps:  Beautiful Wings (Gina K)
Paper:  Neenah Solar White, Rose Red (ret. SU), Pearlescent Vellum (Lawn Fawn), Indian Summer paper pad (BG), Thinking of You Sentiment Strips (SSS), 
Ink:  Versamark
Other:  Fine Detail White embossing powder (SSS), Botanical Enamel Dots (Waffle Flower), Beautiful Wings Coordinating dies

Thursday, March 4, 2021

So She Did

Hi there, friends!  I hope you're doing well, still staying safe and healthy!  Today I'm sharing a card made for the current Paper Players challenge, where the lovely Ann has given us a fun sketch to play with.  I'm also joining Addicted to Stamps where the challenge is to use dies and/or stencils.


For my card, I used a new stamp and die set from a new-to-me company called Studio Light.  There's a whole series of these Missees sets (I found mine at Simon Says Stamp) and I had a blast putting together this card and others still in the works.  


Isn't she fabulous? All the details to create this image were die cut from various pieces of cardstock then adhered together.  The only coloring I did was her tongue and I used a bit of white gel pen for the highlight in her eye, on her teeth and to create the polka dots on her dress neckline. The hardest part was deciding which accessories to use and picking out the papers.  I first saw these sets used on the Prairie Paper and Ink blog of Amy Rysavy here.  Then, in addition to making cards for female family members, I came upon a wonderful reason to make a number of them (more on that below).


The card size is 5 x 7" due to the size of the image.  I stenciled gold stars on the upper part of a panel of Ivory, matted it onto a black cardstock panel, the added the die cut image.  The sentiment was stamped on Ivory as well, then I used gold metallic paint around the edges so it would stand out against the background.  Foam tape was used to adhere the panel to the card base and also add the sentiment to the front to finish things off.


I hope you enjoyed my fun take on Ann's sketch!  

After I received my purchase of some of the Missees stamp and die sets, I visited Jaydee's Paper Players blog post here to admire her card, and then read about a wonderful card drive for foster kids at Bearly Art.  A light bulb went on in my head and I found a reason to create a number of cards, which I will share with you in future posts once I get them all assembled.   

Here's some information from the Bearly Art website about foster children:

The Adoption and Foster Care Analysis and Reporting System (part of the US Dept of Health and Human Services) reports that over 430,000 children are currently in foster care, with 125,000+ waiting to be adopted.  The top 4 reasons for children entering foster care is neglect, drug abuse (parent), caretakers inability to cope, or physical abuse.  The average age of a child in foster care is 8 years old. 

Sending a card to one of these children could let them know they are valued and not forgotten.  I already had in my stash many cards age appropriate for younger children, so the cards with the Missees images will be for older girls.

Sorry for the long post but this topic really touched my heart as it has with many others and I wanted to share it with you in the hopes you would check out the drive.

Thank for visiting, as always I appreciate it so much!  Take care and have a great weekend!

Stef


Stamps:  Misseess Betty, Carol, Tasha, and Melanie (Studio Light and Karin Joan)
Paper:  Ivory, Black, Chestnut (Heros Hues), Desert Storm, Sorbet and Grapfruit (Concord & 9th), Gold Mirror (Tonic)
Ink:  Versafine Claire Nocturne, Delicata Golden Glitz, 
Other:  Missees coordinating dies, Elegant Rectangle die (MFT), Scattered Stars Stencil (SSS), Gansai Tambi Starry Colours metallic paint, Sakura White Gelly Roll pen

Just A Note for the Tic Tac Toe Challenge

Hello, friends and welcome back!  It's time for a new Tic Tac Toe challenge!  This week the fabulous Tenia has created a terrific board with loads of inspiration.  


No surprise, for my card I went down the left column (splatter, flowers, green).  I enjoy doing scenes, cute critters and different techniques, but my first love is always coloring flowers.

I'm also joining the current Double D Challenge, where the theme is Book Covers.  So clever!  I was inspired the greens and the red flowers in the There's A Tiger in the Garden cover.


The large camellia in the Best Friend Ever set was calling me, since it reminded me the bushes in my parent's backyard when I was growing up.  My mother loved her red camellias so that's how I colored the one on my card. 

The camellia was colored with Copic markers.  Since I was going to use a lot of green, I aimed to achieve a red mix that was more on the pinkish side than the tomato red side - also I didn't want it to look like a Christmas card LOL!  When the coloring was complete, the floral image was die cut with the coordinating die.


To create the background, I ink blended Rustic Wilderness Distress ink on a panel of Bristol paper, going from dark to light in opposing corners.  The panel was splattered first with water, then some watered down green ink and next with pearl metallic acrylic paint.  The pearl paint didn't stand out well enough so I added splatters with white gouache.  I tell you, I had a fun time just splattering away!  

When the panel was dry, it was run through my die cutting machine with the leaf cover die, then cut down with the rounded rectangle die.  The panel was matted on the black layer then added to the white card front with foam tape.  After the sentiment was heat embossed and cut with a circle die, both it and the floral image were added to the panel with thin foam squares.  Because the background was busy enough already, I decided not to add any gems or other embellishments.


Thanks for visiting, I always appreciate it so much.  Be sure to use the link above to check out all the amazing cards by the other DT members and hopefully be inspired to play along with us this week!

I hope you're continuing to stay safe and healthy.  Take care and have a great weekend!

Stef


Stamps:  Best Friend Ever (Simon Says Stamp), Mini Everyday Messages (Mama Elephant)
Paper:  Neenah Solar White, Black, Strathmore Bristol
Ink:  Gina K Obsidian Amalgam, Versamark, Rustic Wilderness Distress
Other:  Best Friend Ever matching die, Nested Infinity Rounded Rectangle and Circle dies (Hero Arts), Pinpoint Leaf Plate cover die (Memory Box), White Gouache, Pearl Metallic Acrylic Paint (Ranger), Wow Superfine white embossing powder
Copics:  R37, 35, 43,YG67, 45, 41, B99, YR24, 23, Y21