Showing posts with label Stamping Bella. Show all posts

Sunday, September 7, 2025

So Sweet for the Paper Players

Hello friends!  It's time for a new challenge at The Paper Players and this week the lovely Ann is hosting.  It's Theme week and Ann has chosen a great one that has loads of options for creating.  Let's take a look!

I'm also joining in with the lovelies at TOC, with their friendship/encouragement/support challenge.  My card, while a bit punny, is letting the recipient know they are appreciated.


Before getting to my card, I want to take a moment to congratulate Christy Stanford for being our newest member of the Paper Players Design Team!  Christy was a year-long guest designer a few years ago and has been joining us each week on a regular basis with her delightful and charming cards.  Welcome to the team, Christy!

For our latest PP challenge, and since we're heading into fall, I chose to use a little cutie eating her caramel apple.  I remember loving them when I was young. 


To start, I stamped the girl and the apples, then masked them off so I could create the scene using stencils for the sky and ground.  Once that was complete, the masks were removed and I colored her in fall colors using Copic markers.  

I decided to cut out and pop up the center of the panel using an arch die, then stamped the sentiment.  I added the outside to a white card base then popped up the center portion.  I finished off the apple with some Glossy Accents to make it shiny and when that was dry, also used a white gel pen to create highlights.


What are you inspired to create using this theme?  For more ideas, please head over to the challenge blog where my talented teammates have loads of great design to inspire you.  The challenge remains open until 3pm EDT, Friday September 12th. I hope you'll join us this week!

Thanks for stopping by!

Stef

  • Stamping Bella Caramel Apple Bundle Girl stamp
  • Altenew Sweet Jasmine sentiment stamp
  • Simon Says Stamp Landscapes and MFT Mini Cloud Edges stencils
  • Altenew Sea Breeze and SSS Fairway and Field inks
  • SSS A2 Arches die
  • Copics - YR18, 09, 07, 15, 21, 27, 23, R59, 37, 35, G29, 17, 03, E29, 27, 23, 21, 11, 00

Monday, September 1, 2025

Pumpkin Patch for Color Hues

Hello friends!  The first of the month has rolled around again (can you believe it???) and Color Hues has a new challenge.  The lovely Karen is hosting and has chosen a lovely color combo of orange and green.  Hmmm, rather fall-ish to me...🍃🎃.

As you can tell from the title of my post, I definitely went for a fall scene and used a sweet Bundle girl from Stamping Bella.


The scene was stamped, then before coloring with my Copics, the sky was stenciled using a light orange ink and a cloud stencil.  I completed the coloring, stamped the sentiment and die cut the panel with a rectangle die.  The panel was then added to a green matte that was barely larger than the colored panel.  

I added that to the card base, then as I was photographing it, I wondered to myself, where is all the green?  Frankly, there wasn't much because I opted to color the little girl's outfit in brown rather than green, and the leaves and the mat didn't provide much.  I think I lost my mind for a short time while creating this card lol!  Anybody else have those days?

A plaid cover die to the rescue!  It was cut with a Tim Holtz cover die, adhered to the card base, then the main image was added to finish the card.  Finally!


Thanks for taking time to stop by! I encourage you to pop over to the challenge blog where my very talented teammates have a variety of card design using these colors.  The challenge remains open until Sunday, 9/14 at 3pm EDT.  I hope to see your card in the gallery!


Stef

  • Stamping Bella Bundle Girl at the Pumpkin Patch and Frightful & Delightful sentiment set stamps
  • MFT Mini Cloud Edges die
  • Hero Arts Nesting Rectangle die
  • Tim Holtz Simple Plaid cover die
  • Copics:  Pumpkin - YR18, 24, 09, 07, 16, Y38 E57, 35; Leaves YG67, 17, 03; Skin E11, 21, 00; Hat, Jacket and Boots E77, 74, 71; Scarf T2, 0; Ground E31, 41

Sunday, January 19, 2025

Special Delivery for The Paper Players

Happy Sunday, friends!  We have a new challenge at The Paper Players and this week the lovely Jaydee is hosting our CAS challenge with a postage theme.

It's a great theme given that postal cards have been trending for a couple of years.  For my card, I used an older stamp from Stamping Bella.


That sweet little owl was stamped then colored with Copic markers. I ended up fussy cutting her so I could place her on the background stenciled with clouds.  The card design was inspired by this recent You Tube video by Jill Foster for Penny Black.  

I cut a panel to roughly 3.25" x 4.25", then stenciled it and added it to the white card base.  I cut a 1/8th inch strip of red cardstock, then adhered it next to the stenciled panel. The sentiment was stamped and die cut, then both the owl and the sentiment were added with thin foam squares.  Lastly, three tiny hearts die cut from the same red cardstock were adhered around the sentiment.  Super quick and easy card!


For more inspiration, please head over to the Paper Players blog and check out what my talented teammates have created!  The challenge remains open until Friday, January 24th at 3pm EST. Hope to see your card in the gallery!

Thanks for stopping by and take care!

Stef

  • Stamping Bella Special Delivery stamp
  • Hero Arts You're Mine stamps and dies
  • Taylored Expressions Hang-On Hearts die
  • MFT Rolling Clouds stencil
  • Salvaged Patina Distress Ink
  • SSS Schoolhouse Red cardstock
  • Copics - E29, 37, 33, 31, 30, R46, 14, BG49, 13, 11

Monday, September 16, 2024

Girl With A Dream for Color Hues

Hello friends!  I'm back with a card for the new Color Hues challenge.  This time the lovely Cindy has chosen a pretty color combination of pink and blue.


To me, this is a rather dreamy color combination, and when pink is involved, I always want to color flowers.  But this time I had fun with a rather kooky little card.


I'd had my eyes on this stamp set from Stamping Bella for quite a while and so a few months ago I bought it along with a couple of the other Oddball stamps.  I soooo adore these!  Just the drawings crack me up but this one had a fabulous sentiment as well that had me smiling the entire time I was making the card.

I began by stamping her on a 3.75" x 5" panel of white, making sure I had room for my sentiment (which I cut apart in order to fit), then colored her with Copic and Olo markers.  

Next, I softly ink blended pink all around her, then used a stencil to add tone-on-tone detail.  The last step was to add the sentiment using foam squares.  I think this card will be sitting on my desk for a while because it tickles me so!


How do these colors speak to you?  As you can see, there are many directions you could go with them.  For more ideas and fabulous inspiration, please head over to the challenge blog and see what my talented teammates and Guest Designer Ishani have created! I hope you'll join us - the challenge remains open until 9 am EDT on Sunday 9/29.

Thanks for visiting and take care!

Stef

  • Stamping Bella Oddball With A Coffee
  • Simon Says Stamp Lattice Tile Stencil
  • Copics - W3, 0, C9, 7, 5, 3, 1, B93, E11, 21, 00
  • Olos - RV 1.7, 1.5, 1.3, 1.1, B0.6, 0.5, 0.3, 0.2

Sunday, July 21, 2024

Birthday Queen for The Paper Players

Hello friends!  This week The Paper Players brings you a CAS Birthday challenge.

Summertime is the height of birthday season for my family, so it was no trouble making a CAS birthday card.  This one went to my granddaughter, who loved the humor of it.


The stamp set is from Stamping Bella and all of their packaging has a colored example on the front, so this one was relatively easy to recreate.  I knew the pleats were going to be a challenge for me to color, so I stamped the image twice, practiced on one then set about coloring the final image, for which I used Copic markers.

Next the panel was cut with a diagonal stitched rectangle die, then matted on a light purple card stock.  I cut two additional panels from scrap cardstock and layered the behind the main image, then adhered it to the black card base.  The sentiment was stamped and fussy cut in a wonky fashion befitting the script and the "queen", and added to the card front with foam tape.  The last touch was to add some black rhinestones and using a shimmer pen on her crown and dress, because who doesn't need a bit of sparkle on their birthday?


Thanks for visiting, now pop on over to the challenge blog, where my talented teammates have some wonderful inspiration to share with you!

Take care!

Stef

  • Stamping Bella Oddball Birthday Queen stamp
  • Pinkfresh Studio Diagonal Stitched Rectangle die
  • Honey Bee Stamps Obsidian Rhinestones
  • Tonic Aqua Shimmer pen
  • Copics: Crown- YR24, 23, 15, 11; Hair-E29, 37, 33; Skin-E04, 11, 01, 00; Dress-V17, 15, 01; Shoes, Skulls, Plate and Fork-T8, 6, 4, 2, 0; Cake-E59, 57, 55, 53; Shadow-W3, 1, 0

Sunday, November 19, 2023

Caroling Owls

Hello friends!  Just popping in with a fun card that I made for this week's challenges at Color Throwdown and Just Us Girls.  I was inspired by the pinks and greens in both challenges.


I decided to use a darling stamp set from Stamping Bella to create a few Christmas cards. 


These happy owls just make me smile, like so many SB stamps.  I stamped them in an alcohol friendly ink, colored them with Copic markers using pinks, greens and a couple of grays (warm for the owls, cool for the shadows), then restamped them with black pigment ink.  The sentiment is from a Purple Onion holiday sentiment set.


I used two Spellbinders Essential Stylish Ovals to die cut the image and a green mat and added the die cut sentiment with thin foam squares. The embossed background was sprayed with Hero Arts White Iridescent Shimmer Spray.  When that dried, it was adhered to the A2 card base, then the owls added with thin foam tape for a small bit of dimension. In my stash I had some small snowflakes die cut from silver glitter cardstock, so I added a few of those then finished things off with a white gel pen on the scarves and Star Dust Stickles on the brim and poms of the hats.  I love how this turned out!


I hope you've had a great weekend and if you're in the US, that you have a wonderful Thanksgiving!  

Take care and thanks for visiting!

Stef


Stamps:  Stamping Bella Three Owls Caroling, Purple Onion Winter Wishes Sentiment Set
Paper:  Neenah Solar White, C&9 Evergreen, SSS Silver Glitter
Ink:  Memento Tuxedo Black, Versafine Clair Nocturne
Dies:  Spellbinders Essential Stylish Ovals, Altenew Featured Sentiment die, Hero Arts Snowflake Confetti Fancy die
Embossing Folder, SSS Icy Snowflakes
Other:  Hero Arts White Iridescent Shimmer Spray, White Sakura Gelly Roll pen, Star Dust Stickles
Copics:  W3, 1, 0, C3, 1, 0, R43, 32, 20, E08, G28, 09, 02

Wednesday, August 23, 2023

Friends Like You for Christmas Craft Creations

Hello and welcome!  I'm back with my reminder card for Christmas Craft Creations.  This month our theme is CAS and my goodness, both the launch and reminder design teams have some beautiful samples to inspire you!


For my card, I used a sweet little Bundle Girl from Stamping Bella.


It's easy to keep my cards clean and simple using the Bundle Girl stamps, as they are just so adorable on their own.  This cutie and her friend the blue bird were colored with Copic markers.  I also used a white gel pen to add highlights on the berries and polka dots on her scarf.


Next, I searched through my Christmas sentiment stamps and was so pleased that this one from Poppystamps couldn't be more perfect.  I centered it and stamped in black pigment ink, then the panel was die cut with the stitched modern rectangle die for a nice bit of additional interest.  I cut two more panels with the same die, layered them up and adhered it to the cardbase to finish things off.


Now that it's getting to be time to get serious about making holiday cards, we'd love to have you join us and add to your stash at the same time!  The challenge is open until September 12th, so there's still plenty of time to play along.

Take care!  

Stef


Stamps:  Stamping Bella Bundle Girl with a Winter Branch, Poppystamps Christmas Sparkle
Paper:  Neenah Solar White
Ink:  Memento Tuxedo Black, Versafine Clair Nocturne
Other:  MFT Stitched Modern Rectangle STAX die, Sakura White Gelly Roll pen
Copics:  R89, 59, 29, 27, 21, 20, W3, 1, 0, G28, 09, 05, 02, E11, 21, 00, B26, 24, 21, 91, Y38, BG000, 0000

Sunday, June 11, 2023

Just a Bunch of Hocus Pocus

Hello there!  I'm back with my second post of the day (you can find my Sunday Stamps DT post here.) For this post I'm playing along with the super fun challenge at Inkspirational, where they want us to share seasonal cards.  


Every year since my grandchildren were young, I have sent each of them a Halloween card.  Now that they are adults, I still do it because it's fun, they love getting them and I love to make them.  So, the card I'm sharing today was one I made for my granddaughter last fall but have never shared it in a blog post, so I thought now's the perfect time!


My favorite Halloween movie (and probably so for many people) was and is Hocus Pocus.  I'm a huge Bette Midler fan and she and the other two women were absolutely hilarious.  So, when I saw that Stamping Bella had this stamp, it was a must have for me.  

After stamping the image, I used Copic markers to color the witches and the background, using a lot of inspiration for that from the super talented Elaine Hughes and the other DT at SB.  The panel was then cut down with a wonky rectangle die, then adhered to a black A2 card base.


The sentiments are from a separate stamp set (both listed below) and after they were white heat embossed on black, I fussy cut them down to size and added them with a bit of foam tape.  The last step was to add some Honey Bee Stamps Obsidian Rhinestones, including a small one for the necklace on the middle witch.


Thanks so much for taking time to stop by.  I hope you have a great week ahead!

Take care!

Stef


Stamps: Stamping Bella Curvy Girls Witches 3 and Frightful and Delightful
Paper:  Neenah Solar White, Hero Arts Pitch Black
Ink:  Memento Tuxedo Black, Versamark
Other:  Simon Says Stamp Wonky Rectangle die, Honey Bee Stamps Obsidian Rhinestones
Copics:  Hair: (YR35, 33, 31) (E29, 09, YR18, 14) (C9, 7, 6, 3); Dresses: (BV29, 09, 06, BG99, G28, YG67, 17, 25 W9, 7, 5) (RV99, 19, 66, 55, BV17, V17, 15, 12) (E57, YR18, 16, Y17, BV17, V17, 15, 12); Background: V25, 22, T6, 4

Wednesday, February 1, 2023

A Whole Year More IncredibleRer

Hello friends!  I'm popping in with my second card of the day (you can find my DT card for Color Hues here.)  This card is a sweet CAS birthday card for the challenges at Just Us Girls and Seize the Birthday.


I've had this darling stamp from Stamping Bella for a number of months and never used it, so these challenges were a prime opportunity to get it inked up.


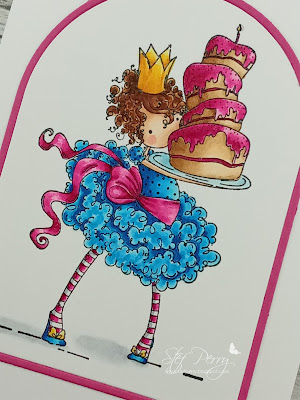
Little Miss Tiny Townie Bree definitely has her hands full with that enormous cake topped with a small candle.  She was stamped and colored with Copic markers, then die cut with an Essential Arches die from Ellen Hutson.  I used the same die to cut an arch from SSS Doll Pink cardstock but only using the frame portion.  


The arched panel with the colored image was adhered directly to the card front, then I ran a bead of glue all around the outside of it so I could adhere the frame.  Unfortunately, the photos don't capture the shimmer added with an Aqua Shimmer pen to her crown, the big bow around her waist and the cake frosting, but it looks pretty IRL!  The candle is pretty tiny, so I had to delicately color it with the same bright pink and the flame in yellow, then I added a touch of glossy accents to the flame.  I tried to fit a sentiment on the card front but nothing worked so I put it on the inside.


The first part of the sentiment, which I think is just too cute (!), is from the same stamp set.  The Happy Birthday is from an old Paper Smooches set called Sentiment Sampler.  I thought the two fonts worked well together.


Well, there you have it, my CAS birthday card with a candle!  Thanks for taking a moment to stop by!  

Take care!

Stef


Copics:  B26, 04, 2, 01, 00, RV17, 06, 04, 02, YR24, 23, Y15, 11, E57, 55, 53, 51, 37, 33, 31, 29, 21, 11, 000, R21

Sunday, May 29, 2022

Special Delivery for Sunday Stamps

Hello and welcome!  It's time for a new challenge at Sunday Stamps and this time Heidi has given us a very interesting and fun sketch to work with.

I love the diagonal cut in the top rectangle to give it a different look, and initially I thought of using a flower die (what a surprise, right?) across both sections but then I was inspired to go a different direction.


I've had this cute little set from Stamping Bella for months and hadn't yet used it, so I thought it would be a fun way to use the sketch.  Initially I was going to use patterned paper but when I decided on the paper, I didn't want to cut it up so I used it for the background.  The sweet little owl with her special delivery envelope was colored with Copic markers then fussy cut, as there are no coordinating dies.  The sentiment was stamped, trimmed down, cut in two then rimmed with one of the Copic markers used to color the envelope.


The floral panel was die cut with a stitched rectangle die, then added to a white woodgrain card base, which is also the same paper I used for the diagonally split rectangle.  I used a brown Copic marker to color a strip of cardstock, matted it on a slightly larger white one, then adhered to the card.  The parts of the split rectangle were added with foam tape, as were the own and sentiment.  I debated about adding any embellishments as the background is already pretty darn busy, but in the end I liked how it looked with the addition of a few silver pearls.


Thanks for taking time to stop by!  I hope you'll use the link above to see how the other DT members used this sketch in spectacular fashion and also take time to join us!

Take care!

Stef


Stamps:  Special Delivery (Stamping Bella)
Paper:  Neenah Solar White, White Woodgrain (Ellen Hutson), Honey Bee Stamps "Free Bee" patterned paper (gift with purchase)
Ink:  Memento Tuxedo Black, Versafine Clair Nocturne
Other:  Stitched Rectangle die (MFT), Aqua Shimmer Pen (Tonic), Pearls - Silver Mix (Lucy's Cards)
Copics:  E77, 19, 15, 13, 11, 01, 000, 0000, YR14, R59

Tuesday, October 26, 2021

Peace Joy Hope Love

Hello and welcome!  I have a card to share that I made for the current Inspired By Challenge, using their Christmas inspiration board.


I'm working on my Christmas cards, as I'm sure many of you are as well, and I was inspired by the soft, muted colors of the board that I thought would work well with one of my Stamping Bella stamps.


The sweet image was stamped on a panel of white then, without masking, the background was stenciled using the Peace Joy Hope Love stencil with Polar Bear ink and using a light hand.  I also took the blending brush and lightly went over the background going around our cute little Bundle Girl and the bird, but I also wasn't too worried as I knew the Copic markers would cover up any unwanted ink. Copics are typically not muted colors but I found a salmon pink marker (RV42) I bought last summer and had never used that worked for a less saturated pink.  It also went well with the muted blue greens used on her scarf, boots and the snow as well as the inked background.


When the coloring was complete, I put the panel back in my Misti where I'd left the stamp and reinked it with black pigment ink to get a better outline.  I've seen many a YT crafter do this but I rarely remember to do it myself, so I'm glad I did here as it made a difference.

Next the panel was trimmed down to be layered on the slightly larger white scallop panel but I thought it needed a mat to make it stand out a bit more.  A white panel was cut slightly larger and colored around the edges with one of the blue green markers then all the layers were adhered together.  After adding to the card base with foam tape, Glossy Accents was used to bring a nice shine to the star and tree ornaments.  I was going to add a sentiment on the front but I didn't want to cover up the stenciled words, so I left it as is.  What do you think?  Should I add a sentiment before sending out?

Thanks for stopping by, I appreciate it!  I'll be back later today with another post, so drop back by if you have a chance.

Take care!

Stef


Stamps:  Bundle Girl With A Christmas Tree and a Birdie (Stamping Bella)
Paper:  Neenah Solar White,
Ink:  Memento Tuxedo Black, Versafine Clair Nocturne, Polar Bear (Altenew)
Other:  Peace Joy Hope Love stencil (Simon Says Stamp), A2 Scallop rectangle die (Honey Bee), Glossy Accents (Ranger)
Copics:  Girl - E11, 21, 51, RV93, 42, R30, 20, E11, 21, 51; Bird - BG72, 70; Tree - BG96, 90, YG93, E44; Star and ornaments - YR23, 21, E09, R46

Thursday, October 14, 2021

Snow Globe Deer

Hello and welcome!  Today I'm slipping in on the final hours of a new challenge - the Peace on Earth Christmas Challenge.  It's twice monthly and brought to us by the tireless (this is their 4th blog!) and oh-so-talented Diane and Darlene!  I just found out about it today (thanks Michele) and saw that I had a couple of hours left to join in.  Be sure to head over there and check it out.  From the participation, it looks like they have another hit on their hands!


I made this card a few days ago just for fun, so it was great to have on hand for the challenge. I used a cute new Stamping Bella stamp set with a snow globe and three sets of critters that can be stamped inside of it.  I decided to go with the darling little deer. 


Didn't I say they were cute?  These are very tiny images, so I did very simple Copic coloring, including the background and the base for the snow globe.  And of course, what's a snow globe with out snow? I created the snow using a white gel pen.  When the coloring was complete, I fussy out the image.


Next a panel of white was sprayed with some shimmer spray (photos don't pick that up unfortunately), embossed with a snow embossing folder, die cut with on of the Altenew Mix and Match Frames dies, then mounted on the navy card base with foam tape.  The sentiments, which are from a different stamp set, were white heat embossed on navy then trimmed out.  First the globe was added to the panel with thin foam tape, then the sentiments were added, also with thin foam tape to finish things off.


Thanks for taking time to visit, I really appreciate it!  Be sure to use the link above and check out this fun new challenge!

Stef


Stamps:  Design a Globe (SB), Santa's Sleigh Ride (Simon Says Stamp)
Paper:  Neenah Solar White, Soft Navy (SSS)
Ink:  Memento Tuxedo Black, Versamark
Other:  Softly Falling embossing folder (ret. SU), Mix and Match Frames die set (Altenew), Detail White embossing powder (SSS), Sparkle Sheer Shimmer Spray, Sakura White Gelly Roll pen
Copics:  E37, 35, 33, 31, 42, YR20, 000, R39, 37, 35, G46, 43, Y28, 15, C5, 3, 1, 0, B39, 37, 14 12

Wednesday, October 6, 2021

Spooky!

Hello and welcome!  Today I'm sharing a card that I made for Halloween to be sent to my granddaughter this year.  I'm sharing it with two challenges with Halloween themes - the Paper Players and Just Us Girls.


For this card I turned to one of my favorite stamps from Stamping Bella and I decided to CASE this card I made with it last year, with a few changes and additions.


Love those crazy pumpkins!  First step was to ink up and color the pumpkins with Copic markers. I determined where the moon was going to be on the panel, stenciled the bats in black ink and clear heat embossed them, then masked the pumpkins and the moon so the background could be ink blended.


Distress Oxide inks were used to create the background, then I removed the moon mask, inked the circle up with Fossilized Amber, then used a moon stencil to create the "craters".  The sentiment was cut twice from black and once from purple glitter paper, layered up and adhered to the vellum shadow.  The vellum has been covered on the backside with a piece of double sided adhesive, so it could be securely adhered to the inky background.  After using the deckle rectangle die to cut the panel, it was adhered to a piece of fun foam then added to the orange card base.  

I debated about whether or not to splatter the panel with water drops for that cool oxidization and opted to do so, covering up the moon and the sentiment before splattering. I think I got a bit carried away lol!, but I do have to say IRL the water spots are more subtle than in the photos.


Thanks for taking time to visit, I really appreciate it!

Take care and stay safe!

Stef


Stamps:  Oddball Naughty Pumpkins (Stamping Bella)
Paper:  Neenah Solar White, Burnt Orange (Simon Says Stamp), Black, Frosted Glitter Paper  (Memory Box), vellum
Ink:  Memento Tuxedo Black, Versafine Clair Nocturne; Fossilized Amber, Spiced Marmalade, Crackling Campfire, Seedess Preserves, Chipped Sapphire, Gathered Twigs, Walnut Stain and Black Soot DOX
Other:  Deckled Frame die (Waffle Flower), Spooky dies (SSS), Layered Bats stencil (SSS), Moon Stencil (Tim Holtz), Copic multiliner, Ultrafine Clear embossing powder.
Copics:  YR18, 09, Y38, 17, E29, 37, YG 97, 95, 93, C3, W9, 7