Showing posts with label Festive Friday. Show all posts

Thursday, October 19, 2023

Spooky Forest

Hello friends!  I have another Halloween card to share with you.  I'm sharing it over at Just Us Girls (card #2!), Festive Friday and the Four Seasons Challenge (card #3!).  

(I went with black, stencil, witch and moon)

So I went a little crazy on stocking up with new Halloween stuff and this card mixes and matches die cuts from Simon Says Stamp and Tim Holtz.


I LOVE making Halloween cards so this was so fun to put together.  I started with the SSS Arched Forest embossing folder and die.  I used two shades of brown (all inks used are Distress Oxide listed below) to ink blend a panel of Tim Holtz Heavyweight cardstock that I'd embossed with the Arched Forest folder, then used the matching die to cut out the background, leaving just the trees.  I re-embossed the tree section as it got flattened out a bit in the die cutting process.

Next I used a moon mask on another panel of the same cardstock and ink blended the spooky sky.  I then used a moon stencil to added layers to the moon, then the panel was splattered with Hocus Pocus and Unravelled Distress Mica Stain Sprays.


While the panel dried, I die cut the fun trick-or-treaters from black cardstock three times, then adhered them together for some dimension. I just love the kid with the pumpkin head lol! Before adding the embossed trees to the background, I stenciled the bats with some black pigment ink.  After adhering the trees to the background, the panel was slightly trimmed down and added to a black card base.  After the trick-or-treaters and sentiment were adhered, I used a white gel pen to add just a few highlights from the moon and that finished things off!


If you like Halloween cards, take a peek at a couple cards I made last month here and here.

Thanks for taking time to visit.  Take care!

Stef


Stamps:  Stamping Bella Frightful and Delightful (sentiment)
Paper:  Hero Arts Pitch Black, TH Heavyweight white
Ink:  Versamark, Versafine Clair Nocturne;  Antique Linen, Scattered Straw, Fossilized Amber, Spiced Marmalade, Wild Honey, Gathered Twigs, Walnut Stain, Black Soot, Villainous Potion and Wilted Violet Distress Oxide
Die/Embossing folder:  SSS Arched Forest, Tim Holtz Halloween Night
Stencils:  Picket Fence Mini Haunted Moon Blending Stencils, SSS Layered Bats
Sprays:  Hocus Pocus and Unraveled Distress Mica Stain Sprays

Sunday, October 16, 2022

Is it Halloween Yet? for Sunday Stamps

Hello friends!  It's time for a new challenge at Sunday Stamps and this time it is a sketch brought to you by yours truly.  I hope you like it and are inspired to join us!

I'll also joining the lovely ladies at Festive Friday for their Halloween challenge - my card features moon, pumpkin orange, black and ghost from the inspo list - and the Anything Goes Fall Challenge at The Four Seasons Challenge.


My family loves to celebrate Halloween so it's been tradition since I started card making back in 2007 for me to send the three grandkids Halloween cards.  And I love making Halloween cards!  


This was a fun one to put together.  I bought dies that are intended to build dimensional tags but can also be used on card fronts.  I started by die cutting the top (frame with wrought-iron fence) and bottom (spooky house) from black cardstock.  Two additional layers are added in-between were cut from white cardstock and colored with Copic markers.  I also used Copics to color the house windows (cut separately from white cardstock) and the pumpkins.  The backer piece was die cut from white and ink blended to create the moon and spooky purple sky.  When that was complete, all the layers were glued together, the white ghosts added floating in the sky, the pumpkins to the front left and the two bats die cut from black glitter paper adhered at the top.


The banner was cut from some Halloween patterned paper and layered on a black cardbase.  The orange strip across the top seemed rather boring compared to the remainder of the card, and then I remembered I still have oodles of long retired black spider web doilies.  I used one, cutting it down to fit on the corners, then adhered the focal image on top.  The sentiment was white heat embossed and added to the card front then the last step was to add Glossy Accents to the door and all the windows in house. 


Thanks so much for visiting, I appreciate it.  Please use the link above to check out the fabulous cards by the other SSC DT members and hopefully join us with your take on my sketch!

Take care!

Stef


Stamps:  Wicked Together (sentiment/Picket Fence Studios)
Paper:  Neenah Solar White, Pitch Black (Hero Arts), Pumpkin Pie (SU), Spooktacular 6" x 8.5" paper pad (Honey Bee Stamps), 6" x 6" Glitter Paper Assortment pack (SSS)
Ink:  Versamark; Scattered Straw, Wilted Violet, Villainous Potion, Black Soot Distress Inks
Other:  Haunted Entrance Dome Layer die, Winterwood Dome Layer die, Haunted House Dome Layer die, Nested Globes die (all Memory Box); Skinny Strip die (MFT), Spider Web Doily, White embossing powder, Glossy Accents
Copics:  YR18, 07, 04, BG99, E79, 100

Tuesday, June 28, 2022

Big Birthday Splash

Hello friends!  Today I have a fun card that I made for my great niece's upcoming birthday and I'm sharing it with three challenges - Seize the Birthday, Festive Friday and Double D, all with summertime themes.


(cat, hearts, tree)


I have four great nieces and one great nephew of various ages, but this card is for the youngest who is turning nine.


Oh my, I had so much fun making this card!  I just can't get enough of that sassy cat struttin' her stuff down the beach lol!  To begin, all the main images were stamped then colored with Copic markers.  After they were die cut, I started working on the scene.  I used masking paper atop a white panel to mark off the sections which were then ink blended, using a bit darker blue for the water than the sky.  A white gel pen was used to create "waves" and foam along the water's edge, and light brown Copic markers to create the dunes and dots for texture.  My wave drawing skills could probably use some work ;-) but I'm pretty sure my niece won't care!


As I was building the scene and adhering the images with foam tape, I used the same brown markers to create shadows.  Then I bravely put the panel in my Misti and stamped the sentiment just under the sun. I did test on a scrap piece of acetate to ensure the sentiments were straight before finally stamping on the panel.  After it was adhered to the white card base, I found some small, bright pink hearts that were saved after die cutting a cover die.  Three were adhered, then I covered them with Glossy Accents for shine and that was it.


I hope you're having a great week and are able to get yourself out and enjoy some summer activities!  Thanks for taking time to stop by!

Take care!

Stef


Stamps:  Beach Best Friends (MFT), Rain or Shine (sun image/MFT), Summertime Birthday (sentiment/Colorado Craft Company)
Paper:  Neenah Solar White, Distress White Heavystock (Tim Holtz), Polished Pink (SU)
Ink:  Memento Tuxedo Black, Versafine Clair Nocturne, Latte and Marine (Simon Says Stamp), Tumbled Glass and Antique Linen Distress
Other:  Beach Best Friends dies, Heart Cover Plate die (Gina K), Rain or Shine die, Glossy Accents (Ranger), Sakura White Gelly Roll pen
Copics:  Y26, 19, 15, 11, G09, YG07, 01, B05, 02, 00, RV06, 04, 02, 00, R59, 46, 27, 05, E37, 35, 34, 33, 31, 30

Friday, May 6, 2022

Just A Note With Fruit

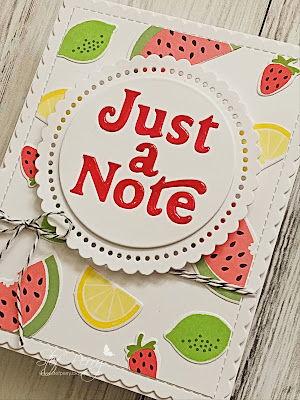
Hi there!  I have a card to share that I made for the current Festive Friday challenge.  I thought celebrating National Eat What You Want Day was fun, and perfect timing since I only recently acquired a stamp set with food items that I wanted to get inked up.

The stamp set I used is one I received as part of a three-day card making event back in March, and I didn't know if I'd use it because it wasn't quite my "style" I guess, but thought it was a fun one to have in my stash.  And sure enough, it worked great for this challenge, where my three items from the Inspo List are Food, Red and Twine.


I started by stamping each piece of fruit three times.  The stamps are layering stamps, so using a stamp positioner was very helpful.  After the stamping was complete, the fruit pieces along with the scallop circle and sentiment circle were all die cut.  I cut two additional circles to layer under the sentiment circle to give it some girth, colored the letters with a red Copic marker then inserted it into the die cut openings.


To go along with the scallop circle, I used a scallop rectangle die to cut a white panel.  A separate white panel was trimmed down to fit just inside the stitching on the scallop rectangle, then I adhered all the fruit pieces, trimming off the excess before adhering to the scallop rectangle.  The sentiment circle was added with foam tape, the panel wrapped with black Baker's Twine, then the panel was adhered to the card base.  The die cut sentiment letters looked a little flat, so I used Glossy Accents to add shine and I was much happier with how it turned out.


Thanks for visiting, I always appreciate it!  

Take care!

Stef


Stamps:  Just A Note (LDRS)
Paper:  Neenah Solar White
Ink:  Versafine Clair Nocturne; Lime, Fresh Leaf, Forest Glades, Green Opal, Coral Bliss, Heartbeat, Citrus Burst and Maple Yellow (Altenew)
Other:  Just A Note dies, Black Baker's Twine (old SU), Scallop A2 Rectangle die (Honey Bee), Copic marker R46, Ranger Glossy Accents

Monday, April 18, 2022

Butterfly Birthday for the SCS Color Challenge

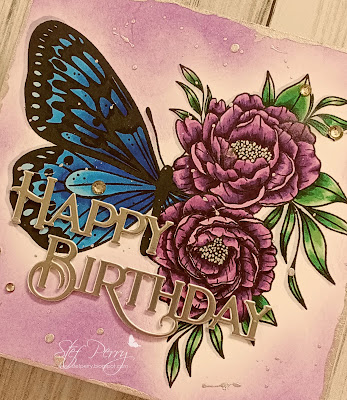
Hello and welcome!  I'm in my third week of guesting with the fabulous Color Challenge team at Splitcoaststampers!  This week, my dear former teamie Karen has chosen some vibrant colors for us to play with - Gorgeous Grape, Pacific Point and Pear Pizzazz.  I was a bit thrown by Pacific Point at first, but figured out a way to use it that I really love, and I hope you do too!

I'm also joining the current challenge at Festive Friday.  I used blue, rhinestones and die cuts from the Inspo List.


Because the image I stamped and colored was so large, and I didn't want to trim it down, the card ended up being five inches square.


Such an amazing stamp and the challenge colors worked beautifully with it.  It was colored with Copic markers, then I inked blended around it with a vibrant Distress Oxide ink called Villainous Poison, which as you can imagine was released last fall just in time for Halloween.  I tried to color the stamen gray but it was too blah, so I used my silver gel pen instead.  And that led me to use more silver for the sentiment die cuts and some metallic ink as well.


After the ink blending was complete, I used a metallic paint/ink around the edges of the colored panel, then decided to add some splatter.  I had a couple of large "bloops" that I had to try to clean up and eventually covered up one with the strategic placement of a crystal gem.  After the paint dried, the panel was adhered to the white card base, then the sentiment (which was die cut and layered 3 times) was added along with the gems.  


I'm so glad you took time to stop by!  I've added a link above to the Splitcoaststamper's front page from which you can access the Color Challenge to check out all the great inspiration and play along this week.

Take care!

Stef


Stamps:  Spread Your Wings (Gina K Designs)
Paper:  Neenah Solar White, Matte Silver (Simon Says Stamp)
Ink:  Memento Tuxedo Black, Villainous Poison Distress Oxide
Other:  Happy Birthday Poe Script dies (Poppystamps), Silver Mica Ink (Kuretake), Silver Gel Pen (Altenew), Crystal Collection-Night Sky (Lucy's Cards)
Copics:  V09, 17, 15, 12, G29, 21, 40, YG45, B28, 26, 24, 21, C2

Wednesday, February 9, 2022

Sweet Friend

Hello and welcome!  Today I have a friendship card to share with you that was made for three challenges, all with the theme of love and friendship.


(pink, sparkle, hearts)


I have three friends back in Oregon that I have been especially close to for several years - we used to go for walks or hikes on a regular basis, plus gather for celebratory meals out and sometimes even allow our spouses to join us lol!  As a result of now living in a different state, I tend to make a lot of friend/hello cards to send.


My card is pretty straightforward.  The floral heart wreath (which I love but recently discovered Simon Says Stamp discontinued or retired it) was stamped and colored with Copic markers then die cut.  The hello sentiment was die cut from pink glitter paper and added to the white die cut shadow.  The sub sentiment, left over from a previous project, was white heat embossed on black cardstock then die cut.


Next, I applied an adhesive sheet to the back of a white cardstock panel then die cut it with a trellis cover plate die.  It was layered on the white card base then I used a bone folder to press it down firmly.  I love the white on white background, adding just enough interest without being too busy. Two more of the floral heart wreaths were die cut from white cardstock, and layered beneath the color image, then adhered to the card front.  Although not captured in the photos, I painted the wreath with an aqua shimmer pen for even more sparkle, then added the sentiment with the aid of strategically placed foam tape and called it done!


 Thanks for taking time to stop by!

Take care!

Stef


Stamps:  You Have My Heart (ret.SSS), Bitty Buzzwords (Honey Bee)
Paper:  Neenah Solar White, Black, Glitter Assortment Pack (SSS)
Ink:  Memento Tuxedo Black, Versamark
Other:  You Have My Heart and Bitty Buzzwords matching dies, Garden Trellis Cover Plate die (Altenew), Featured Sentiment die (Altenew), Tonic Aqua Shimmer pen, SSS Fine Detail White embossing powder
Copics:  RV69, 66, 55, 52, BG99, 96, 93, 90, G29, 21, 40, YG45

Thursday, January 27, 2022

A Groovy Day

Hello and welcome!  Today I have a fun card to share that I made for the challenges at Festive Friday and Fusion.


Used the sketch from Fusion and for Festive Friday, the three elements are brown, masculine, blue.


I've had this fun Ellen Hutson stamp set for a while, which I bought primarily since my husband loves old VW buses (fortunately we don't have room for him to "collect" them lol!).  Since he's seen this particular card, he won't get this one for his birthday, but we have plenty of other male relatives to send it to.  The bus was stamped and colored with Copic markers, die cut with the matching die, then Glossy Accents was added to the lights and the windows. A silver gel pen was used on the peace sign and also randomly along the bumper and the rear view mirrors.  Once the Glossy Accents was dry, I used a white gel pen to add a "reflection" to the windows.


For the rest of the card, I started by die cutting a panel of plaid patterned paper with a Wonky Stitched Rectangle die, then adhered directly to the white card base.  A strip of Crushed Curry was embossed, trimmed down to fit on the plaid layer, the sentiment label adhered behind it, then it was added to the card.  Two skinny strips of Cinnamon Cider cardstock were added to the top and bottom of the strip to help it stand out from the background.  A white circle was layered on a larger one of Cinnamon Cider, then the bus was popped up with foam tape and the entire thing was mounted on the card, also with foam tape.  

Since I was going retro with this card, I even dug out a couple of brads, cut the prongs off the back and glued them to the card front. Back in the day I used brads frequently on my cards, but it's been a long, long time!


Thanks for visiting, I really appreciate it!

Take care!


Stef


Stamps:  Trippin' (Ellen Hutson)
Paper:  Neenah Solar White; Crushed Curry, Cinnamon Cider & Plaid Tidings (all SU)
Ink:  Memento Tuxedo Black, Versafine Clair Nocturne
Other:  Trippin' matching die, Tasteful Texture embossing folder (SU), Wonky Rectangle die (SSS), Nested Infinity Circle dies (Hero Arts), Stitched Jumbo Fishtail die (MFT), Strips 1 die (SSS), brads, Silver and White gel pens (Altenew), Ranger Glossy Accents
Copics:  B04, 02, 01, 000, C9, 7, 5, 1, 00, T4, 2, 0, Y17, 13

Sunday, January 16, 2022

Celebrate!

Hello and welcome! I have a card to share that celebrates milestones for two blogs - Festive Friday and Double D.  Festive Friday is celebrating its 100th challenge and Double D is celebrating its 6th anniversary/birthday.  Big Congrats to both Design Teams and everyone involved in these two great challenges!


I'm also joining the Anything Goes party at Seize the Birthday.


My card, of course, has party balloons and from the FF Inspo list I used celebration, gold, sequins and splatter.  


As you can see, I was in a pink mood when I made this simple card.  I started by gold heat embossing the balloon image on watercolor paper, then used watercolor paint to achieve the bright pink color.  I tried to do a bit of simple shading adding a bit more color on the left side and letting it mix with the lighter layer.  It was die cut after it dried.


For the background, I ink blended a couple of pinks that were a bit lighter in color.  It was die cut with the scallop rectangle die, then splattered with white gouache and gold metallic paint.  While that dried, the sentiment was gold heat embossed on black cardstock and die cut with a label die.  With all the parts dried, the card was assembled.  The balloons were stacked up on two additional die cuts in white cardstock and the sentiment added with a bit of foam tape on each end.  Some clear sequins were scattered about and then I used Glossy Accents on the balloons to make them nice and shiny.  Unfortunately, the shine was difficult to capture in the photos.


Thanks for taking time to visit, I really appreciate it!  

Take care!

Stef


Stamps: Balloon Bundle (MFT)
Paper:  Neenah Solar White, Koh-I-Norr Bristol, Range Watercolor
Ink:  Versamark, Pink Diamond and Pinkalicious (Altenew)
Other:  Artist's 24 pan watercolor (Altenew), Finetec Gold Metallic Paint, Antique Gold embossing powder (Altenew), White Gouache, Balloon Bundle die, Skinny Strips die (MFT), Scallop A2 Rectangle die (Honey Bee), Sparkling Clear Sequins (PPP), Ranger Glossy Accents

Sunday, December 19, 2021

Hug In A Mug

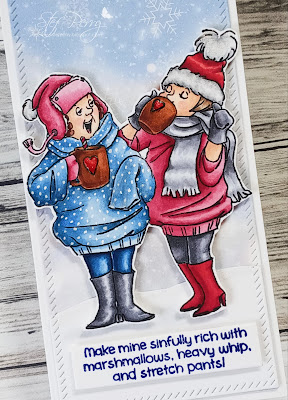
Hello and welcome!  I hope your holiday preparations are going smoothly!  Today I have a card to share with you that I made for the current Festive Friday and Four Seasons challenges.


For Festive Friday, we are to use at least 3 items on the list.  My card includes sparkle, emboss and die cuts.


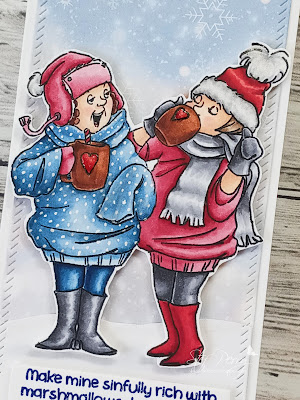
Art Impressions ladies keep me in stitches and this collaboration stamp set with Simon Says Stamp is no exception!  They were stamped, colored with Copic Markers then fussy cut, leaving a small white edge around the images.  Oh, so fun!  Next the sentiment was stamped with blue pigment ink and clear heat embossed.  It was die cut with a sentiment label die then both were set aside so I could create the background. 


I decided to go with a mini-slimline size card with a white card base measuring 3.25" x 6.25".  I found a perfect piece of patterned paper that conveyed the wintery scene I imagined for these ladies, and it was trimmed down with a mini slimline rectangle die that added the nice hash mark (is that what it's called?)  around the edges.  I also hand trimmed a piece of white cardstock for the "snowbank" then cut it down with the same mini slimline rectangle die so the edges would match that of the patterned paper. With those pieces attached to the base, I added the sentiment and ladies with foam tape.  The blue sweater was covered with polka dots using a white gel pen.  Then, using an aqua shimmer pen, sparkle was added to the white "fur" and the heart on the mugs, plus the heart was then covered with Glossy Accents for a nice shine.  The snowbank also got a touch of sparkle along the top and I added a bit of shading to ground the ladies. I think the picture below captures the sparkle a bit better.


Thanks so much for taking time to stop by, I appreciate it so much.  Take care and Happy Holidays!

Stef


Stamps:  Hug In a Much (Art Impressions/SSS)
Paper:  Neenah Solar White, Blurry Flurries 6x6 paper pack (Whimsey Stamps)
Ink:  Memento Tuxedo Black, Versafine Clair Bluebell
Other:  Mini Slimline Essential Bundle rectangle die (Pinkfresh Studio), Sentiment Label die (SSS), Clear embossing powder (Hero Arts), Sakura White Gelly Roll pen, Tonic Nuvo Aqua Shimmer pen, Ranger Glossy Accents
Copics:  B39, 37, 34, R89, 85 83, 81, 59, 46, 27, 20, 14, E29, 39, 33, 11, 21, 0000, C5, 3, 1, 0

Saturday, December 4, 2021

Sprigs and Pine Branches

Hello and welcome!  I have a card to share that I've made for two challenges - Festive Friday and Color Hues. 

(It was fun to find out that in England a jumper is a Christmas sweater. Unfortunately, I didn't have a stamp with one but it's something to think about for next year!)


For I used red, green and gold which fits both challenges (gold is considered a neutral for the Color Hues challenge).  


I love the Holiday Sprigs stamp set from Simon Says Stamp, and it has seen plenty of use in making my Christmas cards as it is fairly easy to make multiples.  I started by stamping the images on multiple panels and coloring everything with Copic markers.  When the coloring was complete, I put the panels back in my Misti and restamped with black pigment ink for a nice black outline.  After die cutting, I painted the poinsettia centers with gold metallic paint, and added Glossy Accents to the berries on the one sprig.


Next, a panel of white was embossed with the Delicate Pine Branches 3D folder then adhered directly to the white card base.  The sentiment was die cut from Matte Gold cardstock and adhered to the white shadow die cut twice and layered to add a bit more dimension so it would stand out better against the white background.  The sprigs were adhered directly to the card, the candy canes on top of them, then the poinsettias added with thin foam tape.  Festive and pretty easy!


Thanks so much for taking time to stop by, I really appreciate it!  

Take care!

Stef

All products from Simon Says Stamp unless otherwise noted
Stamps:  Holiday Sprigs
Paper:  Neenah Solar White, Matte Gold
Ink:  Memento Tuxedo Black, Versafine Claire Nocturne
Other:  Delicate Pine Branches 3D embossing folder, Merry Christmas die (MFT), Holiday Sprigs dies, Metallic Gold paint (Altenew), Glossy Accents (Ranger)
Copics:  R39, 37, 35, BG 96, 93, 90, YG67, 17, 05, 03, T2