Wednesday, July 26, 2023

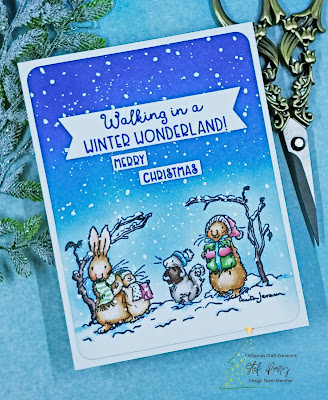
Winter Wonderland for Christmas Craft Creations

Hello and welcome back!  This month's theme at Christmas Craft Creations is Anything Goes - how easy is that?  I'm here with my reminder post and card, and I'm hoping you'll have time to join us and add to your holiday card stash as well - the challenge stays open until Tuesday, August 8th.


Last fall I bought a couple of the Anita Jeram illustrated Christmas stamp sets from Colorado Craft Company but never had an opportunity to use them, so I pulled one out and did so for this challenge!


I absolutely adore these sweet little bunnies and their squirrel friend, obviously on their way to a holiday party as they have presents in hand.  The scene was stamped on an A2 panel of white and also on some masking paper.  While I do have the dies for this set, I decided to mask instead because I really love the look of continuity with a snowy scene.  Once the mask was in place I used a light and medium blue for ink blending the background and once that was complete, the critters and the rest of the scene were colored with Copic markers.


After the panel was cut down with a rounded rectangle die, into my splatter box it went, where I gently added snow with white paint and a small round paintbrush.  I did lay a small piece of Post-it tape over the faces of the critters, because if I forget to, inevitably a big splat would hit one lol!  While the splatter dried, the sentiments were stamped with blue pigment ink and die cut with label dies.  The dried panel was glued directly to the white card base, then the sentiments were popped up with thin foam squares to finish things off.


What is your favorite type of holiday card to make?  We'd love to have you share it with us at CCC!

Take care!

Stef


Stamps:  CCC/Anita Jeram White Christmas
Paper:  Neenah Solar White
Ink:  Simon Says Stamp Morning and Twilight, Versafine Clair Blue Belle, Memento Tuxedo Black
Dies:  Hero Arts Rounded Rectangle Infinity die, MFT Fishtail Foundations die, Gina K Master Layouts 9 
Other:  Dr. Ph. Martin's Bleed Proof White Paint
Copics:  E77, 74, 71, 33, 31, 30, 0000, G46, 43, 40, BG96, 93, 90, 57, 53, 11, 0000, B21, W3, 1, 0, R85, 83, 81, 20

Sunday, July 23, 2023

Glitter Birthday for Sunday Stamps

Hello and welcome back!  It's time for a new challenge at Sunday Stamps and this time Lisa has given us a fabulous sketch to play with.  Be sure to pop over to the challenge blog to see the creative ways the other DT members used it.


To me this design said "use dies" so that's what I did, both for the background and the sentiment.


A week ago I spent the afternoon just playing with Distress Spray Stains and the background panel of this card is one of the results.  Starting with a panel of Distress Watercolor, I sprayed it with Kitsch Flamingo and Wilted Violet, along with squirts of water to get the spray moving.  When I was satisfied with how it looked, I dried it with my heat tool, sprayed it with a shimmer spray, then set it aside to dry while I created the rest of the card components.


Using the Altenew Geo Tiles Cover die, three panels were die cut then adhered together for some girth, and added to the sprayed panel after it dried.  I also die cut a panel of purple glitter paper with the same die, kept the frame for another day, then added the glitter centers to the circles on the card.  The last step was to die cut the sentiment from the same glitter paper and the shadow from vellum and add that to the card front.  All that glitter kind of plays with the camera so the focus isn't as sharp as I'd like but the card is so pretty IRL - lots of purple goodness!


I hope I've given you a bit of inspiration to play along with us - we'd love to see your card in the gallery! 

Take care!

Stef


Paper:  Neenah Solar White, Distress Watercolor, Simon Says Stamp Winter Glitter 6x6 pack, Lawn Fawn Pearl Vellum
Dies:  Altenew Geo Tiles Cover and Versatile Greetings 2 dies
Spray:  Kitsch Flamingo and Wilted Violet Distress Spray Stain, Hero Arts White Iridescent Shimmer Spray

Thursday, July 20, 2023

You're the Coolest

Hello friends!  The Paper Players has a fun CAS challenge this week, so I thought I'd play along.


I love Anne Marie's choice of Bon Appetit! but I don't have many stamps or dies of food, but I did remember one I bought last summer and never got to use.  So, this seemed like the best perfect time to try it out


I was debating whether to die cut and ink blend the popsicle layers or just use multiple colors of cardstock when I spotted an unused panel that I'd ink blended then covered with an iridescent spray, and I thought that would be a fun way to make the popsicles.  We'll just pretend that the spray is frosty-cold goodness lol!  As a child I spent many a hot summer day eating a popsicle or two and those first cool licks were the best!


For the fudgesicle, I originally used a cream cardstock for the ice cream portion but it looked rather blah next two the popsicles, so I ink blended it with Picked Raspberry.  The fudge layer was die cut from brown cardstock, then I added two layers of Ranger Glossy Accents to make it nice and shiny.  Once the sticks were created and everything was adhered together, the sentiment was stamped on the deckled die cut layer which was added to the white card base with foam tape, then the popsicles and fudgesicle were glued on and my CAS card was complete!


Thanks for visiting!  I hope you're able to stay cool and safe in this miserably hot summer.  Here in Idaho. we'll be up around 105 degrees for the next few days.  All the better to stay inside and make more cards!

Take care!

Stef


Stamps:  MFT Pair of Popsicles
Paper:  Neenah Solar White and Desert Storm, Stampin' Up Early Espresso, Strathmore Bristol
Ink:  Simon Says Stamp Amethyst; Distress ink in Chipped Sapphire, Wilted Violet, Pick Raspberry, Spiced Marmalade and Fossilized Amber
Dies:  Pair of Popsicles, Altenew Mix and Match Frames
Other:  Hero Arts White Iridescent Shimmer Spray, Ranger Glossy Accents

Sunday, July 16, 2023

Fragrant Florals for Color Hues

Hello friends!  As we continue to roll through the month of July, it's now time for a new challenge at Color Hues!  This time the lovely Nancy chose the beautiful colors of olive and berry.


I'm also playing along with Seize the Birthday, where they have a fun theme of circle or circles.  Since my card here doesn't it into that part of the challenge, my card is for Anything Goes.


Our CH colors would work wonderfully for a Christmas card, but I decided to head towards my favorite this time, which is using florals.


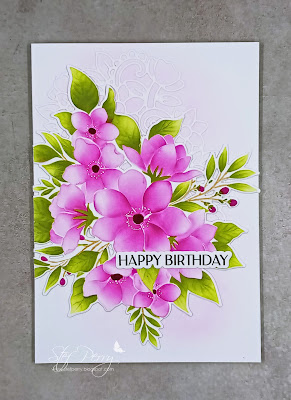
The Altenew Craft Your Life: Fragrant Florals is one of my very favorite sets, this bouquet just makes my heart happy!  I would normally Copic color this image but a couple of weeks ago I used the embossing folder to create this card and decided to use it again along with the matching stencils and die.  

I began by die cutting the image from white cardstock, then used it with the embossing folder.  By doing it in that order, the die cutting didn't flatten the 3D embossing.  I used a combination of Simon Says Stamp and Altenew inks to color it, but the flower centers just weren't dark enough, so I used a dark RV Copic marker to color them, and a white gel pen worked perfectly to highlight the stamen.  I also used a light brown marker to color the stems as stenciling doesn't add that.


Next I used the lightest berry ink to lightly blend a 5"x 7" panel, then a delicate die cut (Altenew's new Fragrant Flowers) was adhered to the panel before adding the main image and the sentiment, both of which were layered twice for a small amount of dimension.  


I am looking forward to seeing what you will create with these colors!  Be sure to head over to the challenge blog where the other DT members have some gorgeous cards to inspire you.  The challenge will stay open until 9 am EST Friday July 28th.  

Take care!

Stef


Stamps:  Waffle Flower Elegant Sentiments
Paper:  Neenah Solar White
Ink:  Versafine Clair Nocturne; Simon Says Stamp Sweets and Taffy; Altenew Olive and Moss
Other:  Altenew Craft Your Life:  Fragrant Florals embossing folder, die and stencils, Altenew Fragrant Flowers die set, WF Elegant Sentiments die, Copics RV69 and E31

Saturday, July 15, 2023

Black-Eyed Susans for The Flower Challenge

Hi all!  We're halfway through the month of July, so it's time for The Flower Challenge reminder post.  This month we are looking for CAS designs.  


As the name of this post suggests, my card features Black-Eyed Susans.  They are such great summer flowers!


I took a cue from Aileen and Vivian's cards from the first of the month on TFC and ink blended my background onto the card base, minimizing layers.  I used an MTF Rectangle Extraordinaire stencil to mask the outside then ink blended light greens and blues into the rectangle.  I haven't used this technique in forever and I appreciated how wonderfully it works for CAS cards.


After coloring the flowers with Copic markers, I used the matching dies to cut them out and then added them to the card front with thin foam tape, because I like that little bit of dimension it adds.  The die cut sentiment is from the same stamp set and after layering it across the flowers my card was complete!


Do you like to make CAS cards?  My endlessly talented teammates and guest designer Therese Calvird have some outstanding examples on TFC blog for your inspiration, so please take a moment to visit and then join us with your CAS card - the challenge remains open through July 25th.  I hope to see your card in the gallery!

Stef


Stamps:  Simon Says Stamp Black-Eyed Susans
Paper:  Neenah Solar White
Ink:  Memento Tuxedo Black, Versafine Clair Nocturne, Simon Says Stamp Marine, Cadette, Limelicious and Pearfection
Other:  Black-Eyed Susan dies, MFT Rectangle Extraordinaire stencil
Copics:  Y26, 08, 13, YG45, G28, 21, E49, 37, 33

Sunday, July 9, 2023

Vibrant Florals for Sunday Stamps

Hello friends!  Today is the beginning of a new challenge at Sunday Stamps and this time we bring you a beautiful color combination!


I was inspired by both the colors and the photo, so I decided to recreate using a foiled image of flowers that I imagined were daisies.


As this is quite a large image, I decided to create a 5"x 7" card in order to limit the amount I had to trim down.  It was foiled with matte gold then I used Copic markers to color.  Cool grays were used to created shadows for the white flowers.  I was originally going to just go around the entire image with blue markers but I ended up loving how the bright blue looked, so I colored in the entire background.


I used a rotary trimmer to cut the panel down to 6"x 4" and it enabled me to cut up to the leaf overhanging on the right side, which I then trimmed around with scissors.  It was mounted on a panel of yellow cardstock then adhered directly to the card base.  The foiled sentiment was popped up with thin foam squares and I was done.


What will you make with these colors?  I hope to see your card in the gallery, but in the meantime, be sure to head over to the challenge blog for more inspiration by the other DT members!

Take care!

Stef


Paper:  Hammermill, Stampin' Up Daffodil, Neenah Solar White
Foiling:  Vibrant Florals Hot Foil Plate, Spellbinders Everyday Sentiments II Hot Foil Plate, Spellbinders Matte Gold Glimmer Hot Foil
Dies:  Waffle Flower A7 Frames, Spellbinders Everyday Sentiments II
Copics:  B4, C2, 1, 00, YG67, 17, 05, 03, Y26, 08, 13

Tuesday, July 4, 2023

You Are the Best for The Flower Challenge

Hello friends and Happy Independence Day to everyone in the US!  It's time for a new challenge at The Flower Challenge, and this month we're focusing on creating CAS cards using flowers.  AND we are so fortunate to have the amazing Therese Calvird as our Guest Designer this month!


I used some cute flowers that had previously been stenciled and die cut but were left unused, so I thought they'd work well for a small grouping on a CAS card.


The flowers are from the Pinkfresh Studio Rainbow Floral set, stenciled in various Altenew pastel colors then die cut with the matching dies.  I decided to carry on the pastel look by ink blending the same pink on a panel cut with the largest Altenew Ornate Nesting rectangle die.  In hindsight, I wish I'd used the yellow in the background to better highlight the pink flowers in the back of the grouping, but I didn't think of it until the card was complete.


After the ink dried on the die cut panel, the sentiment was gold heat embossed.  The flowers were added but things seemed just a wee bit to plain (this is always my challenge with CAS cards lol!) so I did add a few gold glimmer crystals to finish things off before adding the panel to the card base.


Come show us your version of CAS - the challenge is open until the 25th of the month. In the meantime, some beautiful inspiration awaits you at the challenge blog, so be sure to pop over to see what the DT and our special guest Therese have created for you!

Take care!

Stef


Stamps:  Simon Says Stamp Beautiful Friend (sentiment)
Paper:  Neenah Solar White
Ink:  Versamark; Altenew Rose Quartz, Puffy Heart, Lemon Ice, Warm Sunshine, Lime, Fresh Leaf and Wisteria
Dies:  PFS Rainbow Floral, Altenew Ornate Nesting die
Stencil:  Rainbow Floral
Other:  Altenew Antique Gold embossing powder, Studio Katia Gold Glimmer Crystals

Sunday, July 2, 2023

Beautiful Friend

Hi there, I hope your weekend is going well and hopefully you have an extended one due to Independence Day holiday on Tuesday.  I'm here to share a quick post with a card I created for the current challenge at Color Throwdown.


These colors just made me swoon and fortunately I had time this week to put something together before the end of the challenge lol!


I started by using the Altenew Charming Foliage dies to create the flowers and leaves, mostly from Concord & 9th cardstock (listed below).  Putting the layering dies together was pretty easy, using the packaging as a guide.  Then the beautiful new frame from Gina K's Master Layouts 12 was die cut twice from white cardstock and adhered together.

The background was ink blended on Bristol paper with three purples and set aside to dry.  The sentiment was heat embossed on pearlescent vellum then die cut with the stitched circle die, also from the Gina K die set.  That was added to the purple panel along with the frame, then the flowers were arranged and adhered.  All in all, a pretty easy card to make once all the components were assembled.  And I think those die cut flowers are sooo pretty on that lovely frame.  :-)

And one more photo...


Thanks for stopping by, I appreciate it!  Have a great week and take care.

Stef


Stamps:  Simon Says Stamp Beautiful Friend
Paper:  Neenah Solar White, Koh-I-Noor Bristol, Lawn Fawn Pearlescent Vellum; Concord & 9th Sprout, Parsley, Ballet Slipper, Carnation, Sweet Pea and Dragon Fruit; SSS Green Apple
Ink:  Versamark, SSS Lilac, Orchid and Amethyst
Dies:  Altenew Charming Foilage, Gina K Designs Master Layouts 12

Saturday, July 1, 2023

Season's Greetings for Color Hues

Hello and welcome back!  As the calendar flips to another month, it also brings a new challenge over at Color Hues!  This time, the lovely Marcia has chosen Merlot and Navy for her combo.


I thought about making a floral card with these colors but then decided they were perfectly suited for a Christmas card, and I am all about building that stash of holiday cards now instead late fall!  As a result, I'm also joining the new challenge at Inspirational - Christmas in July!


I used the lovely Concord & 9th Holly Berry Turnabout bundle that included the stamp and the dies for this card.  While I didn't have a Merlot ink specifically, I got as close as I could using Simon Says Stamp Cherry, which is almost identical to C & 9's Cranberry.  For the navy, I used SSS Galaxy ink.  I did try to use my new C & 9 Midnight and Cranberry ink pads, but they were still so juicy I couldn't get a crisp image when stamping.  I just need to put them to use and they will be fine in the future, I'm sure.

I used the new Turnabout jig in my Misti and with worked beautifully.  The stamped panel was originally 5.5" square, trimmed down to 3.75" x 5" using a rectangle die.


Next the sentiment, navy backer and leaves were all die cut, along with a 4" x 5.25" panel of SSS Matte Silver that was then layered on an A2 size panel of C&9 Cranberry cardstock.  The leaves were glued to the back of the sentiment then it was all popped up on the card with thin foam squares.  A few silver pearls were added to finish things off.


The design team and our wonderful guest designer Rosemary have some gorgeous inspiration to share with you, so pop on over to the blog and check it out.  I hope you're inspired to join us using this pretty color combo, the challenge will be open until 9 am EDT on July 14th.

Take care!

Stef


Stamps:  C & 9 Holly Berry Turnabout
Paper:  Neenah Solar White, Matte Silver, C & 9 Midnight and Cranberry
Ink:  SSS Cherry and Galaxy
Dies:  Holly Berry dies, Hero Arts Nested Infinity Rectangle dies
Other:  Lucy's Cards Silver Pearl mix