Showing posts with label Fusion. Show all posts

Tuesday, March 8, 2022

Birthday Hugs

Hello and welcome!  I have a card to share that I've made for the challenges at Fusion, where the theme is Turquoise Rose Bouquet, Time Out Challenges, where they are celebrating their 8th birthday (happy birthday DT!), Addicted to Stamps, where the theme is Any Occasion and The Paper Players, where the lovely Jaydee has chosen the theme Spring is in the Air.



I chose to use a beautiful rose stamp set from the latest Altenew project kit that had not yet been inked up and colored the flowers using a member of my favorite color family (teal, turquoise, aqua, love it all!).


Starting with the floral image, it was stamped and colored with Copic markers, then die cut with the coordinating die.  I also stamped, colored and die cut an extra flower bud. I searched through my patterned papers and found a light aqua panel that matched nicely and trimmed it down to a 1.25" strip.
The background was created using the coordinating 3D embossing folder.  The panel was trimmed down to cover an A2 card base.


With the background adhered to the base, it was time to add the rest of the elements.  I cut a slightly smaller strip of white cardstock to give the aqua strip more stability before adhering to the card base.  

I decided roughly where I wanted the floral image to be on the card front, then used the matching die to cut another image from white cardstock.  That was trimmed down and glued to the back of the floral image, but only to the portion of the flowers not adhered to the paper strip, which kept it all level (hope that all makes sense). The additional bud was adhered at the bottom right to give the image a more balanced look on the card front.

The sentiment was white heat embossed on black, die cut and glued to two additional die cuts for dimension.  A few black enamel dots finished things off.


Thanks for taking time to stop by, I appreciate it!

Take care!

Stef

All products are from Altenew unless otherwise noted.
Stamps:  Craft Your Life Project: Never Stock Dreaming, Sentiment Strips 3
Paper:  Neenah Solar White, Black, Enjoy the Ride 6x6 Paper Pack
Ink:  Memento Tuxedo Black, Versamark
Other:  Never Stop Dreaming matching die and 3E embossing folder, Featured Sentiment die, Essential Black and White Enamel dots
Copics:  BG99, 96, 93, 90, 07, 45, 53, 000, 0000

Thursday, January 27, 2022

A Groovy Day

Hello and welcome!  Today I have a fun card to share that I made for the challenges at Festive Friday and Fusion.


Used the sketch from Fusion and for Festive Friday, the three elements are brown, masculine, blue.


I've had this fun Ellen Hutson stamp set for a while, which I bought primarily since my husband loves old VW buses (fortunately we don't have room for him to "collect" them lol!).  Since he's seen this particular card, he won't get this one for his birthday, but we have plenty of other male relatives to send it to.  The bus was stamped and colored with Copic markers, die cut with the matching die, then Glossy Accents was added to the lights and the windows. A silver gel pen was used on the peace sign and also randomly along the bumper and the rear view mirrors.  Once the Glossy Accents was dry, I used a white gel pen to add a "reflection" to the windows.


For the rest of the card, I started by die cutting a panel of plaid patterned paper with a Wonky Stitched Rectangle die, then adhered directly to the white card base.  A strip of Crushed Curry was embossed, trimmed down to fit on the plaid layer, the sentiment label adhered behind it, then it was added to the card.  Two skinny strips of Cinnamon Cider cardstock were added to the top and bottom of the strip to help it stand out from the background.  A white circle was layered on a larger one of Cinnamon Cider, then the bus was popped up with foam tape and the entire thing was mounted on the card, also with foam tape.  

Since I was going retro with this card, I even dug out a couple of brads, cut the prongs off the back and glued them to the card front. Back in the day I used brads frequently on my cards, but it's been a long, long time!


Thanks for visiting, I really appreciate it!

Take care!


Stef


Stamps:  Trippin' (Ellen Hutson)
Paper:  Neenah Solar White; Crushed Curry, Cinnamon Cider & Plaid Tidings (all SU)
Ink:  Memento Tuxedo Black, Versafine Clair Nocturne
Other:  Trippin' matching die, Tasteful Texture embossing folder (SU), Wonky Rectangle die (SSS), Nested Infinity Circle dies (Hero Arts), Stitched Jumbo Fishtail die (MFT), Strips 1 die (SSS), brads, Silver and White gel pens (Altenew), Ranger Glossy Accents
Copics:  B04, 02, 01, 000, C9, 7, 5, 1, 00, T4, 2, 0, Y17, 13

Friday, January 7, 2022

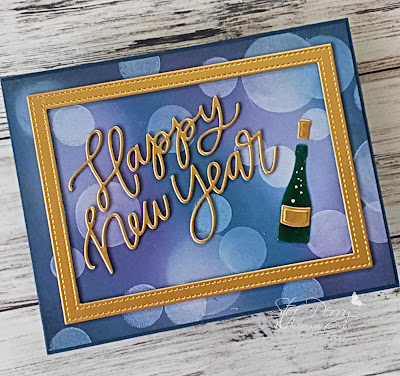
Happy New Year for Just Us Girls

Hello and welcome!  It's time for a new Just Us Girls Challenge, where I am honored to be a guest designer for the month of January.  This week is Trend Week where we are to use inked or sprayed backgrounds.


I'm also joining the Simon Says Stamp Wednesday Challenge and the Time Out Challenge, where both have the theme of "New", along with the New Year Challenge theme at Fusion, where I was inspired by their Bokeh moodboard.


My card is a Happy New Year card with a Bokeh, ink-blended background.


I started by ink blending Distress Oxide inks in purples, blues and black on a panel of white card stock. When that dried, I added the Bokeh effect with white pigment ink, using a handmade stencil (die cut from acetate) and a small ink blending brush, then finishing up with smaller spots using a sponge dauber.  After it was complete, I was pleasantly surprised at how well it turned out since I haven't used this technique in ages.

Next, both the frame and the sentiment were die cut twice from white cardstock and once from Gold Pearl Mirror cardstock, then adhered together.  The champagne bottle was die cut from green cardstock then entirely covered with Glossy Accents so it would appear shiny when dry.  The cork and label were both die cut with the same gold mirror cardstock.


Once the ink blended panel was completely dry, the frame and sentiment were adhered, then the panel added to the navy card base.  The label was added to the bottle, which was adhered to the card front along with the flying cork, then I added a few "bubbles" on the bottle with a white gel pen as a final touch.


Thanks for visiting, I always appreciate it!  Be sure to use the link above to check out the gorgeous cards by the Just Us Girls DT and hopefully be inspired to play along this week!

Stef


Stamps:  None
Paper:  Neenah Solar White, Soft Navy (SSS), Shaded Spruce (SU), Gold Pearl Mirror (Tonic)
Ink:  Milled Lavender, Wilted Violet, Prize Ribbon, Chipped Sapphire and Black Soot DOX, Sharktooth White (Ink on 3)
Other:  Happy New Year Script (Pretty Pink Posh), Scallop Stitched Frames die (Poppystamps), Wine Bottles die (Waffle Flower), Glossy Accents, Sakura White Gelly Roll pen