Wednesday, February 22, 2023

Pink Christmas for Christmas Craft Creations

Hello friends!  The Christmas Craft Creations Challenge for February is up and running, and I'm here to share my reminder card and hope that you will come join us!  This month, it's all things pink - so make yourself a fun pink Christmas card and come play along with us, the challenge remains open through Tuesday March 7th.


Oh, so many fabulous cards by the other DT members! If you're in need of inspiration, use the link above to see all the pretty pink.  For my card I used part of the Simon Says Stamp Holiday Gift Giving card kit that I never fully put to use during the holidays.


The beautiful poinsettia stamp is from the Holiday Gift Giving stamp and die set (still available at SSS), as is the sentiment.  I started by stamping the flower twice in Memento Tuxedo Black, leaving the stamp in my Misti, coloring with alcohol markers, then restamping with Versamark and heat embossing with SSS Ultrafine Silver embossing powder, then using the matching die to cut them out.  The sentiment was also silver heat embossed and cut out with its matching die.


Next, a panel of SSS Doll Pink cardstock was embossed with the beautiful Gina K Tapestry embossing folder and adhered directly to the white card base.  A smaller panel of white was sprayed at opposing corners using Irongate Distress Mica Stain Spray, and when dry, added to the card with foam tape.  The sentiment was die cut three times, layered together and adhered to the panel, then both flowers added with thin foam squares for just a small amount of dimension.  Lastly, some glorious crystals were added to the flower centers and also scattered about the panel.


Thanks for taking time to stop by!  I hope you're ready to get a head start on your 2023 Christmas cards and are inspired to play along with us this month.

Take care!

Stef


Copics:  RV19
Sketchmarker Brush Pros: V111, 114, 105

Sunday, February 19, 2023

Boho Hello for Sunday Stamps

Hello friends!  It's time for a new color challenge at Sunday Stamps with a gorgeous color board.  I really love these colors and I hope it inspires you as well!


I'm also joining the current Simon Says Stamp Wednesday Challenge where the current theme is "Emboss It".

I ended up using the light blue and the greens on my card, along with neutrals gray and black.  I used some glossy black paper and had a heck of a time getting a decent photo, so I apologize for the quality - my camera definitely doesn't want to focus in on shiny or metallic things.


Oh, this card was so fun to make!  I used the branches and vases from Altenew's Boho Vases and palm branches from the Parlor Palm die sets, die cutting the them from three green cardstocks - Concord & 9th's Sprout and Parsley along with Simon Says Stamp's Green Apple.  The vases were die cut from SSS Black Glossy cardstock and I added hand cut scraps of white on the reverse side to cover the openings.  


The background was created by embossing a panel of Stampin' Up Balmy Blue cardstock with the new Altenew Masonry Wall 3D embossing folder then lightly swiping my Hero Arts Unicorn White ink across it to catch some of the layers.  I absolutely love the ef, it reminds me of the fireplace surrounds and walls in mid-century homes. When the ink dried, a strip of Lawn Fawn Gray Woodgrain cardstock was layered on the panel, then the vases were added with foam squares.  The branches were tucked into their respective vases, then I glued the base of the palms down, letting the tops pop up, and I used foam squares to adhere the smaller barnches.  The sentiment was die cut using the SSS Bold Hello die, twice from white and once from the black glossy cardstock.  Once that was adhered, then panel was added to a white card base to finish things off.


Thanks for visiting, I appreciate it!  Be sure to use the link above to check out the fabulous cards by the other DT members, and hopefully be inspired to join us!  The challenge will remain open until 4 pm MST / 6 pm EST March 3.

Take care!

Stef


Thursday, February 16, 2023

Just a Note for Color Hues

Hello friends!  It's mid-month and time for another fabulous challenge at Color Hues!  This time the talented Tracey has chosen the colors Cyan and Lime Green.  Love this color combo!


Since I wanted to get the hue closest to cyan, I did a google search and found it is a greenish blue rather than a blue green, so I found what I felt was the closed ink color in my collection, one more on the blue than blue green side.  But quite honestly, I think anything in the green blue/aqua family would work for our challenge, so don't be intimidated by that.


I had been searching through my butterfly dies last month for one to use for a different challenge and realized I had this beautiful Birch Press Design Butterfly Basics die set that I'd purchased 18 months ago and never used.  So this seemed like the perfect opportunity.   I used the simplest combination of dies, cutting the base from white cardstock and the top detail piece from Lawn Fawn Pearlescent Vellum.  I blended Altenew Sea Breeze and Tide Blue on the base, concentrating the darker color in the middle, fading out to a very light blue.  The vellum piece was then glued on just in the middle, which was hidden under two of Lucy's Cards Silver Pearls.


Next a panel of white cardstock was ink blended with Altenew Bamboo and Parrot inks, this time blending the darker color on the outside and the lighter towards to middle.  While the ink dried, I die cut the Birch Press Epiphany Plate Layers A & B from white cardstock.  The dies cut the outer portion as well as two inner circle pieces.  I layered the two larger pieces on the lime panel, then added just one of the inner circles from Plate A, then adhered the butterfly in the middle with glue at the center, one layer of foam on the lower part of the wing and a double layer of foam under the upper part of the wing.  The Memory Box Just a Note Posh Script dies were cut from matte silver and white, adhered together then glued directly to the card.  The last touch was to add a few more silver pearls to pull the design together.  I love these colors and how this all came together!


I hope you're equally inspired by these colors and decide to play along with us - you have until 9 am EST on 2/28.  In the meantime, be sure to use the link above and check out the fantastic cards by the other DT members.

Thanks for stopping by - take care!

Stef

Wednesday, February 15, 2023

Wonderful in Every Way for The Flower Challenge

Hello and welcome!  Can you believe we're already at the middle of February? That means it's time for our reminder post at The Flower Challenge, where we'd like you to share your latest stamps or dies.  If you haven't joined us already, or wish to share another card, you have until 25th of February.  


I'm also joining the Simon Says Stamp Monday Challenge where the theme this week is "Frame It".

I decided to go a different direction than on my first card for this challenge, using foiling and stenciling rather than Copic markers.


I used the new Pinkfresh Studio Wonderful in Every Way Hot Foil plate along with Spellbinders Blush Glimmer Hot foil to create this gorgeous image illustrated by Emily Midgett.  I also used the same foil to create the sentiment from the new Wonderful Sentiments.  The coordinating stencil was used to color the floral image with Pinkfresh's Peach Fuzz and Apricot inks, along with Altenew's Dew Drops and Aqualicious inks.  Love that combo!  With the stenciling complete, both the sentiment and floral image were die cut with matching dies.


I thought the flowers would look lovely framed up, and I finally settled on the Pinkfresh Fancy Oval Frame die out of Tonic's Copper Mine Satin Effect Mirror card stock.  It was layered on two additional white die cuts, then added to the front of the card that was covered with a white panel die cut with the Pinkfresh Floral Tiles Cover die.  The flowers and sentiment were then added with thin foam square under the areas not laying on the frame and that was it.


Please do join us for this challenge, we'd love to see your card in the gallery!  In the meantime, be sure to pop over to the challenge blog (link above) to admire the gorgeous cards created by the other DT members.  

Thanks for stopping by!  Take care!

Stef

Wednesday, February 8, 2023

Love Ya!

Hello friends!  Today I have a quick post sharing a Valentine card that I made for my oldest grandson. I'm joining the challenges at Double D, where the theme is hearts, along with the Simon Says Stamp Monday Challenge's Love is in the Air theme and the Simon Says Stamp Wednesday Challenge, where the theme is fun with dies.


My card has all sorts of hearts on it!


This was a quick and easy card to make.  Starting with a panel of Neenah Desert Storm, I stamped the Simon Says Stamp Lace Heart Kaleidoscope Background stamp using Versamark ink, then white heat embossed it and die cut it with the largest Hero Arts Nested Infinity rectangle die.  I then blended Ink on 3 Shark Tooth White around the edges of the panel to give it a softening effect and then used an R46 Copic marker to color in the little hearts.


Next came all the die cutting!  I used the SSS Nested Round Hearts dies, cutting from white and their gorgeous new Rich Red Matte Metallic cardstock.  I also die cut the largest heart from a vellum panel covered on the back with double sided adhesive so I could adhere it to the card front without any glue showing.  Next the two white hearts were adhered to the vellum heart, then the smaller red hearts adhered randomly.  Finally, the sentiment, also die cut from the red metallic paper and two layers of white, was added to the middle of the hearts and I was done!


Thanks for stopping by!  Take care!

Stef

Sunday, February 5, 2023

Hello for Sunday Stamps

Hello and welcome!  It's time for a new challenge at Sunday Stamps and this time it is a fabulous sketch by Annette!  


While Annette has included flowers on each side of her sketch, you are free to add whatever images you like.  I decided to create a wreath with die cut branches and flowers.


I knew I wanted to use my new Sweet Blooms die set from Altenew, but it took me a while to settle on die cutting colored cardstock.  I thought I might watercolor the stems and flowers on watercolor paper but didn't like how it looked. Then I tried Copic coloring on white cardstock and still wasn't happy, so I finally pulled out some of my favorite cardstock colors from Concord and 9th, did more die cutting and was finally okay with the results.


To create the wreath on the panel of Aqua Sky, I originally started with just white die cut branches, decided that looked to blah, so I added some die cut from Peacock.  The flowers were die cut from Honeysuckle, Ballet Slipper, Stampin' Up's Calypso Coral and white.  They were layered up, added to the wreath, then several of the tiny die cut flowers were adhered around the wreath.  Finally, I added silver pearls to all the flowers before placing the die cut sentiment (Altenew's Versatile Greetings) in the center of the wreath.


This is a great sketch and I hope you will join us with your fabulous creation!  For more inspiration, be sure to swing by the challenge (link above) and check out the beautiful cards by the other DT members!


Take care!

Stef

Saturday, February 4, 2023

Chrysanthemum Birthday for The Flower Challenge

Hello friends!  It's time for the first challenge of the year at The Flower Challenge.  Did you get some new crafty goodness over the holidays?  If so, now is the time to use your latest stamps or dies - just remember they must be florals.


My card uses a stamp and die set that has been available for quite a while, but it is one of my latest acquisitions.


Having long adored the Pinkfresh Studio Chrysanthemum Slimline illustrated by Emily Midgett, I was thrilled to add it to my "collection".  Using a Misti, I stamped it first in Memento Tuxedo Black, colored it with Copic markers, then restamped it with Altenew Obsidian black.  Once the pigment ink dried, it was die cut with the matching die.  On a slim sized panel, I ink bended Altenew Pumpkin Pie ink to provide a sort of "glow" from behind the large floral image.  I adhered the left side of the floral image to the panel then die cut the panel with a stitched rectangle from Waffle Flower's Slim Lacy Layers dies.


Before using the rectangle die, I made sure the bottom of the leaf and any petals close to the edge were outside the die so they were not cut off.  Because those areas were not adhered with glue, I then add thin foam squares to provide a small amount of dimension.  The sentiment, from the Simon Says Stamp Hibiscus Blooms stamp and die set, was an extra so I simply die cut two additional in order to layer it up.  It seemed that the card needed a little something more, so I added a few of the glorious Aura gems from Spellbinders for some pretty sparkle.


Looking forward to seeing your card in the gallery with your latest florals!  In the meantime, be sure to head over to The Flower Challenge blog, because the other DT members have some gorgeous inspiration for you!

Thanks for visiting!  Take care!

Stef


Copic markers:  BV08, 13, 02, 00, 000, 0000, YG17, G43, 20

Wednesday, February 1, 2023

A Whole Year More IncredibleRer

Hello friends!  I'm popping in with my second card of the day (you can find my DT card for Color Hues here.)  This card is a sweet CAS birthday card for the challenges at Just Us Girls and Seize the Birthday.


I've had this darling stamp from Stamping Bella for a number of months and never used it, so these challenges were a prime opportunity to get it inked up.


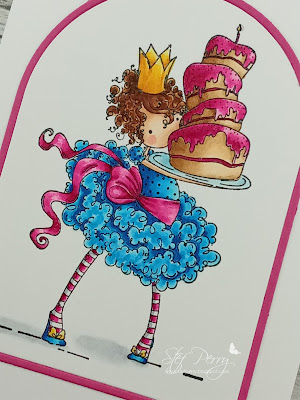
Little Miss Tiny Townie Bree definitely has her hands full with that enormous cake topped with a small candle.  She was stamped and colored with Copic markers, then die cut with an Essential Arches die from Ellen Hutson.  I used the same die to cut an arch from SSS Doll Pink cardstock but only using the frame portion.  


The arched panel with the colored image was adhered directly to the card front, then I ran a bead of glue all around the outside of it so I could adhere the frame.  Unfortunately, the photos don't capture the shimmer added with an Aqua Shimmer pen to her crown, the big bow around her waist and the cake frosting, but it looks pretty IRL!  The candle is pretty tiny, so I had to delicately color it with the same bright pink and the flame in yellow, then I added a touch of glossy accents to the flame.  I tried to fit a sentiment on the card front but nothing worked so I put it on the inside.


The first part of the sentiment, which I think is just too cute (!), is from the same stamp set.  The Happy Birthday is from an old Paper Smooches set called Sentiment Sampler.  I thought the two fonts worked well together.


Well, there you have it, my CAS birthday card with a candle!  Thanks for taking a moment to stop by!  

Take care!

Stef


Copics:  B26, 04, 2, 01, 00, RV17, 06, 04, 02, YR24, 23, Y15, 11, E57, 55, 53, 51, 37, 33, 31, 29, 21, 11, 000, R21

Sulfur Cosmos for Color Hues

Hello and welcome!  It's the first of the month and that means it's time for a new challenge at Color Hues!  This time the amazing Jules has chosen the beautiful combo of Coral and Sage.


When I saw those colors, I immediately thought of my as yet unused Craft-a-Flower: Sulfur Cosmos dies from Altenew.


For starters, I pulled out some Distress watercolor paper, smooshed Abandoned Coral and Bundled Sage on my glass mat, then laid down a base color on the flowers and leaves.  My intent was to add layers of watercolor but I came to the quick realization that my ink pads were very dry and I was shocked to find that out of all the Distress reinkers I have, those two colors were not amongst them!  So, in order to create more depth and dimension, I ended up using my copic markers on the flowers, leaves and the flower centers.


Next came the card base and sentiment.  Originally, I was going to use white on white for the background but I had just received the Distress Kraft Heavystock and thought it would add a bit more interest.  The panel was die cut with the Altenew Scallops Cover die, adhered to a white base measuring 4.5" x 5.75", then added the die cut flowers and leaves.  The sentiment, which is from the Simon Says Stamp Black-Eyed Susan stamp set, was gold heat embossed on a strip of the kraft heavystock, die cut with the coordinating die.  Before adding the sentiment to the card front, I lightly splattered it with white gouache and gold metallic paint.  When that dried, the sentiment was popped up with thin foam squares and I added a few Altenew gold sequins.  


So what are you inspired to make with these colors?  I hope you'll join us for this challenge, it's open until 9 am EST 2/14.  In the meantime, be sure to pop over to the challenge blog and see the gorgeous cards by the other DT members! 

Take care!

Stef