Sunday, June 27, 2021

Ever So Much for Sunday Stamps

Hello, friends!  It's time for a new challenge at Sunday Stamps and we have a fabulous sketch to get your creative juices going!


I tried to think of different things to use for the three repeat images on the stamp, but I was short on time so I took the easy way out for me and used flowers.


The flowers were stamped then colored with Copic markers.  I normally lean towards pinks and purples for flowers and yellow greens for the leaves but I wanted to used something different.  I really like the blue and found a green combo that I think I saw on the blog of Emily Midgett (and if you haven't seen her gorgeous work, you really, really need to check her out!).  With the coloring complete, I used the coordinating die to cut out the floral spray, then employed a white gel pen to create the flower centers and highlight the stamen.


Wanting something more than just a plain white background, I opted to use an embossed panel.  I just love the floral pattern and it's subtle enough not to take away from the main image.  A mint die cut strip was adhered on the left side, then the panel was added to the card base.  The die cut sentiment was added with thin foam squares, then the floral image popped up with regular foam tape for a bit more dimension.  And that finished off my card!


I'm so glad you made time to drop by and take a look.  Be sure to use the link above to check out the other DT member's beautiful cards.  And hopefully join us for this great sketch challenge!

Stef


Stamps:  Best Friend Ever (Simon Says Stamp), Apothecary Labels (Altenew)
Paper:  Neenah Solar White, Mint (SSS)
Ink:  Memento Tuxedo Black, Versafine Clair Nocturne
Other:  Best Friends Ever coordinating die, Apothecary Label die, Finishing Touches Edgelit (ret. SU), Blossom Field 3D embossing folder (SSS), Sakura White Gelly Roll pen
Copics:  B66, 63, 61, G29, 21, 40, YG45

Thursday, June 24, 2021

Sunshine and Love for the Tic Tac Toe Challenge

Hello friends and welcome back to a new Tic Tac Toe Challenge.  This week our board has some great options for creating summer themed cards!

I'm also joining Double D Challenges, where the current theme is Signs of Summer.


For the Tic Tac Toe challenge I went diagonal left to right (beach, big sentiment, red).


I had a hard time deciding which way to go - underwater scene, sailboat, etc. and finally decided on this lighthouse scene because it worked well with the big sentiment from the same stamp set.  I stamped and colored the scene with Copic markers, then used my Misti to stamp the sentiment straight onto the panel.


I decided to keep things CAS. The panel was die cut with a rounded rectangle die, leaving a wide border for the Desert Storm card base.  I upcycled some nice twine that had been used for a clothing tag, cut it in half then wrapped both around the back of the panel where I secured them with tape.  The panel was adhered to the card base with foam tape, then for the final touch I used a white gel pen for the ocean waves and a silver gel pen for the top of the lighthouse and some of the railing.


There you have it, my super CAS card for this week's Tic Tac Toe Challenge!  Be sure to use the link above to check out the fabulous cards by the other DT members and hopefully play along with us this week!

Stef


Stamps:  From the Vault Beach & Sea (Hero Arts)
Paper:  Neenah Solar White and Desert Storm
Ink:  Memento Tuxedo Black, Versafine Clair Nocturne
Other:  Rounded Rectangle die (HA), Marvy Reminisce Silver gel pen, Sakura White Gelly Roll pen, twine
Copics:  B37, 34, 000, 0000, R46, 24, 14, G29, 21, 40 YG45, E47, 44, 43, 27, T2, 0

Monday, June 21, 2021

Missees Slimline Birthday

Hello, friends!  Welcome to my second post of the day.  If you're looking for my earlier post for The Paper Players, you can find it here.

For this post I'm sharing a card that I made for my youngest grandchild and also the only girl of the three.  It's hard for me to believe she'll be 16, it doesn't seem that long ago we were walking to the nearby park, me holding here sweet little 5 year old hand.  Time passes way too quickly lol!

Anyway, back to the card, which I'm sharing Inkspirational, where the current challenge is to make a slimline card.


I had such fun with multiple Missees stamp and die sets, creating something that might look a little bit like my granddaughter. 


The body and head were cut from ivory cardstock, the hair from a reddish brown and the blouse from some designer paper using the body die and a neckline die.  The eyes, nose and mouth were stamped on the head after I determined where the hair was going to land in relation to them.  A white gel pen was used to brighten the teeth, and a pink-red Copic marker for the tongue.  I love the kind of cheeky face with the wink and the open mouth!


The earrings were cut from silver mirror cardstock, then I had to make sure to adhere all the pieces together in the right order so, for instance, I could get the earrings behind the hair.  Once she was all put together, I worked on the background.  I used white ink through a dot stencil on some aqua green paper, found a piece of patterned paper in a darker print, adhered them together on a white panel, then cut it all out with a stitched rectangle die.  I separated the patterns with a thin strip of white, then added the sentiment above, which had been die cut with a large speech bubble die.  After everything was adhered together, I used some silver baubles and crystal stars for embellishments and also as buttons on her dress.  So much fun!


Well, that's it!  Thanks for visiting, I really appreciate it!  Take care and enjoy the rest of your week!

Stef


Stamps:  Missees Melanie (StudioLight), Bitty Buzzwords (Honey Bee Stamps)
Paper:  Neenah Solar White, Ivory; Cinnamon Cider, Coastal Cabana and Bermuda Bay (Stampin' Up),
Bright DSP stack (ret. SU), Silver Mirror (Tonic), Spring Flowers Collection (Moda Scrap)
Ink:  Memento Tuxedo Black, Versafine Clair Nocturne, Hero Arts Unicorn White
Other:  Tasha, Betty and Carol Missees dies (SL), Wonky Dots Stencil (MFT), Speech Bubbles die (Ellen Hutson), Slim Lacy Layers stitched rectangle die (Waffleflower), Crystal Collection Night Sky (Little Things by Lucy's Cards)

Happy Day

Hello all, I hope this finds you doing well! Today I'm sharing a card made for the current CAS challenge at the Paper Players, where the lovely Joanne is hosting and asking us to include berries and/or fruit on our cards  


I'm also joining the Simon Says Stamp Wednesday Challenge where the current theme is Animal Antics.

I realized after digging through my stamp sets that I have only two with fruit images. So I opted to use the one with the cute mouse and her barrel of strawberries. (Thinking about it now, I'm sure I have Christmas stamps with berries on them too....).


I found the scallop rectangle in with my white cardstock and thought it would work perfectly for a little scene.  The mouse and sentiment were stamped first, then the butterfly afterwards, so I could get it very close to the sentiment.  A simple scene was created in the background then I colored the main images, all done with Copic markers.  I used a white gel pen to add a few dots to the strawberries, the used an aqua shimmer pen for some sparkle on both the berries and the butterfly. You can see that better in the photo below (the images are so tiny!!).


The colored panel was mounted on a white cardstock base and while I was trying to keep my card very CAS, it just looked like it needed a little somethin', somethin' more.  Eschewing sequins or the like, I settled on twine, wrapping it around one end of the card base and tying it in a tiny little bow.  


Thanks so much for popping by and taking a look!  Have a great week and try to stay cool if you're summer heat is anything like here where it's 97 degrees today-phew!

Stef


Stamps:  Always Bring a Smile (MFT), Happy Days (Colorado Craft Company)
Paper:  Neenah Solar White
Ink:  Memento Tuxedo Black
Other:  A2 Scallop rectangle die (Honey Bee Stamps), Linen Thread, Aqua Shimmer Pen (Tonic)
Copics:  BG000 YG01, 0000, G21, 40, E31, 30, 19, 0000, YR27, 23, 16, Y17, 11, T4, 2, 0, R39, 37, 35, 20

Friday, June 18, 2021

Pickup Truck Birthday

Hello friends!  I hope you're doing well.  Today I'm sharing a card I made for my husband's birthday and it works perfectly for two challenges - Festive Friday (3 elements - mountains, things with wheels and blue) and Watercooler Wednesday Challenge where the current theme is All About Occasions.


The card was created using the Big Pickup Cab stamp and die from Honey Bee Stamps, because my husband loves his pickup. 😏  For Valentine's Day I made him a card with the rear view of the pickup loaded with hearts here.  Such clever stamps!


I started by stamping and coloring the pickup with Copic markers, then it was die cut with the coordinating die.  Originally I was going to place it on a stenciled background but I didn't like how it looked, so I decided to do a loose watercolor background using Distress Inks.


The background panel of watercolor paper was trimmed down to 5.25" x 7.25".  I began by painting the "road", then the green followed by gray/blue mountains then a blue sky, drying with a heat tool between each step. I went back into the upper part of the green and used a darker shade to create the sketchy treeline.  The background came out a bit muted but I wanted the star of the show to be the pickup.
  
The panel was trimmed down and adhered to a white card base, a white frame was added to the top then the truck and the sentiment popped up on foam tape.  Glossy Accents was applied to the headlights and turn signals and when dry I applied a bit of white gel pen to them and other areas of the truck.  


Thanks for taking time to visit, I really appreciate it!  Take care and enjoy your weekend!

Stef


Stamps:  Big Pickup Cab, Big Pickup Tailgate (license plate) and Bitty Buzzwords (HB)
Paper:  Neenah Solar White, Fabriano Artistico Extra White watercolor paper
Ink:  Memento Tuxedo Black; Versafine Clair Nocturne; Hickory Smoke, Faded Jeans, Salvaged Patina, Peeled Paint, Shabby Shutters, Rustic Wilderness, Salty Ocean Distress Inks
Other:  Coordinating dies, A7 Rectangle die (Waffle Flower)
Copics:  G28, 17, 03, E21, BG0000, W9, 7, 5, C5, 3, 1, 0, 00

Sunday, June 13, 2021

The Sweetest for Sunday Stamps

Hello friends, I hope you're doing well.  It's time for a new challenge at Sunday Stamps.  This week we have a pretty color challenge for you all to play with!


My card design was inspired by the current sketch at Freshly Made Sketches.  I switched it up a bit by making my card a mini slimline and swapped corners for the embellishments in order to accommodate the stamped image.


I chose to go with florals for my card.  Now, when you look at the color board above compared to my card, you may notice some difference.  When I was previewing the color board on my tablet, the colors hues definitely had more yellow in them, so I was seeing dark green not blue and orange rather than the salmon color.  But when I went to create my post on my laptop, I saw the colors looked different, but it was too late to recreate a new card, so I'm going with it as is lol!!


The floral image is from the Miss Your Smile stamp from Pinkfresh Studio.  I colored it with Copic markers, including a light aqua in the background that is hard to distinguish in the photo.  When the coloring was done, I used a mini slimline rectangle die to cut out the panel and it leaves a nice decorative edge.  


The panel was mounted on a white card base with foam tape, then the sentiment was stamped, die cut and added to the front of the card with thin foam squares.  The final touch was to add the clear dew drops in the upper right corner.  Aside from the time spent with Copic coloring, this card was quick and easy to make.


Thanks for taking time to drop by, I really appreciate it.  Be sure to use the link above to check out the wonderful cards by the other DT members and hopefully join us for our current Sunday Stamps color challenge!

Take care and have a great week!

Stef


Stamps:  Miss Your Smile, Floral Notes (both Pinkfresh Studio)
Paper:  Neenah Solar White
Ink:  Memento Tuxedo Black, Versafine Clair Nocturne
Other:  Mini Slimline Essential Bundle rectangle die (PFS), Fishtail Foundations die (MFT), Clear Dew Drops
Copics:  R56, 46, 24, 14, YR18, 07, 15, 21, G29, YG 67, 63, 61

Thursday, June 10, 2021

So Grateful for the Tic Tac Toe Challenge

Hello again, friends!  I hope you're doing well.  It's time for a new Tic Tac Toe Challenge and this week I am hosting, bringing you this board that I certainly hope inspires you!


As you can imagine, in creating this board I had all sorts of ideas for cards, but ultimately ended up going across the top row - die cut, stencil and flowers - so I could use a new stencil and die set.


Layering stencils are all "the thing" right now and they are great to work with.  I did practice on a couple of panels before getting all the layers lines up to my satisfaction, but it really is fun to see the end results.  I used a number of Altenew inks, which are great because they come in coordinated color sets and cover beautifully.  With the stenciling complete, the floral image was die cut with the coordinating die.


Next, I decided I would ground the floral image on some kind of cover die on top of the white card base.  I ended up using the Reflections die (which technically isn't a cover die) because I liked the random design and texture, plus it kind of reminded me of a twiggy trellis.  It was cut twice from white card stock, layered, then added to the base.  The sentiment was die cut from black cardstock, then layered on two strips of white.  The floral image was added with a combo of glue and foam tape for the overhanging flower and leaf on the left, then the sentiment was layered across the bottom of the bouquet.  A few clear sequins were adhered around the image, then I finished up by adding shimmer and Glossy Accents to the pink flower centers.


I'm so grateful for YOU and your visit!  Please be sure to use the link above to check out the amazing cards by the other DT members and hopefully join us this week!

Stef


Stamps:  None
Paper:  Neenah Solar White, Black
Ink:  Pink Diamond, Rubellite, Razzleberry, Hydrangea, Ultraviolet, Firefly, Grass Field, Mountain Pine (all Altenew)
Other:  Flower Bunch Layering Stencil and Die set (Altenew), Reflections die (Altenew), Essential Sentiment Strips die (Altenew), Sparkling Clear Sequins (Pretty Pink Posh), Aqua Shimmer Pen (Tonic), Glossy Accents (Ranger)

Sunday, May 30, 2021

Butterfly Greetings for Sunday Stamps

Hello all, I hope you're doing well! It's time for a new challenge at Sunday Stamps and this week Annette has given us a fabulous sketch to work with.


I'm also joining the current Simon Says Stamp Wednesday Challenge with a theme of Anything Goes and playing along with the Paper Player's where my card fits the left column of their Tic Tac Toe Challenge (blue, die cut, heat embossing).


I think this sketch is so versatile, I know I will want to use it again in the future.  This time I reached for a background panel I'd made a couple of weeks ago using a stencil and embossing paste over a lightly water colored background.


To create the background panel, I took a piece of watercolor paper, taped it down to a board, covered it completely with water and dropped in some Salvaged Patina Distress Ink. This is definitely one of my favorite DI colors, along with the other two newer ones Rustic Wilderness (a gorgeous green) and Kitsch Flamingo, a fabulous bright pink.  Once the panel dried, I used embossing paste and that pretty stencil to create the design.  After the embossing paste dried, the panel was splattered with leftover Salvaged Patina, white gouche and black ink.


To create the butterflies, I stamped them on a scrap of the same watercolor paper with pigment ink, clear heat embossed then water colored them with a couple DI yellows and an orange.  When dry, they were die cut with coordinating dies.  Once the background panel was dry, I trimmed it down and added it to an Ivory card base with foam tape.  The sentiment sticker was adhered to a strip of card stock to give it a bit more girth, then it and the butterflies were popped up on the panel with foam squares. 


Thanks for taking time to visit my blog, I appreciate it!  Be sure to use the link above to check out the other DT member's beautiful cards and hopefully be inspire to join us for this sketch challenge!

Stef


Stamps:  Beautiful Butterflies (Simon Says Stamp)
Paper:  Ivory, Arches 140# Cold Press Watercolor, Tim Holtz Label Stickers 
Ink:  Versafine Clair Nocturne; Salvaged Patina, Scattered Straw, Mustard Seed, Spiced Marmalade and Ripe Persimmon Distress Inks
Other:  Boho Circle Stencil (SSS), A2 Rectangle Stax Set 1 (MFT), Beautiful Butterflies dies, Dream Weaver embossing paste, White Gouache, Jet Black Ink Spray (Altenew)

Thursday, May 27, 2021

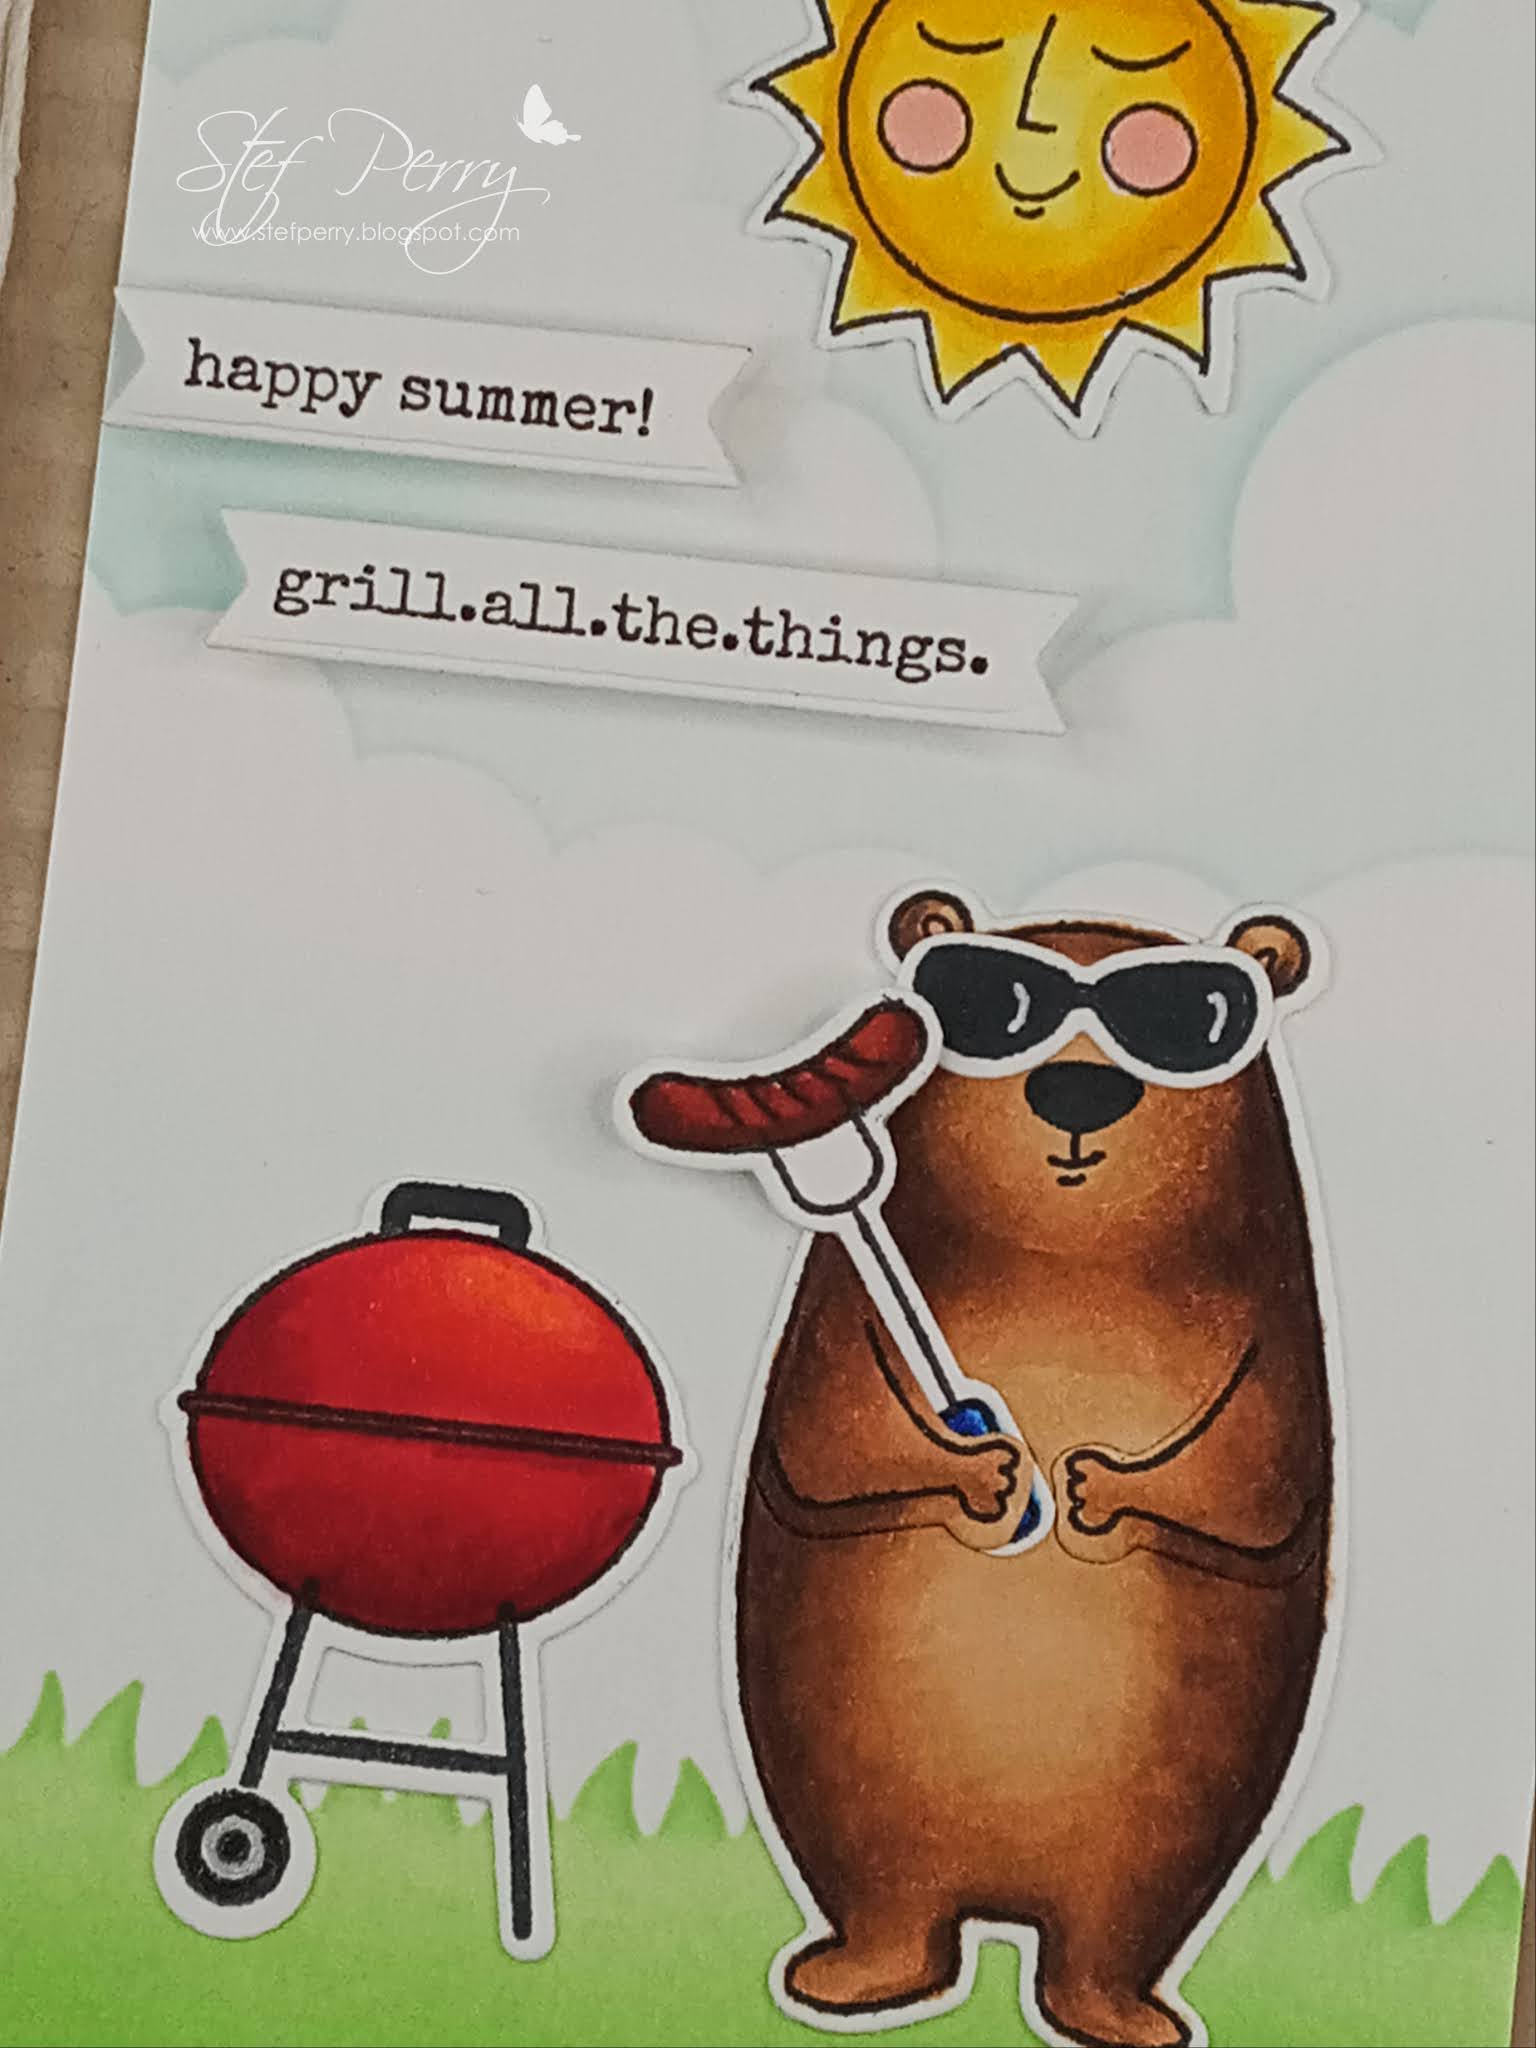
grill.all.the.things for the Tic Tac Toe Challenge

Hello friends!  I hope you're doing well.  It's time for another Tic Tac Toe Challenge and this week Claire has given us a fun board that would be perfect for Father's Day or a masculine card.


I'm also joining Addicted to Stamps ATSC #406  and the current Simon Says Stamp Wednesday Challenge, where the theme is Anything Goes


For my card, I went diagonal - die cut, twine/ribbon, texture.


A while back, Ellen Hutson had a wonderful sale on all her Essentials by Ellen products, and I used the opportunity to scoop up some stamps and dies I have had my eye on for over two years.  I LOVE this cute bear and all the accessories you can use to create fun scenes! I started by stamping and coloring the barbeque, bear, sun and hot dog, using Copic markers.  After die cutting with the matching dies, I moved on to creating the background.


I used stencils to create the ink blended grass and clouds. Next a panel of Desert Storm cardstock was embossed with the Corrugated 3D embossing folder, then the stenciled panel was trimmed down and adhered to it.  Before adding to the Desert Storm card base, I wrapped some hemp twine around the panel and tied on a bow.  The BBQ, bear, sun and sunglasses were adhered directly to the panel.  The grilling fork was glued under the bear's paw (the die cuts the paws away from the body so he can hold things) but I used a small amount of foam tape to pop up the wienie portion.  The sentiments were stamped, die cut and added to the card front with foam tape, then the last step was to use my white gel pen on his sunglasses.  This will be perfect to send to one of our grill-loving friends!


Thanks so much for visiting, I really appreciate it!  Be sure to use the link above to check out the fabulous cards by the other DT members and hopefully join us this week!

Take care!

Stef


Stamps:  All Inside and Bear Ware 3 (EH)
Paper:  Neenah Solar White and Desert Storm
Ink:  Memento Tuxedo Black; Versafine Clair Nocturne; Fire Fly, Grass Field and Sea Glass (Altenew)
Other:  All Inside and Bear Ware 3 matching dies, Skinny Strips die (MFT), Grassy Edges and Rolling Clouds stencils (MFT), Corrugated 3D embossing folder (ret. SU), Hemp Twine
Copics:  E79, 57, 35, 33, 31,30, 29, 09, R59, 46, 24, 05, 22, 20, Y26, 19, 15, 13

Friday, May 21, 2021

Vitamin Sea

Hello friends, I hope you're doing well!  I have a card to share that I made for two challenges - Addicted To Stamps where the current theme is die cuts and/or stencils, and the current Simon Says Stamp Wednesday Challenge with a theme of using dies and/or punches.

ATSC #405

The lastest card kit from Hero Arts was just too awesome to pass up and I used it for this card, creating a slimline ocean scene.


The stamp set in the kit has one main image, the large coral reef, along with the fish, seahorse and jelly fish you see on the card.  I'm not gonna lie, this took me a couple of afternoon sessions to complete but I love how it turned out!  I started with the background, stenciling the "water" on a panel of white cardstock with three shades of blue, starting with the darkest at the bottom.  After washing the ink off the stencil, it was realigned to the inked portion and I used white glitter gel over the blue for some outstanding sparkle (in real life it looks amazing!).  While that dried, I colored the images with Copic markers then die cut them with the coordinating dies.


I search the internet for coral reef images so I could stay a bit realistic in my coloring and was amazed at the variety of colors of the coral reefs, especially in warm water oceans (obviously I've never done much diving lol!).  With the stenciled panel dry, it was adhered to the card base.  Before adding all the images to the base, I created the "sand" ocean bottom by smearing Versamark over a piece of white cardstock then heat embossing with Sand embossing powder.  I hand cut the embossed panel into a couple of pieces and layered them at the bottom of the card with foam tape.  I began adding all the colored and die cut images mostly popped up with foam tape. Lastly, I used a couple of Violet Copic markers to color a small panel of white cardstock.  The sentiment was white heat embossed on it, then it was trimmed down and added to the panel. 


Thanks for taking time to visit, I really appreciate it!  Take care and enjoy your weekend!

Stef


Stamps:  0521 My Monthly Hero card kit (Hero Arts)
Paper:  Neenah Solar White
Ink:  Versamark; Memento Tuxedo Black; Sea Glass, Ocean Waves and Dusk (Altenew)
Other:  Waterflow Slimline Stencil (HA), MMY card kit dies, Gina K White Glitter Glitz gel, White and Sand embossing powders (HA), Copic markers

Wednesday, May 19, 2021

Hello Flowers

Hello again!  I hope you're doing well.  Today I'm sharing a card made for three challenges - Color Hues, The Flower Challenge and The Paper Players.


For my card, I did use a stamp with two of my very favorite flowers - anemone (I think that's what it is on the stamp lol!) and peony - and colored the images in teal and two shades of purple.  The stamp is a background stamp so I just used a portion of the colored image for my A2 sized card.


I love these huge floral images and they are so wonderful to color.  It was stamped on an A2 panel of white, colored with Copic markers then trimmed down to fit the card design.   A white gel pen added back the ends of the stamen that were muted by the coloring.


A separate panel of white was embossed with a large polka dot folder, adhered to a white card base, then the colored panel added to the top portion.  A strip of black was added at a slant, then the die cut sentiment was adhered on top.  I looked through my stash of enamel dots and was happy to find some in a teal shade. I love the embossed polka dots for the subtle texture they add, yet keeping things CAS.


Thanks for taking time to visit, I always appreciate it!  Take care!

Stef


Stamps:  Spring Blooms Background (Honey Bee), Perfect Sentiments (Pinkfresh Studio)
Paper:  Neenah Solar White, Black
Ink:  Memento Tuxedo Black, Versafine Clair Nocturne
Other:  Perfect Sentiment matching die, Large Polka Dot embossing folder (ret. SU), Sea Shore Enamel Dots (Altenew), Sakura White Gelly Roll pen