Wednesday, January 25, 2023

Season's Greetings for Christmas Craft Creations

Hello and welcome!  It's time for the reminder post for Christmas Craft Creations and this month our challenge is to use snippets (aka your crafty leftovers) to make your creation.


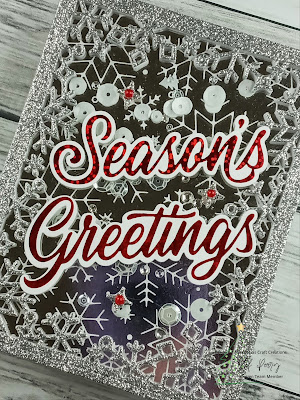
For my card, I used a couple of leftover foiled items - a snowflake foiled background in silver and the foiled and die cut sentiment.


I started with the background and sentiment, then decided I would a cover die to create a shaker card.  The Lawn Fawn Snowflurries Backdrop die was die cut three times from white cardstock then the final time from Simon Says Stamp Silver Glitter.  They layers were adhered together, with a Hero Arts Clear Card Panel between the silver and last white layer to create the shaker front.  The sequin and crystal mix were added in before adhering the back panel, then the entire thing was added to a white cardbase.


The cover die also includes two snowflake dies and four tiny star (?) dies.  I didn't use the snowflakes but after adhering the foiled sentiment to the front of the card, I also added three of the glitter stars, then topped them with red crystals to match the sentiment.  I LOVE all the glitter and the glamorous look, I hope you like it too!


Thanks so much for taking time to drop by.  Please be sure to use the link above to see how the other DT members used their snippets, and hopefully be inspired to join us - you have until February 7th.

Take care!

Stef


Stamps:  None
Paper:  Hammermill, Neenah Solar White, Accent White, Simon Says Stamp Silver Glitter, Hero Arts Clear Card Panels
Ink:  None
Other:  Lawn Fawn Snowflurries Backdrop die, Lawn Fawn Snowflake Background Hot Foil Plate, Pinkfresh Studio Solid Hot Foil Plate, Pinkfresh Studio Brushed Sentiments: Holiday Hot Foil Plates and dies, Glimmer Red Sparkle and Silver Hot Foil, Lucy's Cards Snow on Snow and Crystal Collection - Rouge sequin mixes

Sunday, January 22, 2023

Best Wishes for Sunday Stamps

Hello friends!  It's time for a new challenge at Sunday Stamps and this week we have a great color challenge with lots of vibrant colors to create with.


I'm also joining the current challenges at Freshy Made Sketches and Simon Says Stamp Wednesday Challenge where this week's theme is Fabulous Flowers.


I decided to use the dark and medium purples along with the coral for my card.


This was a very quick and easy card to make.  I started by ink blending Villainous Potion, Seedless Preserves and Abandoned Coral Distress inks on a panel of Canson Montval watercolor paper.  I love how Seedless Preserves has just enough red and Abandoned Coral just enough pink so that they blend together beautifully rather than making mud!  A bit of water splatter followed by white gouache splatter and it was set aside to dry.


Next the I die cut the flowers from white cardstock using the Tim Holtz Wildflowers #1 dies and found the die cut sentiment in with the Pickup Lines stamp set from Honey Bee stamps.  I used the die to cut a couple more then layered them together for a bit of dimension.  After the inked panel dried it was cut with the largest of Waffle Flower's Deckled Rectangle dies then layered atop a 6"x 4.75" card base made from Ellen Hutson's White Woodgrain Embossed cardstock.  The die cut flowers were adhered to the panel then a leftover strip from the same woodgrain cardstock was trimmed down and adhered over the flowers.  Lastly I added the sentiment and was done!


So what will you create with these colors? I hope to see your card in the gallery and in the meantime, take a moment to drop by the challenge (link above) to see the beautiful cards by the other DT members.

Take care!

Stef

Friday, January 20, 2023

Butterfly Birthday

Hi there, I hope you're having a wonderful day!  I have a card to share with you that I made for the challenges at Seize the Birthday and As You See It.


As You See It #290

As it turned out, almost all of my card components were left unused from other projects.  Always a bonus and makes creating a bit quicker.


I love Jane's sketch for As You See It, but it worked best for my card to flip it to the side.  I started by die cutting the Memory Box Drifting Side Butterfly from Simon Says Stamp Matte Silver and white cardstock, then adhering the pieces together just along the bottom so the silver outline could be lifted slightly on the left edge.  I thought it would look pretty on floral embossing and found the Concord and 9th Honeysuckle embossed panel from my stash already embossed with Altenew's Beautiful Bergenia 3D folder.  I took my white pigment inkpad and lightly brushed it across the panel to highlight the raised edges and after the ink dried, trimmed it down about a half inch on one side.


The panel was adhered to a white card base, then I added a skinny strip of Matte Silver and a strip of embossed white to cover the remainder of the card front.  I pulled the SSS Happy Birthday from my die storage and found the one used on the card already completed and tucked in with the dies.  Sweet!  I adhered it onto the card front then added the butterfy and my card was complete!  


Thanks for stopping by and taking a look.  Take care and I hope you have a wonderful weekend!

Stef


Monday, January 16, 2023

Marshmallow Fluff for Color Hues

Hello and welcome!  It's mid-month and time for a new challenge at Color Hues.  This time the lovely Sheri has chosen a timely combo for Valentine's Day - pink and red!


While I was quite tempted to make a valentine, I decided to go a completely different direction and keep it wintery using these colors.


I am always drawn to the fun Art Impression stamps illustrated by Bonnie Krebs, so I thought these two cocoa-drinkin' gals would be fun to color up in pink and red.  And besides, after the holidays, I could identify with their desire to hide their marshmallow fluff lol! (Darn egg nog...and cookies...and everything else!)  I used Copic markers to color them and a white gel pen to create polka dots on one cup and, with a red marker, create a kind of plaid on the other cup.  Since the set didn't come with a die, I fussy cut the image.


For the background I used a piece of light gray and white polka dot, which looks very much like a snowy sky to me.  I hand cut a couple of snowbanks and layered those along with the pp on a panel of white, then popped that up on the white card base.  The sentiment was cut with a circle die and placed among the white glitter snowflakes, then the ladies were added along with a little bit of shadow at their feet so they wouldn't look like they were floating in air above the snow.


So glad you dropped by, I appreciate it.  Be sure to use the link above to take a peek at the fabulous cards by the other DT members and hopefully be inspired to join us with your take on these colors!

Take care!

Stef


Stamps:  Hug in a Mug (Simon Says Stamp/AI)
Paper:  Neenah Solar White, Trinity Stamps Winter Hues Paper Collection 
Ink:  Memento Tuxedo Black, Versafine Clair Nocturne
Other:  Hero Arts Nested Infinity Rectangle and Circle dies, Tim Holtz Twig & Stump snowflake dies, Sakura White Gelly Roll pen
Copics:  R39, 37, 35, RV17, 14, 13, 10, E49, 37, 33, 08, 11, 21, 000, YR18, 14, T6, 4, 2, 0, C9, 6, 4, 2, 00, Black 100

Tuesday, January 10, 2023

Snowy Hugs

Hello friends!  I have a fun little card to share that I made for the current challenge at The Paper Players.  The lovely Ann has chosen a theme of tags and while I don't use them often, I do love using tags on cards as the focal image.  


I'm also joining the current Simon Says Stamp Wednesday Challenge, slipping in on the last day to play along with their theme of "Something New"
 
I'm still feeling the winter vibe here in Idaho, although our snow finally went away for now and we're in the "balmy" 40's this week lol!  Plus I wanted to use my awesome new stencil set from Taylor Expressions.


Wintery but not Christmas-y, with aqua, pink and purple.  The stencil set is called Create-in-Quads, with four 8" x 10.5" stencils used over a letter size piece of cardstock.  After the stenciling was complete, I cut the card stock into four panels measuring 4" x 5.25", and then cut the tag from the one that had the most stenciling.  Next, the hugs portion of the sentiment was die cut from white glitter paper, with the shadow from purple.


The diagonal stitched rectangle in aqua was layered directly onto the white card base, then before adding the tag with foam tape, a piece of white glitter ribbon was tied on to the tag with a piece of silver twine.  The hugs die cut was adhered directly to tag, then the sub-sentiment popped up on thin foam squares.  All the little glitter snowflakes and do-dads were cut out with a snowflake confetti cover die, then adhere randomly to the card for added sparkle.


Thanks for dropping by, I appreciate it!  Take care and have a great week!

Stef


Stamps: Honeybee Stamps Bitty Buzzwords
Paper:  Neenah Solar White, Taylored Expressions Sugar Cube, Concord & 9th Aqua Sky, Simon Says Stamps White Glitter, Stampin' Up Gorgeous Grape
Ink:  Versafine Morning Mist, SSS Seafoam, Surf, Peony and Amethyst
Other:  TE Snowflake Create-in-Quads Layering Stencil, Honeybee Stamps Bitty Buzzwords dies, Ellen Hutson Tag Trio die, Pinkfresh Studio Diagonal Stitched Rectangle die, Hero Arts Snowflake Confetti Fancy die, Silver twine (ret. SU), May Arts White Glitter Ribbon

Sunday, January 8, 2023

Love You for Sunday Stamps

Hello friends!  Today's post for Sunday Stamps is pretty special as we are celebrating the 300th challenge!  Woot woot!  And we're doing so with a fabulous sketch by the amazing Claire plus we'd love to see you make your card a celebration card as a bonus.

And a big thank you to everyone that has joined our challenge for the last 300, we wouldn't be here without you! 💓


I'm also joining the current Time Out Challenge where the theme is Romantic.  While my card will be sent to one of my grandchildren for Valentine's Day, it certainly could be used to give to a romantic partner lol!


For my card, I followed the sketch very closely.


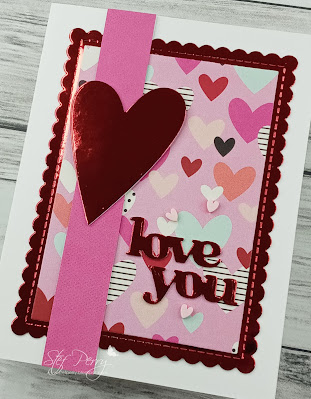
This card came together so easily, once I made the decision on which patterned paper to use.  The paper was die cut with a rectangle die then layered on a scallop rectangle die cut from red foil.  But, before layering the pp on top, I die cut the large heart from the panel, which was then covered up by the pp.


Sorry about the photo quality, metallics are the worst for getting a crisp image.  Next, I adhered the scallop panel to the white card base, then cut a strip bright pink patterned paper from the same pad, layered it on a strip of white cardstock to give it some heft, then adhered it on the card.  I did the same with the heart and the sentiment dies, added a layer of white cardstock underneath before adhering to the card.  The last step was to add some cute pink clay hearts around the sentiment.  I know, they kind of get lost in the photo but IRL they look fine.


Thanks for stopping by, I appreciate it!  I do hope you'll use the link above to check out all the beautiful cards by the other DT members and hopefully help us celebrate our 300th challenge!

Take care!

Stef


Stamps: None
Paper:  Neenah Solar White, Memory Box Polished Foil 6x6 pad, Simple Stories Sweet Talk 6x8" patterned paper pad
Ink: None
Other: Ellen Hutson Folk Heart die, Honeybee Stamps Scallop A2 rectangle die, Hero Arts Nested Infinity Rectangle die, Altenew Versatile Greetings dies, Pretty Pink Posh Pink Hearts Clay Confetti

Sunday, January 1, 2023

New Beginnings for Color Hues

Welcome and Happy New Year!  I am so pleased to finally announce that I have joined the fabulous design team over at Color Hues!  Woot woot!  And we are starting the year off right with a lovely color combination chosen by Nancy.


I am also sharing my card with the challenges at Simon Says Stamp Monday Challenge and Simon Says Stamp Wednesday Challenge where the theme for both is "Party!".


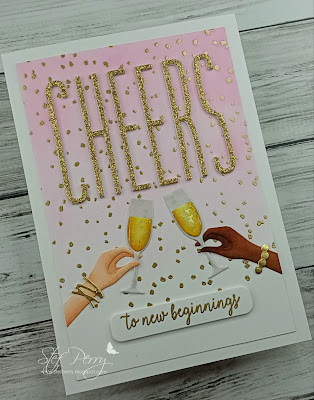
What says party more than confetti and champagne?  I started with the confetti background, using the MFT Colorful Confetti background stamp.  It's unique in that it can be turned a quarter turn to add more confetti, and if you were using colored inks rather than gold heat embossing as I did here, you could get four colors of confetti.  I just turned it twice.  Once the embossing was complete, I ink blended a light pink on the panel, darker at the top and lighter as I went down the panel, fading off to white.


The arms were die cut from white cardstock and colored with Copic markers.  I used two layers of Lawn Fawn Pearlescent vellum for the glasses, then used my Copics to create my "golden champagne", adhering those pieces to the glasses, then covering them with Glossy Accents for some shine.  Matte Gold paper was used for the bracelets.  After die cutting the large sentiment from gold glitter cardstock and gold embossing the sub-sentiment, everything was adhered to the big panel and then added to the 5" x 7" white card base.  This card was so fun to make - I love those hands raising a toast!  Trust me, you will be seeing them again in the future.


Thanks so much for visiting.  Now be sure to use the link above to see all the amazing cards by the other DT members and certainly you'll be inspired to join us - you have until 9 am EST on January 14th!

Take care!

Stef

All products from MFT unless otherwise noted.
Stamps: How to Say Cheers, Colorful Confetti Background
Paper:  Neenah Solar White, Simon Says Stamp Gold Glitter and Matte Gold, Lawn Fawn Pearlescent Vellum
Ink:  Versamark, Altenew Baby Pink
Other:  In Good Hands, Pop the Champagne and Tall Cheers dies, Altenew Featured Sentiement die, Studio Light Missees Tasha criss-cross bracelet die, Waffle Flower A7 Rectangle die, Altenew Antique Gold embossing powder, Ranger Glossy Accents
Copics:  Y28, 11, YR21, 31, BV04, E37, 15, 11, 21, 00