Sunday, March 16, 2025

Joy to the World for The Paper Players

Hello friends!  Today the Paper Players have a fun Clean and Simple challenge for you, hosted by the amazing Joanne.  She is asking that we use a single stamped image on our cards.  

I'm also playing along with the Krafty Chicks and their Christmas challenge this week.


Stamping a single image made creating my card super quick and easy.  In fact, I made two and both are Christmas cards.  


During the holidays I bought a stamp and die set from Whimsy Stamps with several cute penguins enjoying the holidays/winter, so I used a couple to whip out two Christmas cards.   I first cut two white panels with rounded rectangle dies then stamped two penguin in the lower right corners.  After coloring with my Copic markers, I restamped it and a sentiment with a pigment ink (thank goodness for stamp positioners!).


For the first background I used a pine branch embossed folder with a panel of green cardstock and the second used a panel of two-toned glossy red cardstock with a snowflake folder.  Both were adhered to the card base, then the main panels added after layering on two additional rectangles cut from scrap paper.  While keeping it all CAS, the cards needed a wee bit more, so I added a trio of pretty gems to finish them off.


Aren't those penguins so very cute?  Even my husband, who is not typically of "cute" cards really like the one above, so that made me happy and means I'll make a few more in different colors.

The challenge will remain open until Friday March 21st at 3 pm EDT and I sure hope to see your card in the gallery this week!  In the meantime, I encourage you to visit the challenge blog for our CAS guidelines and to check out the amazing CAS cards my wonderful teammates have created.

Thanks for visiting and take care!

Stef

  • -Whimsy Stamps Penguin Winter Holiday stamps
  • -Simon Says Stamp Delicate Pine Branches and Snowflake Visions embossing folders
  • -Hero Arts Rounded Rectangle die
  • -SSS Color Blend Holiday Assortment glossy cardstock
  • -Picket Fence Candy Cane Gem Mix
  • -Copics - C0, 1, 5, 7, 9, T0, 2, R20, 35, 37, 39, 59

-Olos - YG1.6, 1.4, 1.2, RV1.7, 1.5, 1.3, 1.1

Saturday, March 15, 2025

Especially for You for The Flower Challenge

Hello friends!  We're halfway through the month and I'm back with my reminder card for The Flower Challenge.  This month, along with florals, we're adding circles to our cards. And because it's our 100th challenge, there are prizes to be won! 

I'm also joining the Anything Goes option at Seize the Birthday.


This time I opted for a pretty die cut floral that needed a little love, since it's been a long time since I last used it.


I started with the embossed background and used a large blending brush to softly add some light green to the raised areas of the panel.  It's not easy to see in the photos but it's there.  Then I trimmed the panel down to leave a nice frame around it from the A7 card base.

The flowers were die cut from white cardstock, then ink blended.  I really love the peachy colors with the muted greens and the metallic gold center.  A white circle was added as a landing spot for the die cut flowers then before adding the foiled sentiment, I splattered the card front with gold metallic paint. 


So many ways to add circles, what is your favorite?  I hope you'll show us by posting your card to the gallery!  The challenge is open until Tuesday March 25th, so there's plenty of time to join in.  I encourage you to visit the challenge blog (linked above) to see what my super talented teammates have created to inspire you and get all the info about the prizes to be won.

Thanks for stopping by and take care!

Stef

  • Simon Says Stamp Divine Peony dies
  • Spellbinders Origami Folds embossing folder
  • Pinkfresh Studio Folk Edge Circle die
  • Spellbinders More Sentiments Foilplate and die
  • SSS Cabbage, Artichoke and Kale inks
  • Altenew Peachy Glow, Golden Honeycomb, Amber Blaze and Melted Butterscotch inks
  • Gansi Tambi Starry Colors gold metallic paint

Sunday, March 9, 2025

Just a Note for the Paper Players

Hello friends!  It's Sunday, so you know what that means, it's time for a new challenge at the Paper Players.  This week the lovely Jaydee is hosting our monthly color challenge and is asking us to use only pastels.  Couldn't be more perfect for this time of year with Easter and Spring just around the corner!

In hind sight, I should have worked on Easter cards but instead I used one of my older favorite Altenew flower stamps.


I love pastels but they are not my usual color choices, mainly because I love the drama of the contrast and shading I can achieve with darker colors, but I enjoyed the change. I thought it would be fun to go with pink, mint and aqua, with a dash of yellow.  I colored the floral image then went around the edges of it with a light blue marker, and used a rectangle die to trim it down.

A panel of mint cardstock was added to the middle front of the card base, then the main image popped up with foam tape.  The thing that took me the longest in making this card was choosing the sentiment and in the end I used one from the same stamp set and added it with thin foam squares.


I so look forward to seeing all the beautiful pastel cards in the gallery this week - I hope yours is one of them! Do visit the challenge blog (linked above) where my wonderfully talented teammates have some beautiful inspiration for you.  The challenge will remain open until Friday, March 14th at 3pm EDT.  

Thanks for visiting and take care!

Stef

  • Altenew Fragrant Florals stamps
  • Altenew Featured Sentiment die
  • Spellbinders A2 Matting Basics A die
  • Copics - RV91, 21, 10, BG34, 32, 11, G16, 02, 00, Y08, 00, B0000

Tuesday, March 4, 2025

Peruvian Lilies for The Flower Challenge

Hello friends!  It's a special time over at The Flower Challenge because we are celebrating our 100th challenge!  And there are prizes to be won!  All you need do is create a card featuring flowers and using our theme this month which is Add Circles.

To go along with the theme, I decided to use a Waffle Flower cover die behind my flowers.


I love this new Peruvian Lily set from Altenew, the floral bouquet is so pretty.  Did you know that the scientific name for these flowers is the Alstroemeria?  I kept looking at the stamp, thinking I didn't have any lilies such as this in my garden (and we have many!) so I looked it up.  Alstroemeria are used extensively in cut flower arrangements because they are long-lasting.  And very pretty too.

So, on to the actual creation of the card.  After stamping the image, I used the simple coloring stencils with two colors per petal and leaf to create some dimension, then it was die cut with the matching die.  The sentiment is also from the same stamp set and was die cut with its matching die as well.

The Ring Panel cover die was cut from a panel of white and layered on the card base.  I tucked the end of the stem underneath a corner of it, then added foam tape under the flowers and the sentiment.  The final touch was to add some sapphire gems.


I hope you're excited to play along and share how you add rings to your card, and for further inspiration, look no further than my very talented teammates over on the challenge blog (linked above).  More information about how the prize winners will be chosen is over there along with photos of the prizes. The challenge will remain open until Tuesday, March 25th. Hope to see you there!

Thanks for visiting and take care.

Stef

  • Altenew Peruvian Lily stamps, dies and stencils
  • Waffle Flower Ring Panel cover die
  • Altenew Water Hyacinth, Indigo Skies, Honeydew Glow, Lemonade Stand, Firefly and Mountain Pine inks
  • Lucy's Little Things Dark Sapphire gems

Sunday, March 2, 2025

Best Day for The Paper Players

Hello friends!  Here we are at the first Sunday in March and the Paper Players have a new challenge for you.  The lovely Claire is hosting our theme challenge and she has chosen spring flowers.  You know I'm here for that!

I decided to use a stamp set I have had for at least a year and I don't believe I've ever used it.  Anyway, with lots of flowers, I thought it would work great for this challenge.


The stamp was specifically designed for the matching oval dies, as you can tell (unfortunately, it's no longer available).  The wreath was stamped and colored with Copic and Olo markers in my favorite bright colors.  Before die cutting I stamped the sentiment on the same piece and thought I had it straight but after die cutting I realized, even using my stamp positioner, I managed to stamp it crooked lol!  So, the oval was cut and matted on a pink oval, then I stamped the sentiment on a scrap of white, fussy cut around it and added it with foam tape.

Next a white panel was embossed with a wood planks folder, adhered to the base, then I added a bright yellow strip that matched the yellow flowers.  The oval was popped up on foam tape and I decided there was enough going on with all the bright flowers that embellies weren't needed.


So, for my northern hemisphere friends, are you as ready for spring as I am? No matter what hemisphere you're living in, we'd love to have you pull out your favorite spring flowers and share them with us this week!  For more inspiration, my wonderfully talented teammates have a some gorgeous cards over on the challenge blog (linked above).  

I do hope you'll play along - the challenge will remain open until Friday, March 7th at 3pm EST.

Thanks for visiting and take care!

Stef

  • Spellbinders Stylish Oval Birthday Wishes stamps (retired)
  • Spellbinders Stylish Oval dies
  • Honey Bee Stamps Wood Plank embossing folder
  • Copics - BG49, 13, 23, 11, YG 67, 63, 61, V09, 06, 04, 01, YR23, 15, 13 (yellow), YR18, 16, 09, Y17 (orange)
  • Olos - RV 1.7, 1.5, 1.3, 1.1, BV 1.7, 1.4, 1.2, 1.1, YG 1.6, 1.4, 1.2


Saturday, March 1, 2025

Especially For Color Hues

Hello friends!  Here we are at the first of March and we have a new challenge for you at Color Hues.  This time the amazing Carol is hosting and has chosen a lovely color combo as we edge closer to Spring.

I'm also sharing over at Seize the Birthday, where my CH teammate Jules is hosting with a toppings theme of No Stamping.  I used dies and a foiled sentiment on my card.


Today I have another one of the modern floral die cuts to share, this time it's one from Spellbinders.


The leafy vines were die cut from sage cardstock, then I used Copic markers to add shading.  For the flowers, I added a light of amount of shading before adhering the matte gold centers.

Next came the background.  For that a panel of Neenah Natural White was die cut with the Simon Says Stamp Double Plaid Cover die.  It's an off white paper and stands out a little more against the white card base, and I like that the die cut looks like a trellis.  The floral die cuts were adhered to the card, then the sentiment and some sparkly gold gems were added to finish things off.


What are you inspired to create with these two colors?  If you need more ideas, then pop over to the challenge (linked above) where my immensely talented teammates and wonderful guest designer Nance have loads of beautiful cards to inspire you!  The challenge remains open until Friday, March 14th at 9 am EST and I hope you'll take time to join us!

Thanks for visiting and take care!

Stef

  • Spellbinders Fresh Picked Daisies die set
  • SSS Double Plaid Cover die
  • Spellbinders Fancy Sentiments Press Plate 
  • SSS Sage and Matte Gold cardstock
  • Honey Bee Stamps Marvelous Moments gems
  • Copics - YG67, 45, 41, W1


Sunday, February 23, 2025

Sweet Jasmine Birthday for the Paper Players

Hello friends!  It's time for a new challenge at the Paper Players and this week I am hosting and have created a sketch that I hope will inspire you to play along.

I'm also playing along with the Anything Goes portion of the challenge at Seize the Birthday.


I kept it fairly simple to give everyone lots of creative options.  For my card I used....drum roll....flowers!  What, not surprised? 😅


The floral spray was stamped in a very light brown, then I used the matching stencils to color it in.  They are simple coloring stencils so I added shading to the leaves, flower centers and the part of the bud closest to the stem.  

For the kraft panel, I ran it through my Betterpress with a wood press plate, using that same light brown ink.  I trimmed it down then used a slightly darker ink around the outside edge before adhering to the card front.  The flower image was layered on two additional die cuts for a bit of dimension, then the sentiment added with thin foam tape.  I rummaged through my box of twine and found a hemp twine for a bow to finish things off.


So, what are you inspired to make with this sketch?  It could be used innumerable ways and I look forward to seeing your interpretation in the gallery! But before you run off to your craft room, please head over to the challenge (linked above) to see how my super talented teammates have used it.  The challenge will remain open until Friday, February 28th at 3pm EST.

Thanks for visiting and take care!

Stef

  • Altenew Sweet Jasmine Stamp, Die and Stencils
  • Altenew Essential Textures:  Wood Press Plate
  • Simon Says Stamp Silhouette Sentiments stamp and die
  • SSS Latte and Cappuccino inks
  • Altenew Baby Pink, Fuchsia, Magenta, Citrus Burst, Honey Drizzle, Lime and Green Onyx inks

Sunday, February 16, 2025

Whimsical Flower Vine for Color Hues

Hello friends!  Yes, a second post for me today because it's time for a new challenge at Color Hues. (If you're here for my DT post for the Paper Players, you can find it here)  The amazing Bonnie is hosting this week and has chosen the color combo of coral and yellow.

I love nearly all colors, but I have to admit coral is a bit of a struggle for me, and I have no idea why.  But nevertheless, I made a fun little card using my default - flowers!


Last fall I'd purchased a couple of these modern floral design die sets and thought I'd use this one from Altenew (watch for the other one from Spellbinders, it will be coming soon!).  It certainly was easy to put together once the die cutting was complete and I added it to a panel where I'd inked up a bit of light yellow ink blending so the white leaves would be more visible.  But the card needed a little somethin' somethin' since die cut doesn't fill a full card front, so I layered up a frame and the helped a lot.

Since the frame was black I thought a black sentiment strip would work well along with a few black enamel dots.  But still...it needed something more, so I added the Baker's Twine and called it good!  


We'd love to have you join us for Bonnie's challenge and I encourage you to visit the challenge blog for loads of wonderful inspiration from my very talented teammates and our guest designer,  Teresa.  The challenge remains open until Thursday 2/27 at 9 am EST.  I do hope you'll play along!

Thanks for stopping by and take care!

Stef

  • Altenew Whimsical Flower Vine and Picture Frames dies
  • Simon Says Stamp sentiment strip
  • Concord & 9th Sorbet cardstock
  • SSS Lemon Chiffon cardstock
  • Altenew Lemon Ice ink
  • Altenew Essential Black and White enamel dots

Geo Happy Birthday for the Paper Players

Hello friends!  It's Sunday and you know what that means - a new challenge at the Paper Players.  This week Jan is hosting our CAS challenge with a theme of masculine cards.

Like many, I struggle with creating masculine cards.  But one of my fall backs is to use geometrics.  For todays card, I used a geometric foil plate and matching stencils that has been retired, but there are many stencils and stamps available for creating something similar.


The geometric pattern was created with silver foil on a Spellbinders Glimmer machine, as was the sentiment.  I then used the matching stencils to create the colored pattern.  There are three stencils but I only used two because I liked leaving part of the pattern white.  I actually made creating four cards in one day using this and another geometric foil plate/stencil set and different colors.

After the stenciling was complete I used a rectangle die to trim down the panel and adhered it to a white card base.  The sentiment was layered on two additional die cuts then added to the card.  This is a ridiculously simple design, but I like the clean and crisp look to it.


So glad you came by and I encourage you to visit the challenge blog because my talented teammates have loads for masculine card inspiration for you.  The challenge ends on Friday, Feb 21st at 3pm EST. I hope you'll join us!

Stef

  • Pinkfresh Studio Geo Tiles hot foil plate and stencils
  • PS Fancy Script Words hot foil plate and die
  • Altenew Water Dyacinth and Alpine Aster Fresh Dye inks
  • Spellbinders Glimmer hot foil in silver

Saturday, February 15, 2025

Festive Poinsettias for The Flower Challenge

Hello friends!  I'm here today sharing my reminder card for The Flower Challenge, where this month we are featuring the color pink.

Earlier this month my card for TFC was a bold vibrant pink birthday card.  This time I took the opportunity to add to my stash of Christmas cards.


A couple of months ago I purchased this beautiful poinsettia Betterpress, intending to use it for 2024 Christmas cards, but it never got inked up.  So I thought it would be fun to make a card with pink poinsettias.  I was in somewhat of a hurry to get this card done, so after inking it up in black pigment ink, I clear heat embossed it, then used the stencils to color the images.


The panel was trimmed down and splattered with a bit of white paint, then added to the silver panel after drying.  The sentiment is from an old package of foiled holiday sentiments, which was popped up on foam tape over the foiled strip.  It was quite easy to make, so I made a second one only using red rather than pink.


If you haven't yet had a chance to join us this month, why not take a moment to pop over to the challenge for more inspiration from the design team, then head on into your craft room!  We'd love to see your card (or a 2nd card!) in the gallery.  The challenge remains open until 2/25.

Thanks for stopping by and take care!

Stef

  • Spellbinders Festive Poinsettias Betterpress plate and stencils
  • Pinkfresh Studio Foiled Sentiments 4 Holiday
  • Altenew Baby Pink, Fuchsia, Magenta, Grass Field, Mountain Pine & Sunray inks
  • Simon Says Stamp Rhubarb, Cranberry, Latte, Cappuccino and Mocha inks

Sunday, February 9, 2025

Flamazing Day for The Paper Players

Hello friends!  I'm back with my card for this week's challenge at the Paper Players.  It's color week and LeAnne has chosen a beautiful combination that offers lots of options for creativity.

What immediately leapt to my mind with these colors was a tropical scene of some kind and below is what I came up with.  I didn't have all the papers and/or inks in these colors, so I tried to come as close as possible. 


As soon as I saw Flirty Flamingo as one of the colors, I knew I had to use this fun flamingo die from Ellen Hutson.  It was cut from Flirty Flamingo cardstock, then I used a bit of ink blending on the body and top wing but it doesn't show up well in the photo.  I cut a second flamingo from white, colored the legs with yellow Olo markers, removed the pink legs and added the pink body to the white die cut.  The beak was cut from white and colored the same as the legs, then the black die cut piece was layered on top.

The arch panel was ink blended with Distress Inks to simulate a beach scene, then I stamped the sentiment and added the flamingo.  I used a tropical leaf die that had a larger and smaller leaf, cutting it four times from what I think is Coastal Cabana cardstock, used some Distress inks for shading, adhered them around the edges of a white panel, then added the beach layer.  This really was an easy card to make thanks to all the dies and using some colored cardstock.


Thanks for stopping by and I hope you'll do the same over at the challenge blog (linked above) where my talented teammates have some wonderful inspiration for you!  The challenge will remain open until Friday, Feb 14th at 3 pm EST.  Hope to see your card in the gallery!

Stef

  • Ellen Hutson Flockstar die and Inner Flamingo sentiment stamp
  • Simon Says Stamp Tropical Leaf Bunch die
  • SSS Nested Domed Arches die
  • Evergreen Bough, Peacock Feathers, Squeezed Lemonade and Antique Linen Distress Inks
  • SU Flirty Flamingo and Coastal Cabana (?) cardstock


Tuesday, February 4, 2025

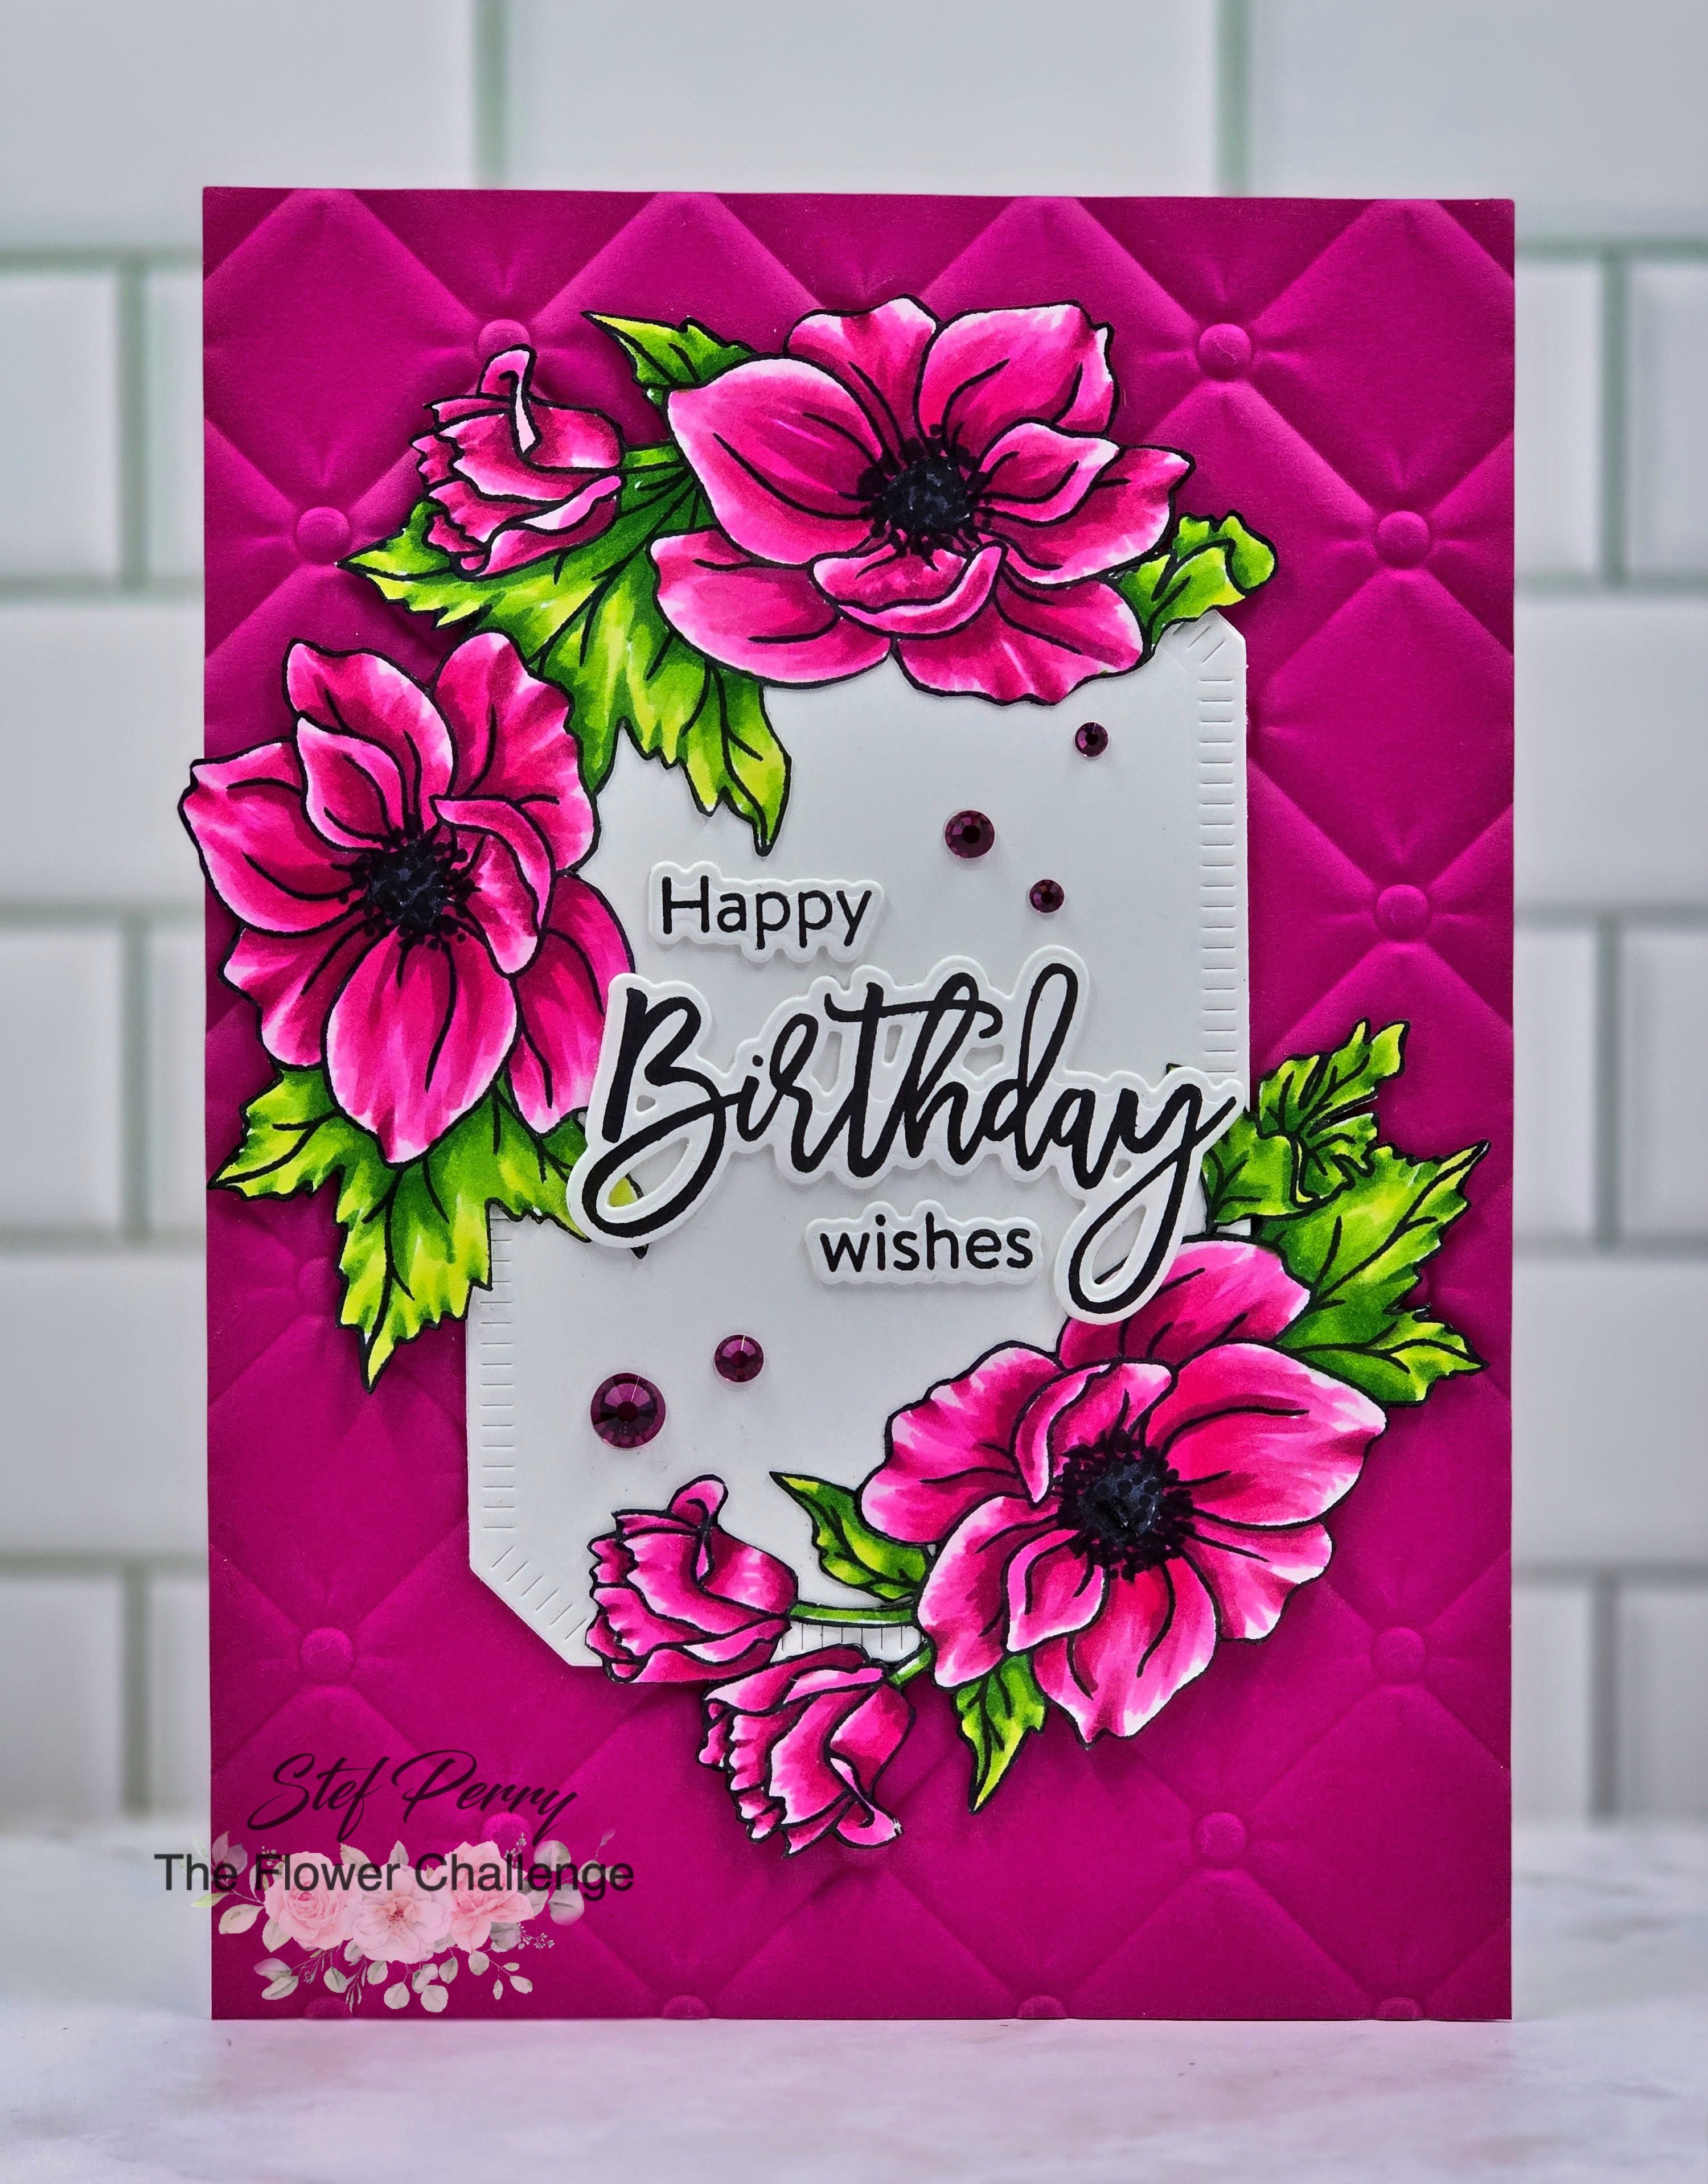
Anemone Birthday for The Flower Challenge

Hello friends!  The Flower Challenge returns for 2025 and this month we're looking to feature pink on your floral cards.  

I went all in for some vibrant pinks on my card!


I started by coloring the Anemone Wreath from Simon Says Stamp.  It's a large stamp, roughly 5" x 5 1/2", and it does not come with a die, so when I was done coloring, I started fussy cutting it. There are more leaves that complete circle but they have single line stems, so I omitted them and ended up with two sprays to edge the opposing sides of a white die cut octagon panel.

I then embossed an A7 panel of Dragonfruit cardstock with the Tufted folder (I'm so in love with that one!) then adhered the white panel, florals and the sentiment.  I know the photo makes the bottom half on the panel look less embossed but that's just a trick of the lighting.  The folder equally embossed the entire panel.  I had plenty of open space on the octagon so I thought some sparkly gems would be appropriate to complete card.


Won't you come join us this month?  Time to get back to florals!  My lovely and talented teammates have oodles of inspiration for you over on the challenge blog (linked above) and I'll be back on the 15th with a reminder card.  The challenge is open until the 25th of the month and we'd love to see your card in the gallery!

Thanks for stopping by!

Stef

  • Simon Says Stamp Anemone Wreath
  • Honey Bee Stamps Birthday Wishes stamps and dies
  • Pinkfresh Studio Blanket Stitched Octagon die
  • Spellbinders Tufted ef
  • Concord & 9th Dragonfruit cardstock
  • SSS Taffy Dazzling Gems
  • Olos - RV1.7, 1.5, 1.3, 1.1, YG1.6, 1.4, 1.2

Sunday, February 2, 2025

Hugs & Kisses for The Paper Players

Hello friends! It's Sunday and time for a new challenge at The Paper Players.  This week, the lovely Ann has chosen a theme of love to start off the month of February.

The stamp set I used for this card is not new but it was unused until I was reminded of it and inspired by the lovely and talented Donna Mikasa when she posted this card. I initially used the stamp set for my card posted here yesterday and had so much fun making it that I created another with a slightly different layout for this challenge.


I started with the stamp set, which has three stamps that create different designs on nine hearts.  I then used the matching die to cut them all out.  I did this twice, once with the reds and once with the aquas.  

I thought I would layer them on a panel sprayed with Distress Mica spray but it was too busy.  So I searched through my unused embossed panels and decided on one with a wavy pattern, using the debossed side for adding the hearts.  All the layers were added to the card base with foam tape, including the hearts and sentiment, which is from the same stamp set.  Easy peasy (kind of) and I'll be sending this one off to one of my grandsons.  All three of my grands are adults but they still like getting Vday cards from their grandmother. 😍 


Thanks so much for stopping by. I hope you'll take a moment to visit the challenge blog (linked above) and see all the amazing cards the rest of the DT created.  The challenge remains open until Friday February 7th at 3pm EST and we hope to see your card in the gallery!

Take care!

Stef

  • Simon Says Stamp Printmaking Hearts stamps and dies
  • Stampin' Up Seaside embossing folder (ret.)
  • Spellbinders Postage Edge Rectangle die
  • Shiny Bauble Distress Mica Spray
  • SSS Guava, Watermelon, Cherry, Seafoam, Surf and Ocean inks

Saturday, February 1, 2025

A Valentine for Color Hues

Hello friends!  Did the month of January fly by as quickly for you as it did for me?  Wow!  But the good news is that it's time for a new challenge at Color Hues! The amazing Tracey will be hosting for the next two weeks and has chosen the timely colors of red and pink.

We are also excited to share with you that we are partnering up this challenge with the Inkspirational Challenge!

Inkspirational is a two-week challenge that features a rotation of: Word Prompt, Designer's Choice, Mood Board, Clean and Simple, Use Stencils and Seasonal.  We are teaming up together in order to perhaps introduce challenge participants of both to another challenge that maybe they weren't familiar with.  We hope you'll play along with us by linking up to both challenges!  

I'm also playing along with the lovelies over at the Time Out Challenge, where they have a fun new challenge called Pick Two.  I've chosen heart and layers.


So, now after all that, let's get on to the card!


A little back story here too...I purchased this stamp set last year but never used it.  I was reminded of it and inspired by the lovely and talented Donna Mikasa where she shared this card for CH101.  And since it was hearts, I knew it would make the perfect Valentine card for Tracey's pink and red challenge.

I started by stamping the hearts with the three layering stamps that create nine hearts with different designs, six of which you can see above.  I just love that!  And then there is a single die that cuts them all out.  

I decided to make a square card, so I cut a white panel that was large enough to include the sentiment in the middle, layered that panel on a black mat, which was added to the pink scallop square and popped up on a white 5"x 5" card base.  Rather than add embellishments, I painted the hearts with a shimmer pen then covered them with glossy accents to make them shiny and pretty!  This card will be heading off to my granddaughter in Oregon (yes, my adult grands still like getting Valentine's from me lol!).


So what are you inspired to create with these colors?  It doesn't have to be a Vday card, just as long as it includes pink, red and neutrals of your choice.  For an abundance of incredible inspiration, please visit both challenge blogs (linked above) to see what our two very talented design teams and guest designer Trina Phan, have created.  

The CH challenge will remain open until 9 am EST February 14th. We hope to see your card in the gallery and don't forget to link up over at Inkspirational too!

Stef

  • Simon Says Stamp Printmaking Hearts stamps and dies
  • SSS Love You Greetings stamp and die
  • Pink and Main Layered Square dies
  • Hero Arts Nested Scallop Square dies
  • SSS Guava, Watermelon and Cherry inks
  • C&9th Pink Lemonade cardstock
  • Glossy Accents