Sunday, April 30, 2017

Flora Thanks

Hi there friends!  I'm sharing a card that I made with a gorgeous background stamp from Simon Says Stamp.  While it was time consuming to color, it was also a labor of love (because I LOVE this stamp!) and worth it in the end I think.


I cut a piece of Strathmore Bristol paper to 6" x 6", which is just slightly larger than the stamp, then used a Misti to stamp twice with Versamark to ensure a good stamped image before heat embossing with white embossing powder.  Coloring then ensued using Zig markers and a water brush.  The pattern was somewhat overwhelming at first but I started from the middle and worked my way out, coloring the same parts as I moved my way around the card.  After the flowers and leaves were dry, I used a very light gray to color the background in-between the images.  While not so obvious in the photos, IRL the gray helps the white embossing pop at bit.


To assemble the card I trimmed down the background image to 4.5" square, then adhered to a slightly larger card base cut from Crushed Cucumber card stock.  For the die cut sentiment I used some Stick It adhesive to the back of a scrap of white card stock large enough to cut the word twice, the layered one on the other after running through my Big Shot, and because the bottom piece had Stick It on the back as well, it was easy to adhere to the vellum flag.  I then turned the vellum over and added foam tape just under the die cut in order to hide the adhesive.  I hesitated to add any embellishments because the background is already so busy but finally decided on a few sequins for a bit of sparkle.  For the interior, I added one of the trimmed pieces to the bottom of the white card stock panel I added for a greeting.


I'm entering this into three challenges - the current challenge at Color Throwdown, Jaydee's fun Tic Tac Toe challenge at The Paper Players, and the current Simon Says Stamp Wednesday Challenge where Anything Goes this week.  I've added links below, so be sure to head over to the challenges and enjoy all the gorgeous inspiration!


Thanks for visiting!

Stef


Product details:
Stamps:  Flora Background (SSS)
Paper:  Cucumber Crush (SU), Neenah Solar White, Strathmore Bristol, Vellum
Ink:  Versamark, Zig Clean Color Real Brush Markers:  Light Pink, Purple, May Green, Yellow Green, Yellow, Cool Gray 1
Other:  SSS Thanks die, Pretty Pink Posh Sparkling Clear Sequins, Kuretake Water Brush, Stick It adhesive

Thursday, April 27, 2017

Greetings, Baby!

Hello again!  I've made a fun little baby card for a couple of challenges - the current Color Challenge at Splitcoaststampers using the Stampin' Up! colors of Pink Pirouette, Soft Sky and Smoky Slate, and the wonderful sketch challenge at The Paper Players.


The SU Moon Baby set has some darling baby images, but to fit into the small rectangle on in the sketch, I ended up using the cute image with the little stuffed animals.


I stamped the image in Versafine Onyx Black on Canson watercolor paper and heat embossed it with clear embossing powder.  I then water colored the bunny with Smoky Slate ink and the bear with Crumb Cake ink using a watercolor paint brush.  When that dried I added the pink cheeks and ears to all three critters, then used my White Extrafine Sharpie to color the lamb because the watercolor paper is more ivory than white.  Finally, the background was water colored with a light wash of Soft Sky.


Once the panel was dry, I mounted it on a slightly larger rectangle of Smoky Slate that was cut on the bottom with a SU Scallop Border punch.  It was then layered with foam tape on the base that was sporting a strip of pink dsp with hearts that I've long hoarded kept in my stash.  ;-)  Next, the die cut sentiment from the Simon Says Stamp Handlettered Greetings cut from Pink Pirouette card stock was glued to the focal point, just slightly hanging off each side.


Finishing touches included using some Nuvo White Blizzard Glitter Drops to both the interior of the stars and also to create drops, adding Clear Wink of Stella to the little animals, and finally a little flower from the Little Princess sequins from Simon Says Stamp.

I appreciate your visit and hope you'll use the links above to check out all the wonderful inspiration at both of the challenges.

Stef

Tuesday, April 25, 2017

Elphie Birthday Stack

Hi there and welcome back!  I had fun playing with the cute Elphie Selfie stamp set from Lawn Fawn yesterday, making a card for the current challenge at CAS(E) this Sketch.  For the center strip of the sketch I decided to stack the cute images from the set.


Using my Misti, I lined up all the stamps on a panel of Strathmore Mixed Media paper where I wanted to place them to get the correct spacing, then inked up and stamped only the two elephants and bird on the panel, as the other images and sentiment were stamped on separate pieces of card stock so they could be popped up with foam tape.  After all the images were stamped, I used various Zig markers and a water brush for coloring.


The cake, mouse and balloon were die cut with the matching Lawn Cuts dies and adhered with foam tape, then the sentiment was added after heat embossing on black card stock and hand cutting the flag ends with my paper snips.  Hard to tell from the photos, but Clear Wink of Stella was added to the balloon and cake frosting for a bit of sparkle.


I just love these sweet images and the fun scenes that can be made with them!

Thanks so much for visiting!  I've added a link above to the CTS challenge, so be sure to use it and enjoy all the great inspiration!

Stef


Product Details
Stamps:  Elphie Selfie (Lawn Fawn)
Paper:  Strathmore Mixed Media, Basic Black (Stampin' Up!), Royal Purple (Simon Says Stamp)
Ink:  Versafine Onyx Black, Versamark, Zig Markers:  Gray, Light Pink, Purple, Dark Brown, Cobalt Blue, Beige, Yellow, Bright Yellow
Other:  Elphie Selfie Matching Lawn Cuts, Hero Arts White Embossing Powder, Kuretake Water Brush, Clear Wink of Stella

Sunday, April 23, 2017

Mothers and Flowers Paintable Prints

Hello again!  So glad you are here to see what I am sharing today.  I recently purchased from Simon Says Stamp the new set of Suzy's Mothers and Flowers Watercolor Paintable Prints, which are A2 sized pieces of Tim Holtz distress watercolor paper with gorgeous prints by the fabulous Suzy Plantamura.  All the images are so lovely, but I chose the panel with the large flower images, trimming them out with my paper snips after water coloring because I wanted to use a different sentiment from that on the printed panel.  I already had this idea in mind to use with the Mojo sketch challenge (see below), then I saw Amy Rysavy's video (Amy R Prairie Paper and Ink) earlier this week where she did the same thing!  Ha!  I only wish the package contained more copies of these flower images or that Simon would come out with a stamp of this image because I loved water coloring it.


The flower image was colored using a waterbrush and Distress Inks.  Starting with the flower center, I covered it with a light layer of Scattered Straw, then added a tiny bit of Ground Espresso for shading.  Once it dried a bit I added another layer of the same colors but it just didn't seem lively enough, so I pulled out Spiced Marmalade, which created the color I was going for.  Next I moved to the stems and leaves, using Shabby Shutters for a light base and Peeled Paint to shade.  After coloring the flower petals with Abandoned Coral and Fired Brick, I let image dry (helped with my heat tool in the end) before fussy cutting. 


For the background, a piece of Strathmore Bristol paper was trimmed down, then sponged with more distress inks (Squeezed Lemon, Broken China and Shabby Shutters) using the Tim Holtz Mini Blending Tools.  Next I misted and splattered larger water drops, let it sit for a minute, then sopped up the water with a towel.  I think I've said it before, but using the Bristol takes all the anxiety out of blending distress inks.  I've watched many a video about "using a light hand" etc., in ways to effectively blend but was not always successful until I discovered how well they work on Bristol paper.


The sentiment from the Stampin' Up! Circle of Spring stamp set was stamped in Versafine Onyx Black on Neenah Solar White, cut with a SU Stitched Shapes die, then mounted on a scalloped circle of SU Basic Black card stock, and adhered to the blended panel after the flowers were popped up on foam tape.  Before adhering the panel to the card, I layered a strip of Watermelon Wonder card stock wrapped with Basic Black Baker's Twine.  The inside was finished with a strip of the same card stock.

I'm joining 3 challenges with this card, including Mojo Monday (sketch), and two challenges at Simon Says Stamp where both themes are showers and/or flowers.  I've added links to all three below, so be sure to use them to check out all the wonderful inspiration!


Thanks so much for visiting!

Stef

Sunday, April 16, 2017

Big Scripty Greetings Birthday

Hi there!  I hope everyone celebrating Easter are having a wonderful day with their families!  I decided to take a few minutes to post my card that's a little bit late for both last week's color and sketch challenges at Splitcoaststampers.  But fortunately there's no hard deadline so one can play along any time.  I'm also joining the current challenge at Seize the Birthday where the current "toppings" choice is to use two pattern papers on your card. 


Aren't those colors delicious?  Lost Lagoon, Pistachio Pudding and Island Indigo, all lovely together.  I was never a huge fan of the Stampin' Up! pistachio color but I admit it does play well with these two blues.  And I happen to have some retired Venetian Romance designer series paper that worked perfectly with the colors and the STB toppings choice.


Playing around with the tag I decided to use the Big Scripty Greetings stamp set from Simon Says Stamp.  Created by Kristina Werner using her gorgeous script, the set has several wonderful sentiments.  It looks very dark but the ink is Island Indigo, heat embossed with clear embossing powder.  Because the dye ink dries so quickly, I first covered inked the stamp in Versamark then added the Island Indigo ink, that way it stayed sticky enough for the embossing powder to cling to the sentiment.  After heat embossing the sentiment I added the border and heart from the Tin of Cards stamp set from Stampin' Up! in Lost Lagoon, although I ended up using Stickles to cover the heart.  I added the birthday greeting from the same sentiment set \to the interior of the card. 


The tag was finished off by adding the Lost Lagoon and Very Vanilla twine.  After adhering all the card stock and dsp layers, and wrapping the vanilla twine around the horizontal piece, the tag was added using Dimensionals.  I decided to stick with the sketch and add a heart to the lower left side.  I found an Essentials Wooden Elements heart (retired SU), covered it with Sea Spray Stickles and glued it to the card front.


Thanks so much for visiting!  I've added links to all the challenges above, so be sure to head over there and check them out.

Stef


Saturday, April 15, 2017

Persian Motifs

Hi there and welcome back!  I haven't had much time to play in my craft room in the last week but was finally able to spend the afternoon crafting and finished a couple of cards.  This card was made using the current sketch from Freshly Made Sketches.  I've added a link below the image, so be sure to head over there and enjoy all the beautiful inspiration!


I decided to take a very CAS approach to the sketch and used a grouping of floral images to represent the wavy section at the bottom of the card.  Using my Misti to create the pattern, several images from Persian Motifs stamp set were stamped using Versafine Onyx Black on a Bristol card base.  They were then water colored using Zig Clean Color Real Brush Markers and a water brush.


I used Carmine Red for the flower petals, thinking it had a bit more yellow in the pigment.  I was surprised when I started moving the ink up the petals that the lighter color had a definite pink hue to it.  But I was still fine with how it turned out.  The leaves and stems were colored with Mid-Green, a more olive type green.


After the water coloring was complete, the card was put back in the Misti and the sentiment lined up and stamped.  Some Bright Gold Crystal Nuvo drops were then added, along with Pretty Pink Posh Sparkling Clear sequins to finish things off.

That's it for tonight but I'll be back tomorrow with my 2nd card.  Thanks so much for visiting!

Stef


Friday, April 7, 2017

Four You Birthday

Hi there!  Tonight I have a card to share that I had fun making for the current challenge at CAS(E) this Sketch (linked below).  I had a panel of Neenah Solar White that I used to practice ink blending with Distress inks but didn't get the smooth blending I was hoping for, so it was set aside in the reject pile.  Then, when I saw the CTS sketch this week, I knew I found a use for it!


The panel was blended with Peacock Feathers, Salty Ocean and Seedless Preserves Distress Inks.  It was cut into different size strips for the sketch and layered on a #110 Neenah Solar White card base.  I also varied the distance between the strips, leaving enough room for the sentiment.


After laying out the strips but not fully adhering them to the base, I put the card into my Misti to ensure the sentiment was stamped straight, using Versafine Onyx Black.  Then I used a respositionable adhesive to attach the strips, giving me the ability to adjust my layout until I was satisfied with how it looked.  The final touch was adding the silver enamel shapes.


Thanks so much for visiting!  Have a great weekend!

Stef


Product details
Stamps:  Four You (Stampin' Up!)
Paper:  Neenah Solar White both 110# (card base) and 80# (panel)
Ink:  Versafine Onyx Black; Peacock Feathers, Salty Ocean and Seedless Preserves Distress Inks
Other:  Metallic Enamel Shapes (SU), Ranger Mini Blending Tool, Misti

Thursday, April 6, 2017

Tin of Cards Birthday

Welcome back!  I have a second card to share using a Distress ink blended panel.  As I explained in my post earlier today using a different blended panel (Wild About You), I was experimenting with ink blending and finally settled on using Bristol paper for the best results.  With this panel, I used 3 of the Distress Ink reds and created a card that I will give to a friend at work next week for her birthday.


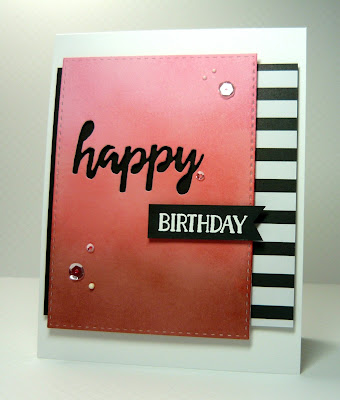
For the sentiment, I heat embossed on a flag of Basic Black card stock the word "birthday" from Tin of Cards by Stampin' Up!, a stamp set with a load of sentiments with delightful fonts.  I liked this one combined with the scripty Brushstroke Birthday die cut.  The inked panel was trimmed with a Simon Says Stamp Wafer Stitched Rectangle die (still love the extra "umph" these dies bring) then layered upon a square of Basic Black card stock covered on one side with the black striped patterned paper.  The entire thing was then mounted on the Neenah Solar White card base with foam tape.


This close up better shows the three ink colors of Worn Lipstick, Barn Door and Aged Mahogany, and the Pretty Pink Posh Sparkling Clear sequins and Simply White NUVO Crystal Drops, my latest embellishment crush.  ;-)


I'm joining a couple of challenges with this card.  The first is the current birthday themed challenge at Simon Says Stamp Wednesday Challenge, where they are celebrating the challenge's 8th year.  The other is Seize the Birthday where the theme is Anything Goes.  I've linked to both challenges below so be sure to head over there and check out all the amazing inspiration!


Thanks for visiting!

Stef


Wild About You

Hello friends!  I've been working on my Distress Ink blending skills and created a couple of backgrounds that I was happy with.  I don't know about you but I have a tough time blending the inks smoothly enough for my satisfaction on regular card stock, even with the Ranger Mini Blending tool, so I chose to work with some Bristol paper.  It was a waxier finish that makes it easier to move the inks around (e.g. more forgiving!).  Last week I received my monthly card kit from Simon Says Stamp, which contained the most darling stamp set called Wild About You.  I used the adorable elephant on this card but the stamp set also has a lion, penguin and giraffe plus hearts and a couple of fun sentiments.

I think it's the eyes that really get me, plus the enormous ears.  Love!  Anyway, after stamping her (yes, "her" don't you think, with pink toe nails?) on Canson XL watercolor paper with Versafine Onyx Black, I set the ink by heat embossing with clear embossing powder.  Then I water colored the little elephant using Gray and Light Pink Zig markers.  When completely dry, she was fussy cut and set aside as I worked on the ink blended panel.  I had previously blended the panel with Spun Sugar, Picked Raspberry, and Seedless Preserves Distress Inks.  Using my Misti, the hearts and sentiment was lined up then stamped in Versamark and heat embossed with white embossing powder.


The panel just didn't pop enough against the white card base, so I mounted it onto a slightly larger piece of Rich Razzleberry card stock then used foam tape to attach to the base.  I kept the finish simple and just added the sequins and popped the elephant up on foam tape as well.

Thanks so much for visiting and as always, I love to hear from you if you have a moment to leave a comment!  I'm entering this card into the current birthday themed challenge at Simon Says Stamp Wednesday Challenge, where they are celebrating the challenge's 8th year.  I've linked it below so be sure to head over there and check out all the amazing inspiration!


Stef


Product details
Stamps:  Wild About You (SSS)
Paper:  110# Neenah Solar White, Rich Razzleberry (Stampin' Up!), Strathmore Bristol
Ink:  Versamark, Versafine Onyx Black, Distress:  Spun Sugar, Picked Raspberry, Seedless Preserves; Zig Clean Color Real Brush Markers:  Gray, Light Pink
Other:  Hero Arts White Embossing Powder, Stampin' Up! Clear Embossing Powder, Pretty Pink Posh Sparkling Clear and Sweet Pea Mix Sequins, Ranger Mini Blending Tool

Saturday, April 1, 2017

Friends Sympathy

Hi there!  I finished a couple of cards this afternoon and am sharing the one made with the awesome sketch at Mojo Monday and using the beautiful color challenge at Stamp Ink Paper.


These colors were so inviting, and the blue and light brown reminded me of some long retired Stampin' Up designer series paper that I have held onto for the last several years that I decided to pull out a couple of pieces and see if I could create a card also tying in the light and dark purples.  I think it worked out okay but I'm not totally sold on with the Baja Breeze and Wisteria Wonder mix.


I looked through my older stamp sets and found the Friends 24/7 stamp set that was also released the same year as the dsp and inked up the bird image with Crumb Cake and then a light layer of Soft Suede, stamping it on a piece of Whisper White.  The sentiment from Petite Pairs was stamped in Blackberry Bliss, then I mixed some Wisteria Wonder and water in the lid of the ink pad, dipped an Aqua Painter into the mix then lightly splattered it on the panel.


Before adhering all the layers, I sponged a bit of Crumb Cake ink lightly around all the edges.  After the damask layer was adhered onto the flower print panel with Dimensionals, Baja Breeze Seam Binding Ribbon was wrapped around the layers and tied with a knot.  After popping the focal point up over the ribbon with more Dimensionals, the entire piece was adhered to the Blackberry Bliss card base. 

Thanks so much for visiting!  I've added links above to the respective challenges, so do be sure to use them to check out all the beautiful inspiration.

Stef


Product details
Stamps:  Friends 24/7, Petite Pairs
Paper:  Whisper White, Wisteria Wonder, Blackberry Bliss, Baja Breeze, Parisian Breeze dsp
Ink:  Crumb Cake, Soft Suede, Blackberry Bliss
Other:  Baja Breeze Seam Binding Ribbon, Aqua Painter

Basket of Wishes

Hello again!  I had a chance to whip up a pretty quick card yesterday, using two of the Basket of Wishes images.  It's a fun stamp set because you have choices of baskets and contents to add, and since they are clear stamps, it made it pretty easy to line up the flowers after stamping the basket.


I used a water brush and a variety of Stampin' Up! reinkers to color the basket of flowers, after stamping with Basic Black on watercolor paper.  A light wash of Marina Mist ink was applied to the background and used a bit of Smoky Slate to ground the basket.  Once dry, I used a few Prismacolor colored pencils to deepen the darker areas and brighten up the yellow petals, then it was die cut it with one of the SU Stitched Shapes framelits and adhered to a Marina Mist scalloped circle.


The sentiment is from the Dragonfly Dreams stamp set.  It was stamped on a 4.25 x 5.5 inch panel of Whisper White, first with Versamark, then Wild Wasabi, and then heat embossed with clear embossing powder.  To add the ribbon above, I put a piece of double sided tape on each side of the back of the panel and then wrapped it around to the other side.  Once I got the first one even, then the next two were a bit easier to line up.  After popping the focal point up on Dimensionals, I thought it needed just a little embellishment, so I dug out some retired Candy Dots to add below the sentiment.

The challenges at Color Throwdown and Freshly Made Sketches provided the color and layout of my card.  I've added links below to both challenges, so be sure to head over there and enjoy all the wonderful inspiration!


Thanks for visiting! 

Stef


Product details
Stamps:  Basket of Wishes, Dragonfly Dreams (both SU)
Paper:  Whisper White
Ink:  Basic Black, Crumb Cake, Early Espresso, Soft Suede, Chocolate Chip, Smoky Slate, Daffodil Delight, Wild Wasbi, Marina Mist, Versamark
Other:  Daffodil Delight 1/8" Grosgrain ribbon, Stitched Shapes and Layering Circles Framelits, Clear Stampin' Emboss powder, Aqua Painter, Candy Dots, Prismacolor Colored Pencils