Tuesday, March 13, 2018

Sweet Pea

Hi there!  I hope your week is going well so far!  I wanted to watercolor a spring image and found just the right one in my stash of Suzy's Watercolor Prints.  This lovely image of Sweet Peas just made me smile.


I used Distress inks in Spun Sugar, Worn Lipstick and Picked Raspberry to water color the flowers, and Shabby Shutters and Peeled Paint for the leaves and stems.  When those images were dried I took a large round paintbrush and covered the background with very diluted Peacock Feathers.


After the panel was completely dry it was die cut with a stitched rectangle die, then the strip of vellum with the heat embossed sentiment was wrapped around and the panel mounted to the bright pink card base with foam tape.  I love this sentiment, it's from such a special set from Hero Arts with wonderfully inclusive and uplifting messages!


Next I used an Aqua Shimmer pen to paint some shimmer on the edges of the sweet peas, then added Nuvo drops and sequins as a finishing touch.


Thanks so much for visiting, it's always so appreciated!  I'm joining three challenges with this card.  I've included links below, so be sure to head over all three challenges and enjoy all the amazing inspiration!


Stef


Product details
Stamps:  You Are Love Messages (Hero Arts)
Paper:  Doll Pink (Simon Says Stamp), Vellum, Suzy's In Full Bloom Watercolor Prints (SSS)
Ink:  Versamark; Distress Inks:  Spun Sugar, Worn Lipstick, Picked Raspberry, Shabby Shutters, Peeled Paint, Peacock Feathers
Other:  A2 Stitched Rectangle Stax Set 1 (MFT), Wow Super Fine Opaque Bright White embossing powder, Simply White Tonic Nuvo Crystal Drops, Spring Meadow Mix sequins (Pretty Pink Posh), Tonic Nuvo Aqua Shimmer pen

Monday, March 12, 2018

Dahlia Thank You

Hello friends and welcome back!  It's time for a new Color Challenge at Splitcoaststampers!  Barbara is hosting this week and she chose the bold and bright combination of Melon Mambo, Tangerine Tango and Night of Navy, with a dessert option to use "bling".  I have to admit I struggled with this color combo a bit because I wanted to do something different than water coloring flowers, and finally landed on doing something a bit more graphic, using the fun Dahlia Turnabout stamp to create a thank you card and used gold ink, cord and sequins for dessert.


The stamp creates the flower by rotating a quarter turn every time you stamp (so using a stamp positioner is really essential IMHO), so each time I made a turn I inked up the stamp with a different color.


After the stamping was done, the panel was trimmed down and added to a slightly larger Orange Peel square panel, wrapped with Gold Cord and popped up on the Doll Pink card base, which measures 4.5" square.  After  stamping and die cutting the sentiment, it was adhered to the center of the flower with foam tape, then the sequins were adhered.


Thanks so much for visiting, it's so appreciated!  I've added a link above to Splitcoaststampers, so I hope you'll head over and check out the , and hopefully join in the challenge!


Stef


Product details
Stamps:  Dahlia Turnabout (Concord & 9th), Scripty Greetings (Simon Says Stamp)
Paper:  Neenah Solar White, Orange Peel and Doll Pink (SSS)
Ink:  Delicatta Golden Glitz; Altenew:  Sapphire, Coral Berry, Orange Cream
Other:  Glitz Collection sequins (SSS), Gold Cord and Stitched Shapes Circle framelit (SU)

Friday, March 9, 2018

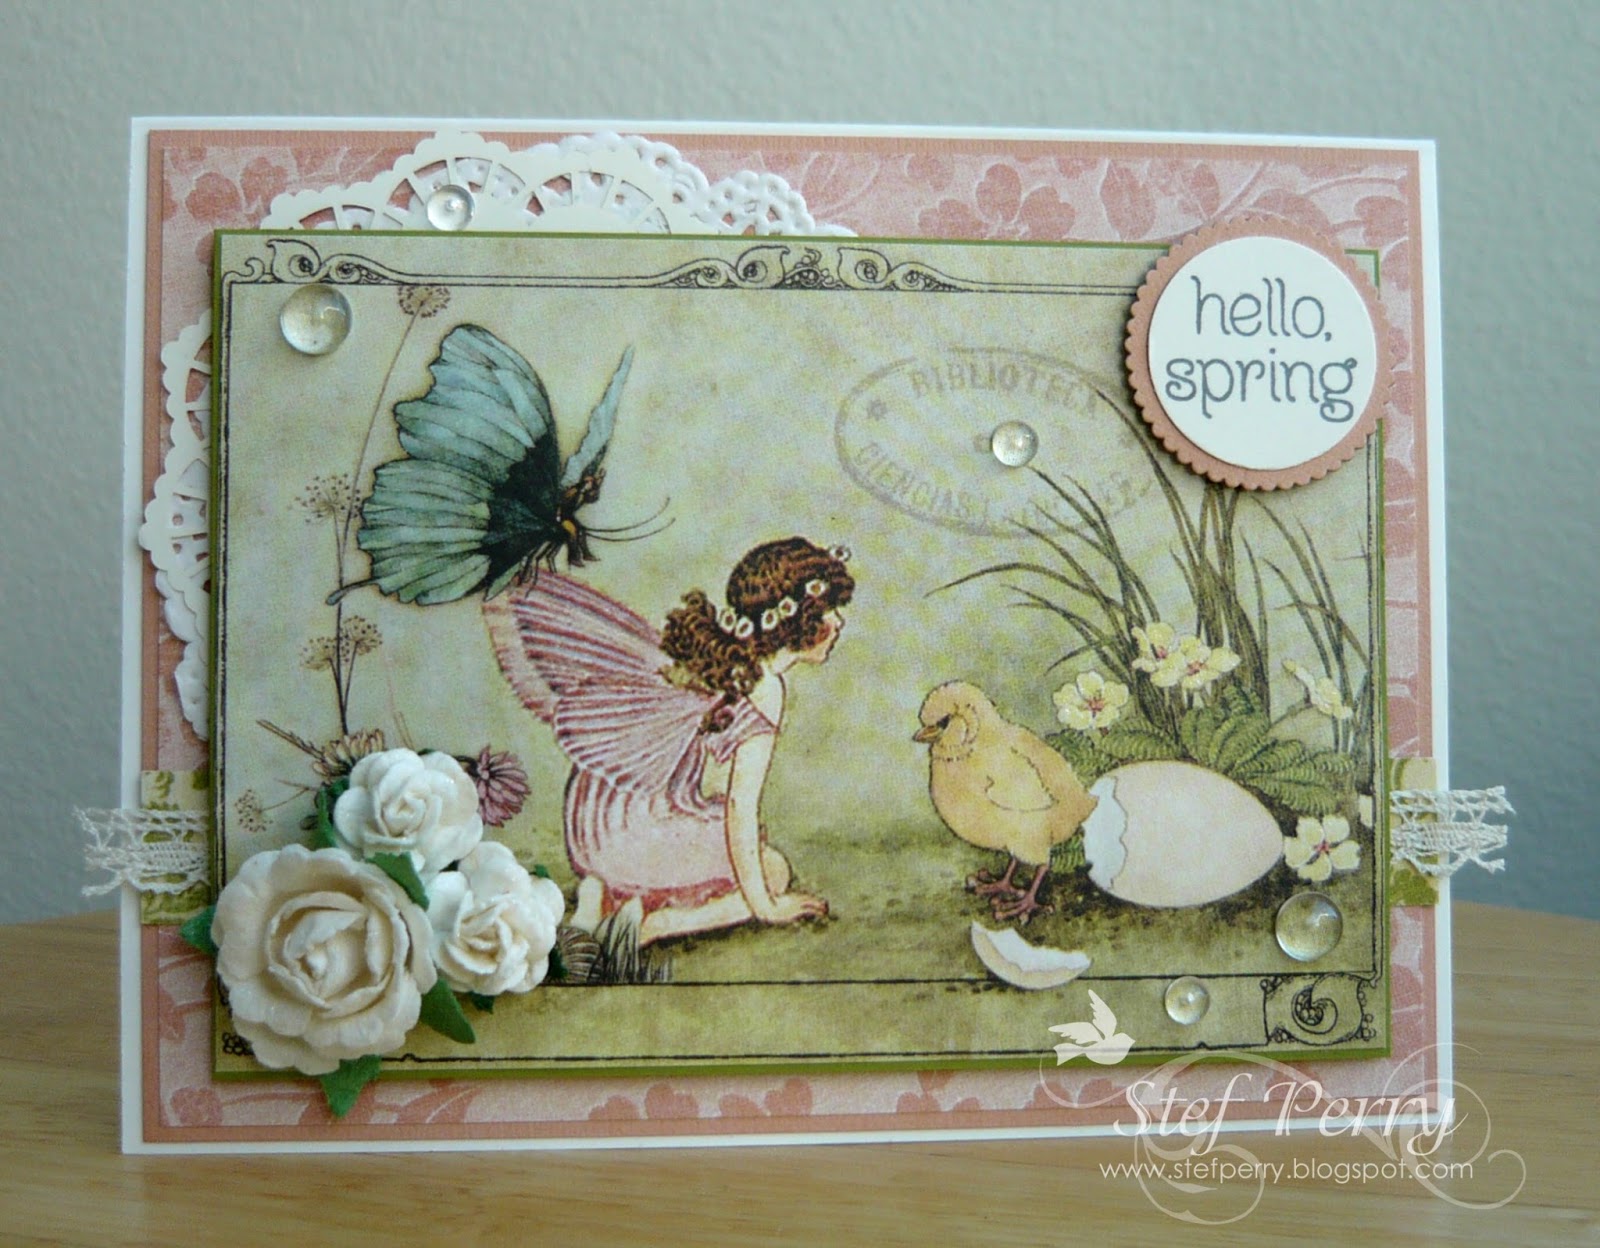
Magical Hello Spring

Hello friends and welcome back!  It's my second week as Guest Designer at Just Us Girls and this week it's Trend Week, where the challenge is to include something mythical or magical on our card.


I was looking through my ridiculously large stash of older patterned paper and found some beautiful vintage style papers with fairy images from Graphic 45's Once Upon A Springtime collection.  Then...I found 3-4 post card sized pieces with beautiful fairy scenes and decided I had to use this one darling scene for my card.


To start building my card, I trimmed down a tone on tone pink piece of the G45 patterned paper, layered it on a Desert Dune card stock and added it to the Ivory card base.  Next I layered a couple of doilies in the corner, then added a strip of green patterned paper along with a piece of lace.  The sweet scene with the fairies and new born baby chick was trimmed down to fit a slightly larger piece of Old Olive card stock, then added to the base with foam tape.


The sentiment was added to the corner with foam tape, then clear droplets adhered around the image and I thought I was done.  Then I decided to add one more vintage element by adhering some paper flowers in the lower left corner.  Lastly, a shimmer pen was used to add sparkle to the fairy's wings and the flowers.


Thanks so much for visiting, it's always so appreciated!  I've added a link to the challenge above, so be sure to check it out and hopefully join us this week!


Stef


Product details
Stamps:  Circle of Spring (SU)
Paper:  Ivory (SSS), Desert Dune Textured card stock, Old Olive (SU), Once Upon A Springtime Collection (G45)
Ink:  Basic Gray (SU,sentiment)
Other:  Doilies, 1" circle punch, Layering Circles Framelit (SU), Clear Droplets (PPP), Tonic Nuvo Aqua Shimmer pen, Lace (SU), Prima and Maya Road flowers

Monday, March 5, 2018

Floral Frame

It's time for a new Color Challenge at Splitcoaststampers!  I'm hosting tonight and have chosen Calypso Coral, Peekaboo Peach and Emerald Envy as the colors this week.  The dessert option is to add your favorite embellishment.  I hope you'll find time to join us this week!


CC677

I'm also joining The Flower Challenge, where this month Anything Goes! 


For my card, I stamped and water colored a few flowers and leaves from Adore You in the challenge colors, then fussy cut them.  I do have matching dies but I was a bit messy with my water coloring so I decided to just cut them out.  I used Stampin' Up inks for the water coloring.  I usually like to substitute Distress Inks because the inks move better, but there really isn't any DI ink like the SU peach, and it blends so beautifully with the coral.


Before fussy cutting the images I used a fine point black Sharpie to trace over all the lines, then added white dots with a gelly roll pen on the end of the flower stamen.  For the base, I used an A2 sized piece of Desert Storm card stock, then added a panel of the same paper that was stenciled with Versamark to get a tone on tone design.  The stitched frame was die cut from white corrugated paper, then added to the base with foam tape. 


The card ended up with a lot of dimension, as the flowers were also layered on with foam tape.  The sentiment from Verve Small Phrases was stamped on white card stock, trimmed down then I hand cut the fish tail end.  A scattering of clear sequins were added (one of my favorite embellishments), then the final touch was to use a Nuvo Aqua Shimmer pen to add sparkle to the flowers and the butterfly.


Thanks so much for visiting, it's so appreciated!  I've added a link above to both challenges, so I hope check them out and enjoy all the beautiful inspiration!


Stef


Product details
Stamps:  Small Phrases (Verve), Adore You (flowers, Altenew), Bamboo Rose (butterfly, Altenew)
Paper:  Neenah Desert Storm, White Corrugated, Arches Cold Press watercolor
Ink:  Versamark, Versafine Onyx Black, Calypso Coral, Peekaboo Peach, Emerald Envy
Other:  Star Grid Stencil (MFT), Tonic Nuvo Aqua Shimmer Pen, Pretty Pink Posh Sparkling Clear sequins, Sakura White Gelly Roll pen, fine point black Sharpie

Friday, March 2, 2018

Balloon Birthday

Hello and welcome back!  Some fun news - I am the guest designer at Just Us Girls for the month of March!  Woot woot!  Can you tell I'm a bit excited?  I hope you'll be sure to join us for the challenges each Saturday!


This week at Just Us Girls it's Trend Week highlighting balloons.  Lots of fun options with this challenge! 


I'm also entering my card in the current challenge at Stamp Ink Paper to add ribbon to your creation.


I only have a couple of stamp sets with balloons and I kept messing around with them but wasn't really happy with any of the designs I came up with.  Then I realized I had some retired patterned paper with a balloon design and then the card design fell together.


The card is pretty simple, with the patterned paper layered on the base then on a Pool Party panel, which was added to the base with foam tape.  The sentiment was cut twice, covered with Tonic Nuvo Aqua Pen for some sparkle and adhered together, slightly offset for a shadow layer look.  The balloons were stamped, cut with a matching punch, then covered with Tonic Nuvo Crystal Glaze.  Once completely dry, White Baker's Twine was wrapped around the bottom, secured on the back with tape, then both were adhered to the panel with foam tape, leaving the twine ends free until the sentiment was added.  When all that was complete, I added a bow made from some pretty Pool Party satin ribbon (long retired).


And that's it for this card!  Thanks so much for visiting, it's always so appreciated!  Be sure to check out both challenges!


Stef 


Product details
Stamps:  Balloon Celebration (SU)
Paper:  Neenah Solar White, Pool Party, Watermelon Wonder, Birthday Bouquet designer series paper
Ink:  Pool party
Other:  Happy Birthday Thinlit and Balloon Bouquet (both SU), White Baker's Twine, retired Satin Pool Party ribbon, Tonic Nuvo Aqua Shimmer Pen, Tonic Nuvo Crystal Glaze

Thursday, March 1, 2018

Cosmos Inspiration

Hello again and welcome back!  Today I'm sharing a card made for the current photo challenge at Just Us Girls.  I'm running up against the deadline (so many cards to make, so little time lol!) so it'll be a pretty quick post.


Flowers?  Pretty spring colors?  I'm in!  So, the photo is of crocus but I only have one crocus stamp and I wanted a large number just like the photo, so I decided to pull out the beautiful Cosmos background stamp to use.  Now, Cosmos come in many colors but probably not similar to these crocus, however I claim creative license and colored the Cosmos as similar to the photo as I could get it.


After stamping on watercolor paper with Versafine Onyx Black, I used Distress Inks (listed below) to color the flowers and the background.  I did kind of goof up the background color at first (too bright, too olive made the yellow flowers look green), so I went back over it with a more blue green ink and thank goodness it resulted in a better color.  After it dried, I went over all the black lines with a fine point Sharpie to really make the stamped images pop, then sprayed the panel with shimmer spray.  The sentiment on vellum was unused from another project, so I wrapped it around the water colored panel, popped it up with foam tape on a black card base, then added a few sequins.


Thanks for visiting, it's always so appreciated!  I've added a link to the challenge above, so do be sure to head over there and check out all the beautiful inspiration!


Stef


Product details
Stamps:  Cosmos Background (Simon Says Stamp), Adore You (Altenew)
Paper:  SSS Black, Canson XL, Vellum
Ink:  Versamark, Versafine Onyx Black; Distress:  Shaded Lilac, Wilted Violet, Squeezed Lemonade, Scattered Straw, Mustard Seed, Picket Fence, Carved Pumpkin, Spiced Marmalade, Mowed Lawn, Crushed Olive, Pineneedles
Other:  Hero Arts White Embossing Powder, Sparkling Clear Sequins (PPP), Sparkle Sheer Shimmer Spray

Monday, February 26, 2018

Gardenia Sympathy

Hello friends!  It's time for a new Color Challenge at Splitcoaststampers.  Karen is hosting this week and she chose the lovely combination of Rich Razzleberry, Sweet Sugarplum and Garden Green, with a dessert option to use scallops.


I decided to use the lovely Build-A-Flower Gardenia layering stamp set with some Altenew inks that are similar to Sweet Sugarplum.  I hadn't used the stamp set before so I had a bit of a learning curve in lining up the layers, but once I figured it out, it worked beautifully.


I used the three lightest inks in the Rose Petal ink collection colors for the flower and the two darkest of the Tropical Forest collection for the leaves.  After die cutting with the companion dies, the flower and leaves were mounted with foam tape on a Rich Razzleberry card stock scallop circle.  Before adding to the white card base, two 1/8" strips of Rich Razzleberry card stock as a way to anchor the flower piece, then the sentiment was added below.  Because this is a sympathy card, I kept the embellishments minimal, adding only a few pearls.


Thanks so much for visiting, it's always so appreciated!  I've added a link to SCS main page above, so be sure to head over there, choose Color Challenge on the main page and enjoy all the beautiful inspiration!


Stef


Product details
Stamps:  Build-A-Flower: Gardenia, Painted Greetings (both Altenew)
Paper:  Neenah Solar White, Rich Razzleberry
Ink:  Rose Petal collection, Tropical Forest Collection (both Altenew), Versafine Onyx Black
Other:  Gardenia Companion dies, Layered Circles Framelits (SU), Basic Pearls

Sunday, February 25, 2018

Brighter Days

Hi there!  I hope you've had a great weekend.  I had a chance to break out the new Simon Says Stamp Monthly Card Kit with all the wonderful Spring images and of course had to put together a card!  There were two stamp sets in the kit, both with darling polka dot rubber boot images, but I chose the smaller one for this card.  While the kit is now sold out, most of the products in the kit are available individually.


The polka dots on the boots drew me in but I also like the whimsical flowers.  I used Distress Inks to watercolor the image, adding a bit of shadow at the bottom and light blue all around the rest.  When it dried I used a gelly roll pen to add white the dots and some highlights, and added Tonic Glitter Gloss pen to the flowers and "berries".


The white card base was layered with a piece of the patterned paper pack included in the pack that was cut with a stitched rectangle die.  The green tag was also made from a piece of the same paper pack and stamped with Versamark ink with a branch image from the kit stamp set.  It was then layered on a piece of card stock to give it more stability so it could be topped with the water colored circle and sentiment.  After wrapping  a bit of white twine around the top, it was added to the base with foam tape.  For the final touch, a few clear droplets were added around the card.


I used the wonderful sketch from the current challenge at Fab Friday for the basis of my card design.  I've added a link below, so be sure to use it to check out all the amazing inspiration!


Thanks so much for visiting it's always so appreciated!


Stef


Product details
Stamps:  Choose Joy (boot and branch), Showers and Flowers (sentiment) (both SSS)
Paper:  Neenah Solar White, Canson XL, Spring Market 6x6 paper pad (Carta Bella)
Ink:  Versamark Onyx Black, Worn Lipstick, Abandoned Coral, Squeezed Lemonade, Mustard Seed, Mowed Lawn, Peeled Paint, Candies Apple, Tumble Glass, Black Soot
Other:  Stitched Shapes and Bitty Banner Framelits (SU), A2 Stitched Rectangle Stax Set 1 die (MFT), White Baker's Twine, Pretty Pink Posh Clear Droplets, Tonic Glitter Gloss, Sakura White Gelly Roll pen

Saturday, February 24, 2018

Take Flight

Hi there and welcome back!  Tonight my card uses the new Come Fly With Me stamp set from Hero Arts.  I love the inspiring images and encouraging sentiments, and was happy to put ink to these stamps.


I started by stamping the main image on Bristol paper with Walnut Stain Distress Oxide Ink then heat setting with clear embossing powder.  Love the birds taking flight from the wind blown seed pods.


Next I used ink blending tools to add Sweet Sugarplum and Fresh Fig inks, focusing the darkest color at the bottom left.  After spritzing the image with clear water, dabbing with a paper towel then letting it dry, the image was cut with a circle die.


In putting the card together, I started by adding some gold watercolor splatter on a Bristol die cut panel and while I was at it, I decided to rim both the sentiment banner and focal point circle with the gold watercolor paint.  After the paint dried, the strip of woodgrain paper was added to the Bristol panel and the whole thing mounted with foam tape onto a Sweet Sugarplum card base.  After adhering the focal point and sentiment with foam tape, a few Sparkling Clear sequins were scattered about as a final touch.


I've used the current challenges at Freshly Made Sketches and The Color Throwdown for my design and color inspiration.  Links have been added below so be sure to head over to both challenges and enjoy all the incredible inspiration!


Thanks so much for visiting, it's always so appreciated!


Stef


Product details
Stamps:  Come Fly with Me (Hero Arts)
Paper:  Strathmore Bristol, Sweet Sugarplum cs (Stampin' Up), Bubinga Woodgrain cs (HA)
Ink:  Sweet Sugarplum and Fresh Fig (SU), Walnut Stain (DOX)
Other:  Hero Arts Clear Embossing Powder, Hero Arts Nested Circle Infinity dies, MFT A2 Stitched Rectangle Stax Set 1, Gansai Tambi Starry Colors Metallic watercolors, Pretty Pink Posh Sparkling Clear sequins

CAS Streaming Heart

Hello and happy Saturday!  I have a quick post to share with a very CAS card.  I started by water coloring blues and greens using Sakura Koi watercolors on watercolor paper, just laying down water, adding color and letting it mix.  Before those colors dried I added some gorgeous gold from my Fine-tec Pearlescent watercolors for a stepped up look.


Once the paints were completely dry, the panel was die cut with the Streaming Heart die, and a sentiment die cut from gold foil paper.  My card base is actually smaller at 3.5 x 5.5 inches and my original plan was to have the heart streaming off the edge, but when I mounted the pieces with from tape I didn't care for how it looked so I trimmed off the ends.  Before mounting the heart, the card base was lightly splattered with the same gold paint as used in the heart and once dry the heart, sentiment and strip of gold foil were added.


While the card is very CAS, I think the colors and the gold really add a nice punch.


I'm entering this card into the CAS Watercolouring Card Challenge February 2018.  This is a monthly challenge but of course I waited to the last day  of the challenge to join in (hopefully do better next month!).  Nevertheless, you should still use the link below and check out all the amazing inspiration from the DT!


Thanks so much for visiting, it's always so appreciated!


Stef


Product details
Paper:  Neenah Solar White, Gold Foil, Canson XL
Other:  Sakura Koi and Fine-Tec Pearlescent Watercolors, Streaming Heart (SSS), Blooming Bouquet sentiment die (Altenew)

Thursday, February 22, 2018

Sew Glad

Hello and welcome back!  I'm sharing a second card tonight, using the same stamp set as here but this time for the Card Maker's Choice challenge at Stamp Ink Paper and a second card for the CAS Stitching Elements challenge at The Paper Players.  A big however, as this card is not so CAS, because I forgot that part of the PP challenge as I was making it.  Oops!  Hope the challenge police will let me still hang out!  While this may not be my favorite stamp set of all time, I just love how this card turned out, so I definitely wanted to enter it into both challenges (links below).


The wonderful old sewing machine was stamped on Ivory card stock and die cut with a heart die and set aside.  For the base I wanted to use some of the lovely patterned papers from Heart of Home so I found two larger pieces and one small strip, all left over from prior projects and adhered them to a panel of Neenah Desert Storm. 


Next I took a 3/4" strip of Desert Storm and trimmed it with an Eyelet punch.  Along with a die cut heart of the same paper, both were sponged with Tattered Rose Distress Oxide Ink and Unicorn White Hero Arts pigment ink.  Once the punched strip was attached to the panel, the entire thing was run through my Big Shot with the Wonky Rectangle die as though I was embossing it so it did not cut the paper, in order to create faux stitching around the edges.  Next, some lace trim was added above the punched strip, then the hearts were mounted with foam tape.  A button with gold cord and gold Nuvo drops were then added as the final touches.


Thanks for looking, it's so appreciated.  I've added links to both challenges below, so be sure to use them to enjoy all the beautiful inspiration!


PP 381


Product details
Stamps:  Puns From the Past (SU)
Paper:  Ivory (SSS), Neenah Desert Storm, Heart of Home patterned paper (Pebbles)
Ink:  Versafine Onyx Black, Unicorn White Pigment ink (HA), Tattered Rose Distress Oxide ink
Other:  Chantilly Lace Trim (ret. SU), Eyelet Border punch (ret. SU), Wonky Stitched Rectangle die (SSS), retired SU button and Gold Cord, Hero Arts Nested Circle Infinity Die, Ellen Hutson Folk Hearts die, Bright Gold Nuvo Crystal Drops

Pun Hearts

Hello!  I hope you've had a good week so far.  Tonight I'm sharing a card using a stamp set that has been long neglected in my craft room.  It's one I love and don't think I'll ever get rid of but don't always think to use it...until I saw LeAnne's challenge over at The Paper Players to make a CAS card with a sewing element.  Well, I am not a seamstress or one that cross-stitches (although I do have a sewing machine...that mainly just gathers dust), but I do have a stamp about sewing.  It's the ONLY one I have so I just had to use it for this fun challenge.  I also used the wonderful current sketch challenge at Sunday Stamps for my card design (links to both below).


I love the old fashioned sewing machine and of course the sentiment is such a sweet pun.  I stamped it on Ivory card stock then die cut it with a heart die  To start completing the card I created an Ivory card base and die cut a wonky stitched panel from the same.  The patterned papers are from a 6 x 6 pad that I am so in love with, Heart of Home from Pebbles.  They were layered on the die cut panel, then wrapped with jute twine.  To anchor the heart with the stamped image, I die cut a different style heart with pink card stock, adhered the stamped heart and popped them up on the panel with foam tape.  The final touch was to add clear sequins and wood hearts.


I've added links to both challenges below, so be sure to head over and check out all the beautiful inspiration.


Thanks so much for visiting, it's always so appreciated!


Stef


Product details
Stamps:  Puns From the Past
Paper:  Ivory (SSS), Powder Pink (SU), Heart of Home (Pebbles)
Ink:  Versafine Onyx Black
Other:  Hearts & Stars Elements, Jute Twine, Ellen Hutson Folk Heart die, Hero Arts Nested Heart Infinity Dies, SSS Wonky Stitched Rectangle die, Sparkling Clear Sequins (PPP)

Monday, February 19, 2018

Birthday and Bird

Hi there!  It's time for a new Color Challenge at Splitcoaststampers and Mary is hosting this week.  She has chosen an interesting combination of Dapper Denim, Lemon Lime Twist and Fresh Fig, with a dessert option of to make the card masculine.  Admittedly I struggled with this color combo at first but ended up making two cards!


This first card is what I consider a rather "buttoned down" look, which works for a masculine birthday card, and fortunately I have a friend with an upcoming birthday who will enjoy the look of this card.  I found patterned papers that matched the blue and green challenge colors so I layered those on a Dapper Denim panel and adhered the entire piece to the white card base.  Next I found a tag that was previously created out of white card stock but not used, and decided it would for the sentiment, which was stamped in Fresh Fig.  After adding the ribbon and Baker's Twine, it was mounted on card front.  The card still seemed a bit plain, so I remedied that by adding the wood star embellishments.


My second card is much more whimsical in nature.  I started by heat setting the Sheet Music background stamp with white embossing powder on Bristol card stock.  Then I ink blended Lemon Lime Twist and Dapper Denim on the panel, wiped the ink off the embossed image, trimmed it down and added it to the white card base.  Going with the music theme, I used the some of the Spoken Bird stamps and dies from the new My Monthly Hero kit for February 2018.  The bird and branch were stamped in Fresh Fig and die cut.  I then die cut a heart from white card stock and added a sentiment and music notes on the heart


Once the heart was adhered to the base, and the bird and branch added with as well, I again reached for wood elements to add a little bit of added interest.  Once the hearts were glued down, I added Glossy Accents over the top to give them some shine.


Thanks so much for visiting, it's so appreciated!  I've linked the Color Challenge above, I hope you'll be able to join us this week!


Stef


Product details
Card #1
Stamp:  Big on Birthdays (SU)
Paper:  Neenah Solar White, Dapper Denim, Little One (Kaisercraft) and Perfectly Plaid (Lawn Fawn) Patterned Papers
Ink:  Fresh Fig
Other:  Hearts and Stars Elements (SU), Scallop Tag Topper punch, Dapper Denim Ruched Ribbon and Baker's Twine, Pinking Shears


Card #2
Stamps:  Spoken Bird (My Monthly Hero kit Feb 2018), Sheet Music background (SU)
Paper:  Neenah Solar White, Strathmore Bristol
Ink:  Versamark, Dapper Denim, Lemon Lime Twist, Fresh Fig
Other:  Hearts and Stars Elements, Hero Arts White Embossing Powder, Glossy Accents, Hero Arts Nested Hearts Infinity dies, MMH companion dies