Friday, December 29, 2017

Magical Birthday

Hello again!  I hope you've had a wonderful holiday season!  Tonight I'm sharing a fun card that I made for our neighbor girl who is turning 5 on Sunday.  I've made a Bridge Card based on the current Technique Lovers Challenge at Splitcoaststampers.  Here's a link to the challenge page where they have both a picture and video tutorial.  I'm also joining the current Anything Goes challenge at the Simon Says Stamp Wednesday Challenge.


For this sweet neighbor girl I wanted to make something fun, so I decided to use the cute Fairy Friends from Lawn Fawn.  The images are so adorable and I had fun creating a little scene with fairies flying above.  The fairies and central panel were water colored with Distress Inks (listed below) on watercolor paper, then added to the card base.


The patterned paper is from two Lawn Fawn 6x6 paper pads and the sequins from Simon Says Stamp.  While my photos unfortunately don't pick it up, Clear Wink of Stella was added to the fairies wings and hair, and to the roof of the little fairy house. 


Thanks so much for visiting, it's always so appreciated!  Please be sure to use the links above to check out both challenges.  If for some reason you have trouble viewing the SCS challenge, there are several Bridge Card tutorials available on You Tube.


Happy New Year everyone!


Stef


Product details
Stamps:  Fairy Friends
Paper:  Neenah Solar White, Ranger and Canson XL watercolor, Lawn Fawn Plaid Patterns and Lucky Prints 6x6 paper pads
Ink:  Versafine Onyx Black; Distress Inks:  Mowed Lawn, Peeled Paint, Twisted Citron, Broken China, Festive Berries, Picked Raspberry, Spun Sugar, Squeezed Lemonade, Scattered Straw, Mustard Seed, Hickory Smoke, Vintage Photo, Tea Dye, Walnut Stain
Other:  Zig markers:  Flesh, Mustard; Clear Wink of Stella, Uniball Gold Gel Pen, Little Princess and Pixie Dust Sequins

Tuesday, December 26, 2017

Evergreen Circle

Hi there friends!  I hope you had a Merry Christmas and were able to enjoy it with those you love!  I was so happy that my family was able to be here on Christmas Eve!

Tonight I'm sharing a card I made for the current sketch challenge at Sunday Stamps.  The sketch was perfect for a die I recently acquired.


I decided I wanted a Northern Lights look for the background behind the die cut circle.  To achieve that I did some ink smooshing on my kraft sheet, using a couple of colors of Tombow markers that were scribbled on the sheet then sprayed with lots of water before dipping a piece of watercolor paper.  Once I achieved the look I was going for (it took a couple of tries) a heat tool was used to speed up the drying.  Some White Gouache was flicked on the panel and when the paint was dry, it was die cut with a large circle die and adhered to the white card base.


For the top panel, I found a piece of white card stock that had previously been sprayed with shimmer spray.  I die cut it with the Evergreen Circle and the largest of the A2 Stitched Rectangle Stax Die-namics.  It was then mounted to the base with foam tape, with small pieces cut to fit under the trees.  I had some die cut "greens" in my stash and adhered them below the circle, adding the Linen Thread bow.


The sentiment was heat set with white embossing powder, trimmed down and added across the die cut circle.  Pixie Dust and Sparkling Clear sequins were added around the card and it was done!


Thanks so much for visiting, it's always so appreciated!  I've added a link to the challenge above, so be sure to head over there and enjoy all the beautiful inspiration!


Stef


Product details
Stamps:  Teeny Tiny Wishes (Stampin' Up)
Paper:  Neenah Solar White, Island Blue (Simon Says Stamp), Canson XL watercolor
Ink:  Versamark
Other:  Brights Collection Tombow Markers, Tim Holtz Mini Holiday Greens, Hero Arts White Embossing Powder, Evergreen Circle die (SSS), A2 Stitched Rectangle Stax Die-namics (Set 1), Pixie Dust Sequins (SSS), Sparkling Clear Sequins (Pretty Pink Posh), Tsukineko Sparkle Sheer Shimmer Spritz, Clear Wink of Stella, White Gouache

Friday, December 22, 2017

Inspired

Hello, how are you?  I hope your holiday season has not been too stressful thus far and you are or will be able to spend time with those you love.  My daughter and her family are to come over on Sunday but the weather is still up in the air, so I'm holding my breath that any snow or ice hold off until Christmas Day!


Tonight I have a card to share with you that I made in part a couple of weeks ago but had to put aside to complete things like tags and gift card holders for Christmas.  Finally I was able to finish it about the same time I saw the challenge at Stamp Ink Paper.  Perfect timing!


Well, my card is anything but Christmas!  I created watercolor background using a couple of my favorite bright Distress inks and splattered it with Shimmer spray.  When it dried, it was trimmed down and covered with white card stock cut with a striped cover die.


Next the flowers and leaves were stamped on watercolor paper, watercolored with Distress Inks and die cut with companion dies, then covered with Clear Wink of Stella prior to mounting on the card front.


The sentiment from the same stamp set was heat embossed on a strip of vellum and wrapped around the panel before attaching to the card base.  Finally a scattering of sequins was adhered to create additional sparkle. 


Thanks so much for visiting, it's always so appreciated!  I've added a link to the challenge above, so please be sure to head over there and enjoy all the beautiful inspiration!


I hope everyone has a safe, fun and festive holiday season!


Stef


Product details
Stamps:  Adore You (Altenew)
Paper:  Neenah Solar White, Canson XL, Vellum
Ink:  Picked Raspberry, Spiced Marmalade, Twisted Citron, Mowed Lawn, Versamark
Other:  Bold Stripes Cover die (MFT), Adore You companion dies, Wendi Vecchi Sunflower embossing powder, Hero Arts White embossing powder, Clear Wink of Stella, Pretty Pink Posh Sparkling Clear sequins

Monday, December 18, 2017

Beary Christmas

Hello my friends!  It's Monday night and time to post my card for the Color Challenge at Splitcoaststampers.  This week Barbara is hosting and she has chosen the great combination of Melon Mambo, Tangerine Tango and Bermuda Bay.  The "dessert" option is snowmen.  I passed on dessert this week, instead using another watercolor print from Simon Says Stamp, this time a cute bear!  I also substituted Distress Inks for the Stampin' Up colors.


The background was first water colored with Peacock Feathers, adding increasingly darker ink on the sentiment for a kind of ombre look.  The bear's scarf was brightly colored with varying challenge colors and when dried I used a white gelly roll pen to add some design details on the scarf and the bear's nose and ears.  A fine tip sharpie added some eyelashes.  ;-)


After the bear was water colored and the panel dried, it was die cut with a Wonky Rectangle die, layered on a panel of Pumpkin Pie (since I didn't have any Tangerine Tango paper) and mounted onto a Melon Mambo base.  To create the illusion of snow, I added lots of white Nuvo drops around the bear.  I think it's kind of a fun look but probably not something I'll do again as I honestly prefer how it looks by flicking White Gouache mixed with water.


Thanks for visiting!  I hope your holidays are merry and that you are able to spend time with those you love. 


I've added links to the challeng above, so I hope you'll be able to join the Color Challenge this week!


Stef


Product details
Stamps:  None
Paper:  Melon Mambo, Pumpkin Pie, SSS watercolor print (this was a gift with purchase from last year, so I'm not sure of the collection or even if it's still available).
Ink:  Peacock Feathers, Picked Raspberry, Spiced Marmalade, Walnut Stain, Pumice Stone, Black Soot
Other:  Simply White Tonic Nuvo drops, Black Sharpie, Sakura White Gelly Roll pen, Wonky Rectangle die (SSS), A2 Rectangle Stax Set 1 Die-namics (MFT)

Friday, December 15, 2017

Vintage Thanks

Hello there, I'm back with a card for the current challenge at Freshly Made Sketches.  I wanted to use some of the beautiful patterned papers that were part of a recent card kit from Simon Says Stamp and this sketch was perfect to highlight them, although I did change the orientation from landscape to portrait.


No ink or stamps were involved with this card!  A pretty unusual feeling for me, but the papers included some sentiments, one of which I used as the top horizontal piece.


The pretty print was layered on a base of Fog card stock after die cutting with a stitched rectangle die, then the center piece added to the middle.  The gorgeous Umber Etched paper took center stage and nicely highlighted the sentiment.  When I saw it in the kit, I was totally swooning, and nicely, SSS carries it for sale.


The wood heart and Rosewater Nuvo drops were added and the card was finished.  So quick to make but still lovely with all the different patterns and texture.


Thanks so much for visiting, it's always so appreciated!  I've added a link above to the challenge, so please be sure to head over there and check out all the beautiful inspiration!


Stef


Product details
Paper:  Textured Crumb Cake, Fog (SSS), Umber Etching (Tonic), Heart of Home 6x6 Paper Pad (Pebbles)
Other:  Hearts & Stars Elements, Rosewater Tonic Nuvo Drops, Corner Rounder & Scallop Border punches, A2 Stitched Rectangle Stax Set 1 Die-namic (MFT)

Monday, December 11, 2017

12 Tags - Day 3

Hello again!  Yes a second post tonight, this time with a tag for the 12 Tags of Christmas with a Feminine Twist, Day 3.  I was totally inspired by Julie Ebersole's "Naturally Neutral" challenge and created this tag...


Pretty easy with the sentiment and stars stamped in Stampin' Up White Craft ink on the Crumb Cake tag, which was also sponged around the edges after cutting out with a Banners framelit.  The "greens" were adhered to the tag with a bow of Linen Thread then the Crumb Cake thick Baker's Twine was added at the top.  Pretty simple but I think that kept with the theme of this particular challenge. 


Thanks for taking a peek and I've added a link above so do be sure to check out Julie's challenge as well as the other daily challenges, and all the beautiful inspiration!


Stef


Product Detail
Stamps:  Tin of Tags (ret. SU)
Paper:  Crumb Cake, Neenah Solar White
Ink:  Craft White (SU)
Other:  Tim Holtz Mini Holiday Greens dies, Crumb Cake Thick Baker's Twine, Linen Thread, Banners framelit (SU)

Warm Wishes

Hello crafty friends!  It's time for a new weekly Color Challenge at Splitcoaststampers!  Pam is our host and she has chosen Cherry Cobbler, Garden Green and Silver as her colors, so beautiful for this time of year.  Dessert is to include Christmas/Jingle bells.


Well, I have to admit I made a mistake by not rechecking the colors before I made my card and for some reason I thought the metallic was gold not silver, so that's what I used on my card.  I started with a panel of Suzy's Watercolor Prints from Simon Says Stamp and water colored with Distress Inks and Starry Colors Metallic watercolor paints.  When the panel dried I used a fine point Black Sharpie to outline everything in the print, plus slightly enlarged the sentiment.


I decided to try to enhance the contrast of the colors and used colored pencils to deepen the shading of the leaves and petals.  I think it turned out okay for my first try with this technique but I'm still not totally satisfied because I couldn't get as smooth of a blend as I was hoping due to the texture of the watercolor paper, a little more evident in the photo below.  You'll also see some of the sparkle that was added to the leaves and petals with Clear Wink of Stella that could not be captured in the other photos.


When I was done with the watercolor panel, it was trimmed down and adhered to a black card base, then the frame of brushed gold card stock was added with foam tape and the card was finished!


Thanks so much for visiting, it's always so appreciated!  I've added a link to the color challenge above, so I hope you'll pop over there and check it out, and maybe play along this week!


Stef


Product detail
Stamps:  None
Paper:  Black (Simon Says Stamp), Brushed Gold (retired Stampin' Up), Suzy's Classical Christmas Watercolor Prints (SSS)
Ink:  Candied Apple, Aged Mahogany, Mowed Lawn, Pine Needles
Other:  Blue Gold and Light Gold Gansai Tambi Starry Colors Metallic Watercolor paints, Clear Wink of Stella, A2 Stitched Rectangle Stax Die-namics (MFT), Stitched Rectangle Frame (MFT), Fine Point Black Sharpie, Prismacolor Colored Pencils

Friday, December 8, 2017

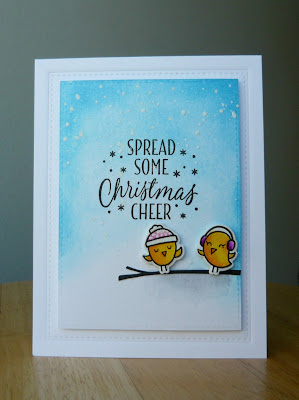
Spreading Cheer

Hello friends!  Tonight I'm sharing a card made for the current "Let it Snow" challenge at Stamp Ink Paper.


I've used the cute Winter Sparrows from Lawn Fawn for a cheerful, snowy scene.  The sentiment is from a retired Stampin' Up set.


After stamping the sentiment the panel of Bristol card stock was ink blended with Salty Ocean Distress Ink around the edges, splattered with White Gouache  and die cut with a stitched rectangle die after drying.  The birds and branch were also stamped on Bristol, then the birds were colored with Zig Clear Color Real Brush markers (listed below).  They were adhered to fun foam, die cut with companion dies and added to the inked panel.


To add some additional interest the white card base was embossed with the largest A2 Stitched Rectangle Stax Die-namic from MFT, then the smaller panel was adhered with foam tape.  Such a simple card but I think it turned out pretty cute.


Thanks for visiting, as always it's so appreciated!  Above I've included a link to the challenge, so be sure to head over there and enjoy all the wonderful inspiration!


Stef


Product details
Stamps:  Winter Sparrows (Lawn Fawn), Tin of Tags (SU)
Paper:  Neenah Solar White, Strathmore Bristol
Ink:  Versamark Onxy Black, Salty Ocean Distress Ink
Other:  Zig Markers:  Yellow, Bright Yellow, Orange, Light Violet, Purple, Almond Pink, Peach Pink, Light Gray; White Gouache, Sparkle Sheer Shimmer Spritz (Imagine Crafts), A2 Stitched Rectangle Stax Die-namics (MFT), Clear Wink of Stella, Winter Sparrow companion dies

Monday, December 4, 2017

Snow and Peace

Hello again!  So glad you were able to take time to drop by my blog!  Tonight I'm hosting the new weekly Color Challenge at Splitcoaststampers.  I've chosen Rich Razzleberry, Pacific Point and Berry Burst.  Making a winter sky or winter scene is "dessert".


As I usually do, mostly because I can't help myself, I made two cards (actually I made more than 2 but I'm only sharing these tonight lol!).  The first card yet again uses the lovely Winter Cottage stamp from Altenew. 


I started by stamping the cottage scene with Vintage Photo Distress Oxide Ink, then heat set it with clear embossing powder.  Using liquid masking fluid, I painted a horizon line.  Once that dried I used a paint brush to put down clear water in the sky section, then dropped in small drops of Rich Razzleberry ink right along the horizon and let it flow part way up the sky.  Next I used heavily watered down Berry Burst at the top of the sky, letting it travel down to the darker raspberry.  After drying, the masking fluid was removed and a light bit of Pacific Point ink was added along the top of the snow and White Gouache lightly flicked on the scene for snowfall.  I then die cut the scene with a stitched oval and layered it on a slightly larger oval of Pacific Point card stock.


I set the completed scene aside to create the rest of the card.  Two white card stock panels were sprayed it with Shimmer Spray.  One was run through the Big Shot with the Softly Falling embossing folder, the other with various dies from the Mini Holiday Greens die set.  When dry, the embossed panel was adhered to the card base, the "greens" added to the middle with tape, then the oval focal point layered on top with foam tape.  I colored each of the berries with Berry Burst ink and covered them with a clear glaze.  Not sure why they look so red in the photo...


My next card was made by ink blending the challenge colors on Bristol card stock.  If found to my dismay that Rich Razzleberry and Berry Burst were much closer in color than I expected when used in this fashion.  So, after experimenting with a couple of panels, I found if I carried the Pacific Point down over the Rich Razzleberry, it gave it a more violet hue and looked lovely against the berry color.  I also tried to use a lighter hand when ink blending the berry color in order to keep it from getting too dark.


The ink blended panel was sprayed with Shimmer spray and generously flicked with White Gouache to create the snow fall.  The snowflakes were die cut from a panel of white card stock also sprayed with Shimmer spray.  The sentiment was heat set with white embossing powder on Berry Burst card stock, then die cut with a scalloped oval.


Thank you so much for visiting and commenting, it's always so appreciated!  I've added a link to the color challenge above, I'd love it if you would join us this week!


Stef


Product details
Card #1
Stamps:  Winter Cottage (Altenew)
Paper:  Neenah Solar White, Textured Pacific Point, Ranger watercolor
Ink:  Pacific Point, Rich Razzleberry, Berry Burst, Vintage Photo DOX
Other:  Softly Falling embossing folder, Hero Arts Ultrafine Clear embossing powder, Layering Ovals and Stitched Shapes Framelits, Sparkle Sheer Shimmer Spritz, White Gouache, Tim Holtz Mini Holiday Greens, Blender pen, Crystal Glaze Nuvo Drops


Card #2
Stamps:  Greetings of the Season
Paper:  Berry Burst, Neenah Solar White, Strathmore Bristol
Ink:  Pacific Point, Rich Razzleberry, Berry Burst, Versamark
Other:  Tonic Studios Winter Snowflake die, Poppy Callum Stitched Snowflake die, Layering Ovals Scallop Framelit, Tim Holtz Ink Blending tools, White Gouache, Hero Arts White Embossing Powder, Sparkle Sheer Shimmer Spritz

Sunday, December 3, 2017

12 Tags of Christmas with a Feminine Twist

Hello friends and welcome back!  It's time for Ellen Hutson's "12 Tags of Christmas with a Feminine Twist".  It's going on at The Classroom between December 1-12 with two fabulous designers every day.  There are prizes for commenting plus a big prize for the challenge that I'm entering, which is to make a tag inspired by one of the designers.  Be sure to use the link above and check out the inspiration and ways to win!


For my tag I was inspired by both Jennifer McGuire and Jessica Frost-Ballas on Day 1 of the challenge.  They made fabulous 3D tags and I thought it would be fun to try.  To effectively create the look, you need to use a symmetrical image, and what came to mind was to use a circle and make an ornament.  I plan on making more of these, but maybe use a star or a heart die.


I started by cutting out six 2" circles from Audrey Blue card stock, scoring them in half, then adhering them back to back with Be Creative tape (here's a link to Jennifer's blog post where she explains in more detail plus has a video).  Next the tag was die cut from thick card stock and also from a piece of festive patterned paper, which was adhered to the card stock tag.  With strong tape on both ends, the "ornament" was adhered to the tag.  Since I don't have a real ornament die I just hand cut a small rectangle from Silver Glimmer paper to represent the ornament top.


After adding the heat embossed sentiment and the silver cord bow and string, I decided it needed a bit more pizazz, so I searched through my stash and found the gorgeous Sea Glass Stickles and used it to go around all the edges.  I was a bit nervous doing so since the tag was essentially complete but I really like how it turned out.  I had to add a couple of layers, letting it dry in between, in order to get good coverage.


That's it for today!  Thank you so much for visiting and commenting, it's always so appreciated.  Come back tomorrow night, where I'll be posting my card for the new Color Challenge at Splitcoaststampers.  I'm hosting this week so I will have a couple of cards to share.


Stef


Product details
Stamps:  My Monthly Hero October 2017 Card Kit (sentiment)
Paper:  Neenah Solar White, Audrey Blue (SSS), Silver specialty patterned paper from the HA card kit, Silver Glimmer
Ink:  Versamark
Other:  2" punch, Silver Cord, Tag die (PTI), Sea Spray Stickles, Hero Arts Silver Embossing Powder