Sunday, July 30, 2017

Blooming Bouquet

Hello again and welcome back!  Tonight I'm sharing a card made for the current challenge at Freshly Made Sketches.  Linda has given us a really fun sketch to work with!


Lots of possibilities with that layout but I decided to stamp a floral image on opposing corners of a 4.25 x 5.5 inch panel of watercolor paper, cut it diagonally down the middle and then layer it on a white cardstock base.  The beautiful new Blooming Bouquet stamp set from Altenew landed in my mailbox late last week, so that became my image of choice.  The main stamp is quite large so I stamped a portion of it on one corner, flipped it around and stamped another portion of it on the opposing corner, then set about water coloring with Distress Inks.


The stamp contains lots of images and some quite small, so I only used basic water coloring technique, not worrying too much about light direction, etc.  While taking a bit of time to complete, I really enjoyed water coloring this beautiful image.  After the florals were completely dried, I used very diluted Peacock Feathers and a larger round paint brush to cover the background.


After the panel was dry, it was trimmed down to 4 x 5.25", then cut diagonally.  Foam tape was used to mount the panels on the card base, then a scattering of sequins was adhered around the card and white Nuvo drops added to the center of the small coral flowers.  The sentiment from Heartfelt Sentiments, also new from Altenew, was stamped, trimmed and also popped up with foam tape.  The final touch to finish the card was to add a bit of Clear Wink of Stella to the flower petals.  You can see it better in the close up photo below.


Thanks so much for visiting, I always appreciate it so much!  Be sure to use the link above to the FMS challenge and enjoy all the amazing inspiration!

Stef


Product details
Stamps:  Blooming Bouquet, Heartfelt Sentiments (both Altenew)
Paper:  Tim Holtz Watercolor, #110 Neenah Solar White
Ink:  Versafine Onyx Black; Distress Inks:  Milled Lavender, Wilted Violet, Abandoned Coral, Worn Lipstick, Picked Raspberry, Mustard Seed, Peacock Feathers, Twisted Citron, Mowed Lawn, Pine Needles, Peeled Paint
Other:  Pretty Pink Posh Wisteria Blossom Mix and Sparkling Clear Sequins, Simply White Nuvo Crystal Drops, Round #4 and #8 Silver Black Velvet paint brushes, Clear Wink of Stella

Thursday, July 27, 2017

Sunny Greetings

Hi there friends!  I'm back to share a fun card, one of two I finished in a busy crafting afternoon yesterday.  This one uses the sketch from the current challenge at Stamp Ink Paper and the colors from the current color challenge at Splitcoaststampers.  I'm also entering it into the Simon Says Stamp Wednesday Challenge where the theme this week is "Anything Goes".

The color challenge colors are Pacific Point, Wild Wasabi and Daffodil Delight.  While Stampin' Up colors are used, participants can use similar colors of any brand, so I chose to use Distress Inks Salty Ocean, Mowed Lawn and Squeezed Lemonade.


When I saw the color challenge colors, I immediately thought of a sunflower against the sky, but in trying to tie it into the sketch, the only sunflower stamp I own seemed too big.  Then I came up with the idea to make a mask and sponge clouds in the square space and add the sunflower image in front of it with foam tape.  Once the clouds were ink blended and the mask removed, I stamped the stem and leaf image below the clouds and the sunflower itself onto a piece of watercolor paper. 


The white panel is Strathmore Bristol, which can be both ink blended and water colored with ease.  After the stem was water colored, it just seemed to be hanging out into space below the clouds, so I decided to add the "ground" and very faint light blue in the background, and after that dried, and some Baker's Twine was added to the top, the panel was adhered to the Pacific Point card base.  Next the sunflower was water colored and fussy cut then added to the panel.  After sequins were added, I spread Glossy Accents around the flower center for a nice shine.

Thanks so much for visiting, it's always so appreciated!  I've added links to the challenges above, so be sure to head over there and enjoy all the beautiful inspiration.

Stef


Product details
Stamps:  Summer Flowers (Simon Says Stamp)
Paper:  Pacific Point (Stampin' Up), Strathmore Bristol, Canson XL watercolor
Ink:  Versafine Onyx Black; Distress Inks:  Salty Ocean, Mowed Lawn, Squeezed Lemonade, Mustard Seed, Ground Espresso 
Other:  Black Baker's Twine, Cloud Stencil (My Favorite Things), SSS Masking Paper, #4 and #8 Silver Black Velvet paint brushes, Tim Holtz Ink Blending Tool, Chameleon (SSS) and Sparking Clear (Pretty Pink Posh) sequins, Ranger Glossy Accents

Sunday, July 23, 2017

Grid Birthday

Hello friends!  Tonight I'm sharing a card made for the current Freshly Made Sketches challenge. 


I decided to use blues and a gray for the colors, ink blending with Clarity brushes over a grid stencil on a 4.25 inch square white card stock panel.  After the blending was complete, I trimmed it down to a 4 inch square and adhered it to a slightly larger piece of gray card stock.


Next three layers of the word "happy" were die cut from white card stock and layered to create a nice thickness.  The word "birthday" was stamped and trimmed down, then both were layered on a circle of vellum that had been die cut with the Stitched Shape circle die.  The ink blended panel was added to the white card stock base with foam tape, then I added adhesive to the back of the vellum panel, hidden behind the sentiment so it would not show through, and adhered it to the panel.  Once that was done, the card was essentially complete, but it seemed just a little something more was needed.  I decided to pull out some retired Stampin' Up Candy Dots that I still have with my stash and added them to the card front.


So that is it!  Very simple, very clean, letting the ink blended panel be the main focus.  Thanks so much for visiting.  I've added a link above to the FMS challenge so be sure to head over there and enjoy all the beautiful inspiration!

Stef


Product details
Stamps:  Big on Birthdays
Paper:  Neenah Solar White, Smoke (Simon Says Stamp), Vellum
Ink:  Distress Inks:  Blueprint Sketch, Hickory Smoke, Faded Jeans, Salty Ocean
Other:  Stitched Shapes Circle die (SU), Scripty Happy die (Lawn Fawn), Star Grid stencil (My Favorite Things), Clarity Ink Dusting brushes, Neutrals Candy Dots

Saturday, July 22, 2017

Stencil Roses and Inlay Die

Hello friends, I hope you are looking forward to a nice weekend!  I'm sharing a couple of cards that I made using Distress Oxide Inks and the Tim Holtz Roses Layered Stencil on dark cardstock.  I'm joining the current Fabulous Florals challenge at Stamp Ink Paper and the monthly Work It Wednesday Challenge at Simon Says Stamp to add glitter and sparkle to your card.  Just a warning that this is a longer than normal post as I was playing with a couple of techniques, but I hope you find it useful and informative.


I'm sure by now most of you are familiar with the new Distress Oxide inks that Tim Holtz has developed.  Not a "hybrid" as we've known in the past, but it is a new type of blend of dye and pigment ink that give it unique properties.  Blending backgrounds with it is amazing and makes anyone look like a pro, plus you can see it on dark card stock, whereas you cannot with regular dye ink.  I started playing around in my craft room earlier this week, using the Tim Holtz Roses Layered stencil on regular watercolor paper and layering Wild Honey, Spiced Marmalade and Abandoned Coral for a deep orange color.  But I was rather uninspired by the result below.


I liked the color of the roses but wasn't excited with the overall look of the panel.  Then I remembered a post about Distress Oxide Inks by Jennifer McGuire using dark card stock (Jennifer McGuire Ink 3.15.17), so I decided to give that a spin.  Using a panel of black card stock I used the same ink colors (honestly!) and the result was much more subdued than I expected.  I still liked it, especially the velvety appearance, so I used the panel to make the card below. I also moved the stencil around while ink blending the panel to fill in the open spaces left by the stencil design, so it is much denser with images than the panel above or the next card.  With such a busy background, only the die cut sentiment and Nuvo drops were added as finishing touches.


While I liked how the card above turned out, I wanted something with a bit more pop so I decided to try brighter DO inks (Picked Raspberry, Wilted Violet and Twisted Citron) and also try using gray card stock rather than black.  I should also point out that I found using sponge daubers rather than the Tim Holtz Blending Tool worked much better to keep the colors from overlapping while using the stencil, which was just a personal preference.


This was more like what I was hoping to see, with much more vibrant colors. Both this panel and the prior one were spritzed with water as that also makes the inked colors glow a bit more.  Playing around with these inks and stencil were not enough techniques for one day (ha ha), so I decided to create an inlay die sentiment for this 2nd card.  I started out by taking the Wilted Violet Distress Oxide Ink pad and wiping it directly on a scrap of white card stock.  Once that was dry, the sentiment was die cut with the Handlettered Greetings die from Simon Says Stamp.


The stenciled panel was cut to 3 1/8 by 5 1/2 inches and adhered to the bottom front of a white card stock base.  I then took a 1 1/8 x 5 1/2 inch piece of white card stock, die cut the sentiment and removed it, (which I ended up using on the prior card), added Stick It adhesive to the back of the white card stock piece, layered in the inked Wilted Violet die cut sentiment, then adhered the finished strip to the top part of the card front.  One of the things you need to remember to do with the inlay die cut technique is to keep all the white pieces for the interior of the loopy parts of the letters such as the o's, g, y and h, etc. because you'll need to add them back into the layered piece.  Plus you want to be sure to keep those small dots above the i's from the inked version to add to the inlay.  I must say they were super tiny and I felt grateful I was able to keep track of them AND glue them to the card LOL!!  The last detail to finish the card was to add some sparkle with sequins.

Well, if you're still with me, I applaud you as I know this was a lot of information, but I wanted to share my discoveries with these inks.  And I hope it all makes sense! 

Thanks for visiting, it's so appreciated!  I've added links to the challenges above, so be sure to stop by there and enjoy all the beautiful inspiration!

Stef


Product details
Stamps:  None
Paper: #110 and #80 Neenah Solar White, Basic Black (Stampin' Up), Smoke (Simon Says Stamp)
Ink:  All Distress Inks:  Card #1 - Wild Honey, Spiced Marmalade, Abandoned Coral, Peeled Paint, Twisted Citron; Card #2 - Picked Raspberry, Wilted Violet, Twisted Citron
Other:  Handlettered Greetings die (SSS), Roses Layered Stencil (Tim Holtz), Sponge Daubers, Pretty Pink Posh Sparkling Clear and Wisteria Mix Sequins, Rosewater Nuvo Jewel drops, Simply White Nuvo Crystal drops, Stitched Rectangle die (SSS) 

Monday, July 17, 2017

Little Things

Hi there!  I hope you had a good day!  Tonight I'm sharing a card made for the current challenge at CAS(E) this Sketch.  Late last week I received my new monthly stamp kit from Hero Arts.  Wow, it is packed with all sorts of wonderful flower images, with all sorts of vessels to put them in, a couple of which I used for this card.


I started by stamping the jar, bottle and flowers with Versafine Onyx Ink on watercolor paper, then used various Distress Inks to color.  The images are somewhat petite so I used maybe one or two colors on each one, mostly just simple coloring, and just adding a bit of lighter blue for the background.  I love these sweet floral images and think using them with colored pencils would be great as well.  On a separate piece of watercolor paper, the butterfly was stamped, water colored and die cut with the accompanying die. 


Next I cut light blue card stock into three panels according to the sketch.  One was scored 1/8th inch around all the sides, and the second was stamped with Versamark ink using flowers from the stamp kit add on set, Little Florals, along with the butterfly from the monthly kit stamp set (easier to see in the photo below).  The third panel was stamped with sentiment, also from the add on set, then the water colored panel was added using foam tape.  After typing the Baker's Twine around the thinner vertical panel, all three were adhered onto the card base.


Morning Dew Nuvo Drops were added to the flowers and around the card and then the butterfly was painted with Clear Wink of Stella.


Thanks so much for visiting, as always it's so appreciated!  I've added a link above to the CTS challenge, so be sure to use it and check out all the amazing inspiration!

Stef


Product details
Stamps:  July My Monthly Hero stamp set, Little Florals
Paper:  Thick Whisper White (Stampin' Up), Sea Glass (Simon Says Stamp), Canson XL watercolor
Ink:  Versafine Onyx Black, Versamark, Distress Ink:  Squeezed Lemonade, Candied Apple, Dusty Concord, Crushed Olive, Peeled Paint, Broken China, Tumbled Glass
Other:  White Baker's Twine, Stampin' Up Scoring Board, Silver Black Velvet #4 paint brush, Nuvo Morning Dew Crystal Drops, Clear Wink of Stella

Sunday, July 16, 2017

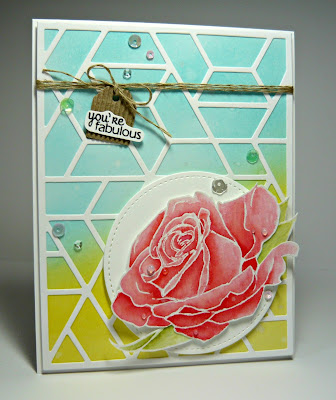
Sketchy Rose

Hello again!  Tonight I'm sharing my second card that I will be adding to The Flower Challenge.  Since I love creating cards with flowers, I think this will be one of my new favorite challenges! 


Back in May I won an amazing amount of blog candy from Stamp Ink Paper (SIP blog) for their 100th blog post, and the beautiful Sketchy Rose stamp set from Altenew was amongst the prizes.  To start, the lovely rose image along with 3 leaves were heat embossed with white embossing powder on watercolor paper, water colored with Distress Inks, then fussy cut with paper snips.  I decided to mount it on a large white card stock die cut circle with foam tape, then set it aside as I worked on the rest of the card.


For the background, I used the Neat and Tangled Polygon Cover Plate and created a die cut from white card stock, then adhered on top of a panel that was previously blended with Distress Inks and misted with a mix of water and Ranger Perfect Pearls.  The entire things was wrapped with Linen Thread, then a cute corrugated tag with the sentiment was tied on with a bow.  After mounting the completed panel on a white card base, the circle with the rose and various sequins were adhered.  I also added a few drops of Nuvo Morning Dew drops to the flower.


Thanks so much for visiting, it's always so appreciated!  Please be sure to use the link above to the Flower Challenge and enjoy all the beautiful inspiration!

Stef


Product details
Stamps:  Sketchy Rose (Altenew), Small Phrases (Verve)
Paper:  #80 and #110 Neenah Solar White, Tim Holtz Distress Water Color, Strathmore Bristol
Ink:  Versamark, Versafine Onyx Black, Distress - Squeezed Lemonade, Tumbled Glass, Fired Brick, Abandoned Coral, Shabby Shutters, Peeled Paint
Other:  Hero Arts White Embossing Powder, Polygon Cover Plate (N&T), Corrugated Elements (Stampin' Up), Linen Thread (SU), Nuvo Morning Dew Crystal Drops, Vintage Chic (Simon Says Stamp) and Sparkling Clear (Pretty Pink Posh) sequins, Ranger Perfect Pearls

Thursday, July 13, 2017

Pink Love

Hi there and welcome back!  Today I had fun playing around with different parts of the Happy Birthday Gorgeous stamp set.  I've noted before that I love all the sentiments and fonts, and it doesn't necessarily have to be used for birthdays, as my card illustrates today.  For inspiration in creating my card, I turned to the Color Throwdown for colors and Freshly Made Sketches for the layout.  And the bonus was that both challenges fit in perfectly with a row of Tic Tac Toe (twine, pink and square) that is the current challenge at Stamp Ink Paper!


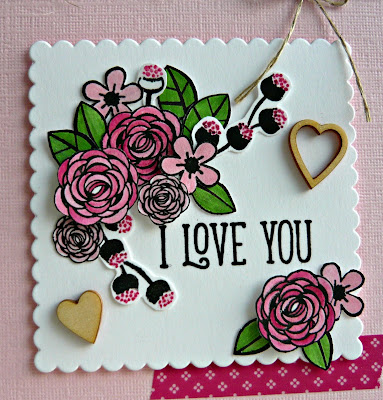
I was thrilled to see the colors Amy Rysavy chose for this week's Color Throwdown - light pink, dark pink, green and white.  Perfect for flowers!  I immediately thought of all the little flowers in the stamp set and went about stamping and coloring multiples in order to build a little bouquet on the small square of the sketch.  I used a Blender Pen and inks to color the flowers and leaves after they were stamped in Basic Black ink, then fussy cut all the pieces.  While there were a number of little parts, it only took a few minutes to cut them all out.


The 4.5" x 9" base was cut from textured Pink Pirouette card stock then scored in the middle to create the square.  A small piece of Melon Mambo washi tape was added to the base, then the scallop die cut white card stock square was popped up in the middle with Dimensionals after stamping the sentiment.  After the fussy cutting was complete, I worked with all the pieces until I came up with a layout that I liked, then took a picture of it with my phone so I could have it for reference as I built the bouquet.


I used glue dots to adhere the bottom pieces, then popped up a few to get that bit of dimension.  Before adhering, Clear Wink of Stella was brushed on all the pieces.  It looks great in real life but I'm not sure it's apparent in the photos.  Once the bouquet was complete and the twine added, I felt like something more was needed.  Then I thought of the cute Hearts and Stars wood embellishments, so I added them as well, also brushed with Wink of Stella.  And that finished my card!


Thanks so much for visiting!  It's always so appreciated.  I've added links above to all three of the challenges, so be sure to head over there and enjoy all the beautiful inspiration!

Stef


Product details
Stamps:  Happy Birthday Gorgeous
Paper:  Whisper White, Textured Pink Pirouette (retired, Stampin' Up)
Ink:  Basic Black, Pretty In Pink (retired SU), Melon Mambo, Garden Green
Other:  Layering Square Framelits, Melon Mambo Washi Tape (retired SU), Hearts & Stars Elements, Linen Thread, Dimensionals, Paper Snips


Tuesday, July 11, 2017

Distress Oxide Congrats

Hello again!  I hope you're having a good summer thus far!  My husband and I have not yet taken a trip but have enjoyed some amazingly beautiful weather at home in the Pacific Northwest (low 80's) that is slated to continue at least through the weekend.  Heavenly!  But I think you've visited to see a card rather than hear a weather report, so I will get on with it!  I made a fairly Clean and Simple (and skinny) card for the current Tall and Skinny sketch challenge over at Sunday Stamps.


A few days ago I had a chance to play around with Distress Oxide inks, since I just received the latest release of 12 more colors.  So, so fun and I decided to use a portion of one of the ink blended panels I made as the background for the die cut panel of this card.


The new release includes two of my favorite Distress Ink colors, Twisted Citron and Peacock Feathers, which I used at the top and bottom, respectively, of the ink blended panel, with Cracked Pistachio in between.  So what you end up seeing here behind the leaf die cut is mostly Twisted Citron and Cracked Pistachio, with splatters of Peacock Feathers.


The base was cut from #110 Neenah Solar White card stock. A little hard to see in this picture (better in the one below), but I used a scoring board to score a line about an inch above the bottom of the card base.  After that, the sentiment was stamped using a Misti so I could be sure to line it up straight and get it centered.  That sentiment is from the new Happy Birthday Gorgeous stamp set from Stampin' Up, which has the most wonderful fonts and a large variety of sentiments that can be used for a variety of occasions.  Really a great set.


Next, the smaller white card stock panel was die cut with the circle leaf die and adhered to the even slightly smaller ink blended panel, then adhered to the base with foam tape.  Green Apple and Morning Dew Nuvo Crystal Drops were added, along with some Pool Party Thick Twine around the top to finish things off. 

Thanks so much for visiting, it's always so appreciated!  I've added a link above to the challenge, so be sure to use it and enjoy all the beautiful inspiration!

Stef


Product details
Stamps:  Happy Birthday Gorgeous
Paper:  #80 and #110 Neenah Solar White, Strathmore Bristol (ink blended panel)
Ink:  Versafine Onyx Black, Twisted Citron, Cracked Pistachio, Peacock Feathers
Other:  Pool Party Thick Twine, Circle of Leaves die (Simon Says Stamp), Morning Dew and Green Apple Crystal Nuvo drops, Stampin' Up Simply Scored Scoring board, Misti

Saturday, July 8, 2017

Adore You Birthday

Hello again!  The card I'm sharing today was made using the wonder sketch from Narelle at Freshly Made Sketches.  I'm also joining 2 other challenges - Trend Week at Just Us Girls, where we are to use ink blending, and the Flower Challenge, to use embossing, either heat or dry.  For my card I ended up using both.


Beginning with a panel of Bristol paper, Distress Inks Twisted Citron, Cracked Pistachio and Lucky Clover were blended with an ink blending tool.  Once the ink dried, I ran it through the Big Shot with the lovely new Layered Leaves embossing folder from Stampin' Up.  Moving on to the flower, it was heat embossed on water color paper, water colored with different Distress inks (listed below), then die cut with the companion die.  I knew I wanted vellum leaf sprigs behind the flower but didn't have a die that would work.  Then I remembered an old Sizzlet I held onto (long retired from SU), and it worked perfectly!  In fact I was pleased that the leaf shapes are very similar to those in the embossed panel.


To assemble the card, the blended panel was adhered to a base of #110 Neenah Solar White card stock, then the horizontal piece of black card stock embossed with the sentiment was added.  A stitched die cut circle was added next, then the flower and leaves popped up on Dimensionals.  Glossy Accent "dew" drops were added to the flower and white and black Nuvo drops added to the panel. .


Thanks for visiting today, I so appreciate it!  I've added the challenge links below, so be sure to head over there and check out all the amazing inspiration!


Stef


Product details
Stamps:  Adore You (Altenew), Happy Birthday Gorgeous (sentiment, SU)
Paper:  Neenah Solar White, Basic Black, Strathmore Bristol, Canon XL watercolor, Vellum
Ink:  Versamark, Twisted Citron, Cracked Pistachio, Lucky Clover, Squeezed Lemonade, Scattered Straw, Spiced Marmalade, Abandoned Coral
Other:  Little Leaves Sizzlet, Stitched Shapes Circle Die (SU), Ranger Fine Detail White embossing powder, Layered Leaves Dynamic embossing folder, Ebony Black and Simply White Nuvo Crystal Drops, Tim Holtz Ink Blending Tool, Silver Black Velvet 04 watercolor brush, Ranger Glossy Accents

Thursday, July 6, 2017

Peace Love Joy

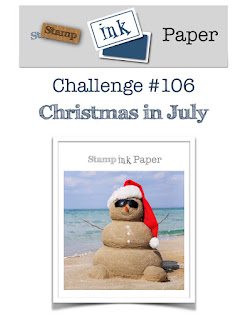
Hello friends!  Today I'm sharing a card that was made using both the current color challenge and sketch challenge at Splitcoaststampers.  I'm also joining Stamp Ink Paper for its current theme challenge of Christmas in July.  "Dessert" for the color challenge is also to make a Christmas card.


The color challenge colors are Tranquil Tide, Silver and Pool Party.  Tranquil Tide is one of the new In Colors at Stampin' Up, which I have not yet decided to acquire, so I substituted Bermuda Bay.  After searching through my stash of Christmas designer series paper, I was pleased to find a retired piece with Silver Foil and Pool Party, which became part of the background on the card.


I started with a Pool Party card base, then added the panel with the dsp layered on Bermuda Bay.  Next the trees and snowflakes were heat embossed with Pool Party and Silver embossing powder, respectively.  For the sentiment, I inked up the stamp first in Versamark, then with Bermuda Bay ink, then heat embossed it with clear embossing powder.  After all the embossing was complete, the panels were adhered to slightly larger panels and then to each other and the sentiment was fussy cut and adhered with foam tape.


After mounting the panels to the base with foam tape, the final touch was to add a couple of metallic enamel shapes.  Truly a very simple card with came together with so much ease, it is definitely one I will make more of when it comes for full Christmas card production.

Thanks for your visit, it's always so appreciated!  I've added links to the respective challenges above, so be sure check out all their beautiful inspiration.

Stef


Product details
Stamps:  Wonderland (SU), Iconic Christmas (sentiment, WPlus9)
Paper:  Neenah Solar White, Pool Party, Bermuda Bay, Silver Foil, retired SU Christmas dsp
Ink:  Bermuda Bay, Versamark
Other:  Silver, Pool Party and Clear embossing powders, Metallic Enamel Shapes.

Sunday, July 2, 2017

Floral Congrats

Hello again and welcome back!  For this post, I am sharing a card made for both the current challenge at Freshly Made Sketches, where Amy has given us yet again another fantastic sketch, and the Anything Goes challenge at Simon Says Stamp Wednesday Challenge.


My card uses the newer Floral Bliss stamp set from Simon Says Stamp that was part of the June monthly card kit.  It is a delight to color and can be used for many occasions, although with the many sentiments in the set, it is primarily focused on weddings.


For the focal point I started with a piece of watercolor paper, upon which I stamped the Floral Bliss stamp in Versamark ink.  Using my Misti, I made sure to ink it up and stamp it twice to ensure good coverage on the watercolor paper.  It was then heat embossed with gold embossing powder and then the panel was cut down to fit the sketch.  That was a little tricky given that the leaves are wider than the panel size but using a T Square ruler and a pencil, I was able to line things up and cut, first with my paper cutter, then by hand with my paper snips. 


After heat embossing the image with gold embossing powder, I used a water brush and Tim Holtz Distress Inks to watercolor the image.  I actually started with the background, very lightly spreading Broken China around the image, then proceeded to watercolor the main image, alternating between the leaves and flowers in order to let things dry.  While the image is heat embossed and therefore helps to keep the image colors separate, I admit I am a bit messy when water coloring, so I always try to swap out areas as I watercolor to keep from mixing colors inadvertently.  Once dried, it was adhered to a slightly larger panel of black card stock.  The base of the card is #120 white card stock from Simon Says Stamp, which was layered with a piece of Echo Park Wedding Bliss designer paper (both also part of that SSS June card kit).  For the paper behind the focal point, I cut pieces from other designs in the Wedding Bliss dsp, then it was all popped up on foam tape.  Nuvo drops and sequins finished things off.


Thanks so much for your visit!  I so appreciate it.  Please be sure to use the challenge links above to enjoy all the beautiful inspiration!

Stef


Product details
Stamps:  Floral Bliss (SSS)
Paper:  SSS #120 white card stock, Tim Holtz Watercolor paper, Echo Park Wedded Bliss dsp
Ink:  Versamark; Distress Inks:  Spun Sugar, Victorian Velvet, Worn Lipstick, Squeezed Lemonade, Fossilized Amber, Shabby Shutters, Lucky Clover, Mowed Lawn, Milled Lavender
Other:  Ebony Black and Simply White Nuvo Crystal Drops, Rosewater Nuvo Jewel Drops, Pretty Pink Posh Sparkling Clear sequins, Black and White Sharpies, Kuratake Waterbrush, Paper Snips