Sunday, February 26, 2017

Hippo Birdie To You

Hi there and welcome back!  The card I'm sharing tonight uses one of the cutest stamp sets - Year Four (or as I call it Hippo Birdie) from Lawn Fawn.


Okay, I'm a lover of puns as well, so this little set just stole my heart.  It's not a new set from Lawn Fawn but it's new to me and I love the adorable images.  To begin with, I took some Neenah Solar White 80 pound card stock and created the sky.  To make masks for the clouds, I hand drew them on a Post It note and cut them out, then used an ink duster to spread the blue ink on the card stock.  Next I die cut a piece of Pear Pizzazz card stock with one of the Lawn Fawn Stitched Hillside Borders, adhered it below the sky on the white card stock, then die cut the stitched circle.


The birdie, hippo, balloons and party hat were stamped on Bristol paper and colored with Distress inks and a watercolor paint brush.  Once dry they were die cut with the matching die set and adhered to the little circle scene.  To make it a bit more festive, I added Clear Wink of Stella to the balloons and hat.  I had the Flirty Flamingo banner on the side without adornment, then decided to stamp the musical notes down it, which I think made kind of fun look.


To build the base I started with 110 pound Neenah Solar White (love how the card stock is extra sturdy).  The next layer was made by taking a white card stock panel, adhering the lovely piece of Doodle Bug dsp, cutting the border with an Eyelet Border punch and trimming down the top to just an 1/8th inch above the dsp.  I put the card base in my Misti then lined up and stamped the fun sentiment, after which I added the panel and popped the circle up with foam tape.

I used the sketch from the current challenge at Splitcoaststampers for my card design, which I've linked below.  I'm also entering this in this week's Simon Says Stamp Wednesday Challenge, where this week it's "Anything Goes" (SSS Wednesday Challenge).


Thanks so much for visiting!  Be sure to use the links above and check out all the wonderful inspiration.

Stef


Product details:
Stamps:  Year Four
Paper:  80# & 110# Neenah Solar White, Pear Pizzazz, Flirty Flamingo, Doodle Bug dsp
Ink:  Versafine Onyx Black; Distress:  Mustard Seed, Hickory Smoke, Tumbled Glass,  Abandoned Coral, Seedless Preserves
Other:  Stitched Oval Shapes and Layering Ovals Framelits (Stampin' Up!); Stitched Hillside Borders and Year Four matching dies (Lawn Fawn); Eyelet Border punch, Inkylicious Ink Duster

Friday, February 24, 2017

Kindness

Hello friends!  I've been playing in my craft room again, this time with a long unused stamp from Stampin' Up!  It's a great time of year to use it, with Spring in the offing (okay maybe not that close yet but I can wish) and bringing the early blooming flowers. 


Aren't those tulips sweet?  The wonderful sentiment is part of the stamp too.  The image was stamped on Bristol paper and then water colored with Zig Clean Color Markers and a watercolor paint brush.  The violet color was a bit tricky to move around but in the end I got it to work.  After the main image was complete, the outside of it was highlighted using a light bluish color and blending with a damp brush.  Finally, the image was die cut with an oval framelit.


The base is Thick Whisper White card stock and it was topped with a Crumb Cake embossed panel after a bit of Linen Thread was tied around the top.  The oval was popped up on foam tape, then the Pretty Pink Posh sequins were added.  The final touch was to add Clear Wink of Stella to the flowers.  The sparkle looks so pretty!


I'm entering four challenges with this card.  I used the current sketch from Freshly Make Sketches as inspiration for my card design; the current color challenge of Mint, Green, Plum and Light Brown at Color Throwdown as a basis for the colors I used (although I didn't have Plum so I had to substitute Violet), Addicted to CAS where the code word is currently "Wood" and Stamp Ink Paper where the theme is "Kindness".  I've included links below to all the challenges so be sure to head over to the blogs and check out all the amazing inspiration!


As always, your visit and comments are so appreciated!  I hope you have a great weekend!

Stef


Product details
Stamps:  Love is Kindness
Paper:  Strathmore Bristol, Thick Whisper White, Crumb Cake
Ink:  Versafine Onyx Black
Other:  Zig Clean Color Markers:  Green Shadow, May Green, Violet, Oatmeal, Mauve Shadow; Linen Thread; Woodgrain embossing folder; Layering Ovals Framelit, Clear Wink of Stella

Tuesday, February 21, 2017

Bright Birthday

Hi there!  I've had a bit of fun playing around with the Big on Birthdays stamp set from Stampin' Up! this weekend and wanted to share the card I ended up making.


This stamp set is so great with it's birthday greetings in many sizes and different fonts, but this is my favorite.  It's actually two stamps, one with the sentiment and lower set of 3 flowers, the second the flowers and leaves on the upper part of the stamped image.  I started by stamping the sentiment first, then adding the flowers above.  Because the stamps are photopolymer, it was easy to line them up.  After stamping everything, I used my Zig Clean Color Markers and a watercolor paintbrush to color the flowers and add light blue around the edges and in between the stamped images to give the whole thing a bit of pop.


Most of these markers have very bright and intense colors, so using water allows one to temper the intensity but still retain those lovely hues.  The panel is Strathmore Bristol, which can take the water coloring without pilling and also is fabulous for moving the color around with these markers, a bit better than some watercolor papers in my experience.  After drying the panel with my heat tool it was adhered above the Daffodil Delight panel with foam tape.  I like the wonky panels! I think it adds a bit of interest to the card, especially since the only other embellishment are the Metallic Enamel shapes.

I'm joining the fun CAS challenge at The Paper Players, where the sentiment is to be the focal point of the card.  I've added a link below, so do be sure to head over to the blog and enjoy all the wonderful inspiration.


Thanks so much for visiting!  I hope the rest of your week is fabulous!

Stef


Product details
Stamps:  Big on Birthdays
Paper:  Marina Mist, Daffodil Delight, Strathmore Bristol
Ink:  Versafine Onyx Black
Other:  Zig markers:  Peach Pink, Purple, Bright Yellow, Green, Light Green, Shadow Mauve; Watercolor paint brush; Metallic Enamel Shapes

Saturday, February 18, 2017

Peony Blossom

Hi there!  I hope your weekend is going well.  Today I'm sharing a card made with one of the stamps from the beautiful Altenew Peony Blossom stamp set.  It's the delicate small blossom from the set that I water colored with Distress inks.


The flower was stamped in Versamark on watercolor card stock, then heat embossed with Hero Arts white embossing powder.  Using a #3 size watercolor paint brush, I started with the lightest color, Shaded Lilac, then added Dusty Concord to the areas where I wanted shading.  Mowed Lawn ink was used for the stem.  I used my heat tool to dry the image, covered it with a mask, then used an ink duster to brush on Tumbled Glass ink in the background.  A Layering Circles framelit from Stampin' Up! was used to die cut the piece.


For the background, I again used the ink duster tool to add ink.  Starting at the top with Shaded Lilac, next with Dusty Concord and finally Tumbled Glass.  This is only the second time I've used the ink duster tool, so I will need to work a bit more on my technique to better blend the light and dark colors.  Despite the blue and purple not overlapping and blending as well as I would have liked, I still like how it turned out, especially after I used a mister to add water, then took the sprayer out to drop larger dots of water.  After letting it set for a minute, I used a paper towel to dab and create the water splotches.  This didn't show up well on the blue, so I watered down some Dusty Concord ink and splattered it on the panel with a large paint brush.  Once dried, the panel was die cut with the largest Stitched Rectangle die from Simon Says Stamp.


The sentiment from another Altenew stamp set was heat embossed on a piece of black card stock and trimmed down to add to the bottom of the scallop circle, which was added to the panel atop a lavender horizontal embossed strip.  The last elements added were Pretty Pink Posh clear droplets and sequins, and Clear Wink of Stella painted on the flower.

This week's fabulous sketch from Freshly Made Sketches was used for my layout inspiration.  I've added a link below, so do be sure to head over to the blog and check out all the gorgeous inspiration!


I'm also entering this in the current Simon Says Stamp Wednesday Challenge, where this week the theme is Fantastic Florals.  Here's the link SSS Wednesday Challenge - Fantastic Florals.

Thank you so much for your visit!  As always, I'd love to hear from you if you have a moment to leave a comment.  Enjoy the rest of your weekend!

Stef


Product details
Stamps:  Peony Bouquet, Persian Motifs
Paper:  Tim Holtz water color, Basic Black, Lovely Lavender (I think; it's a long retired SU color)
Ink:  Versamark; Distress Inks:  Tumbled Glass, Mowed Lawn, Shaded Lilac, Dusty Concord
Other:  Inkylicious Ink Duster, Hero Arts White Embossing Powder, Stampin' Up! Layering Circles framelit, SSS Wafer Stitched Rectangle die, Seaside Stampin' Emboss Folder, Pretty Pink Posh Wisteria Blossom Sequins and Clear Droplets, Clear Wink of Stella, #3 size water color paint brush

Saturday, February 11, 2017

Crazy for You

Time for one more nontraditional Valentine!  Today, this is the one I made for my husband.  I've not been feeling well the last couple of days but I finally made it back to my craft room so finish this up. 


I started with a panel of white card stock and used my new Inkduster ink blending brush to softly blend some Abandoned Coral ink across the main part of the panel, then cut it out with the largest of the Simon Says Stamp Wafer Rectangle dies.  Next I drew three hearts on Bristol card stock in a sketchy manner to kind of match the style of Bird Crazy stamp.  I then colored them with a Light Carmine Zig marker and fussy cut them.  They were added to the panel after positioning the main focal point.  The sentiment was created on a scrap of white card stock stamping the individual letters from the Labeler Alphabet stamp set, then cut out with my paper snips.  I like the funky uneven look it creates.


The bird was stamped on a piece of Bristol paper and colored with Zig markers and a water pen.  After it was dry, I fussy cut it with paper snips and set it aside until I was ready to assemble my card.  The flags under the corrugated horizontal strip were created by rubbing my Abandoned Coral mini cube over a scrap of white card stock then cut them out with Bitty Banners framelits.  I did that to try and match the background but after putting it all together I think I should have used the same Zig marker that I did on the hearts to color them so they would pop a bit more.  Oh well, my husband won't notice!  ;-)

The layout for my card was based on this week's sketch at Freshly Made Sketches.  I've added a link below, so be sure to head over there to enjoy all the beautiful inspiration.


Thanks so much for visiting!  I'd love to hear from you if you have a moment to leave a comment.  I hope the remainder of your weekend is enjoyable!

Stef


Product details
Stamps:  Bird Crazy (Tim Holtz), Labeler Alphabet
Paper:  Neenah Solar White 80# and 110#, Corrugated White paper, Strathmore Bristol
Ink:  Memento Tuxedo Black (used for sentiment), Versafine Onyx Black, Abandoned Coral (Ranger Distress)
Other:  Zig Clean Color Markers, Bitty Banner Framelits, SSS Wafer Stitched Rectangle die, Black Journaling pen, Paper Snips, Inkduster Blending Tool


Thursday, February 9, 2017

Be Mine, Valentine

Hi there and welcome back!  Tonight I have a couple fun cards to share that I made for my "tween" and teen grandchildren.  They are kind of at the age where they would appreciate Valentines from "Meima" that are humorous rather than "cute" so I pulled out my Crazy Bird stamp set by Tim Holtz and went about making a couple of cards.


This fun bird was stamped on Strathmore water color paper, then colored with Zig Markers and a water pen.  It took a few tries as I'm still working on improving my blending technique with these markers.  Since I wanted a couple of hearts to add to the background, I grabbed a Stampin' Up! Journaling pen with permanent black ink and hand drew a couple of wonky hearts on a scrap of water color paper, then colored and fussy cut them as well. 


To create the background, I took a panel of watercolor paper, spread water in sections then used the yellow and purple markers to dab color which I spread with a paintbrush.  After drying with my heat tool I splattered water drops on it, then blotted them up and again dried the panel.  Next I mixed a bit of white gouache on an acrylic block, added a bit of water that I mixed with my paint brush, then splattered it over the panel.  It really didn't show up as well as I hoped probably because the colors were too light, but you can see it up close.  After all was dry, the bird and hearts were adhered.


The sentiment was stamped in Versafine Onyx Black pigment ink then heat embossed with Stampendous Cristal embossing power, which is clear with glitter as you can see in the photo above.


The second card was made much in the same way as the first, although I drew the hearts on the dried watercolor panel.  I love these birds!

I'm joining the Stamp Ink Paper challenge this week, where the theme is Love.  I've added a link below so be sure to use it to visit the blog and enjoy all the beautiful inspiration!


Thanks for visiting!

Stef


Product details:
Card #1
Stamps:  Crazy Birds, Bloomin' Love
Paper:  Basic Black, Strathmore watercolor
Ink:  Versafine Onyx Black, Versamark
Other:  Zig Clean Color Markers:  Yellow, Light Blue, Cornflower Blue, Purple; Stampendous Cristal embossing powder, white gouache, water pen, paintbrush

Card #2
Stamps:  Crazy Birds, P.S. I Love You
Paper:  Island Indigo, Basic Black, Strathmore watercolor
Ink: Same
Other:  Zig Clean Color Markers:  Persian Green, Yellow Green, Orange, Red Carmine

Monday, February 6, 2017

Bella Valentine

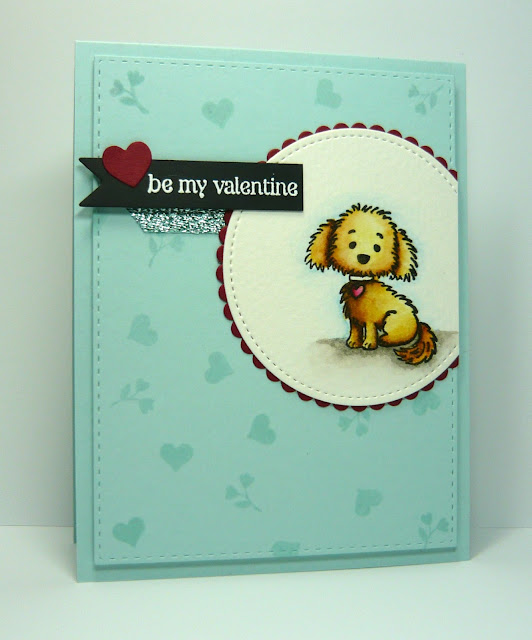
Hello again!  I've made a Valentine's card for one of my grandchildren using the Bella & Friends stamps set.  This little dog is so sweet, I just love this stamp set.  It was a bit of a challenge for me as I used my new Zig Clean Color Markers, so it took 3 attempts to get the blending to work on the main focal image, but I'm happy with the end result.


I started with a Soft Sky panel and created a background design with two small stamps from two different retired SU stamp sets (listed below), then cut it out with the largest Wafer Stitched Rectangle die from Simon Says Stamp.  For the Bella image, I stamped it with Versafine Onyx Black ink on water color paper, then used Zig markers and a water color paint brush to color it.  I started with the lightest color and added layers of the same color marker, then dried with my heat tool before applying the darker color for deeper shadows.  That's when it got a bit interesting as the darker color had a greener base so then I had to go back and add the original brown and blend in...I was grateful it ended up looking okay; it was a bit touch and go for a while! 


I added a light blue around Bella then used a gray to ground her.  After the panel was dry it was cut with a Stitched Shape Circle framelit and mounted on a Cherry Cobbler layer cut with the largest scallop circle Layering Circles framelit.  Before adding it to the Soft Sky panel, a piece of Soft Sky Glitter Ribbon was layered underneath.  Once the circle was in place and trimmed on the right side, the embossed sentiment on a banner of Basic Black card stock was added.


After all was adhered and added to the card stock base, it just seemed I needed one last addition, so I added a little heart to the sentiment that was cut from Cherry Cobbler card stock and cut a couple extra to add to the piece of white card stock added to the inside

I've used the current sketch challenge at Fab Friday for my card design.  I'm also entering this in the current challenges at Paper Player (Valentine theme) and Just Us Girls (Word Week - dog).  I've added the challenge graphics and links below, so be sure to use them to visit and check out all the amazing inspiration!


Thanks you so very much for visiting, and as always, your comments so are so appreciated!  Have a great week!

Stef


Product detail
Stamps:  Bella & Friends, Tin of Cards (heart), P.S. I Love You (sentiment), Bloomin' Love (flower and heart)
Paper:  Whisper White (interior), Soft Sky, Cherry Cobbler, Basic Black, Strathmore Watercolor
Ink:  Versafine Onyx Black, Versamark, Soft Sky
Other:  Stitched Shapes, Layering Circles and Gift Card Envelope and Trims Framelits, Wafer Stitched Rectangles (SSS), Soft Sky Glitter Ribbon, Hero Arts White Embossing Powder, water color paint brush, Zig Clean Color Markers:  Light Brown, Mid Brown, Deep Red, Haze Blue, Gray Tint.

Saturday, February 4, 2017

Happy Birthday, Little Fox

Hello again!  We have a great nephew that is going to have his 3rd birthday next Friday, so today was the day I had to get his card made.  I decided to use the Foxy Friends stamp set to create a cute little scene.


Using my Misti, the fox, tree stump, large tree and those cute mushrooms were stamped on white card stock.  Thank goodness for that tool, as I was FINALLY able to get to get a good stamped image of that cute little fox, plus easily align the eyes, nose and front legs.  Next I fussy cut all those stamped images so I could pop them up on foam tape on the panel where I can created the scene with trees, clouds and grass.


The Calypso Coral base was layered with a piece of the designer series paper from A Little Foxy paper stack, then the scene was added along with a horizontal piece of White Corrugated paper and the sentiment.  I was happy with how quickly this card came together once the fussy cutting was complete. 

I used this week's sketch Sketch Challenge at Splitcoaststampers for inspiration for my card layout.  I've added a link below so be sure to head over there and check out all the amazing inspiration!


Enjoy the rest of your weekend!  I hope to be back with one more card in the next two days before heading back to work on Tuesday.

Stef


Product details
Stamps:  Foxy Friends, Petite Pairs, Sky's the Limit, In the Meadow
Paper:  Whisper White, Calypso Coral, Pool Party, White Corrugated, A Little Foxy dsp
Ink:  Calypso Coral, Pool Party, Garden Green, Smoky Slate, Tip Top Taupe, Wild Wasabi, Chocolate Chip, Memento Tuxedo Black
Other:  Stitched Shapes and Layering Ovals Framelits, Misti, Paper Snips

Friday, February 3, 2017

Color of Love

Hello again!  I recently acquired some Zig Clean Color Brush Markers and had a chance to play around with them a bit.  Actually, I made myself a color chart so I could get to know the colors and how I think I might blend them.  I tried water coloring with them on various types of paper, and came up with the main focal point of my card today. 


I started with a larger piece of watercolor paper, two of the Zig markers and a watercolor paint brush.  I moved the first marker back and forth across the top of the panel, with more complete coverage up above then less so as I moved it down towards the middle, then used my wet brush to blend and lighten.  Next I turned the paper around and started with the 2nd marker on the other end and worked towards the middle, again blending with water towards the middle.  After it dried it was trimmed down to roughly 2 x 2.25 inches.


Next, I used my Misti to center and stamp the sentiment on a 4 x 5.25 inch panel, then used foam tape to add the water colored piece.  All along my plan was to add either stenciled or die cut hearts under and around the water colored panel but once the panel was added just above the sentiment, I loved how it just popped against the white background and decided not to add any embellishments. 


I love how spare and totally CAS it is, plus your eye has plenty of white space to rest after looking at that very bold water colored piece LOL!!

My card was inspired by this week's challenge at Freshly Made Sketches and I've also entered it in the Wednesday Challenge at Simon Says Stamp, which the theme is...The Color of Love.  ;-).  I've added links below so be sure to head over to both challenges and enjoy all the amazing inspiration.


Thanks so much for visiting!  Have a great weekend!

Stef


Product details
Stamps:  Painted Greetings (Altenew)
Paper:  80# & 110# Neenah Solar White, Watercolor
Ink:  Barn Door (Distress)
Other:  Zig Clean Color Markers (Red, Carmine Red), water color paint brush, Misti